This is part 3 of my series demonstrating my rebuild of my homelab in NixOS.
- Initial creation of the NixOSVM on Proxmox Part 1 .
- Enabling SSH access on NixOS Part 2 .
- Mounting a secondary drive on NixOS Part 3 . (This Part)
- Decrypting boot early with initrd-ssh Part 4 .
- Installing Docker on NixOS Part 5
Mounting A Second Drive In NixOS:
So far we have built our VM, installed NixOS and configured it for SSH authentication. We still have a little more basic configuration to do before we can progress further. We need to mount the secondary drive, luckily this is a quick process and NixOS has a handy tool that helps us make this mount permanent and it doesn’t involve manually configuring fstab for change!
Listing Drives In NixOS:
If you have setup the drive as per the guidance in part one if you run lsblk you should see something similar to the below, primary drive mounted at sda1 and then a secondary data drive sdb unmounted.
[martin@nixos:~]$ lsblk
NAME                                          MAJ:MIN RM  SIZE RO TYPE  MOUNTPOINTS
sda                                             8:0    0   32G  0 disk
└─sda1                                          8:1    0   32G  0 part
  └─luks-37b6f582-27a6-4e93-87ff-1a477dba2a77 254:0    0   32G  0 crypt /nix/store
                                                                        /
sdb                                             8:16   0   40G  0 disk
sr0                                            11:0    1  2.4G  0 rom
As we can see the drive is just listed as disk and is currently not formatted, so we will need to format it.
Formatting Our Drive:
Before we can do anything we will need to format the drive to the EXT4 file system.
Prepare The Drive Using fdisk:
-
Drop into the
fdiskprompt:sudo fdisk /dev/sdb -
Create a primary partition:
- Type “p” to select primary partition
 [martin@nixos:~]$ sudo fdisk /dev/sdb

 Welcome to fdisk (util-linux 2.39.4).
 Changes will remain in memory only, until you decide to write them.
 Be careful before using the write command.

 Device does not contain a recognized partition table.
 Created a new DOS (MBR) disklabel with disk identifier 0x0cef112a.

 Command (m for help): p #This is me typing "p" her and pressing ENTER
 Disk /dev/sdb: 40 GiB, 42949672960 bytes, 83886080 sectors
 Disk model: QEMU HARDDISK
 Units: sectors of 1 * 512 = 512 bytes
 Sector size (logical/physical): 512 bytes / 512 bytes
 I/O size (minimum/optimal): 512 bytes / 512 bytes
 Disklabel type: dos
 Disk identifier: 0x0cef112a
- Type “p” to select primary partition
-
Write our changes using
fdisk:- We need to write the changes we have just made.
  Command (m for help): w

  The partition table has been altered.
  Calling ioctl() to re-read partition table.
  Syncing disks.
- We need to write the changes we have just made.
Creating the ext4 file system using mkfs?
We now need to create the filesystem we want on the drive, which in this case ext4, you will be prompted to proceed anyway just click y and press enter.
[martin@nixos:~]$ sudo mkfs.ext4 /dev/sdb
mke2fs 1.47.1 (20-May-2024)
Found a dos partition table in /dev/sdb
Proceed anyway? (y,N) y
Discarding device blocks: done
Creating filesystem with 10485760 4k blocks and 2621440 inodes
Filesystem UUID: 211c9f9e-cb14-4ce4-9cf3-dbbc26692fc9
Superblock backups stored on blocks:
	32768, 98304, 163840, 229376, 294912, 819200, 884736, 1605632, 2654208,
	4096000, 7962624

Allocating group tables: done
Writing inode tables: done
Creating journal (65536 blocks): done
Writing superblocks and filesystem accounting information: done
Why Choose ext4?
ext4 is a robust, widely-used Linux filesystem that offers good performance and stability. For a homelab environment, it’s often an excellent default choice due to its reliability and broad support across Linux distributions. Other options you might consider:
- btrfs: Offers advanced features like snapshots and compression, but can be more complex to manage
- xfs: Good for large files and high-performance workloads
- zfs: Powerful features like snapshots, compression, and data integrity, but requires more resources
For our Docker data, ext4 provides a good balance of performance, stability, and simplicity.
Mounting The Drive In NixOS:
So we have our lovely formatted drive, however but in order to use it we will need to mount it.
Create the Mount Point:
- We need somewhere to mount the drive so let’s create a mount point.
sudo mkdir -p /mnt/docker
Now We Mount The drive:
We run the below command to mount the drive.
sudo mount /dev/sdb /mnt/docker
- Check ensure it’s mounted and we can see on the right hand side that
sdbis mounted at/mnt/docker
[martin@nixos:~]$ lsblk
NAME                                          MAJ:MIN RM  SIZE RO TYPE  MOUNTPOINTS
sda                                             8:0    0   32G  0 disk
└─sda1                                          8:1    0   32G  0 part
  └─luks-37b6f582-27a6-4e93-87ff-1a477dba2a77 254:0    0   32G  0 crypt /nix/store
                                                                        /
sdb                                             8:16   0   40G  0 disk  /mnt/docker
sr0                                            11:0    1  2.4G  0 rom
Setting Proper Permissions On Our Newly Mounted Drive:
After mounting the drive, you will want to set appropriate ownership and permissions:
-
Understanding default permissions:
- The default permissions for a freshly formatted ext4 filesystem are:
- Root directory owned by
root:root - Permissions set to 755 (rwxr-xr-x)
- Root directory owned by
- You can check current permissions with:
[martin@nixos:~]$ ls -la /mnt/docker
total 24
drwxr-xr-x 3 root root  4096 Feb 28 07:56 .
drwxr-xr-x 3 root root  4096 Feb 28 07:44 ..
drwx------ 2 root root 16384 Feb 28 07:56 lost+found
- The default permissions for a freshly formatted ext4 filesystem are:
-
Set ownership to your user account to avoid permission issues when working with files:
sudo chown -R yourusername:users /mnt/docker # For example: sudo chown -R martin:users /mnt/docker- +Note+: In NixOS, unlike some other Linux distributions, user groups need to be explicitly defined in your configuration. By default, a NixOS user doesn’t automatically get a group with the same name so instead of it being
martin:martinit’smartin:users.
- +Note+: In NixOS, unlike some other Linux distributions, user groups need to be explicitly defined in your configuration. By default, a NixOS user doesn’t automatically get a group with the same name so instead of it being
-
Re-check permissions:
[martin@nixos:~]$ ls -la /mnt/docker
total 24
drwxr-xr-x 3 martin users  4096 Feb 28 07:56 .
drwxr-xr-x 3 root   root   4096 Feb 28 07:44 ..
drwx------ 2 martin users 16384 Feb 28 07:56 lost+found
As we can see our user now has the appropriate permissions.
-
+Note+: For a Docker data directory, appropriate permissions are essential to allow Docker to create and manage container volumes without permission errors.
Modifying hardware-configuration.nix To Make This Mount Persistent:
Traditionally in Linux if we want a mounted file system to mount at boot we would need to manually change fstab etc, however NixOS makes this a lot more convenient. NixOS has a file called hardware-configuration.nix that is stored under /etc/nixos this contains, you guessed it, hardware configurations for the host system.
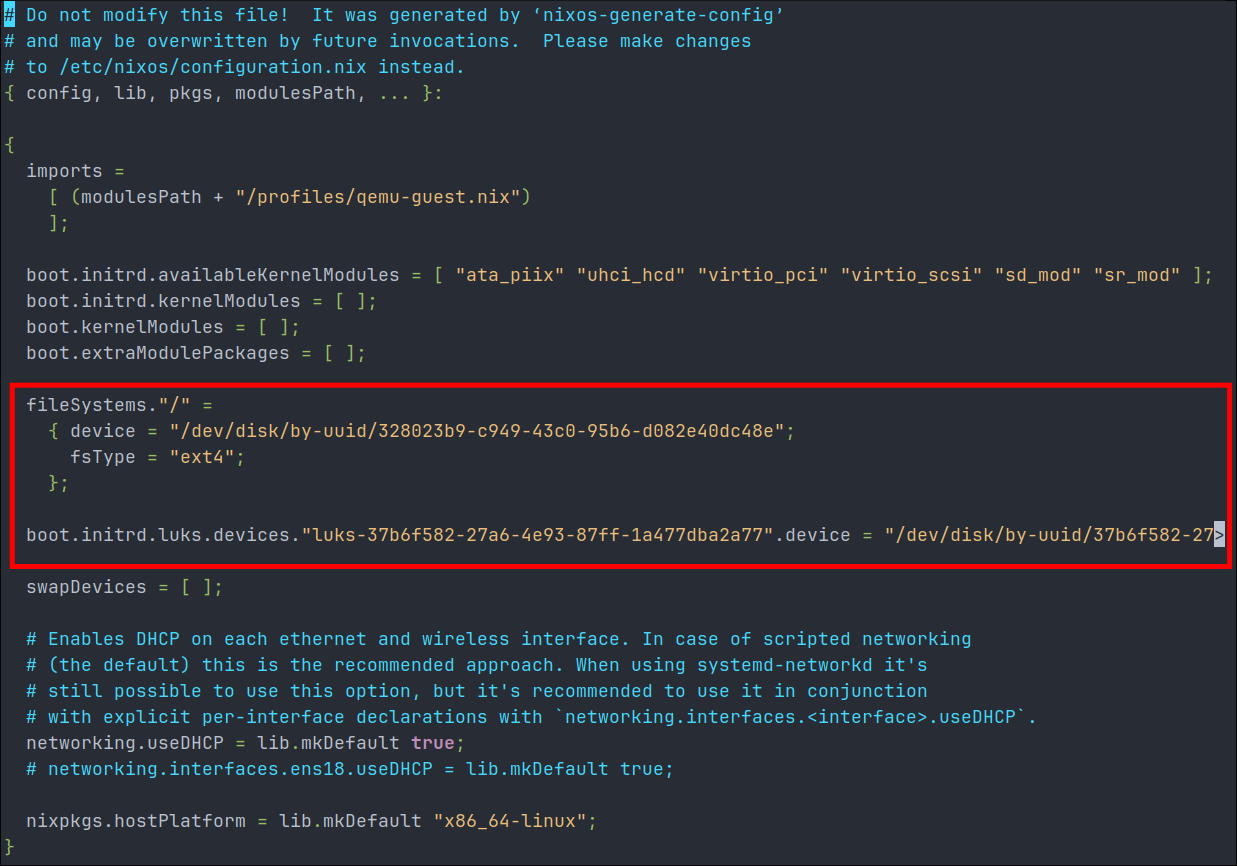
If we examine this file now, we can see it currently holds various boot information as well kernel modules, DHCP information as well as our file-system information. Below is an image of mine currently, before we make the changes to mount the docker drive permanganate.
We can use a handy tool nixos-generate-config to make this mount persistent, so lets do that.
[martin@nixos:~]$ sudo nixos-generate-config
[sudo] password for martin:
writing /etc/nixos/hardware-configuration.nix...
warning: not overwriting existing /etc/nixos/configuration.nix
- +Note+: The great thing is, it won’t overwrite our existing
configuration.nix
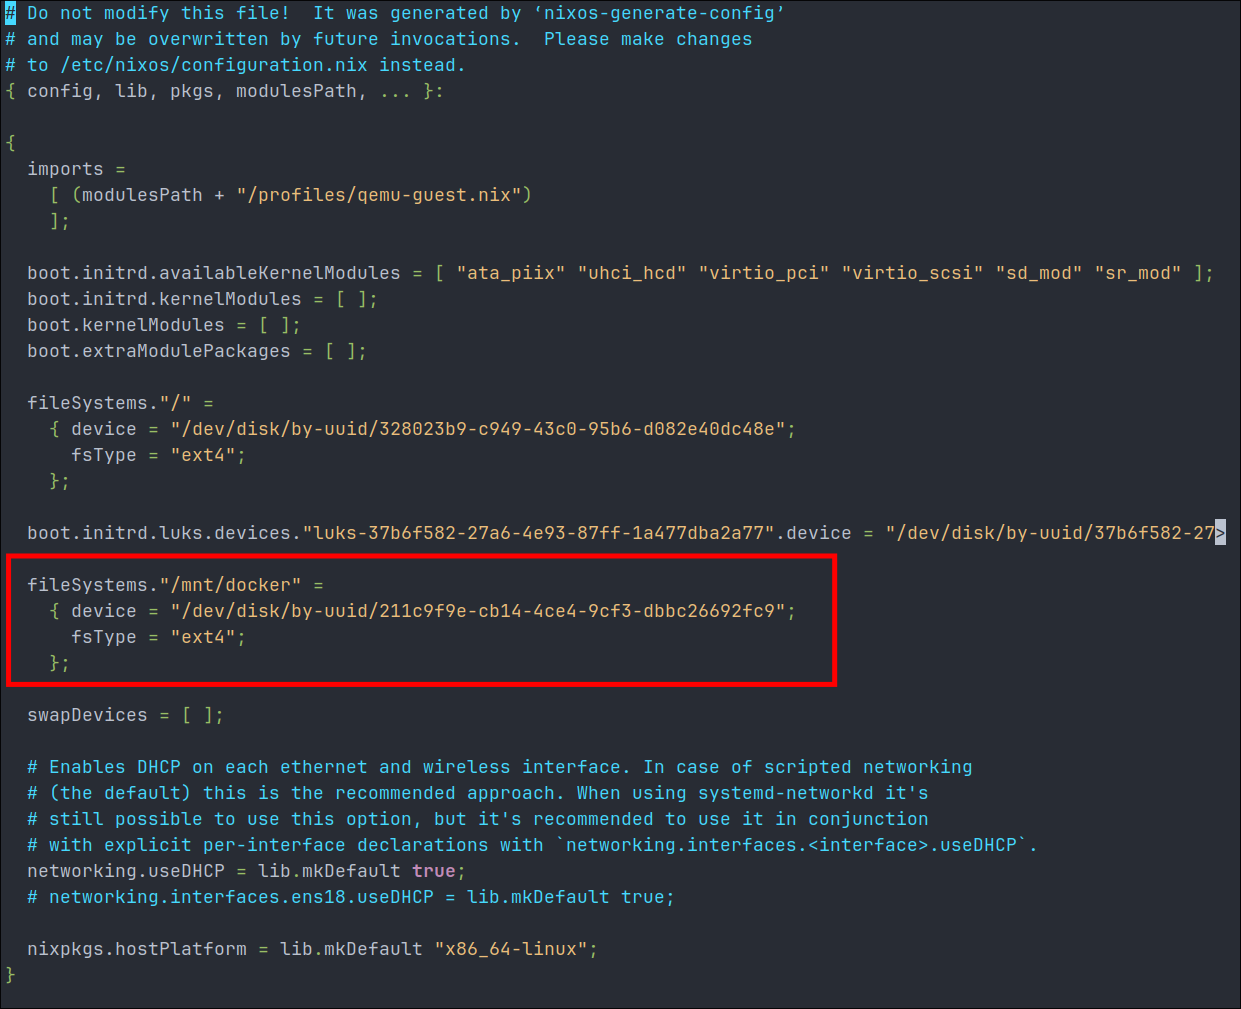
Now if we recheck the hardware-configuration.nix file we can see it’s added an entry for our newly created filesystem and it will now be mounted at boot.
Rebuilding The System:
- For these changes to take affect we need to rebuild the system, we run the below:
sudo nixos-rebuild switch
Understanding The Configuration:
Let’s take a closer look at what NixOS added to the hardware-configuration.nix file:
fileSystems."/mnt/docker" = {
  device = "/dev/disk/by-uuid/YOUR-UUID-HERE";  # Uses UUID for reliable identification
  fsType = "ext4";                              # Filesystem type
  options = [ "defaults" ];                     # Mount options
};
Some key points to understand:
- The configuration uses a
UUID-based device pathrather than/dev/sdb - This is a crucial difference from traditional Linux systems where you might directly reference device names in
/etc/fstab - Even though this is different from traditional Linux, we can still pass the same additional arguments for example.
  options = [ "defaults" "noatime" "nofail" ];
  # - noatime: improves performance by preventing access time updates
  # - nofail: system will boot even if this drive fails to mount
Why UUID-based Mounting Is Important:
NixOS uses UUIDs /dev/disk/by-uuid/.. rather than device names /dev/sdb in the configuration for reliability. Here’s why this matters:
- Device names can change between reboots (a drive that’s
/dev/sdbtoday might become/dev/sdcafter adding another drive) UUIDsare unique identifiers that remain consistent regardless of where the drive is connected- This makes your system more robust to hardware changes
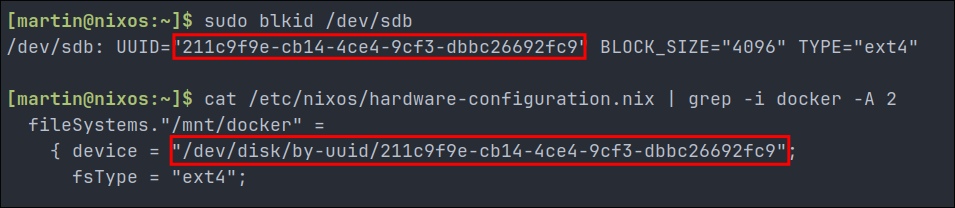
To find the UUID of your drive manually, you can use:
sudo blkid /dev/sdb
- The UUID in the
hardware-configuration.nixfile should match what’s shown in this command’s output. - For example we can see it matches here:
Verifying Your Setup:
After rebooting, verify that your drive mounts properly:
# Reboot your system
sudo reboot

# After logging back in, check that the drive is mounted
lsblk -f

# Check available space
df -h /mnt/docker

# Verify you can write to the drive (if permissions are set correctly)
touch /mnt/docker/test_file
- +Important+: Remember if you have configured an encrypted drive you will need to enter the password from the Proxmox console before you can get access again VIA SSH (luckily we will address this annoyance in the next part of this series)
Next time:
- This post is already long so next time we will configure an ssh server in initrd as a way to easily enter our LUKS password on boot so we don’t have to have physical access or access to the Proxmox console.
Sign-off:
As always hack the planet homelab!