This was originally posted on 2025-02-23 however I have since added the mullvad integration into this so have updated the guide to reflect this.
- +Note+: You do not need the mullvad integration for this to work, I have highlighted the arguments to add if you are going to use mullvad.
Are you tired of running sudo tailscale up every time you login, I know I am. So I thought why spend under two seconds waiting for something to run and using auto complete with ZSH to easily find the command when I can easily create a service that launches Tailscale on boot for me and re-launches on every rebuild of the system.
This configuration will ensure that:
- Tailscale starts automatically with your system.
- You don’t need to manually authenticate each time.
- Your authentication key is stored securely using sops /sops-nix
- The connection is established only when needed (won’t try to reconnect if already connected).
- All non lan traffic is routed over mullvad.
This assumes you already have a Tailscale account with the mullvad extension and sops setup, if you don’t please see guides below.
Generating The Tailscale Auth Key:
- As we want to automate the process of authenticating of connecting our NixOS host to the Tailscale network we will need to generate an auth key. This will mean we do not have to follow the provided Tailscale links when adding the host to the network or re-authorizing.
- +Note+: Even if you have already added your host to the Tailscale network this process is still the same.
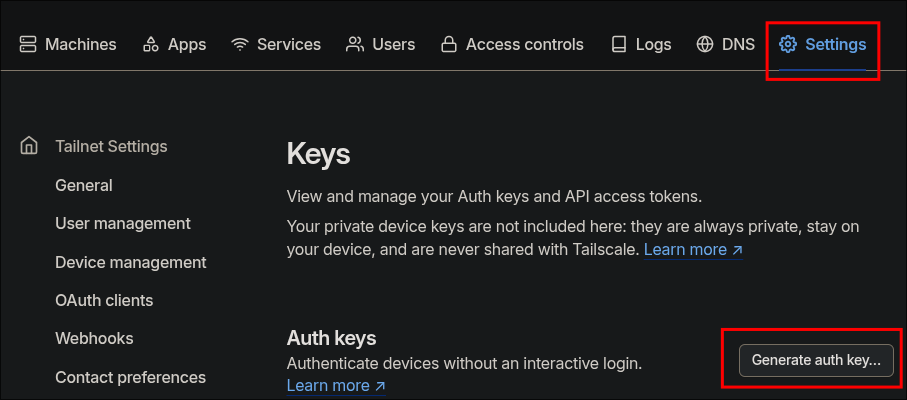
Login to your account and click “Settings” –> “Personal Settings” –> “Keys” –> “Generate Auth Key”
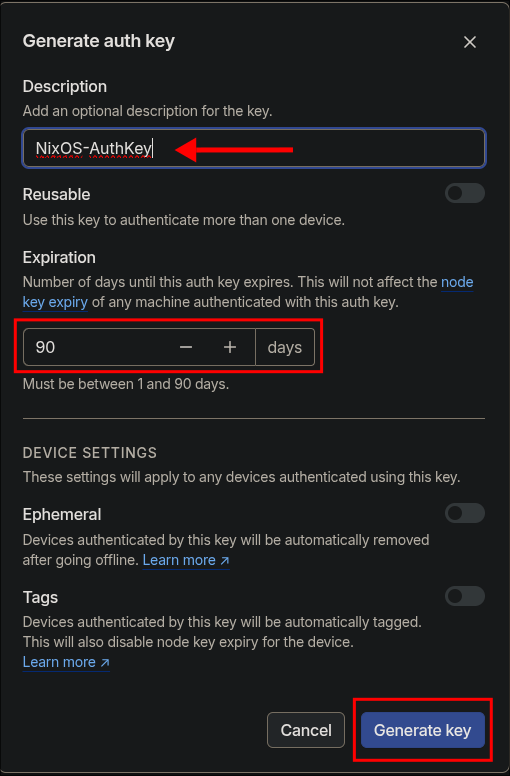
Key settings, give your key a memorable name and also set it for the amount of time you want it to be valid for, I have set it for the max 90 days have added a reminder to my todo list to regenerate one in 85 days.
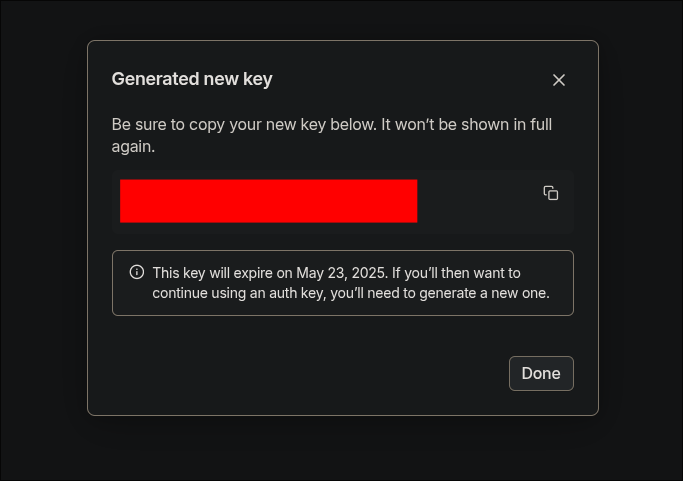
You should now have a Tailscale auth key.
Adding Tailscale Auth Key To Sops:
It’s now time to add our Tailscale Auth Key to sops so our system has access to it.
# If your sops file is called something different obviously you need to enter that...
sops secrets.yaml

# Store it in this format is important as we will be calling it later as a variable
tailscale_preauth: |
    TAILSCALE_AUTH_KEY=tskey-auth-xxxxx-xxxxxxxxxxxxx

- +Note+: It is also possible to use age for this however I personally use stops as it also allows integration with home-manager.
Edit your configuration.nix and add the secret so it’s accessible by other services.
  sops = {
    defaultSopsFile = ./packages/sops/secrets.yaml;
    age.keyFile = "/home/martin/.config/sops/age/keys.txt";
    # I have other sops secerts here but have removed for brevity
    secrets.tailscale_preauth = { };
  };
- +Important+: The part
secrets.tailscale_preauthhas to match name that was placed into the sopssecrets.yamlas this is the key for the value referenced. So if in your sops secrets file you called itts-keyyou would writesecrets.ts-key - +Note+:
- This has to be done in
configuration.nix& not home-manager as this is a system wide service that is running and not a user specific service.
- This has to be done in
Choosing a mullvad exit node for tailscale.
If you are planning on using mullvad please ensure you add the service (it’s chargeable) by following the tailscale documentation here .
You will also need to select an exit node. You can do this by running one of the following commands.
# Get list of exit nodes
tailscale exit-node list
# Get a list of exit nodes by country
tailscale exit-node list --filter=[country name]
#Example
tailscale exit-node list --filter=USA
# You can also get tailscale to suggest an exit node
tailscale exit-node suggest
Now that you have an exit node, take a note of it.
Creating The Tailscale Service:
- Edit your NixOS
configuration.nixand add the below service.
# Add tailscale to your system packages
environment.systemPackages = [ pkgs.tailscale ];

# Enable the tailscale service
services.tailscale.enable = true;

#Required for resolution when using mullvad.
services.tailscale.useRoutingFeatures = "client";

# Create a oneshot to autoconnect on rebuild/switch
systemd.services.tailscale-autoconnect = {
  description = "Automatic connection to Tailscale";

  after = [ "network-pre.target" "tailscale.service" ];
  wants = [ "network-pre.target" "tailscale.service" ];
  wantedBy = [ "multi-user.target" ];

  serviceConfig = {
    Type = "oneshot";

    # Pass our tailscale auth key from sops as a Environmental Variable
    EnvironmentFile = config.sops.secrets.tailscale_preauth.path;
  };

  # have the job run this shell script
  script = with pkgs; ''
    # wait for tailscaled to settle
    sleep 2

    # check if we are already authenticated to tailscale
    status="$(${tailscale}/bin/tailscale status -json | ${jq}/bin/jq -r .BackendState)"
    if [ $status = "Running" ]; then # if so, then do nothing
      exit 0
    fi

    # otherwise authenticate with tailscale using the key from secrets

    # Not using mullvad exit node:
    ${tailscale}/bin/tailscale up -authkey "$TAILSCALE_AUTH_KEY" --accept-routes=true --reset

    # Using mullvad exit node:
    # ${tailscale}/bin/tailscale up -authkey "$TAILSCALE_AUTH_KEY" --exit-node-allow-lan-access --exit-node=gb-mnc-wg-201.mullvad.ts.net --accept-routes=true --reset --acccept-dns=true`
  '';
};
- +Important+:
- As stated before if you have called your Tailscale Auth key in your secrets file something other than
tailscale_preauthyou will then have to modify the line below.# Pass our tailscale auth key from sops as a Environmental Variable EnvironmentFile = config.sops.secrets.tailscale_preauth.path;
- As stated before if you have called your Tailscale Auth key in your secrets file something other than
Breaking Down The Configuration:
Let’s break down what each part of this configuration does:
-
System Package and Service Setup:
environment.systemPackages = [ pkgs.tailscale ]adds the Tailscale package to your systemservices.tailscale.enable = trueenables the Tailscale daemon serviceservices.tailscale.useRoutingFeatures = "client";The article in the NixOS Wiki about tailscale explains this betterIf you are using features like subnet routers or exit nodes you will also need to set services.tailscale.useRoutingFeatures to “server”, “client” or “both” depending on the role of your machine.
- As we are a client in this situation we will set it as
client.
-
Automatic Connection Service: The
systemd.services.tailscale-autoconnectsection creates a systemd service that:- Runs once during system startup (
Type = "oneshot") - Starts after networking and the Tailscale daemon are ready
- Loads your authentication key from the sops-encrypted file
${tailscale}/bin/tailscale up -authkey "$TAILSCALE_AUTH_KEY" --accept-routes=true
- Runs once during system startup (
-
Connection Script Logic: The script section:
- Waits 2 seconds for the Tailscale daemon to fully start
sleep 2 - Checks if you’re already connected to Tailscale by querying its status.
status="$(${tailscale}/bin/tailscale status -json | ${jq}/bin/jq -r .BackendState)"
- If already connected (
Runningstate), exits without doing anything.if [ $status = "Running" ]; then # if so, then do nothing
- If not connected, authenticates using your stored auth key and passing the relevant arguments.
- If you are not using mullvad use this one!
tailscale up -authkey "$TAILSCALE_AUTH_KEY" --accept-routes=true --reset- +Note+: I also use some of my nodes as routers within my home network to allow access to other hosts so I also pass the
--accept-routes=trueargument, however if you don’t do this you can omit this argument.
- +Note+: I also use some of my nodes as routers within my home network to allow access to other hosts so I also pass the
- If you are using mullvad use this one!
tailscale up -authkey "$TAILSCALE_AUTH_KEY" --exit-node-allow-lan-access --exit-node=gb-mnc-wg-201.mullvad.ts.net --accept-routes=true --reset --acccept-dns=true
- +Note+: Ensure you add the exit node you have chosen.
- Waits 2 seconds for the Tailscale daemon to fully start
Rebuilding The System:
That’s it now run either:
sudo nixos-rebuild switch flake [location/of/flake]sudo nixos-rebuild switch
Check Tailscale is running & connected
-

-
+Note+: If you have already had this service running a you will need to actually run a manual tailscale command too:
sudo tailscale up --accept-dns=true --accept-routes --exit-node=gb-mnc-wg-201.mullvad.ts.net --exit-node-allow-lan-access --reset


